 Switch to a Faster Local Workflow with: Aiarty Video Enhancer
How to Use Topaz Video in Premiere Pro (Panel Setup, Workflow & Fixes)



If you recently searched for how to use Topaz Video in Premiere Pro, you're not alone. Many Premiere users are confused because Topaz has released a new integration called the Topaz Labs for Premiere Panel, which looks like a plugin but works more like an external AI workflow tool.
Instead of applying effects directly on the timeline, it sends your video to Topaz for cloud-based AI upscaling and enhancement, then returns the processed clip back into Premiere Pro.
This is where most confusion comes in. Users often ask:
- Why they can’t find Topaz Panel inside Premiere Pro
- Whether it is a plugin or an external workflow tool
- Why footage is uploading instead of being processed locally
- Where the effect appears in the editing timeline
- Why export results may look unclear or inconsistent
This guide explains how the system works, how to install it, and how to fix the most common issues.
What Is Topaz Panel in Premiere Pro?
The Topaz Panel is a free UXP extension that connects the editing software to the Topaz Cloud processing system. It requires a Topaz Labs account, and cloud processing requires paid cloud credits.
The TopazLabs for Premiere is the first UXP extension that connects Adobe Premiere with the Topaz Cloud. It enables users to send video clips from Premiere Pro for AI-based processing, including upscaling, enhancement, and batch rendering.
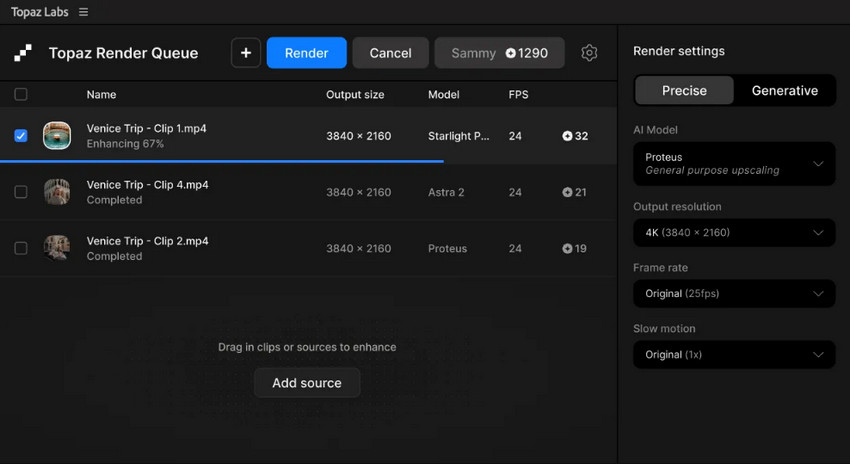
In other words:
- Premiere Pro does NOT process AI enhancement directly.
- Clips are sent outside Premiere for processing.
- Enhanced clips are then returned back into your project.
It simply goes as Premiere Pro → Topaz Panel → AI Processing → Return to Premiere
Editor's Note (June 2026): Adobe has announced its planned acquisition of Topaz Labs, the developer behind Topaz Video AI. According to Adobe, existing Topaz applications will continue to be available as standalone products while AI enhancement technologies are expected to become more deeply integrated into Adobe's creative ecosystem in the future. At the time of writing, the installation process and Premiere Pro workflow described in this guide remain unchanged.
How to Install & Open Topaz Panel in Premiere Pro
Step 1: Install Topaz Panel
- Download the official Topaz installer and open Adobe Premiere.
- Locate the downloaded .CCX installer file and double-click it.
- This will launch the Adobe Creative Cloud Desktop app, click OK to confirm the installation.
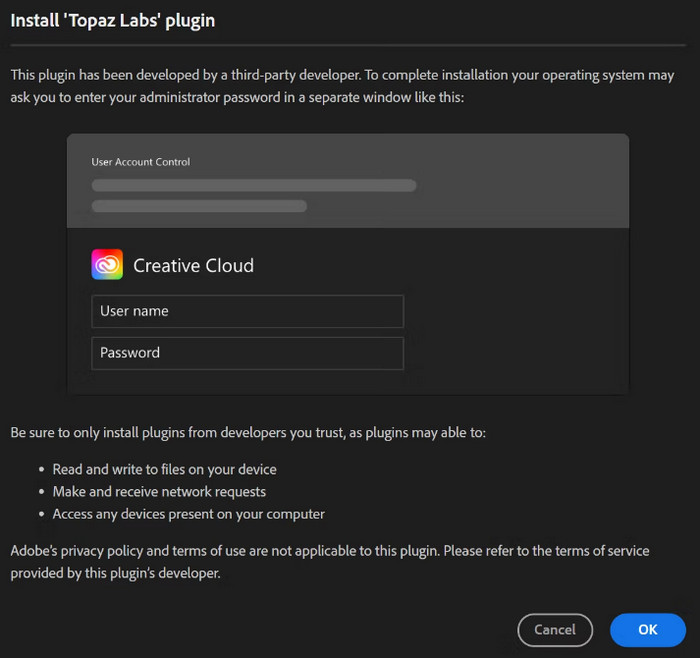
This will open the Topaz Panel in Premiere Pro, and we recommend docking it in the upper-left Source panel area for easier access.
Step 2: Sign in to Topaz account and check credits
Log in your Topaz account, this panel requires a Topaz user account and cloud credits. Topaz Studio and Topaz Video subscriptions include cloud credits, which can be viewed after logging in and topped up if needed.
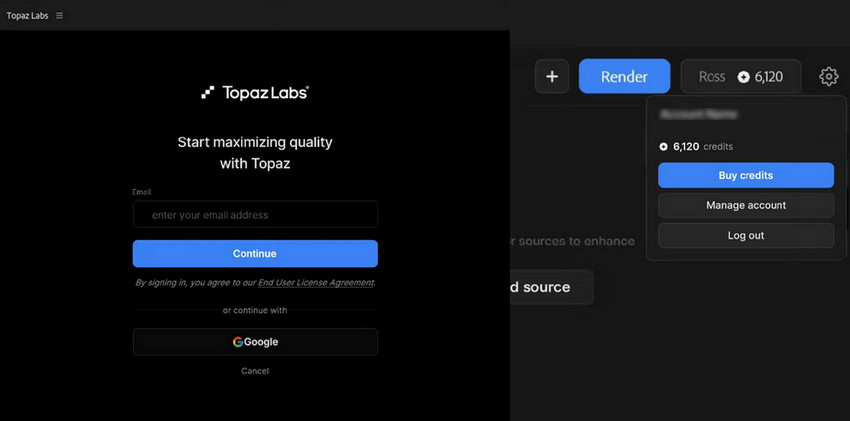
How to Use Topaz Labs in Premiere Pro
Once the panel is open, the workflow is straightforward:
Step 1: Import Clips in Premiere Pro
Create a new project and import the clips to Premiere Pro as usual. Select a clip from your timeline or media bin, then drag and drop it into the Topaz Panel to add it to the enhancement queue for processing.
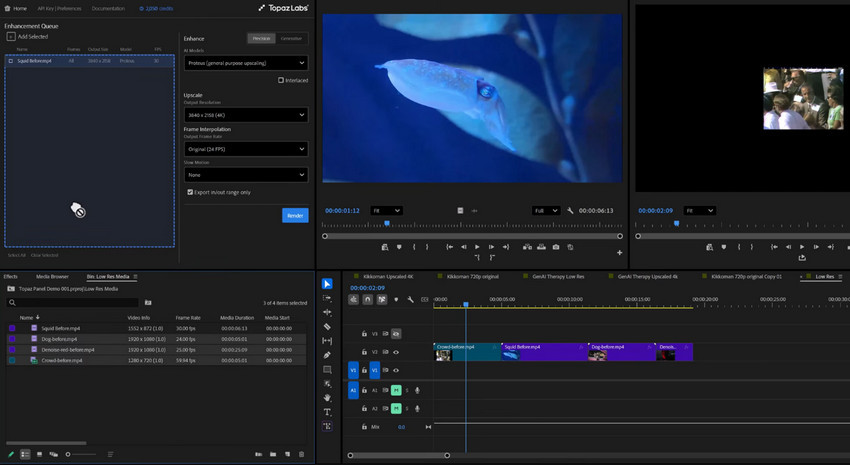
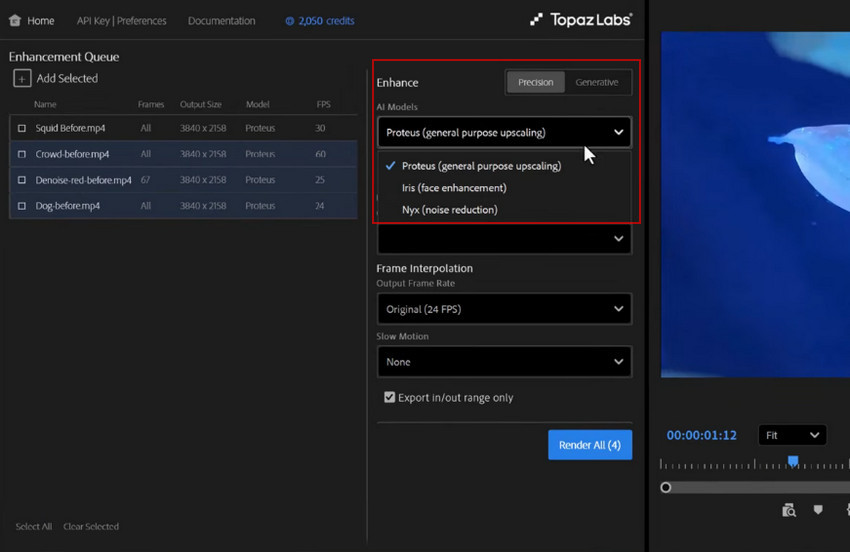
Step 3: Choose an AI Model for the Clip.
Topaz separates its AI models into two main categories: precision enhancement and generative enhancement.
- Precision Enhancement: Maintains source fidelity. Use Proteus for general upscaling, Iris for faces restoration, and Nyx for noise reduction.
- Generative Enhancement: Recreates missing details via the Starlight family. Use Starlight Mini for old/archival footage and Starlight Precise 2.5 for enhancing AI-generated video.
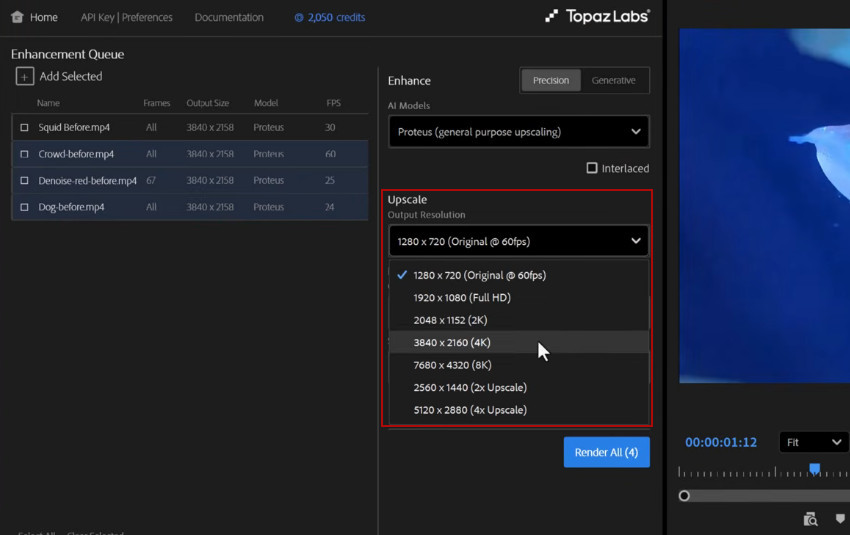
Step 4: Choose the Output Resolution
Under the Upscale option, you can decide the Upscale factor, from the original up to 4K or 8K as needed.
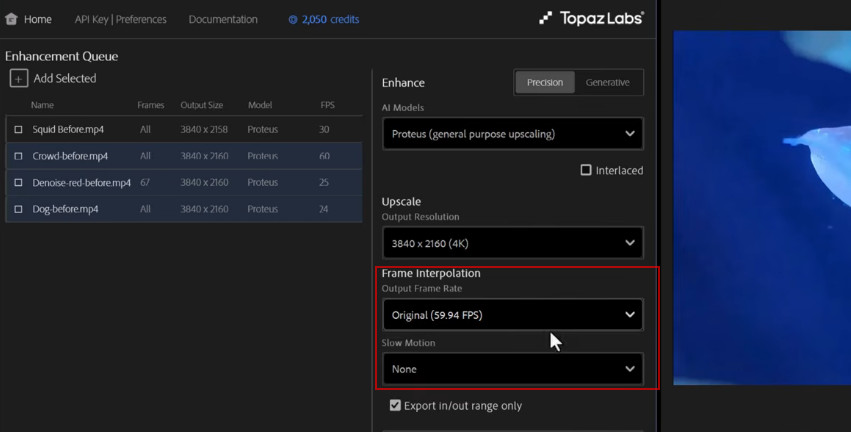
Step 5: Change the Frame Rate and Add Slow Motion Optionally.
Under the Frame Interpolation, you can change the frame rate, such as 24FPS/30FPS to 60FPS for smoother playback, or add slow motion from 2X to 8X for highlighting the key frames.
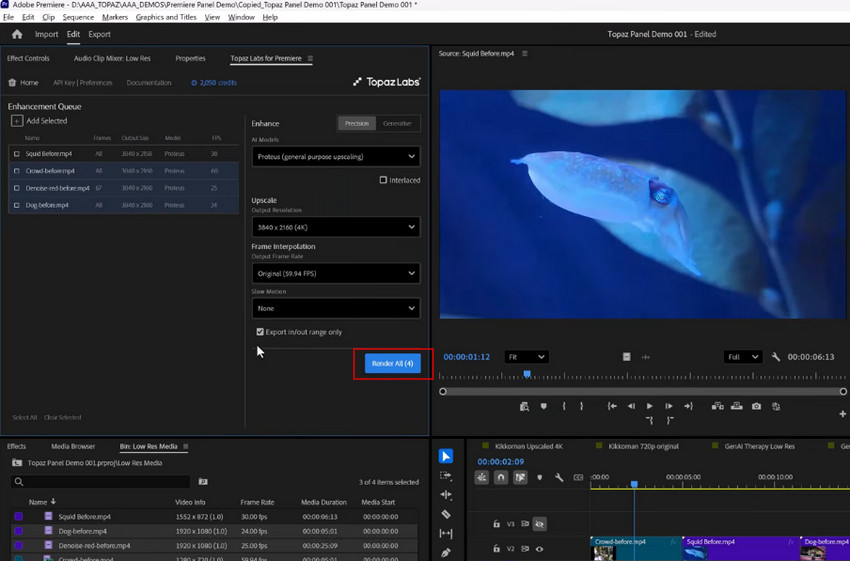
Step 6: Send Clips to Topaz Cloud for AI Enhancement
Click the Apply All button to send the clips to Topaz cloud for remote processing. Because processing is not handled locally in Premiere Pro, you can continue working in Premiere while waiting.
Step 7: Check the Final Results in Topaz Folder
When the files are done, they will be send back to Premiere Pro in Topaz Folder, where you can check the before and after results.
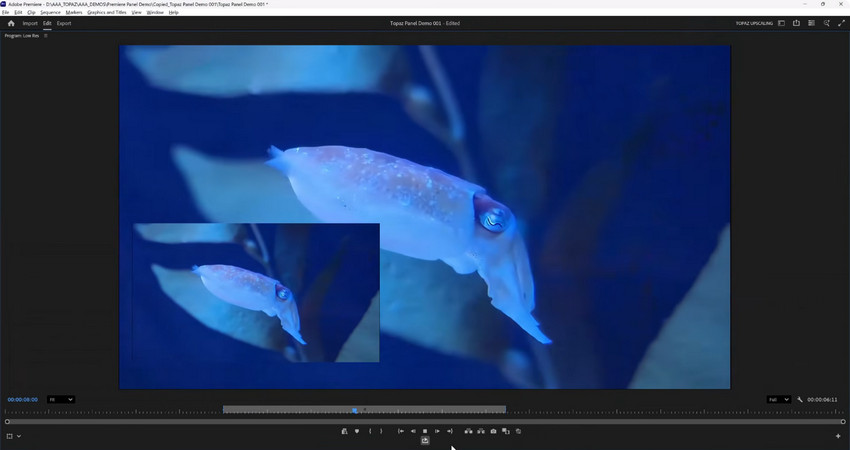
Most Common Issues for Topaz Panel in Premiere Pro
Since the Topaz Panel is still relatively new, some workflow limitations and unexpected behaviors may occur when using it inside Premiere Pro.
1. Topaz Panel Not Showing in Premiere Pro
Some users may not see the Topaz Panel after installation due to unsupported Premiere Pro versions, incomplete installation, or disabled UXP extensions. Restarting Premiere or reinstalling the panel usually resolves the issue.
2. Upload Stuck, Slow Processing, or Lag
Because the Topaz Panel relies on cloud-based processing, large video uploads, slow internet connections, and cloud queue delays can slow down the workflow. Premiere Pro may also feel less responsive when handling heavy media or multiple enhancement jobs.
3. Cloud Credits and Workflow Limitations
AI enhancement tasks require paid cloud credits, which may be consumed quickly when processing long videos or batch projects. The panel currently supports H.264 rendering and H.265 for 8K workflows, while some timeline-based workflows may behave unexpectedly.
4. Topaz Panel Not Responding
The panel may occasionally freeze or stop responding because of UXP cache issues, expired login sessions, or installation conflicts. Restarting Premiere Pro or reinstalling the extension often helps.
5. Compatibility Problems
Older Premiere Pro versions may not fully support the latest UXP integration, and some macOS users may encounter extension permission or loading issues.
A Simpler Local Workflow to Enhance Videos for Premiere Pro
While the Topaz Panel offers a convenient cloud-connected workflow inside Premiere Pro, some editors prefer enhancing footage locally before importing it into their editing timeline. This approach avoids upload delays, cloud queues, and credit-based processing, which can become more noticeable when working with long videos, batch projects, or large source files.
Tools like Aiarty Video Enhancer are designed around this type of local AI workflow. Instead of sending clips from Premiere to a cloud processing system, users can enhance videos directly on their local GPU before editing.
- Upscale low-resolution footage to cleaner HD or 4K results before editing
- Reduce noise and compression artifacts in dark, old, or heavily compressed videos
- Recover clearer details from slightly blurry or soft footage
- Create smoother motion with AI frame interpolation for slow motion or sports clips
- Batch process multiple videos locally without cloud upload limits or waiting queues
- Keep client projects fully offline and processed directly on your own GPU
A local workflow can also make it easier to process multiple videos at once, work offline, and keep client footage entirely on-device without additional upload steps. For many Premiere Pro users, the workflow simply becomes: Enhance footage locally → Export high-quality video → Edit smoothly in Premiere Pro
Unlike credit-based cloud processing systems, Aiarty Video Enhancer is available as a local software license priced at $165 lifetime or $79/year, without per-export rendering credits.
How Does Aiarty Video Enhancer Compare to Topaz in Quality?
For many common enhancement tasks, Aiarty Video Enhancer delivers results that are surprisingly competitive with Topaz Panel in Premiere Pro, especially considering its fully local workflow and lower overall cost.
In tests involving compressed footage, low-light videos, old recordings, and low-resolution clips, Aiarty is able to recover cleaner textures, reduce visible noise, and improve overall sharpness without requiring cloud rendering or export credits.
Topaz still offers some advantages in high-end restoration workflows, particularly with its larger collection of specialized AI models and more aggressive generative recovery. However, for many creators editing YouTube videos, social media content, client projects, tutorials, interviews, or archived footage, the visual gap is often much smaller than expected.
Test 1: This is a Midjourney-generated 480P video, upscaled using both Topaz Video and Aiarty Video Enhancer.
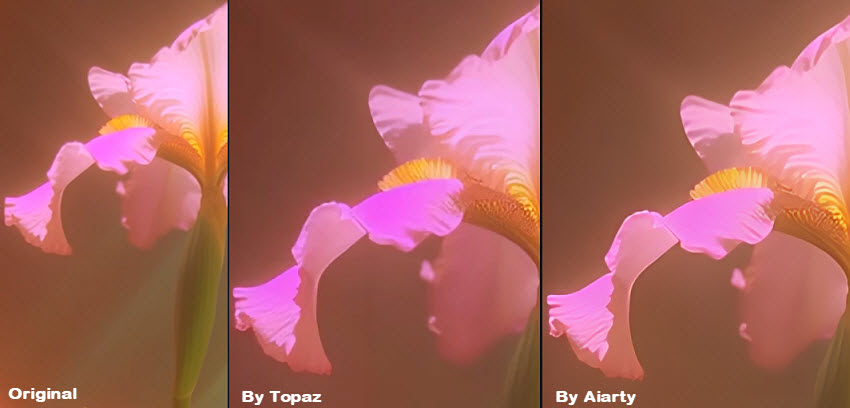
Test 2: Enhancing low-Resolution videos using Topaz vs Aiarty
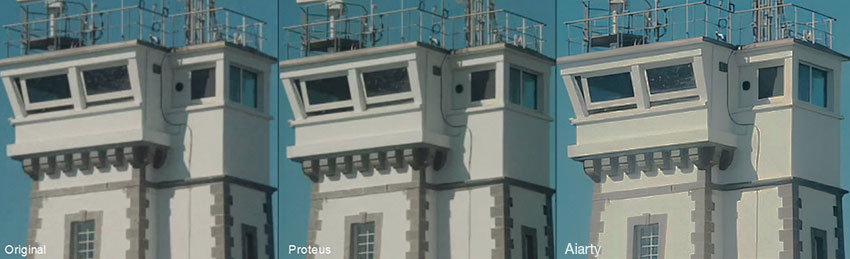
Test 3: Enhancing a blurry and noisy video by Topaz and Aiarty

For editors who prioritize local processing, smoother workflows, batch enhancement, and predictable pricing, Aiarty Video Enhancer can provide a more balanced solution between quality, speed, and cost.
Related Read: Aiarty Video Enhancer vs Topaz Video AI: Hands-on Testing
Best Workflow Recommendation for Premiere Pro Users
Many professional editors now separate their workflow into two stages to improve efficiency and keep Premiere Pro running smoothly.
1. AI Enhancement Stage
- Upscale, denoise, and restore footage using AI tools (cloud or local, such as Aiarty Video Enhancer)
- Pre-process videos before they enter the editing timeline
- Improve resolution and clarity upfront to reduce editing load later
2. Editing Stage (inside Premiere Pro)
- Color grading and visual styling
- Cutting, sequencing, and timeline editing
- Adding effects, transitions, and audio mixing
This separation helps reduce Premiere Pro lag, improve playback performance, and avoid heavy AI processing inside the editing timeline. Overall, this creates a more stable and efficient workflow from enhancement to final export, especially when working with large or low-quality source footage.
If you're interested in a more detailed breakdown, this guide explains how to upscale video in Premiere Pro without losing quality.
 FAQs
FAQs
No. Topaz Panel is not a traditional Premiere Pro plugin. It works as a UXP panel that connects Premiere Pro to external AI processing workflows.
This issue is usually caused by installation errors, UXP panel compatibility problems, or using an unsupported version of Premiere Pro.
Yes. Many Topaz Panel workflows rely on cloud-based AI processing, which may involve upload time, queue waiting, and credit-based usage depending on the plan.
Performance can be affected by upload speed, cloud queue delays, file size, and network stability, especially when working with long or high-resolution videos.
For users who prefer a fully local workflow and one-time payment, Aiarty Video Enhancer is a strong alternative. It processes videos offline on your GPU without cloud uploads, queues, or credit-based rendering, making it more predictable for batch and high-volume editing.
Adobe announced its planned acquisition of Topaz Labs in June 2026 to bring Topaz's AI enhancement technologies into the Adobe ecosystem. For Premiere Pro users, there are no immediate workflow changes. The current Topaz Panel and standalone workflow remain the same unless Adobe announces future updates.
Yes. You can continue using Topaz Video AI with Premiere Pro just as before. If you rely on AI upscaling, sharpening, or video restoration today, there's no need to wait for future Adobe integrations, as no new Premiere Pro features or timeline have been announced.
Yes. Adobe has stated that Topaz's existing applications will continue to be available as standalone products. While Adobe plans to integrate Topaz's AI technologies into Creative Cloud over time, users can keep using Topaz Video AI independently as part of their current editing workflow.
You May Also Like


This post was written by Brenda Peng who is a seasoned editor at Digiarty Software who loves turning ordinary photos into extraordinary works of art. With AI assistance for brainstorming and drafting, the post is reviewed for accuracy by our expert Abby Poole for her expertise in this field.
