Summary: This guide covers three effective methods to speed up video in Adobe Premiere Pro for different editing needs. It also highlights common quality challenges like motion artifacts that can occur when adjusting speed. To address these, Aiarty Video Enhancer is recommended as a powerful AI-driven tool that restores clarity, smooths motion, and enhances video details, ensuring your sped-up footage remains sharp and professional-looking.
When editing videos, adjusting the playback speed can add excitement, emphasize important moments, or improve storytelling flow. And Adobe Premiere Pro is a big helper to do this job perfectly. It offers several powerful and flexible methods to speed up your footage to suit various creative needs.
Whether you want a quick speed boost, smooth slow-motion transitions, or precise control over time remapping, this guide will walk you through three effective techniques to speed up video in Premiere Pro. Let's explore how to enhance your editing workflow and bring dynamic motion to your projects with ease.
Method 1. How to Speed up Video in Premiere Pro Using the Speed/Duration Command (for Uniform Speed Changes)
This method allows you to change the speed of an entire clip (or a previously-selected segment) by adjusting a percentage value.
Step 1. Preparing the Clip
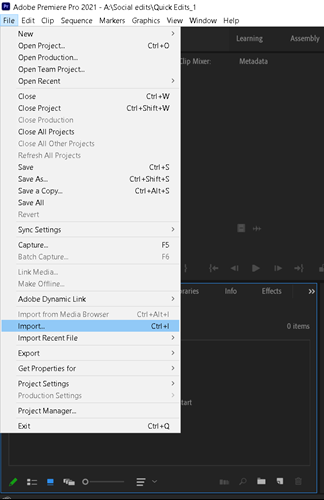
- Launch Premiere Pro and create a project: As with any editing task, begin by opening Premiere Pro and creating or opening the project you're working on.
- Import the video: Import the desired video clip into your project. You can do this by dragging the clip from your computer's file explorer directly into the Project panel within Premiere Pro or by right-clicking in the Project panel and choosing "Import".
- Place on the timeline: Drag the imported video clip from the Project panel onto the timeline to create a sequence. This is essential as the "Speed/Duration" command applies to clips within a sequence.
Step 2. Accessing the Speed/Duration Command
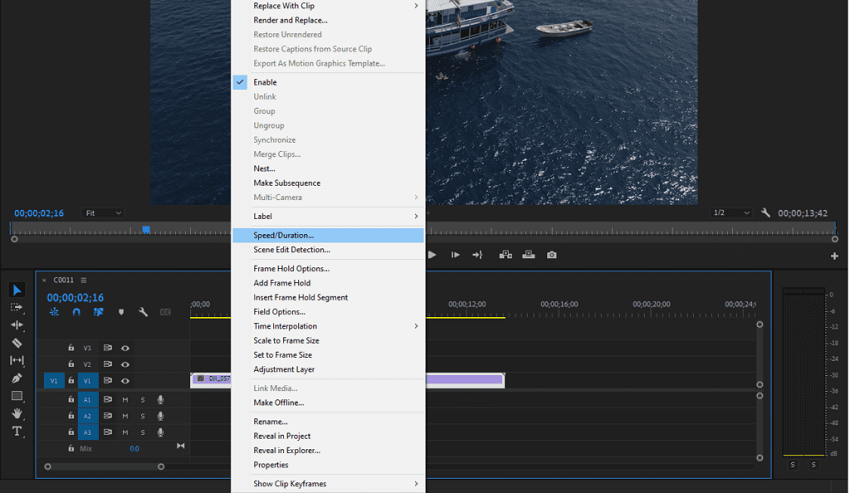
- Select the clip: Click on the video clip in the timeline to select it.
- Right-click and select "Speed/Duration": Right-click the selected clip. A contextual menu will appear. Choose "Speed/Duration..." from this menu.
- Keyboard shortcut: For a faster workflow, you can use the keyboard shortcut Ctrl+R (Windows) or Cmd+R (Mac) to open the Speed/Duration dialog box.
Step 3. Adjusting Speed and Duration
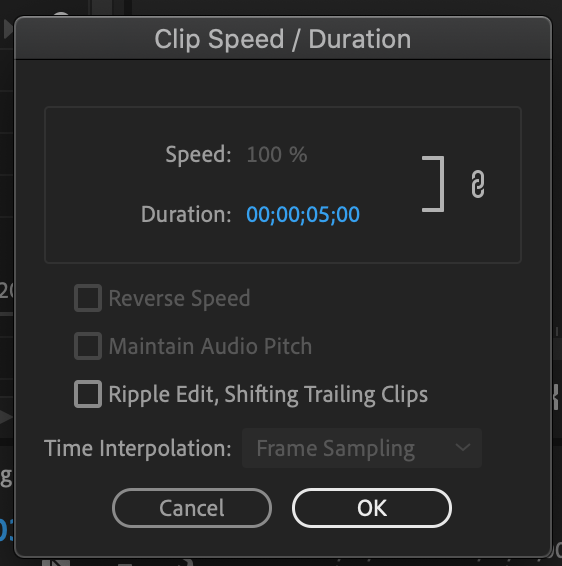
- Speed (%): This is the primary control for speeding up or slowing down your clip.
- To speed up: Enter a value greater than 100%. For instance, entering "200%" will double the playback speed, and the clip's duration on the timeline will be halved.
- To slow down: Enter a value less than 100%. Entering "50%" will halve the playback speed, and the clip's duration will double.
- Duration: You can also directly input a new duration for the clip. Premiere Pro will automatically adjust the speed percentage to match the new duration you enter.
- Linking speed and duration: By default, the Speed and Duration parameters are linked (indicated by a chain icon). This means if you change the speed, the duration automatically adjusts, and vice versa. If you wish to change the speed without affecting the clip's duration, click the chain icon to unlink them.
Step 4. Understanding Additional Options
- Reverse Speed: Check this box to play the clip backward. This can create interesting and surreal effects.
- Maintain Audio Pitch: When speeding up or slowing down a clip, the audio pitch can change, sometimes creating an undesirable "chipmunk" or "demon" effect. Enabling "Maintain Audio Pitch" helps to preserve the original audio pitch, even when the playback speed changes.
- Ripple Edit, Shifting Trailing Clips: This option controls how Premiere Pro handles clips that follow the one you're adjusting. If checked, when you shorten a clip by speeding it up, the subsequent clips on the timeline will automatically shift to the left to fill the gap. If unchecked, a gap will be left on the timeline. YouTube provides a visual demonstration of this option.
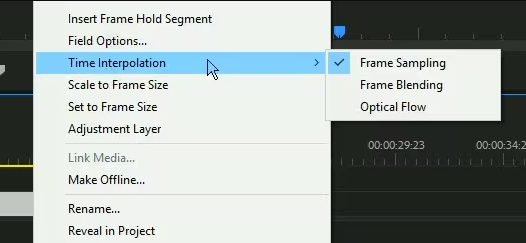
- Time Interpolation: This option determines how Premiere Pro calculates and creates new frames when you change the speed, especially for slower motion. The available options include:
- Frame Sampling: This is the default and simplest method, basically skipping or repeating frames.
- Frame Blending: This blends adjacent frames to create smoother motion during slow-motion segments.
- Optical Flow: This advanced method analyzes pixel movement between frames and creates entirely new, interpolated frames, often resulting in the smoothest slow-motion effects, particularly with footage shot at standard frame rates.
Step 5. Applying the Changes
Click OK: Once you've adjusted the desired settings, click "OK" to apply the speed and duration changes to your clip. The clip on the timeline will visually reflect the new duration, and when you play back the sequence, the clip will play at the adjusted speed.
Also see: how to slow down video using Premiere Pro time interpolation
Method 2. How to Speed up Video in Premiere Pro Using the Time Remapping (for Variable Speed Changes/Speed Ramping)
Time remapping is a powerful Premiere Pro feature that allows you to change the speed of your clips over time, creating smooth transitions between different speeds, a technique commonly known as speed ramping. This is ideal for adding dramatic effects, drawing attention to specific actions, or simply creating more dynamic sequences.
Time remapping offers more control by letting you create keyframes and smoothly transition between different speeds within a single clip.
Step 1. Preparing the Clip
- Import and placement: Import your video clip into the Project panel and drag it onto the timeline.
- Enlarge the track (recommended): For easier manipulation of the speed remapping controls, it's beneficial to increase the height of the video track in the timeline. You can do this by positioning the mouse pointer on the track header (the gray area to the left of the clip) and scrolling on your mouse or using the keyboard shortcut Ctrl + or Cmd + a few times to zoom in.
Step 2. Enabling Time Remapping
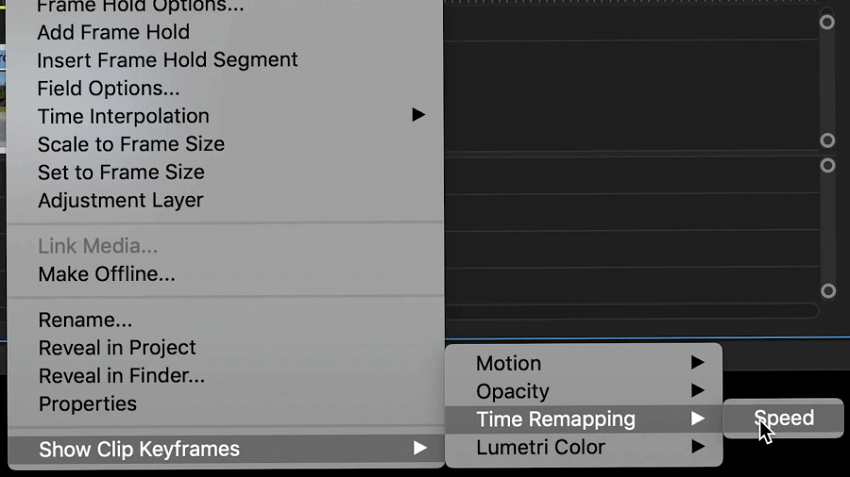
- Access the option: Right-click on the video clip in the timeline, then navigate to "Show Clip Keyframes" > "Time Remapping" > "Speed". You can also access this by clicking the fx badge on the clip and choosing the same path.
- Visual confirmation: You'll know it's enabled because a horizontal white line (often referred to as a "rubber band") will appear across the center of your clip, representing the clip's speed.
Step 3. Creating and Adjusting Keyframes
- Setting the speed change points: Use the Pen tool (shortcut P) to click on the white line at the points where you want the speed change to begin and end. This will create keyframes, essentially markers defining sections where you can adjust the speed.
- Adjusting speed between keyframes: Switch back to the Selection tool (shortcut V). Click and drag the white line between two keyframes:
- Drag upward to increase the playback speed of that segment.
- Drag downward to decrease the playback speed (slow motion).
- The percentage of the speed change will be displayed as you drag.
- You can create multiple keyframes to vary the speed throughout the clip.
Step 4. Smoothing Transitions (Speed Ramping)
- Creating the ramp: For a smoother transition between speeds, instead of an abrupt change, you can create a speed ramp. It would be great to use alt-clicking or option-clicking the keyframe to split it, then dragging the sides to separate them, creating a ramping effect.
- Adjusting the ramp duration: Drag the split keyframe markers left or right to increase or decrease the duration of the speed ramp, controlling how gradual or abrupt the transition is.
- Refining the curve (Bezier handles): For even smoother and more controlled transitions (often described as "ease in" or "ease out"), click on a keyframe to reveal the Bezier handles. Dragging these handles allows you to adjust the acceleration and deceleration curves of the speed change, creating a more natural and fluid transition.
Step 5. Time Interpolation (for Smooth Slow Motion)
- Understanding the need: When slowing down footage, especially clips shot at standard frame rates, Premiere Pro needs to generate or manipulate frames to create the slow-motion effect. Without proper interpolation, this can result in choppy playback.
- Accessing the setting: Right-click the clip, and choose "Time Interpolation".
- Options for interpolation:
- Frame Sampling: The default setting, which duplicates or skips frames, potentially causing choppiness.
- Frame Blending: Blends adjacent frames to create smoother motion, particularly useful when some natural motion blur is present in the footage. This can sometimes create a slightly blurry look.
- Optical Flow: Analyzes pixel movement between frames and generates entirely new, interpolated frames, resulting in the smoothest slow-motion effects, especially with high-quality footage. This is often the preferred method for dramatic slow-motion sequences. However, it can sometimes introduce artifacts or distortions with lower-quality footage or complex motion.
Pro Tip: Enhance Video Quality After Speed Changes with Aiarty Video Enhancer
If you find that speeding up or slowing down your video causes unwanted artifacts, motion distortions, or loss of detail, Aiarty Video Enhancer is an excellent tool to restore and improve your footage. Powered by cutting-edge artificial intelligence algorithms, Aiarty intelligently analyzes each frame to perform high-quality upscaling, noise reduction, and motion smoothing. It can enhance fine details, sharpen edges, and remove visual imperfections that may arise from speed adjustments.
Aiarty Video Enhancer is designed to work seamlessly with various types of videos, including low-resolution or heavily compressed clips, making it ideal for post-processing after speeding up or slowing down footage. By using Aiarty, you ensure your final videos maintain crispness, fluid motion, and professional-grade visual quality - perfect for sharing or further editing.
Additional Tips
- Audio synchronization: Time remapping affects the audio pitch and sync. You may need to unlink the audio and adjust it separately or mute the original audio and add a new soundtrack.
- Experimentation: Play around with different keyframe placements, speed percentages, and Bezier handle adjustments to find the optimal speed ramp for your specific footage and desired effect.
- Moderation: While speed ramping is a powerful tool, overuse or poorly executed transitions can be distracting. Use it judiciously to enhance the narrative or visual impact of your video.
Method 3. How to Speed up Video in Premiere Pro Using the Rate Stretch Tool (for Quick, Less Precise Adjustments)
The Rate Stretch tool in Premiere Pro is a convenient way to quickly adjust a clip's speed by visually dragging its edges in the timeline. While lacking the precision of the Speed/Duration command or the fine-tuned control of Time Remapping, it's perfect for quick adjustments or when you need to match a clip to a specific duration without concern for an exact speed percentage.
In short:
- The Rate Stretch tool allows you to shorten or lengthen a clip in the timeline, and Premiere Pro automatically adjusts the clip's playback speed to fill the new duration.
- Dragging the clip's end inward (shortening the clip) will increase its speed.
- Dragging the clip's end outward (lengthening the clip) will decrease its speed (slow motion).
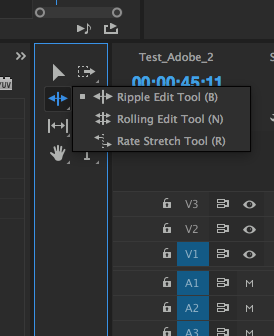
Step 1. Select the Rate Stretch Tool
- Locate the Rate Stretch tool in the Premiere Pro toolbar. It's often found grouped with other tools like the Ripple Edit tool or Rolling Edit tool. You might need to click and hold one of these to reveal the hidden Rate Stretch tool.
- Alternatively, use the keyboard shortcut R to quickly select the Rate Stretch tool.
Step 2. Adjust the Clip
- Click on either the start or end edge of the clip you want to modify in the timeline.
- Drag the edge inward to speed up the clip (making it shorter).
- Drag the edge outward to slow down the clip (making it longer).
Step 3. Observe the Speed
As you drag, Premiere Pro displays a percentage value next to the clip's name, indicating the new playback speed relative to the original. 100% is the original speed, anything higher is faster, and anything lower is slower.
Limitations of This Feature
- Lack of precision: You can't enter a specific speed percentage directly, unlike with the Speed/Duration command.
- Can distort motion: If you drastically slow down a clip, especially one shot at a lower frame rate, the stretched duration of individual frames can result in choppy or unnatural-looking slow motion. In such cases, methods involving frame blending or optical flow interpolation (available via the Speed/Duration command or Time Remapping) are recommended for smoother results.
- Audio Pitch: The Rate Stretch tool changes the duration of both video and audio within the clip, and will therefore alter the audio's pitch unless you take further steps to adjust it. You may want to unlink the audio track and modify it separately or mute the original audio and add a new soundtrack.
How to Choose from Them
It's great to have multiple options, but choosing the right one depends on your specific editing needs and desired level of control. Here's a breakdown to guide your decision:
When to Use the Speed/Duration Command
- When you need precise, uniform speed changes for an entire clip: This is the most straightforward method if you want to speed up or slow down a whole clip by a specific percentage.
- When you need to adjust duration accurately: If you know the exact length you want your clip to be, you can input the duration directly, and Premiere Pro will adjust the speed accordingly.
- When you need to reverse a clip: The Speed/Duration command allows you to reverse playback with a single click.
- When maintaining audio pitch is crucial: This method offers the option to preserve the audio's original pitch, preventing the undesirable "chipmunk" or "demon" effects that can occur when changing speed.
- For setting basic time interpolation: You can choose between Frame Sampling, Frame Blending, or Optical Flow to control how Premiere Pro renders the new playback speed, especially for slower motion.
When to Use Time Remapping
- When you need variable speed changes (speed ramping) within a single clip: This is the most advanced and flexible option. It allows you to create keyframes and smoothly transition between different speeds within a single clip.
- For creating dramatic effects: Speed ramping can build tension, highlight specific actions, or add a dynamic flow to your video by speeding up or slowing down at precise moments.
- When you need fine-tuned control over transitions: You can create smooth transitions between speeds by adjusting the Bezier handles on the keyframes.
- When creating complex sequences with changing rhythm: Time remapping enables you to manipulate the pacing to match music or create unique visual effects.
When to Use the Rate Stretch Tool
- For quick, less precise adjustments: This is the fastest way to stretch or compress a clip on the timeline and have the speed automatically adjust.
- When filling a gap in the timeline: If you have a specific space to fill and don't care about the exact speed, the Rate Stretch tool is ideal as it adjusts the speed to fit the duration.
- When experimenting with pacing: It's great for quickly trying out different speeds to see how they impact the flow of your edit without committing to specific percentages.
In Summary
| Feature | Speed/Duration Command | Time Remapping | Rate Stretch Tool |
|---|---|---|---|
| Uniform speed changes | Yes | No | Yes |
| Precise speed percentage | Yes | No | No |
| Precise duration setting | Yes | No | No |
| Variable speed changes | No | Yes | No |
| Speed ramping | No | Yes | No |
| Keyframe control | No | Yes | No |
| Smooth transitions | No | Yes | No |
| Reverse clip | Yes | Yes | No |
| Maintain audio pitch | Yes | No | No |
| Fill gaps in timeline | No | No | Yes |
| Quick & intuitive | Yes | No | Yes |
You May Also Like
This post was written by Ashley Brown, a videographer turned AI explorer. As an associate writer at Digiarty Software, she dives into the latest AI-powered tools for video enhancement and content creation, offering practical insights and unbiased commentary. Accuracy confirmed by Abby Poole.