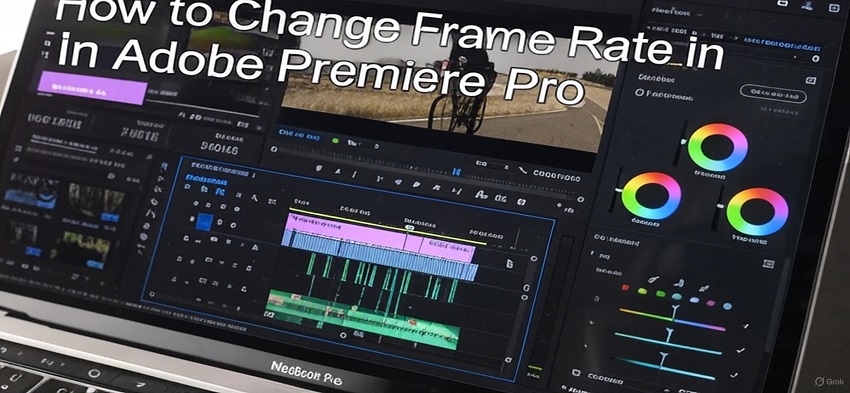
Summary: This guide explains two simple methods to change frame rates in Adobe Premiere Pro: using the Interpret Footage feature to adjust individual clips for effects like slow motion, and modifying Sequence Settings to set the frame rate for the entire timeline, ensuring smooth playback suited for your target platform. For changing frate rate and also enhanced video quality, consider using Aiarty Video Enhancer alongside these techniques to make your final output even more professional and polished.
When working with video footage in Adobe Premiere Pro, adjusting the frame rate can be crucial for achieving the perfect look and playback speed for your project. Whether you want to create smooth slow-motion scenes by lowering the frame rate of individual clips or need to match the overall sequence frame rate to suit your target platform, Premiere Pro offers intuitive tools to make these changes seamless.
In this guide, we'll walk you through two effective methods - using the Interpret Footage function for individual clips and modifying Sequence Settings for your timeline - to help you master frame rate adjustments with ease.
Check them now.
Method 1. How to Change Frame Rate in Premiere Pro (for An Individual Clip)
If your plan is to change an individual clip's frame rate, the feature naming Interpret Footage is the perfect option. The Interpret Footage function in Premiere Pro is your tool to tell the software how to understand or interpret a video clip's frame rate.
This is super useful when your video clip was shot at a different frame rate than the sequence (timeline) where you're editing it. By changing how Premiere Pro interprets the clip, you can ensure it plays back at the desired speed and matches your sequence seamlessly.
Here's how to do it step-by-step:
Step 1. Locate the Video Clip
In your Premiere Pro project, look for the Project panel. This panel usually sits in the bottom left or top left of your screen. It's where all your imported media (video clips, images, audio files) are stored. Locate the specific video clip whose frame rate you want to change.
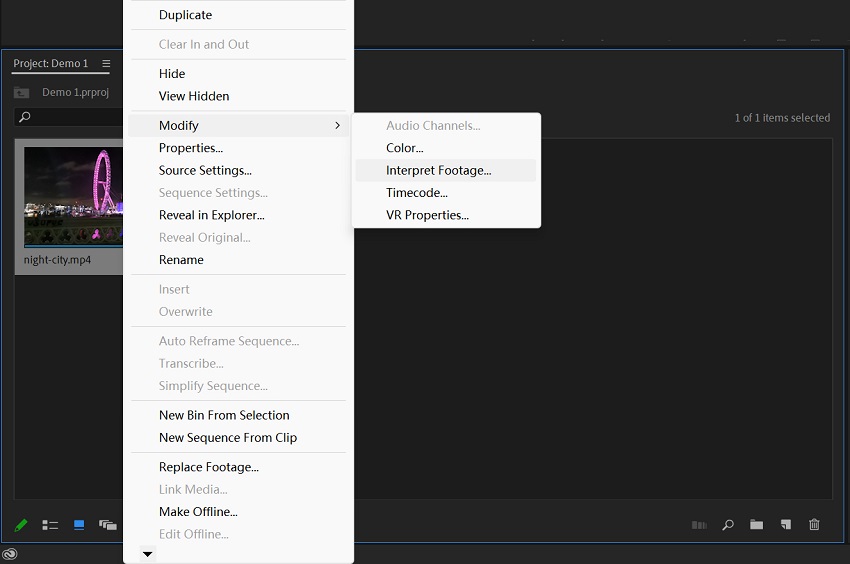
Step 2. Right-click and Choose "Interpret Footage"
Once you've found the video clip in the Project panel, right-click on it (or Ctrl-click on macOS). This will open a special menu. Look for the option that says "Modify" and then click on "Interpret Footage...".
Step 3. The "Modify Clip" (Interpret Footage) Dialog Box
A new window called the "Modify Clip" dialog box will appear. This is where you'll tell Premiere Pro how you want the footage to be interpreted.
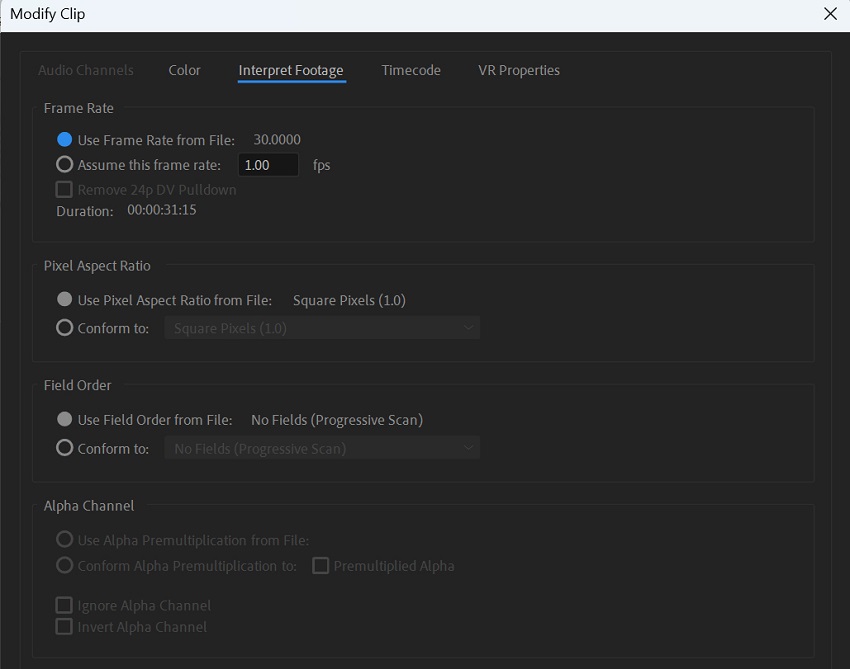
Step 4. Adjust the Frame Rate
In this dialog box, find the section labeled "Frame Rate". You'll see a current frame rate displayed, and beneath it, an option to "Assume this frame rate". Check the box next to "Assume this frame rate".
Now, you can type your desired frame rate into the box. For example, if your original clip is 60 frames per second (fps) and you want it to play smoothly in a 24fps sequence, you'd type "24" here.
Step 5. Click "OK"
Once you've entered the new frame rate, click the "OK" button to apply the changes.
What Happens Next
- Changes in Playback Speed: If you've lowered the frame rate of a clip (e.g., from 60fps to 24fps), Premiere Pro will now play it back slower, effectively creating a smooth slow-motion effect.
- Changes in Duration: When you reinterpret the footage to a lower frame rate, the clip's duration will become longer since more frames are being stretched out over time. The opposite is true when reinterpreting to a higher frame rate - the clip's duration will shorten and the footage will appear to be playing back faster.
- Matching the Sequence: Once the footage has been interpreted, you can add it to your sequence, and it will now conform to the sequence's frame rate while playing at the new speed you set with "Interpret Footage".
Important Tip: Interpreting footage mainly affects the speed and duration of the clip without affecting the overall number of frames. If you want to change a clip's playback speed without changing the frame rate, consider using the "Speed/Duration" option, also accessed by right-clicking on the clip and choosing "Speed/Duration".
Method 2. How to Change Frame Rate in Premiere Pro (for A Sequence)
Changing the frame rate of a sequence in Premiere Pro means you are setting the overall playback speed for your entire edited video timeline. This is important for ensuring that your finished video plays back smoothly at the desired speed and matches the target platform (e.g., YouTube, film) where it will be viewed.
Here's how to change the frame rate of a Premiere Pro sequence, even if you are a beginner:
Step 1. Select the Sequence
In Premiere Pro, find the Project Panel. This panel usually sits in the bottom left or top left of your screen. It's like your project's main storage area. Look for the sequence you want to adjust and click on it to select it. It will likely have a small film strip icon next to it and a name you assigned when you created it. Alternatively, you can select the sequence in your Timeline panel, also known as the Timeline.
Step 2. Access Sequence Settings
Go to the top menu bar in Premiere Pro. Click on "Sequence". From the drop-down menu that appears, select "Sequence Settings...".
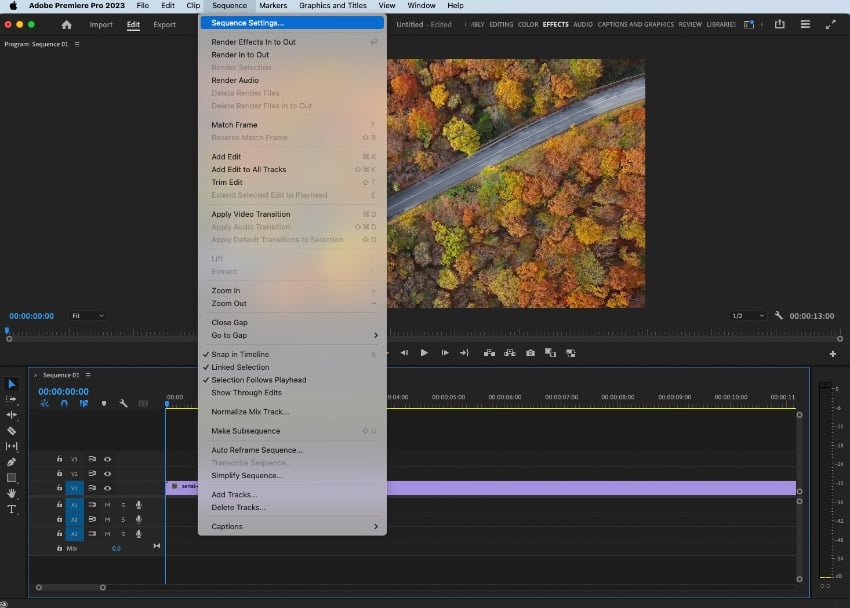
Step 3. The "Sequence Settings" Dialog Box
A new window called "Sequence Settings" will appear. This is where you can change various aspects of your sequence, including its frame rate, frame size (resolution), and audio settings.
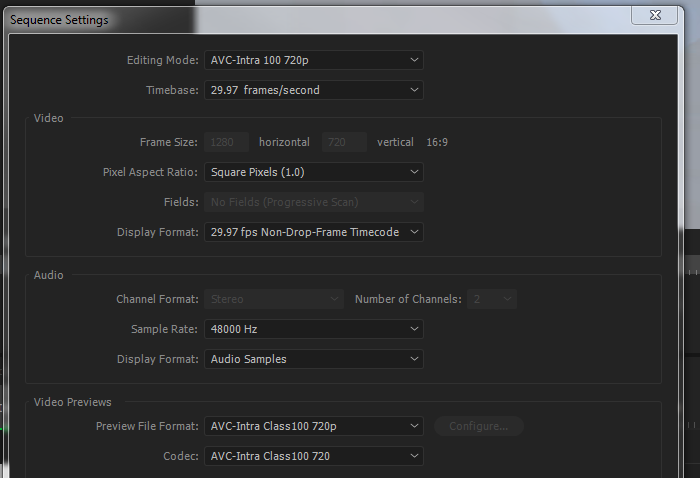
Step 4. Find the Timebase Setting
In the "Sequence Settings" dialog box, look for the "Timebase" setting. This setting is directly related to the frames per second (fps) of your sequence.
Step 5. Choose Your Desired Frame Rate
Click on the drop-down menu next to "Timebase". You'll see a list of common frame rate options like 23.976 fps, 24 fps, 25 fps, 29.97 fps, 30 fps, 59.94 fps, and 60 fps. Select the frame rate that you want your sequence to have.
Step 6. Click "OK"
Once you've chosen the new frame rate, click the "OK" button to apply the changes to your sequence.
What Happens Next
- Impact on existing clips: If you change the sequence frame rate after adding clips, Premiere Pro will automatically adjust the clips to match the new frame rate while trying to maintain their playback speed.
- Potential visual impact: Keep in mind that changing the frame rate of a sequence, especially to a lower value, can sometimes affect the smoothness of motion, particularly if the original footage has a significantly higher frame rate.
- Audio synchronization: If you have audio that needs to be perfectly synchronized with your video, changing the sequence frame rate can potentially cause audio sync issues, requiring adjustments to be made.
- Posterize Time Effect: For more granular control over individual clips within the adjusted sequence, consider using the "Posterize Time" effect to modify the frame rate of specific segments without affecting the entire sequence or modifying the clip's playback speed.
How to Choose From These Two Methods
Choose "Interpret Footage" when:
- Creating slow motion or fast motion: If you shot footage at a higher frame rate (e.g., 60fps) and want to create smooth slow motion in a lower frame rate sequence (e.g., 24fps), interpreting the footage to match the sequence frame rate will play it back slower and longer.
- Matching mixed frame rate footage: If you have clips shot at different frame rates and want to ensure they conform to your sequence's frame rate while playing at their original speed, you can interpret the footage to match the sequence's frame rate. This is particularly useful when combining footage from different sources.
- Dealing with specific clip properties: "Interpret Footage" also lets you modify other properties like pixel aspect ratio and field order for individual clips.
Choose "Sequence Settings" when:
- Starting a new project: When you create a new sequence, setting the timebase (frame rate) is crucial for defining the overall playback characteristics of your video.
- Establishing the delivery frame rate: If you know your final video needs to be delivered at a specific frame rate for a particular platform (e.g., 24fps for film or 30fps for standard web video), setting the sequence frame rate is the way to go.
- Working with footage that already matches: If all your footage was shot at the same frame rate as your desired output, simply creating a sequence with that frame rate will suffice.
- Important Tip: While you can mix different frame rate footage in a single sequence without interpreting, Premiere Pro will adjust clips by dropping frames or performing interpolation to match the sequence's frame rate, which may lead to choppiness or a less ideal look depending on the frame rates involved. In such cases, interpreting footage or using effects like "Time Interpolation" can provide more control and potentially smoother results.
In essence, "Interpret Footage" is about how Premiere Pro understands a clip, affecting its individual timing and playback speed, while "Sequence Settings" defines the overall playback environment for your edited video. Choosing the right approach depends on your specific editing needs and desired creative or technical outcomes.
Pro Tip: How to Change Frame Rate with An AI Way
AdobePremiere Pro's methods manipulate the playback of existing frames, which can result in changes to speed or potentially introduce artifacts if not handled carefully. If you want to change your video clips frame rate easily, and make them get much smoother motion and potentially enhanced quality, at the same time, Aiarty Video Enhancer is highly recommended.
Aiarty Video Enhancer is a part-time frame rate converter, mainly designed to improve video quality by using AI to upscale resolution, reduce noise, and enhance clarity in low-quality or blurry footage. However, in its toolbox, you can also find the feature to change frame rate. Compared with Adobe Premiere Pro's methods, Aiarty's approach focuses on generating new frames to create a smoother and potentially higher frame rate video through AI-powered frame interpolation.
- AI Frame Interpolation: Aiarty's AI algorithms analyze the motion within your video and generate realistic intermediate frames between existing ones. This effectively increases the frame rate, resulting in smoother transitions and enhancing the overall viewing experience. It is particularly effective for creating smooth slow-motion effects or boosting the frame rate of videos with low frame rates, such as those from older cameras or those shot under challenging conditions.
- Integrated Workflow: Aiarty also combines frame interpolation with other AI-powered enhancement features, like upscaling, denoising, and stabilization. This allows for a more streamlined workflow, delivering a range of enhancements in a single process.
In contrast to Premiere Pro's methods, Aiarty's AI-driven approach creates new, interpolated frames, potentially leading to smoother motion and enhanced visual quality, especially when dealing with low frame rate footage or creating slow-motion effects. Aiarty's AI models are trained on large video datasets to understand motion dynamics and generate realistic frames, aiming to avoid artifacts and ghosting commonly associated with traditional frame interpolation methods.
So why not free download it now and then follow the steps below to check how this AI tool make the job done?
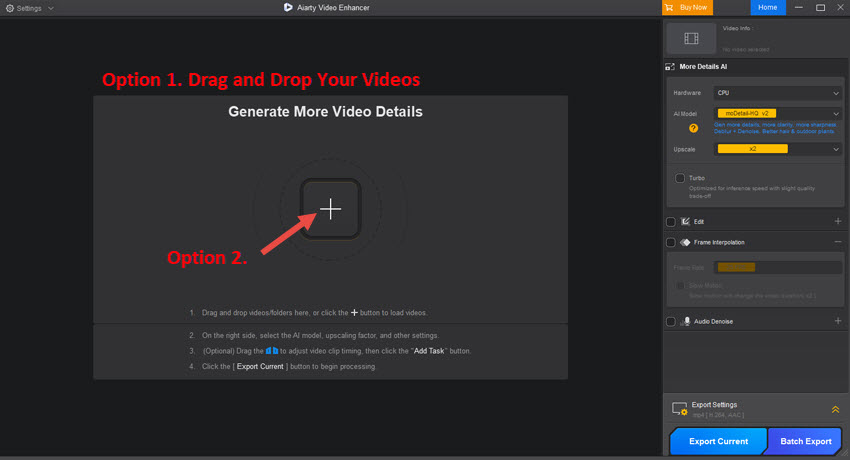
Step 1. Lauch Aiarty Video Enhancer on your computer. And then import your video clips into it.
Step 2. Select the video which you want to change frame rate.
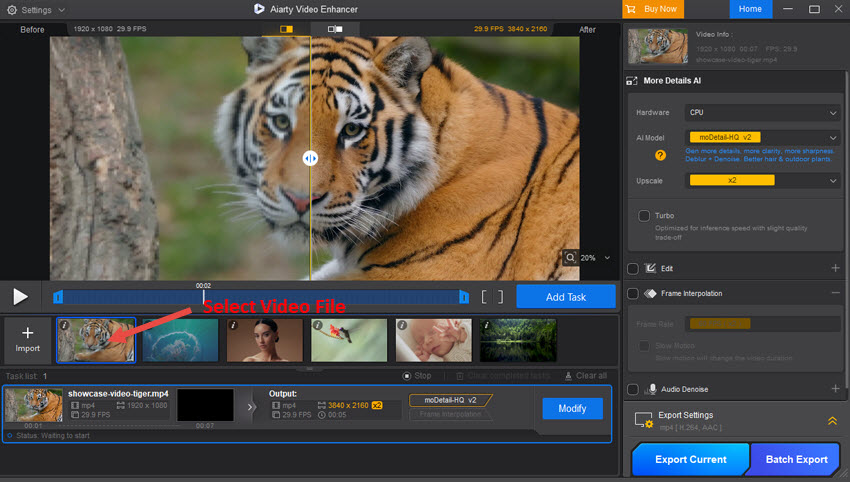
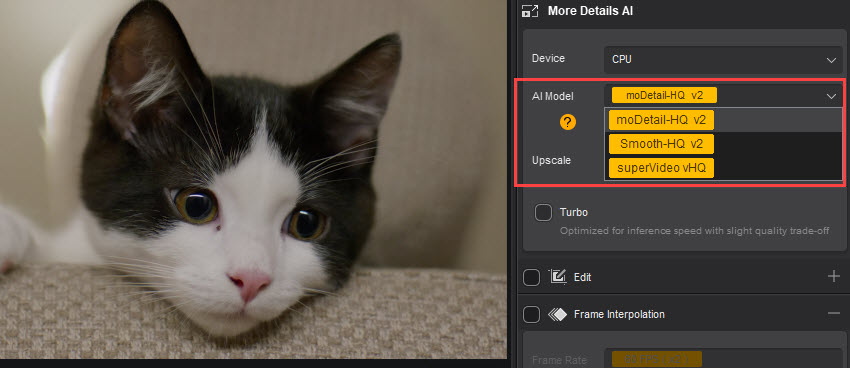
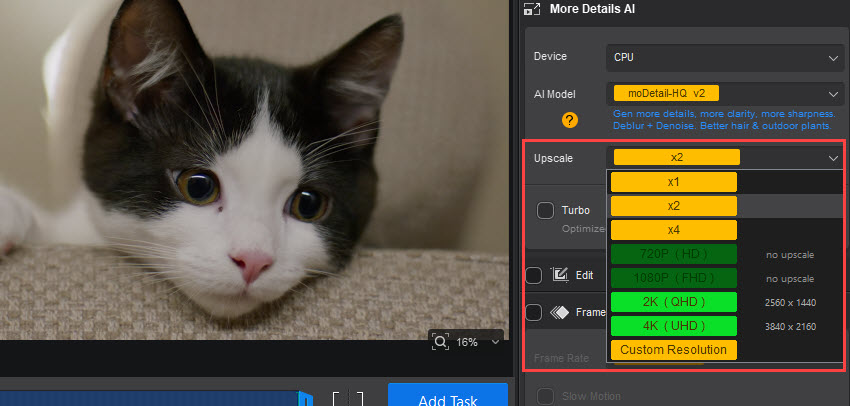
Step 3. In the right panel, choose an AI model, if you also want to enhance your video.
Step 4. Right below it, choose an upscaling option for your video. If you have no plan for it, simply choose the x1 option.
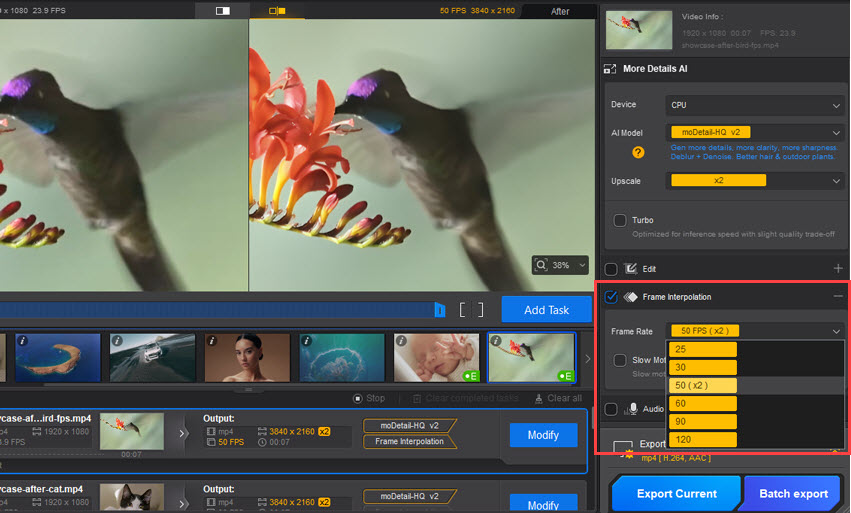
Step 5. Now move to the Frame Interpolation section. Check it, and then you can choose the frame rate option for your video in the drop-down menu of Frame Rate. Available options include standard rates like 25, 30, 50, 60 (x2), 90, and 120 FPS.
If you are creating a slow motion video, please check the Slow Motion feature, which will slow down the video's playback speed, enabling the creation of epic slow-motion sequences with AI-level smoothness.
Step 6. Simply click the Export Current or Batch Export button to save your videos.
Conclusion
Adjusting the frame rate in Adobe Premiere Pro is a powerful way to control the look and feel of your video projects. Whether you're aiming to create smooth slow-motion effects by interpreting footage with a new frame rate or setting the appropriate frame rate for your entire sequence to match your target platform, Premiere Pro provides straightforward and effective tools to make these changes.
By mastering these two methods, you can ensure your videos play back exactly as you envision, enhancing both the quality and professionalism of your final output. Experiment with these settings to find the perfect frame rate that brings your creative vision to life.
You May Also Like
This post was written by Ashley Brown, a videographer turned AI explorer. As an associate writer at Digiarty Software, she dives into the latest AI-powered tools for video enhancement and content creation, offering practical insights and unbiased commentary. Accuracy confirmed by Abby Poole.