Summary: This guide explains two methods to change aspect ratio in Adobe Premiere Pro: creating a new sequence with a custom aspect ratio and using the Auto Reframe Sequence feature to adjust clips automatically. While Premiere Pro focuses on editing aspects, Aiarty Video Enhancer offers additional AI-powered video enhancement features not available in Premiere Pro.
Changing the aspect ratio of your video is a fundamental step when preparing content for different platforms or creative needs. Adobe Premiere Pro offers flexible tools to help you achieve the perfect frame size, whether you want to create a new project with a specific aspect ratio or adjust an existing sequence to fit a different format.
In this guide, we will explore two practical methods: manually setting up a new sequence with your desired aspect ratio and using the Auto Reframe Sequence feature to automatically adjust your clips. These techniques are ideal for tailoring your videos to social media platforms like Instagram and TikTok, ensuring your key visuals are always properly framed and displayed.
Whether you're working from scratch or adapting an existing project, this tutorial will help you master aspect ratio adjustments in Adobe Premiere Pro.
Method 1. How to Change Aspect Ratio of an Existing Sequence in Premiere Pro
This method is suitable when you want to change the aspect ratio for your entire project or a specific sequence. It involves creating or modifying the aspect ratio of a sequence, which is the "canvas" for your video project.
Step 1. Creating a new sequence with a desired aspect ratio.
Here is how to make it.
- Launch Premiere Pro and open your project. Or, create a new project if you're starting from scratch.
- Go to File > New > Sequence. This opens the "New Sequence" dialogue box.
- Select the "Settings" tab. This is where you'll find the core settings for your sequence.
- Locate "Frame Size" under the "Video" section. This determines the resolution of your sequence (width x height).
- Input your desired resolution (e.g., 1080x1920 for vertical video, 1920x1080 for widescreen). Premiere Pro will automatically display the corresponding aspect ratio next to the boxes.
- Click "OK" to create the sequence. You may be prompted to adjust preview files; choose "OK" or "Keep Existing Settings".
- Import and add your video footage to the timeline.
Step 2. Changing the aspect ratio of an existing sequence.
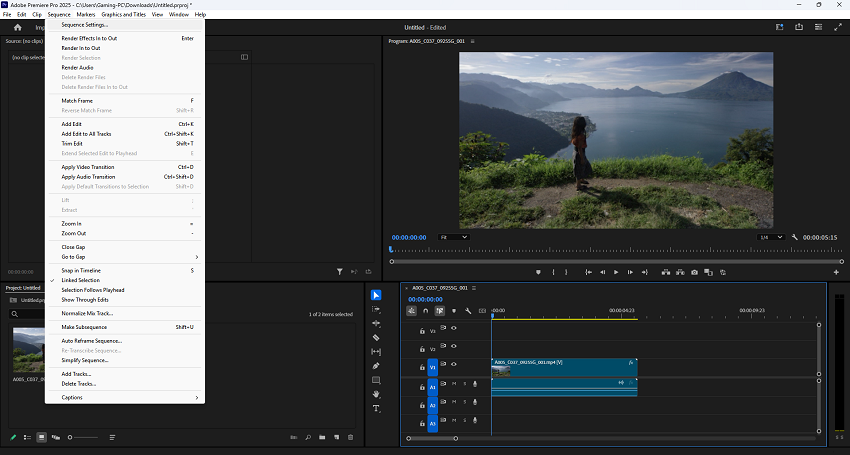
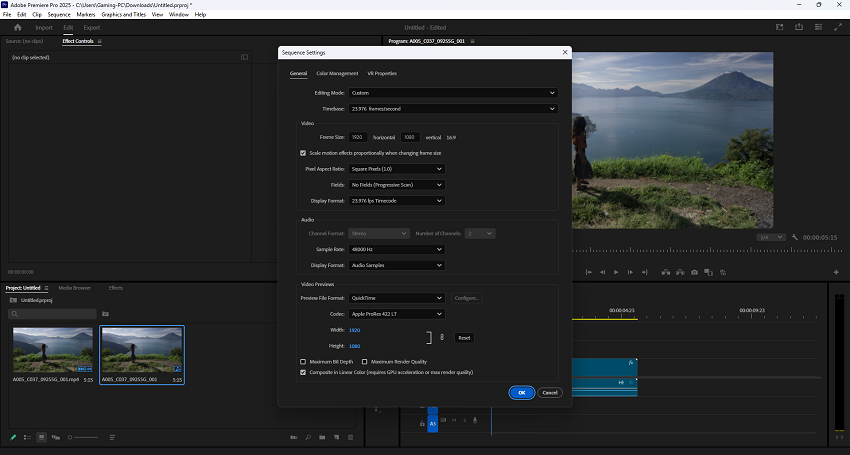
Select the sequence you want to modify in the Project panel or the Timeline. Then go to Sequence > Sequence Settings. You can also right-click on the sequence in the Project panel and choose "Sequence Settings".
In the dialogue box, locate the "Frame Size" section. Adjust the "Horizontal" and "Vertical" values to your desired aspect ratio. And lastly, click "OK".
Step 3. Adjusting clips to fit the new aspect ratio.
After changing the sequence's aspect ratio, your clips may not perfectly fit the new frame, resulting in black bars or parts of the video being cut off.
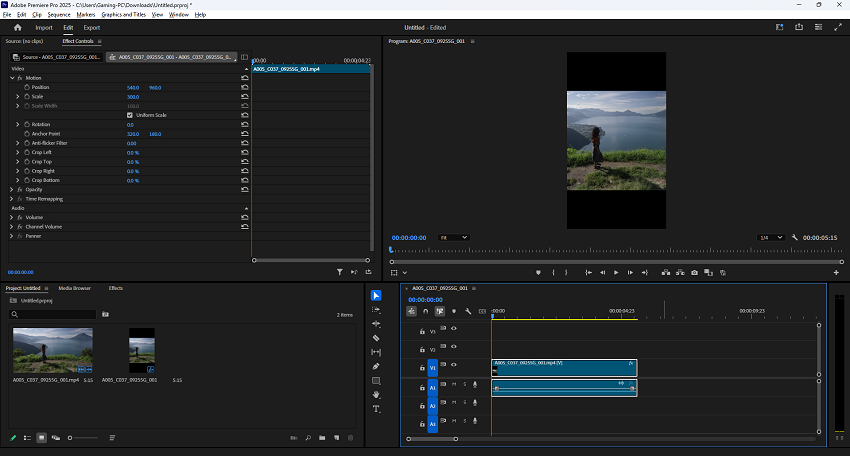
- Select the video clip in the Timeline panel.
- Go to the Effect Controls panel. If it's not visible, go to Window > Effect Controls.
- Under "Motion", adjust the "Scale" and "Position" parameters. Scale can help resize the video to fill the frame, but avoid scaling too much above 100% to prevent pixelation. And Position can help move the clip to center the most important elements within the frame.
- You can also double-click the video in the preview window to manually resize and reposition it.
Step 4. Exporting with the new aspect ratio.
Go to File > Export > Media. You can also use the shortcut Ctrl/Cmd + M. Choose your desired format (e.g., H.264 for MP4). Crucially, ensure the "Output Dimensions" match the new aspect ratio of your sequence to avoid unwanted black bars or cropping. Lastly, click "Export".
Method 2. How to Change Aspect Ratio for Adapting Existing Sequences in Premiere Pro
This method is especially useful when you've already started a project and need to output it in a different aspect ratio for various platforms. It lets you quickly adapt an existing video sequence to a new aspect ratio, for instance, turning a widescreen (16:9) video into a vertical (9:16) video for social media without manually adjusting every clip.
Step 1. Preparing the sequence.
Open your Premiere Pro project. Select the sequence you want to reframe in either the Project panel or the Timeline.
Step 2. Accessing the Auto Reframe Sequence tool.
Go to Sequence > Auto Reframe Sequence in the top menu. Alternatively, you can right-click on the sequence in the Project panel and choose "Auto Reframe Sequence".
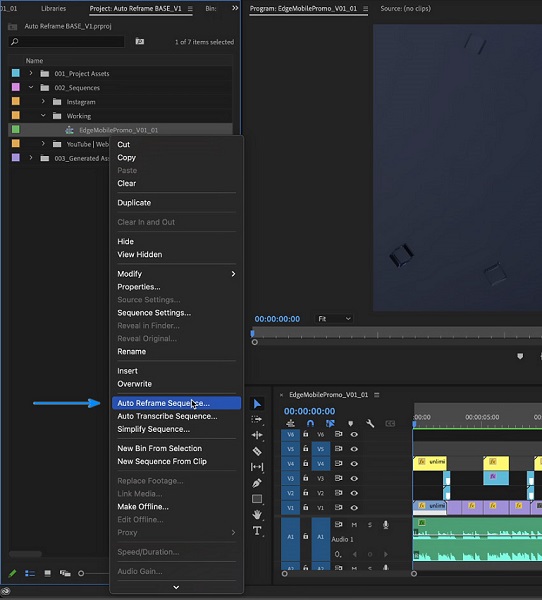
Step 3. Configuring Auto Reframe settings.
The "Auto Reframe Sequence" dialog box will appear with the following options:
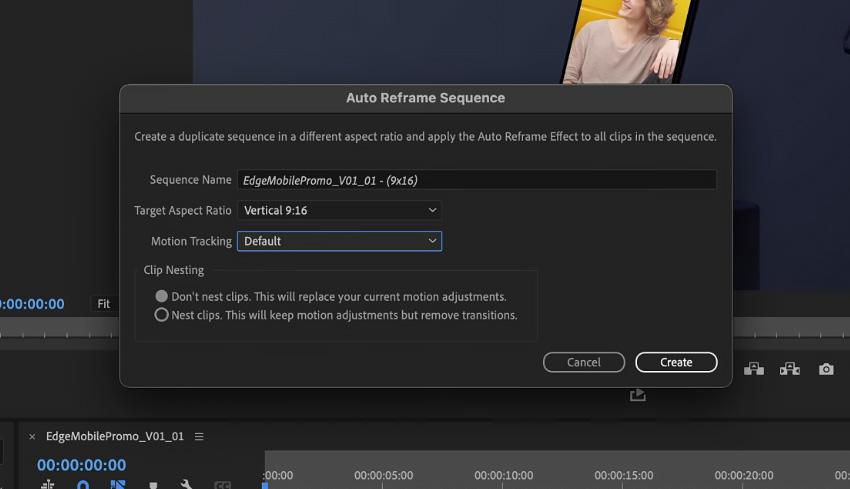
- Target Aspect Ratio: Select the desired aspect ratio for your reframed sequence, such as Square (1:1), Vertical (9:16 or 4:5), or Horizontal (16:9).
- Motion Tracking: This setting dictates how Premiere Pro analyzes and tracks motion within your video to keep the subjects in the frame. Three options are available:
- Slower Motion: Ideal for videos with little or no camera movement, like talking head videos.
- Default: Suitable for most content with moderate movement.
- Faster Motion: Best for fast-paced videos like sports footage.
- Nesting (Optional): This option determines how Premiere Pro handles existing motion adjustments or transitions in your sequence.
- Do not nest: If your clips don't have existing motion adjustments or transitions, you can choose this option.
- Nested Sequences: If your clips have existing motion adjustments or transitions, it's best to keep this option selected. It will embed your original sequences into the new sequence while maintaining your adjustments and keyframes.
Step 4. Applying and reviewing the reframing.
Click "Create" and Premiere Pro will analyze your footage and generate a new sequence with the applied aspect ratio. Review the reframed sequence in the timeline and preview window.
If necessary, make manual adjustments to the "Scale" and "Position" of individual clips in the Effect Controls panel to fine-tune the reframing. You can also manually adjust keyframes in the Effect Controls panel for more accurate tracking, especially in scenes with multiple moving subjects or if the auto-reframing isn't perfect.
Step 5. Exporting the reframed sequence.
Go to File > Export > Media (or use the shortcut Ctrl/Cmd + M). Choose your preferred format (e.g., H.264 for MP4). Ensure that the "Output Dimensions" in the Export Settings match the reframed sequence's aspect ratio. This will prevent unwanted black bars or cropping when viewed. And finally, click "Export".
How to Choose Between These Two Methods
In short, choosing Method 1 when you are starting a new project and know the final output aspect ratio. Or you want to create a new sequence with a specific aspect ratio, e.g., square for Instagram or vertical for TikTok. Or you need to change the aspect ratio of an entire existing project and manually adjust clip positioning.
Method 1 gives you complete control over the sequence's resolution and aspect ratio from the outset. And it is ideal for projects with a planned output format.
However, please note that it requires manual adjustments of clip positioning and scaling to fit the new aspect ratio. Compared to method 2, it is more time-consuming if you have many clips or complex edits.
Choosing Method 2 when you have an existing project and want to quickly reformat it for different social media platforms (e.g., convert a 16:9 video to 9:16). Or you want Premiere Pro to automatically detect and track subjects within your video and keep them in the frame when changing the aspect ratio. Or you have many clips or a long sequence and want to save time on manual adjustments.
Method 2 automates the reframing process, saving time and effort. Besides, it uses AI (Adobe Sensei) to identify and track the subject, keeping it in the frame even after resizing. And it offers options for different motion speeds to fine-tune tracking accuracy.
However, please note that it is not always perfect, and may require manual tweaks to individual clips. And Auto Reframe does not adjust scale or adjust on both axes automatically, requiring additional steps for desired results. If clips have existing keyframes for motion or transitions, you might need to use nested sequences or face potential overwriting.
Prot Tip: How to Change Aspect Ratio and Enhancing Your Videos at the Same Time
While Premiere Pro is an industry standard for video editing, it sometimes falls short when dealing with low-quality, noisy, or blurry footage when changing aspect ratio of a video. This is where Aiarty Video Enhancer steps in as a powerful alternative tool, designed to revitalize your videos and unlock their full potential.
The limitations of Premiere Pro
While Premiere Pro offers tools for noise reduction and sharpening, they often fall short in complex situations like heavily degraded footage, requiring time-consuming manual adjustments to fix grainy images, blurry footage, and compression artifacts.
Adobe Premiere Pro primarily focuses on editing and doesn't offer AI-powered features specifically designed for video enhancement like detail restoration or noise reduction.
Aiarty Video Enhancer: an AI-driven Solution
Aiarty Video Enhancer has a built-in editing feature to help you change the aspect ratio of a video in just one click.
And more imprtantly, it harnesses the power of AI to address these limitations and delivers superior video quality through its unique features:
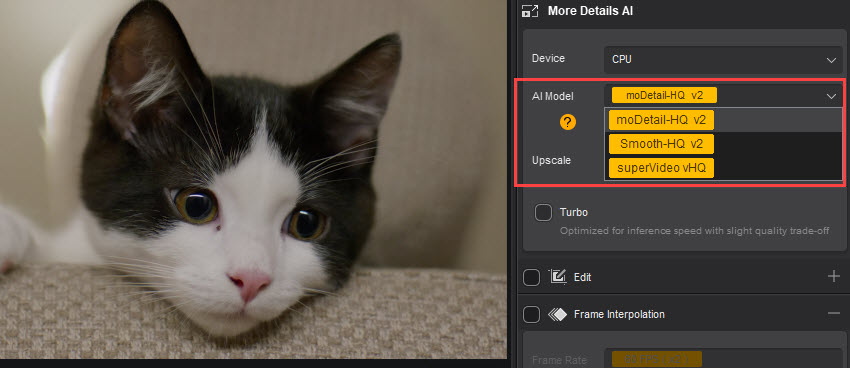
- AI-driven enhancement for every scenario: Aiarty offers three specialized AI models - moDetail-HQ, Smooth-HQ, and superVideo vHQ - each tailored to a specific video enhancement task.
- moDetail-HQ: Best for restoring fine textures in faces, hair, and natural elements, perfect for portraits and detailed shots.
- Smooth-HQ: Gently removes noise and preserves natural skin tones, ideal for everyday videos and casual environments.
- superVideo vHQ: Designed for extreme low-light conditions, it excels in removing noise and recovering details in challenging scenes like night skies or dimly lit interiors.
- Beyond upscaling - true 4K resolution: Unlike many tools that merely stretch pixels, Aiarty intelligently reconstructs missing details and enhances clarity to achieve true 4K quality, breathing new life into old or compressed videos.
So why not download its free trial and discover how it can transform your videos from ordinary to extraordinary, by following the steps below?
Step 1. Run Aiarty Video Enhancer on your computer. And then import your video clips into it.
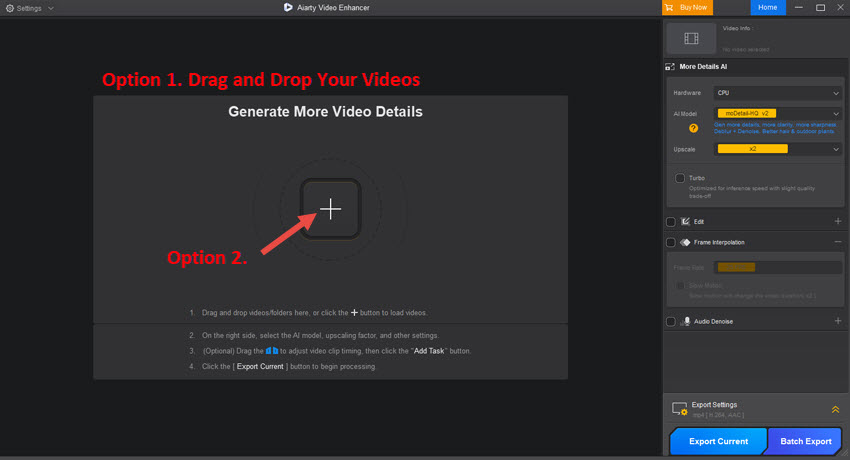
Step 2. Select the video which you want to change aspect ratio.
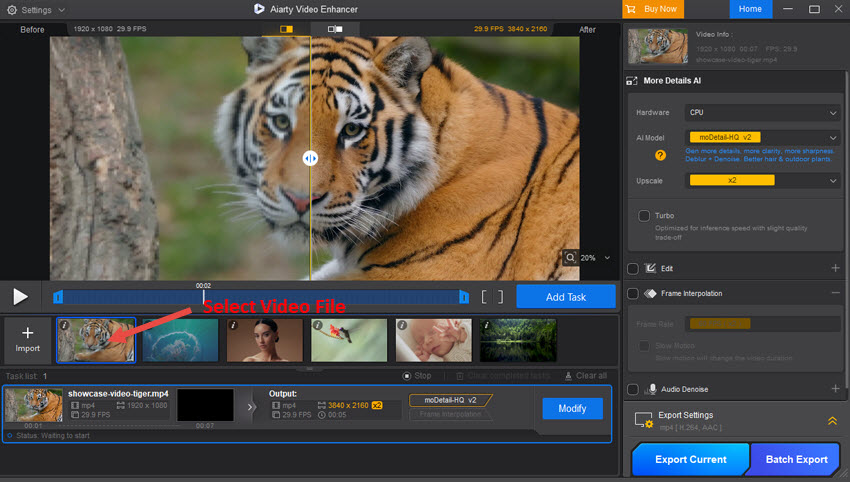
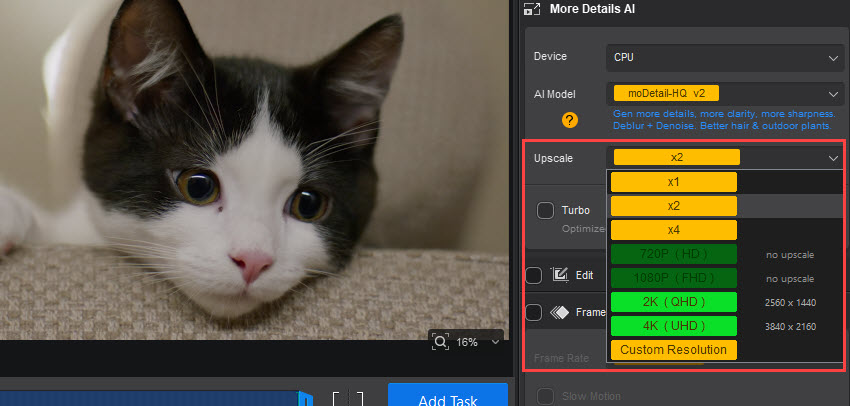
Step 3. In the right panel, choose an AI model, which can ensure to enhance your video when changing aspect ratio.
Step 4. Right below it, choose an upscaling option for your video. If you have no plan for it, simply choose the x1 option.
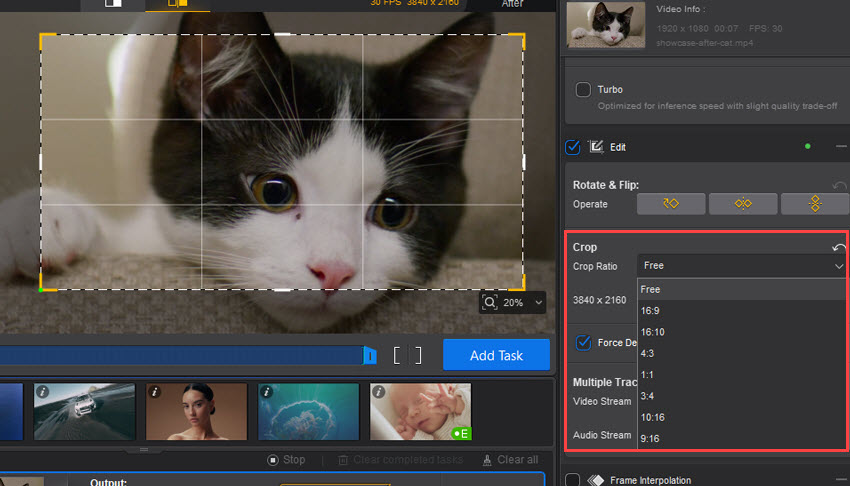
Step 5. Now move to the Edit section. Check it, and then click the Apply Crop button. Under Crop feature, you will a bunch of aspect ratio options in the drop-down menu (e.g., 16:9, 16:10, 4:3, 1:1, 3:4, 10:16, 9:16). Choose one that you prefer or set custom dimensions.
Step 6. Simply click the Export Current or Batch Export button to save your videos.
Conclusion
Changing the aspect ratio in Adobe Premiere Pro is a vital skill for adapting your videos to various platforms and creative requirements. Whether you choose to create a new sequence with a custom aspect ratio or utilize the Auto Reframe Sequence feature to automatically adjust your clips, both methods provide effective ways to ensure your content looks its best.
By understanding these techniques, you can optimize your videos for social media formats like Instagram and TikTok or tailor them to any specific output needs.
You May Also Like
This post was written by Ashley Brown, a videographer turned AI explorer. As an associate writer at Digiarty Software, she dives into the latest AI-powered tools for video enhancement and content creation, offering practical insights and unbiased commentary. Accuracy confirmed by Abby Poole.