How to Upscale Video to 1080P/4K: A Hands-On Guide
Key Takeaways
- What is Video Upscaling: The process of increasing video resolution (e.g., from 1080p to 4K) while preserving or enhancing visual details.
- AI vs. Traditional: Unlike traditional bicubic scaling that simply stretches pixels, AI video upscaling uses deep learning to generate new pixels, fixing blur and noise for a clearer image.
- Best Method: Balancing quality, speed, price, and ease of use, Aiarty Video Enhancer stands out as the top choice for both beginners and pros.
- Quick Steps: Download the video upscaler –> Import your footage –> Select an AI Model –> Choose upscale factor (e.g., 2x, 4x) or output resolution –> Export.
Ever tried watching an old video clip from the 2000s or a VHS rip and thought, "This would look so much better if the resolution were higher"? You're definitely not alone. On Reddit and other forums, people often ask how to upscale old videos — whether it's home movies, low-quality YouTube uploads from the 2010s, vintage documentaries, or digitized DVD or VHS footage. A lot of users want to bring these videos back to life by upscaling them to 1080p, 2K, or even 4K so they look crisp on today’s screens.
Video upscaling isn’t just for old footage, though. Gamers often want to upscale gameplay recordings to higher resolutions, while social media creators may need to improve smartphone or action-cam videos. Whatever the type of footage, the goal is the same: clearer, sharper, and more professional-looking results.
These days, there are tons of video upscaler tools available. In this guide, we’ll take a closer look at four popular options — Aiarty Video Enhancer, VideoProc Converter AI, Topaz Video AI, and Vmake — and show you how to use each one to upscale your videos. We also ran hands-on tests with real footage to see how each tool performs and what kind of results you can expect.
Alright, let’s get started.
What Is Video Upscaling?
Video upscaling is the process of converting a video from a lower resolution, such as 480p or 720p, to a higher resolution like 1080p or 4K. Instead of simply stretching the image, good upscaling methods analyze every frame and try to create additional detail, so the result looks sharper and more natural on modern high-resolution screens.
Think of it this way: when you watch an old DVD on a 4K TV, the video often appears soft or even pixelated because the number of pixels in the source video is far lower than what your screen can display. Traditional upscaling methods used by TVs or players usually just "stretch" the pixels, which can make the picture look blurry.
Modern AI upscaling tools—especially those powered by advanced algorithms—work differently. They examine the textures, edges, and patterns in the original video to guess what extra detail should be there. This approach helps to reduce noise, sharpen edges, and give the video a more realistic look.
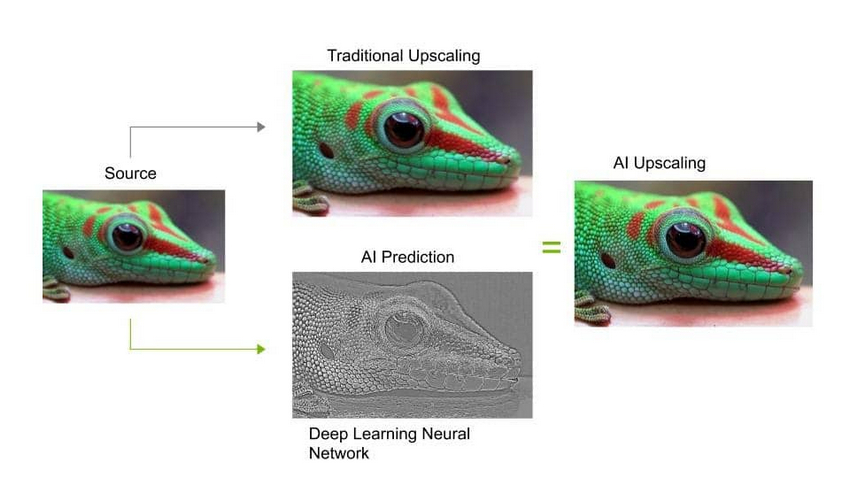
Upscaling won’t magically turn a poor-quality clip into a perfect 4K masterpiece, but with the right tool, it can make older or low-resolution videos look far better on today’s big screens.
How to Upscale Video?
If you’re ready to improve the resolution of your footage, there are several ways to get started. From professional desktop software to quick online solutions, the right method depends on your video quality, the level of detail you need, and your budget. Below, we’ll explore a few practical approaches, beginning with Aiarty Video Enhancer — a powerful yet beginner-friendly option.
Method 1: Upscale Video with Aiarty Video Enhancer
Aiarty Video Enhancer is a powerful desktop tool powered by state-of-the-art AI models. It lets you upscale videos by 2×, 4×, or to a custom resolution like 720p, 1080p, 2K, or 4K—while intelligently removing blur, reducing noise, and restoring fine details. Whether your footage is old, low-res, or AI-generated, Aiarty delivers exceptional clarity, natural texture, and impressive processing speed.
Step 1. Download and install
Download and install Aiarty Video Enhancer by clicking the download button below.
Open the software and click the + button to import your video. You can also drag and drop multiple files for batch processing.
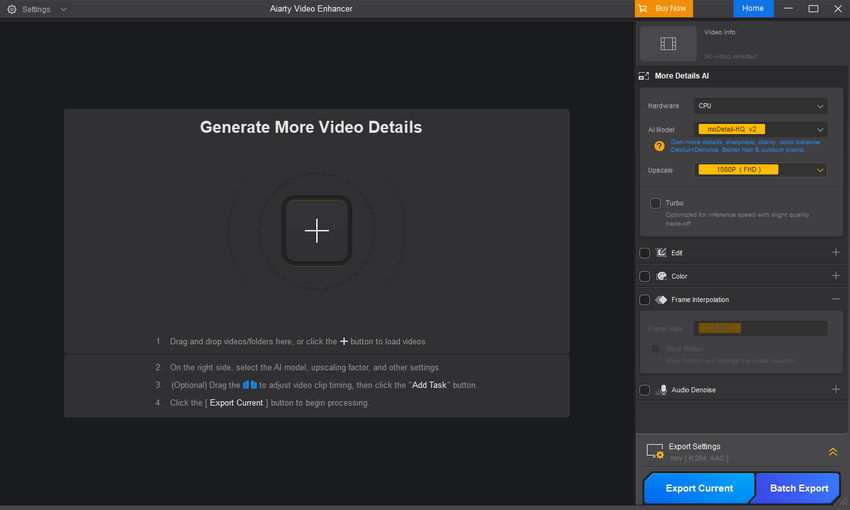
Step 2. Choose an AI model
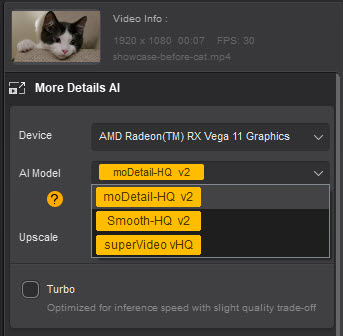
Aiarty offers several models optimized for different scenes:
- moDetail-HQ v3: Combines Diffusion and GAN for high-precision deblurring and denoising. It’s ideal for hair, plants, and daylight nature scenes. Supports 1×, 2×, and 4× upscaling.
- Smooth-HQ v3: Uses Diffusion for smooth and natural results. Best for indoor lighting, faces, and general footage with moderate flaws.
- superVideo vHQ: Designed for extremely dark footage like night skies and cityscapes. Offers top-level denoising and quality (2× only).
Pick the model that best suits your source material. You can always switch later if needed.
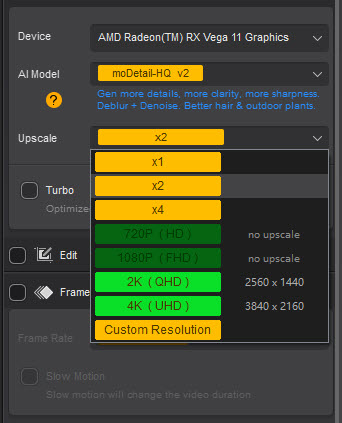
Step 3. Set your upscale resolution
Click the Upscale menu and select 2× or 4×. You can also select a target resolution (e.g. 3840×2160 for 4K).
Tips: For very low-resolution sources (e.g., 480p), sometimes scaling step-by-step (e.g., 2× then another 2×) can yield better final quality than a direct 4× upscale.
Step 4. Preview the result
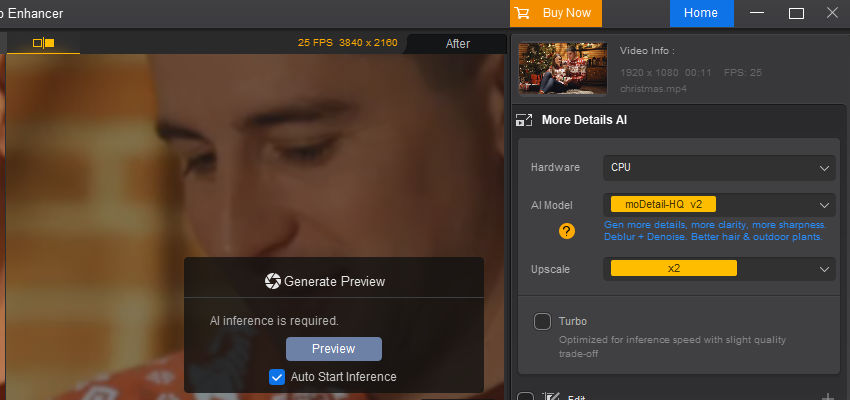
Once settings are configured, click the Preview button. Aiarty will load the model and display Waiting for inference—this usually takes only a few seconds thanks to fast model loading and optimized inference speed. After processing, a real-time preview will be shown. If you're satisfied, move on; if not, here're some tips for you.
Pro-Tip: Fine-Tuning Your Results (Advanced Adjustment)
If you are not entirely satisfied with the real-time preview, or if you are aiming for the absolute best quality, try these three key adjustments before moving on to the final export:
- Quickly Compare AI Models: If the current model doesn't meet your expectations (e.g., if it adds too much texture or insufficient noise reduction), you can rapidly switch to a different model. Simply select another model and click the Preview button again to instantly view the new processing result on the same clip for comparison.
- Balance with Strength Control: Use the dedicated Strength slider to precisely adjust the intensity of the AI enhancement and sharpening effects. Fine-tuning this control is crucial to balance maximum video clarity with a natural, less 'over-processed' look.
- Activate Step Mode for Cleaner Quality: For high-resolution or complex footage, switching to Step Mode is highly recommended. This setting utilizes tiled AI inference, which, although slower than Turbo Mode, significantly enhances visual consistency and produces cleaner, artifact-free results by reducing the load on your GPU memory.
Step 5. Add task and export
Once satisfied, click Add Task to queue the video. Double-check the output settings. When ready:
- Click Export Current for a single video
- Click Batch Export to process multiple files at once
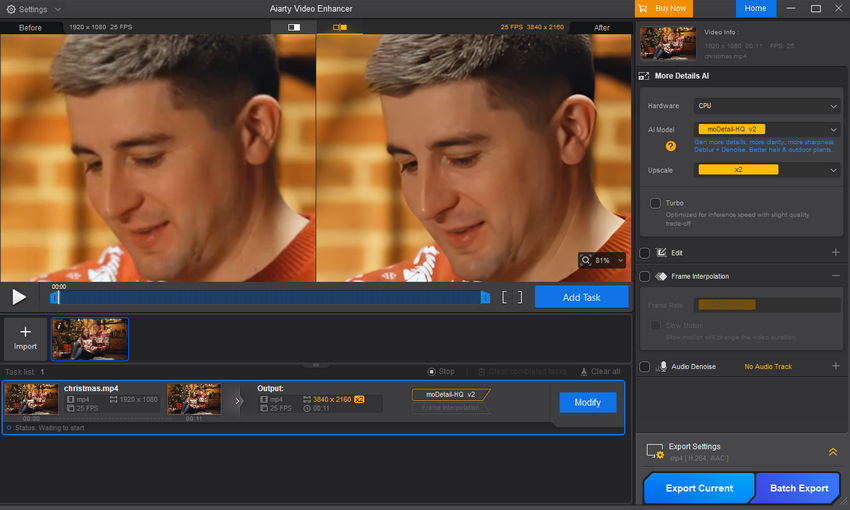
Aiarty’s models are deeply optimized for GPU acceleration—GPU usage can reach up to 95%, enabling much faster processing than similar tools. In tests using the latest RTX 5090 GPU and moDetail-HQ, upscaling from 1920×1080 to 3840×2160 (4K) reached 21.7 FPS, and with Turbo Mode enabled, it jumped to 31.3 FPS. In contrast, similar software only achieved around 7 FPS.
Comparing Video Quality: Before and After AI Upscaling
The image below presents a cropped comparison of the original video and the 4K upscaled video, both reduced to 50% of their size. From this comparison, we can observe that the video quality was not lost after upscaling; instead, it became even clearer.

If you prefer a video tutorial and want to check more test examples, check out this YouTube guide.
Method 2: Upscale Video with VideoProc Converter AI
If you just want something that works — no complicated setup, no heavy system requirements — VideoProc Converter AI is one of the easiest ways to upscale your videos using AI.
This is the tool I usually go to when I’m dealing with old clips from my phone, or grainy footage from a 2008 digital camera. It does video upscaling and enhancing really well.
Step 1. Download and install
Hit the download below to go to VideoProc Converter AI product page and get the setup file.
If you’re unsure whether your computer can handle it, check the tech specs — but compared to most AI video upscalers, this one isn’t too demanding. It runs fine even on average laptops.
For example, I was able to use it on a machine with an Intel® Core™ i5-4460 CPU @ 3.20GHz and 16 GB of RAM without any issues.
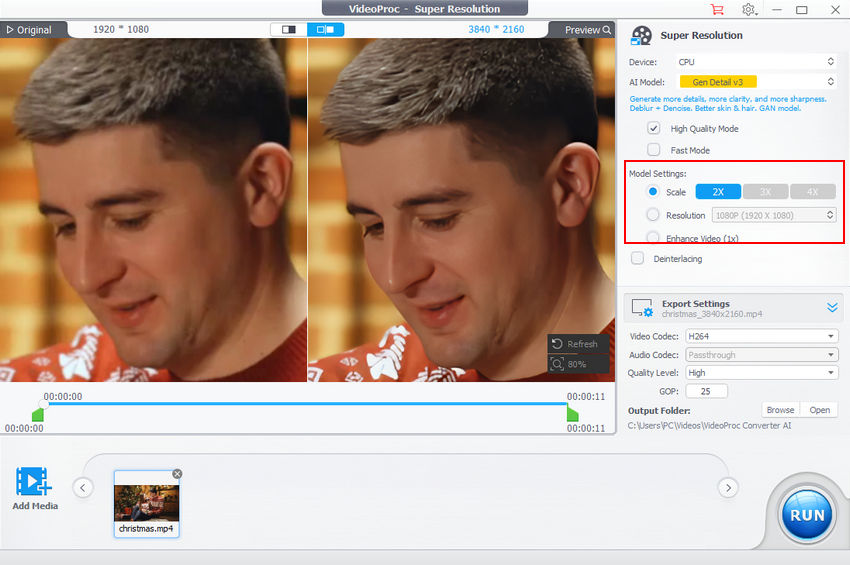
Step 2. Launch the app and go to Super Resolution
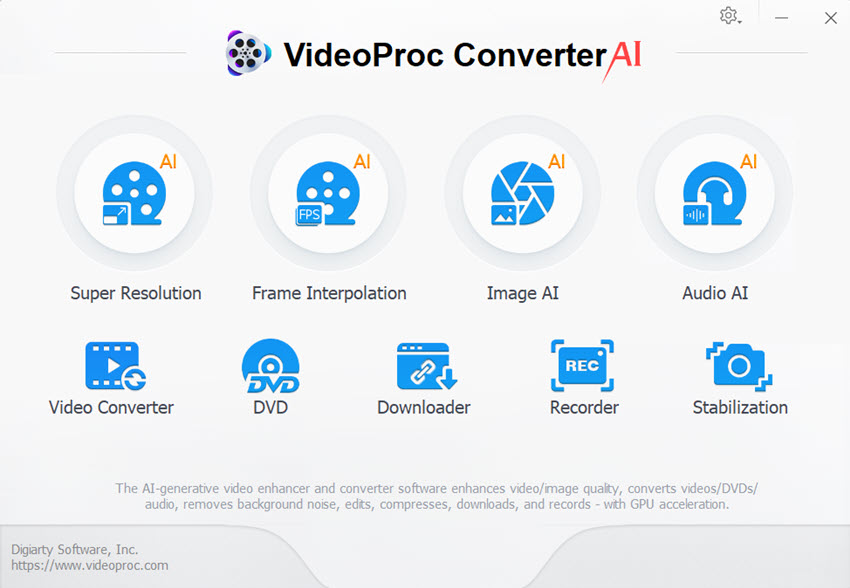
After opening VideoProc converter AI, select the Super Resolution module — this is where the AI video upscaling happens.
Step 3. Import your video
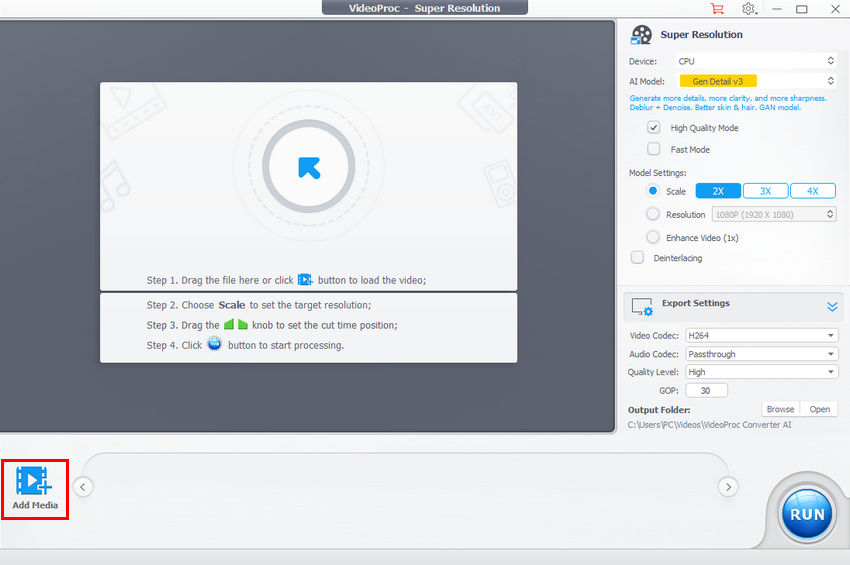
Drag and drop the file, or click the Add Media button. You can load one video or several if you're batch-processing.
Step 4. Choose an AI model
The developers have fine-tuned four AI models for different video types — like low-res clips, anime-style content, or videos with heavy noise. Just pick the one that matches your source best. You don’t need to guess — the names and tips are pretty clear.

Step 5. Tweak the model settings
You can scale the video by 2X, 3X, or 4X — or simply pick a target resolution from the dropdown (e.g. 1080p, 2K, 4K). Go with what fits your screen or project needs.
Step 6. Preview the result
This is one of my favorite parts: the preview window on the left shows how your video will look after upscaling.
Step 7. Adjust export settings and hit RUN
You can tweak bitrate, format, and other export options if needed. Then just click RUN and let the AI do its thing.
Comparing Video Quality: Before and After AI Upscaling

We can see that Videoproc doesn’t just stretch the video — the AI actually tries to recover details and sharpen things up.
Method 3: Upscale Video with Topaz Video AI
Topaz Video AI is one of the most well-known names in the AI upscaling world — especially popular among video editors and restoration hobbyists. It uses advanced machine learning models to sharpen, denoise, and upscale footage with impressive precision. That said, it's not the most beginner-friendly tool out there, and it definitely demands a powerful GPU setup to run smoothly.
Step 1. Download and install the software
You can grab the installer from the official Topaz website. Just make sure to check the system requirements — a high-performance GPU is strongly recommended, or you might run into slowdowns.
Step 2. Launch the App
Open Topaz Video AI and sign in to your account.
Step 3. Import Your Video
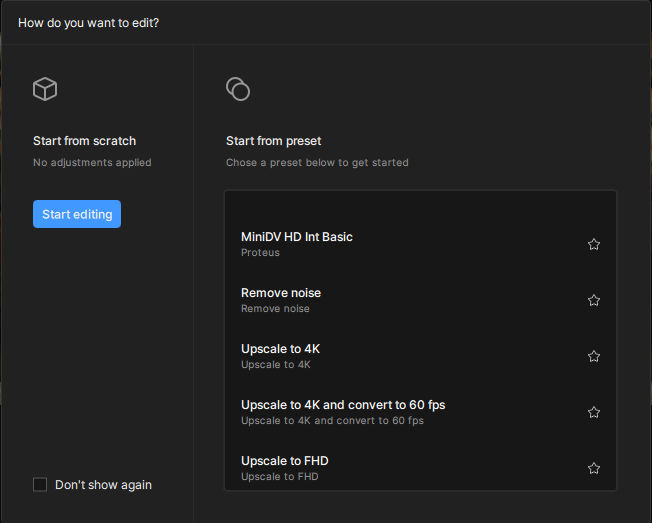
Create a new project and drag your video into the workspace. Then, select a preset, such as "Upscale to 4K".
Step 4. Adjust Settings
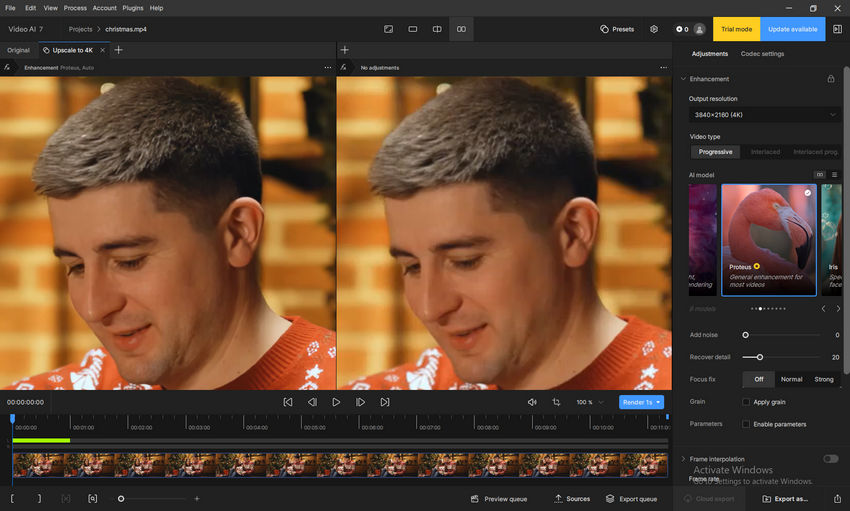
On the right-hand panel, you can specify:
- Output Resolution: Choose a scale factor (e.g., 2X or 4X Upscale), a predefined resolution like 4K, or manually enter a custom resolution.
- Video Type: Select Progressive, Interlaced, or Interlaced Prog.
- AI Model: For general video enhancement, the Proteus model is recommended.
- Parameters: Enable and fine-tune parameters according to your specific needs.
Step 5. Preview the Result
Click Render to generate a preview. You can choose how much of the video to render (e.g., 5 frames, 1s, 2s, or 5s).
Keep in mind, this step can be time-consuming — for example, rendering a 5-second video took approximately 11 minutes and 21 seconds during testing.
Step 6. Export the Upscaled Video
Once you’re happy with the preview, click Export as or Quick export to finalize and save your video.
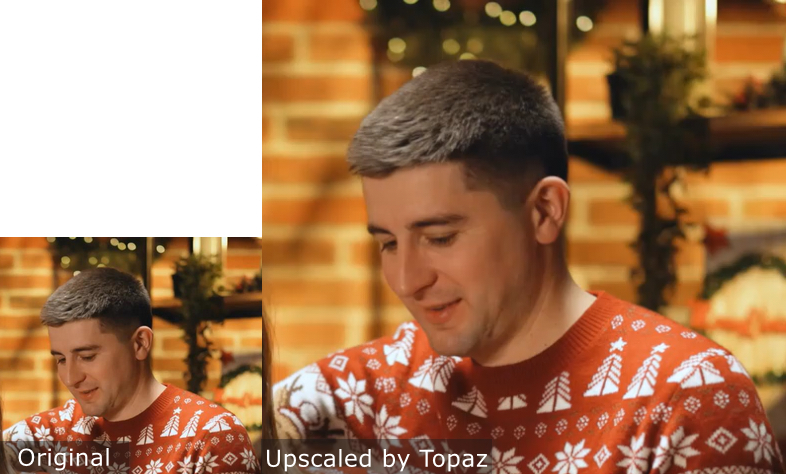
Comparing Video Quality: Before and After AI Upscaling
For this particular example, I used Topaz Video AI with the Proteus model and default settings. While the clarity of the upscaled result is somewhat less impressive compared to what I've seen from Aiarty Video Enhancer and VideoProc, it's still quite acceptable. Crucially, when compared to the original video, there's no noticeable loss in quality.
Method 4: Upscale Video Online with Vmake
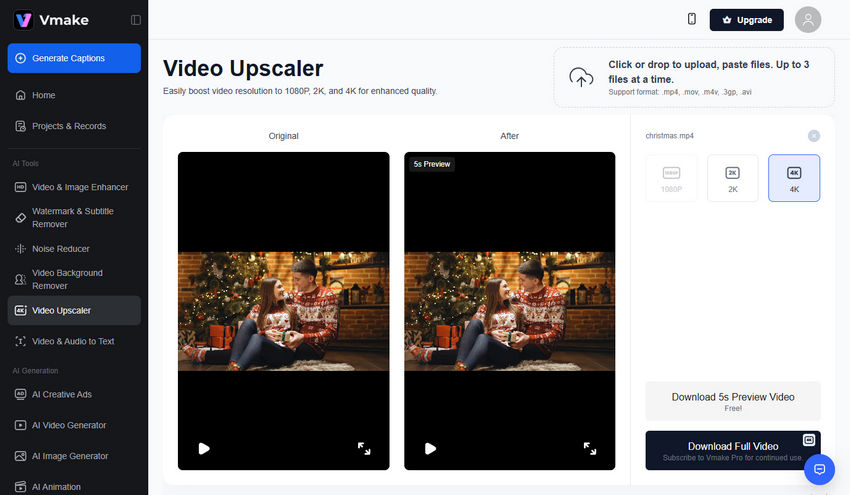
If you're looking for a quick, no-install way to upscale a video, Vmake Video Upscaler is one of the few online tools that actually work. It's super simple to use — just upload your clip, pick a target resolution (1080p, 2K, or 4K), and let the AI do the magic.
That said, there’s a catch: in the free version, you can only export 5 seconds of video. So it’s more of a preview tool unless you're okay with short clips or plan to upgrade.
Step 1. Go to the official Vmake Video Upscaler page
No download needed — it runs entirely in your browser.
Step 2. Upload your video
Drag and drop your file, or click to browse. It supports common formats including MP4, MOV, AVI, M4V and 3GP.
Step 3. Choose your upscale target
You’ll see options for 1080p, 2K, or 4K. Just pick one depending on your needs.
Step 4. Wait for processing
The AI takes a moment to analyze and enhance the video. You’ll see a preview once it’s done.
Step 5. Download the result (up to 5 seconds)
With the free plan, you can export a short 5-second clip to check the quality. For full-length exports, a subscription is required.
Comparing Video Quality: Before and After AI Upscaling
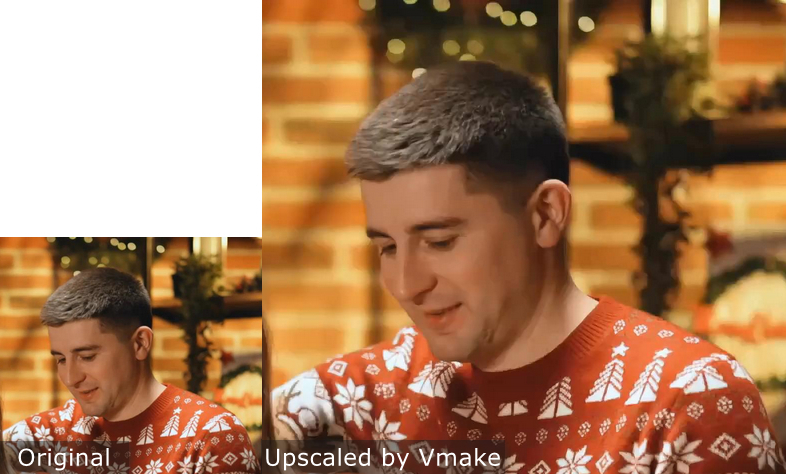
As you can see, the quality isn’t as sharp as what we got from Aiarty Video Enhancer, VideoProc and Topaz — the image still looks quite blurry in comparison. However, if you want to upscale video online, you can give it a try.
Which Video Upscaler Should You Use?
Not sure which tool to pick for your video upscaling needs? Here’s a quick side-by-side comparison of four popular options — Aiarty Video Enhancer, VideoProc Converter AI, Topaz Video AI, and Vmake Video Upscaler. We’ve looked at their pros and cons, pricing, supported platforms, speed, quality, and more, so you can easily decide which one fits your workflow and budget.
Why Does Video Upscaling Take So Long?
If you’ve ever tried AI video upscaling, you’ve probably noticed that the process can take hours, especially for longer clips. This is because upscaling isn’t just about stretching pixels. Modern AI tools analyze every single frame, predict missing details, and rebuild textures to make the video look sharper and more natural.
Several factors affect how long it takes:
Video Length and Resolution
A 10-second 720p clip might upscale to 4K in minutes, but a 30-minute video could take hours because every frame must be processed individually.
AI Model Complexity
AI-powered enhancers use deep learning models that require heavy computation. More advanced models—those designed to reduce noise, sharpen faces, or restore details—naturally require more time.
Hardware Limitations
Your computer’s CPU and GPU have a huge impact. A high-end graphics card (e.g., NVIDIA RTX series) can speed up upscaling dramatically, while older hardware may struggle.
Additional Filters or Effects
If you apply extra enhancements like stabilization, color correction, or de-noising during upscaling, the processing time will increase.
Output Resolution and Bitrate
Upscaling from 720p to 1080p requires far less computation than pushing the same video to 4K or beyond. Higher bitrates and complex codecs also add to the rendering time.
To avoid excessive waiting times, consider using a powerful GPU, closing unnecessary apps, or splitting long videos into smaller segments. Choosing lighter AI models or skipping unneeded filters can also help.
What to Avoid When Upscaling Video
While upscaling can breathe new life into older or low-resolution footage, there are a few common pitfalls to steer clear of:
Pushing the resolution too far
Upscaling a 480p clip directly to 8K often introduces artifacts or overly smooth textures. Instead, aim for a reasonable jump (e.g., 1080p to 4K) to maintain a natural look.
Ignoring the source quality
Upscaling can’t fix extremely compressed or heavily pixelated videos. If the base quality is too poor, the final output may still look bad despite higher resolution.
Skipping preview checks
Always review a short preview segment before processing the entire video. This saves time and ensures you’re happy with the chosen settings.
Why Aspect Ratio is Critical for Video Upscaling
When upscaling video, aspect ratio (the proportional relationship between width and height, e.g., 16:9, 4:3, 9:16) is just as important as resolution. Ignoring it is the #1 cause of distorted (stretched or squashed) videos or unwanted black bars (letterboxing/pillarboxing) after upscaling.
Common Aspect Ratios:
- 16:9: Standard for HD (1280×720), Full HD (1920×1080), 4K UHD (3840×2160) — TVs, YouTube, modern video.
- 4:3: Standard Definition (SD), old TV shows, vintage camcorders (e.g., 640×480).
- 9:16: Vertical video for smartphones (e.g., 1080×1920).
- 21:9: Ultra-widescreen cinematic format.
- 1:1: Square format, common for social media previews.
So, if you’re working with a video whose aspect ratio doesn’t match your target resolution (for example, upscaling a 4:3 DVD to 16:9 HD), the upscaler has to decide how to handle it. Default settings often lead to stretched images or excessive black bars.
Modern AI upscaling tools usually offer two ways to handle mismatched ratios:
- Maintain Original Aspect Ratio — Safest option; black bars are added to preserve the original composition without distortion.
- Crop — Fills the frame by trimming edges; may remove important parts of the video.
Avoid using "stretch" or "fit to frame" options, as these distort the image. Always check your upscaler’s aspect ratio settings before processing.
 FAQs
FAQs
To upscale a video to 4K, you'll need a tool that supports resolution enhancement. All the video upscalers we recommended here let you select 4K as the target resolution directly. Just import your video, choose 4K in the resolution settings, and export. The better the original quality, the better the 4K result.
Yes, but there are usually some trade-offs — like time limits, watermarks, or restricted output quality. For example, Vmake lets you upscale videos for free, but only up to 5 seconds. Topaz Video AI offers a free trial, but the output will have a watermark. Aiarty Video Enhancer allows you to process up to 120 seconds of video for free, with all AI features available during the trial. VideoProc Converter AI allows free processing for videos up to 5 minutes, with no watermark, which is a good option if you're just testing things out.
You can search for "online video upscaler" and find several browser-based tools. In this article, we featured Vmake, which lets you upload your video, pick a resolution (1080p, 2K, or 4K), and let the AI handle the rest. Once it’s done, you can preview and download the result.
That said, online upscalers aren’t for everyone. On platforms like Reddit, many users mention they don’t feel comfortable uploading personal or sensitive videos to the cloud due to privacy concerns. Upload and download speeds can also be a pain, especially with large files. If you’re dealing with private footage or just want more control and faster processing, a desktop tool like VideoProc Converter AI might be a better choice — everything happens locally on your computer.
Upscaling without losing quality is all about using the right tool. Traditional methods (like simply stretching resolution in an editor) can make your video look soft or pixelated. AI-powered tools are much better at preserving — or even improving — detail during upscaling.
For example, apps like Aiarty Video Enhancer and Topaz Video AI use trained AI models to intelligently enhance sharpness, reduce noise, and recover textures while increasing resolution. These tools don’t just blow up the image — they analyze frame-by-frame content to make the output look more natural on 1080p, 2K, or 4K displays. So, if you're aiming for the best quality, go with AI-based upscalers rather than manual resizing.
In DaVinci Resolve, you can upscale by setting a higher timeline resolution (like 4K) and enabling the “Scale image to fit” or “Scale image to fill” option in your clip inspector. For better quality, use the "Super Scale" feature under the clip's settings — it applies AI-like enhancement for cleaner results.
Upscaling in Premiere Pro is straightforward: drop your low-res video into a 4K sequence, then right-click the clip > "Set to Frame Size". For better quality, apply sharpening or third-party plugins. You can also export in 4K resolution via the export settings.
In Final Cut Pro, create a project with a higher resolution (e.g. 4K), then insert your lower-res video. FCP will automatically scale the video to fit. For better quality, you can add sharpening effects or use Motion plugins that simulate AI enhancement.
In After Effects, import your video and create a composition with 4K settings. Scale up the footage, then apply effects like "Detail-preserving Upscale" or use third-party plugins like Red Giant or Topaz Video Enhance AI via Dynamic Link for more refined results.
Check detailed guide on how to upscale video in After Effects >>


