


How to Upscale Video in After Effects: 3 Proven Methods



As the industry standard for compositing and visual effects, After Effects is naturally a go-to choice for upscaling video. However, simply scaling up a low-resolution clip on a 4K timeline usually results in a soft or pixelated image. This isn't a flaw in the software—it is simply the reality of stretching a limited number of pixels over a larger canvas.
The good news is that After Effects provides specific built-in tools and effects designed to handle resizing while minimizing quality loss. Whether you need a slight bump in resolution or are trying to integrate older 720p footage into a modern project, there are proper workflows to maintain as much detail as possible. Here is a breakdown of the best methods to scale your footage correctly inside AE.
How to Upscale Video in After Effects
Method 1: Basic Scale and Composition Settings
This is the simplest way to enlarge your video inside After Effects, and most people start here. The idea is straightforward: you increase the composition size to your desired resolution, then scale up your video layer to fill that space.
How to do it:
Step 1. Open your After Effects project and go to Composition > Composition Settings. Change the width and height to your target resolution — for example, from 1920×1080 (Full HD) to 3840×2160 (4K).
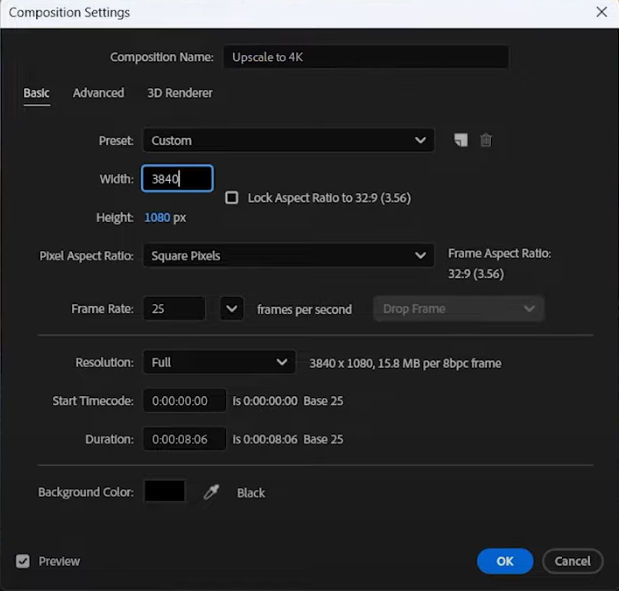
Step 2. Back in the timeline, select your video layer and press the S key to bring up the scale controls.
Step 3. Increase the scale percentage until your footage fills the new composition size. Usually, doubling the scale means setting it to 200%.
You might want to move or crop parts of the video if it doesn’t fit perfectly, but usually, scaling up is enough for a quick resize.
When to use it: This works okay if your footage is close to your target size or if you’re fine with some softness. It’s also handy if you just need a quick resize and don’t have fancy tools or plugins.
What to watch out for: Because this method just stretches pixels, the image often looks blurry or blocky once scaled too much. No magic detail is added — just bigger pixels. So if you blow up a small clip too much, it will lose clarity and look rough.
Method 2: Use the Detail-preserving Upscale Effect
If you want something a bit smarter without extra plugins, After Effects has a built-in effect called Detail-preserving Upscale. It tries to keep edges sharp and reduce blur when scaling.
How to do it:
Step 1. Find the Effects & Presets panel inside After Effects and type “Detail-preserving Upscale” in the search box.
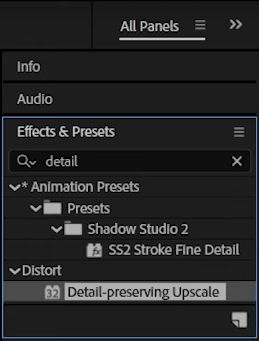
Step 2. Drag the effect onto your video layer in the timeline.
Step 3. In the effect controls panel, set the scale percentage to your target size, like 200%.
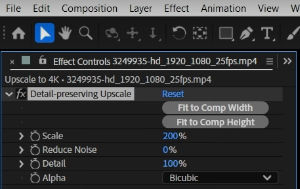
Step 4. Adjust the sliders for Reduce Noise and Detail to find a balance between sharpness and smoothness that works for your clip.
Pro Tip for AE Users: Before you move on, click the Quality and Sampling switch on your video layer in the timeline and set it to Bicubic (the icon with a curved line). This tells After Effects to use a slightly better algorithm than the default Bilinear scaling. It won't magically add missing details, but it prevents the edges from looking overly jagged during a basic scale.
When to use it: It works best on footage that’s not too low-res to begin with and when you want to keep some crispness while scaling up.
What to watch out for: It’s not perfect—some blurriness or mild artifacts might remain, especially with really small or noisy videos.
Method 3: Use Third-party Plugins (Optional)
For people who want serious quality boosts, third-party plugins are the way to go. These tools often use advanced algorithms or AI to improve sharpness, reduce noise, and upscale intelligently.
Popular options include:
- Red Giant Instant 4K: A plugin designed specifically to upscale footage smoothly and maintain detail. It’s popular among editors who want quick, high-quality results without leaving AE.
- RE:Vision Effects’ Super Resolution: Another solid choice that reconstructs details frame by frame, often producing cleaner upscales.
Step 1. Choose a plugin like Red Giant Instant 4K or RE:Vision Effects’ Super Resolution that fits your needs and budget.
Step 2. Install the plugin according to the developer’s instructions and restart After Effects if necessary.
Step 3. Apply the plugin effect to your video layer and use its controls to upscale with better quality than AE’s native tools.
These plugins use advanced algorithms or AI to add detail and sharpen images while upscaling.
When to use it: Great for professionals or anyone needing high-quality results inside After Effects without switching apps. But for quick or occasional use, they might be overkill.
What to watch out for: They usually cost money, might slow down your workflow due to longer render times, and take some time to learn for best results.
When You Need Something Faster and Sharper
After Effects can do a decent job upscaling if you know your way around its settings, and plugins can push it even further. But sometimes you just want a quick way to turn soft, low-res footage into something that actually looks watchable without spending hours fine-tuning sliders.
In moments like this, Aiarty Video Enhancer can save you a lot of trouble. Aiarty utilizes advanced AI models to intelligently restore natural clarity. It effectively removes compression artifacts and noise while upscaling, delivering a clean, crisp result that stays true to your original footage—without that artificial, over-processed look.
You just drop in your clip, pick your target resolution, and let it process. You’ll quickly get a cleaner, sharper file that’s ready to go back into After Effects for any creative work you want to add.
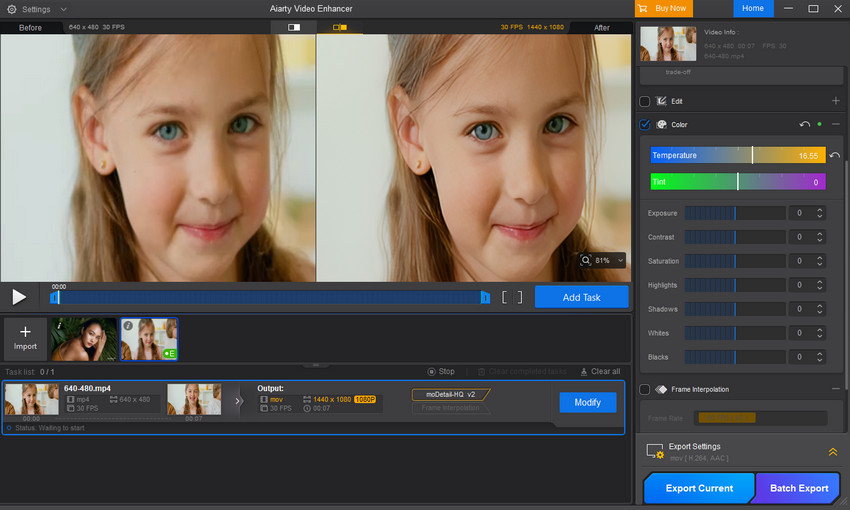
Some editors even run all their footage through Aiarty Video Enhancer first, then bring them into After Effects for compositing and effects work later. Starting with a better-looking source means you can scale less inside AE, avoid unnecessary pixelation, and even shorten render times.
If you’re curious, you can try Aiarty Video Enhancer for free and see how it compares to AE’s built-in upscaling. Worst case, you save yourself a lot of time; best case, you get footage that looks like it was shot in a much higher resolution.
Final Thoughts on Upscaling Workflows
Upscaling video in After Effects ultimately comes down to your specific project needs. For minor resolution bumps or quick adjustments, AE’s native scaling and Detail-preserving tools are completely capable of keeping your footage intact without leaving the application.
However, if you are dealing with significant upscales—such as bringing legacy 720p footage into a modern 4K timeline—native interpolation will eventually show its limits. In these cases, pre-processing your clips with a dedicated AI video upscaler like Aiarty is the most efficient route. It restores natural clarity and eliminates noise before the edit, ensuring you don't tax your CPU with heavy rendering tasks during compositing.
Ultimately, a clean, high-resolution source file is the foundation of any good composite. Choose the method that best balances your required visual quality with your timeline performance.
| Feature / Dimension | AE Basic Scale (Transform) | AE Detail-Preserving Upscale | Premium AE Plugins | Aiarty Video Enhancer |
|---|---|---|---|---|
| Visual Quality | Soft and pixelated on extreme upscales. | Keeps edges sharp, but may amplify existing noise. | Excellent; generates real details using AI. | Excellent; restores natural clarity and removes noise. |
| Timeline Performance | Lightning Fast (Zero lag during playback). | Moderate Lag (Can slow down preview and rendering). | Very Slow (Heavy timeline lag; requires pre-rendering). | Lightning Fast in AE (Upscaling is done before importing). |
| Hardware Demands | Very Low | Moderate | Very High (Requires powerful GPU/VRAM). | Moderate (Runs independently outside of AE). |
| Best Use Case | Slight resizing (e.g., fitting 1080p to a 4K comp roughly). | Moderate upscales where sharp edges are enough. | Professional workflows requiring strictly in-app processing. | Automated, artifact-free upscaling |
| Cost | Included with AE | Included with AE | High ($199 - $299+) | Free Trial / 1-year / 1PC plan: $79; lifetime / 3 PCs plan: $165 |
 FAQ about Upscaling Video in After Effects
Technically, standard scaling in After Effects (or any NLE) will always result in some quality loss because it stretches existing pixels using Bilinear or Bicubic interpolation. To minimize this, use AE's built-in Detail-preserving Upscale effect, which intelligently maintains edge sharpness.
For more extreme upscales (like 720p to 4K), native tools have their limits. In those cases, using a dedicated AI upscaler before importing into AE is the industry standard for maintaining true visual quality without adding noise.
This usually happens when there is a mismatch between your source footage resolution and your Composition Settings. If you drop a 1080p clip into a 4K comp and scale it up to 200%, After Effects has to fill in the missing pixel data, resulting in a soft or blurry look.
To slightly improve this natively, ensure your layer's Quality and Sampling switch is set to Bicubic (the curved line icon) instead of Bilinear. Also, check your output module settings in the Render Queue to ensure you aren't accidentally exporting at a lower resolution or bitrate.
Yes. If you don't want to use paid plugins or external AI software, you can combine a few native effects. Apply the Detail-preserving Upscale effect to handle the resizing, and then add a subtle Unsharp Mask or Lumetri Color (adding a bit of contrast and sharpening) to make the footage pop.
This native method works reasonably well for slight upscales (e.g., 1080p to 1440p), though it cannot reconstruct complex missing textures like skin details or text.
For the best performance, it is highly recommended to upscale before bringing the footage into After Effects (a process known as pre-processing). After Effects is heavily dependent on RAM and CPU.
Applying heavy upscaling effects or third-party plugins directly on your timeline can cause severe preview lag and drastically increase your final render times. Upscaling your clips externally first gives you a clean, full-resolution ProRes or MP4 file, resulting in a much smoother and faster compositing workflow inside AE.
You May Also Like


This post was written by Brenda Peng who is a seasoned editor at Digiarty Software who loves turning ordinary photos into extraordinary works of art. With AI assistance for brainstorming and drafting, the post is reviewed for accuracy by our expert Abby Poole for her expertise in this field.
