Quick Answer: Resize Photos on Mac
You can resize photos on Mac using tools like Preview for quick edits, Quick Actions for batch resizing, and Photoshop for more advanced control. If you need to resize photos on Mac without blur, use Aiarty Image Enhancer for the best quality.
Resizing photos on a Mac sounds simple, until your image turns blurry. Whether you're trying to upload images faster, fit photos for social media, resize pictures for printing, or batch resize multiple files, Mac tools like Preview and Quick Actions can handle basic resizing with ease. But things quickly get frustrating when you need to resize a photo larger on Mac because instead of adding detail, most tools just stretch pixels, leaving your photo soft and jagged.
In this guide, you’ll learn how to resize photos on Mac for different needs, and more importantly, how to resize photos without blur on Mac using smarter tools like Aiarty Image Enhancer and more.
How to Resize a Photo on Mac with Built-in Tools
How to Resize a Photo on Mac with Preview
If you just need a quick way to resize a photo on Mac, Preview is the easiest built-in tool to use. It comes pre-installed on macOS and lets you change image dimensions or resolution in just a few clicks, no extra software required.
Steps to Resize A Photo in Preview:
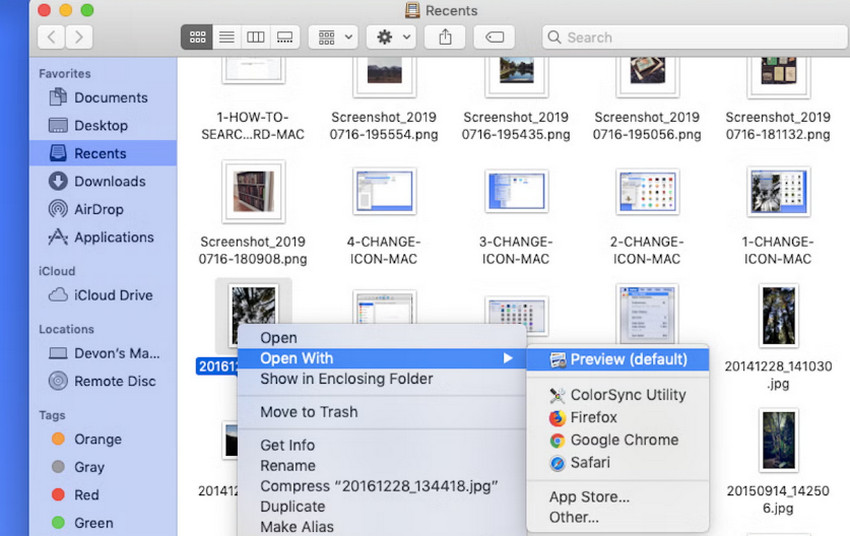
Step 1. Open the image in Preview. Double-click the image (Preview is the default viewer), or right-click → Open With → Preview.
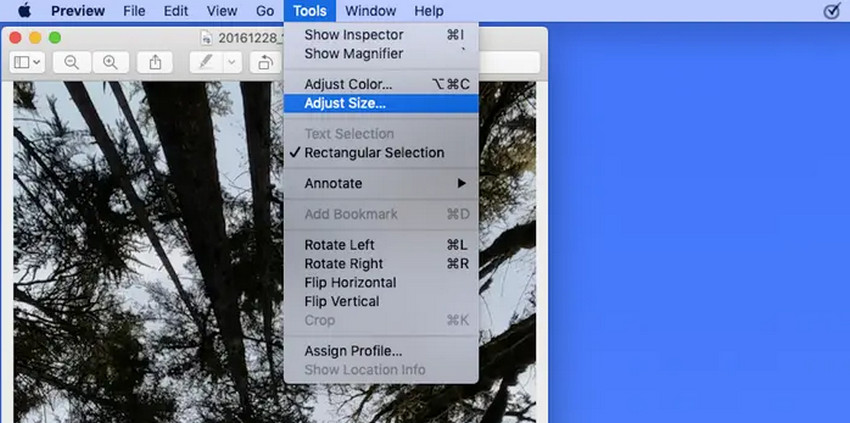
Step 2. Go to the resize panel. Click Tools in the top menu, and select Adjust Size.
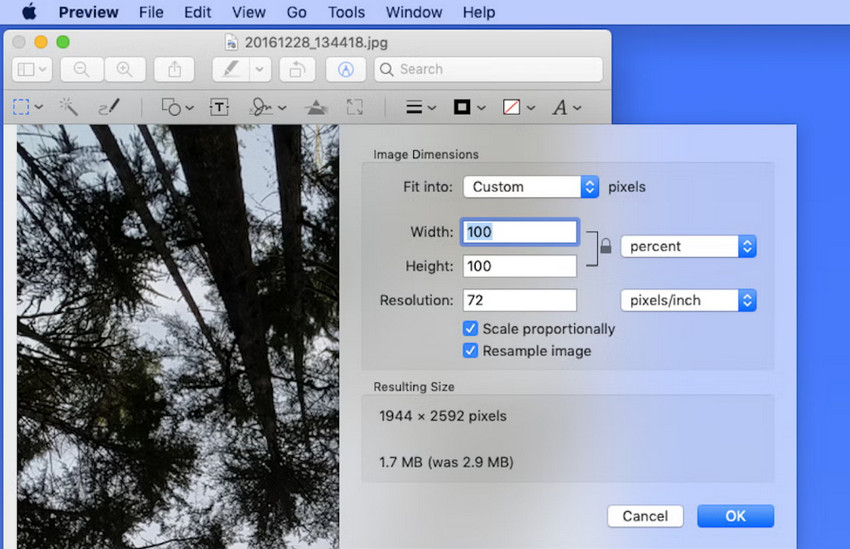
Step 3. Enter new dimensions. Input your desired width and height (pixels, inches, etc.). Keep “Scale proportionally” checked to avoid distortion, and optionally adjust Resolution (DPI) for printing.
Step 4. Apply changes and save. Click OK, Go to File → Save or Export to create a resized copy.
Best for: Preview is best for quick and simple resizing, reducing image dimensions or file size, and making basic adjustments without installing any extra tools.
Limitations:
- Enlarging images often leads to blur and pixelation.
- No intelligent detail enhancement.
- Not ideal for high-quality upscaling.
In short, Preview works great when making images smaller, but if you need to resize a photo to a larger resolution without losing quality, you’ll need a more advanced solution, which we’ll cover below.
How to Resize Photos on Mac with Quick Actions (Batch Resize)
If you often resize photos, macOS makes it simple. Using Automator, you can create a custom Quick Action that resizes multiple images at once. You can just select your photos in Finder and run the action for fast, batch processing without opening each file. It's perfect for batch processing photos for social media, email, or web use.
Steps to Resize Images Using Quick Actions:
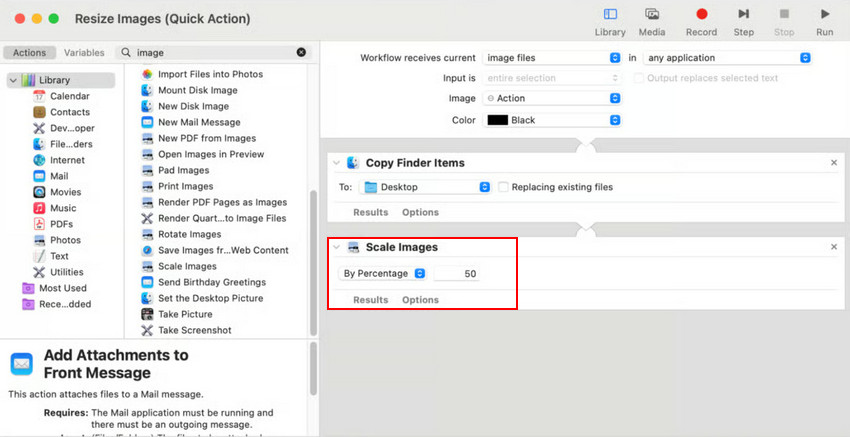
Step 1. Open Automator (Finder → Applications → Automator) and create a Quick Action that receives image files. Add the Scale Images action and set your preferred resizing method (pixels or percentage), then save the workflow.
Step 2. Select multiple images in Finder. Click and drag, or hold Command (⌘) and click to select individual files. Right-click on the selected images → choose Quick Actions → Resize Image.
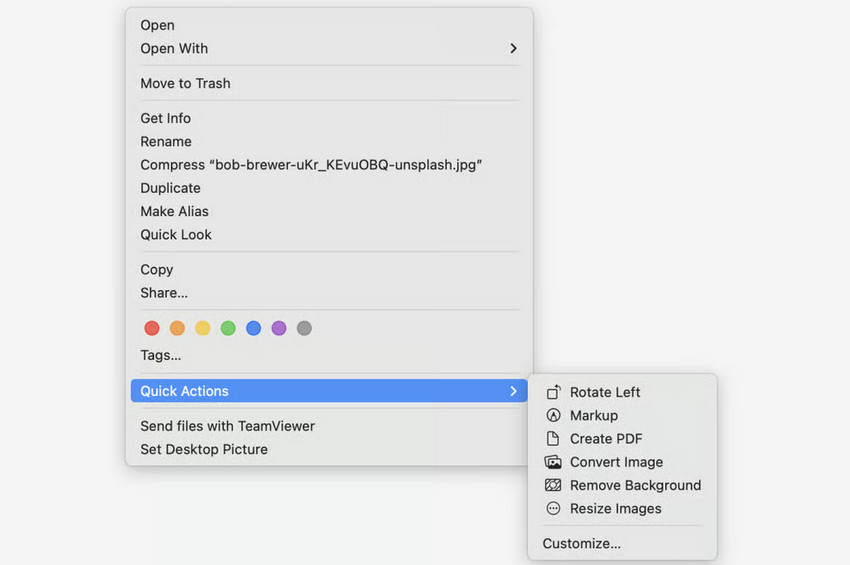
Step 3. Choose size and save. Pick a predefined size (Small, Medium, Large) or enter custom dimensions; Quick Actions will then create resized copies or overwrite the originals based on your settings.
Limitations:
- Customization options are limited.
- No quality improvement option.
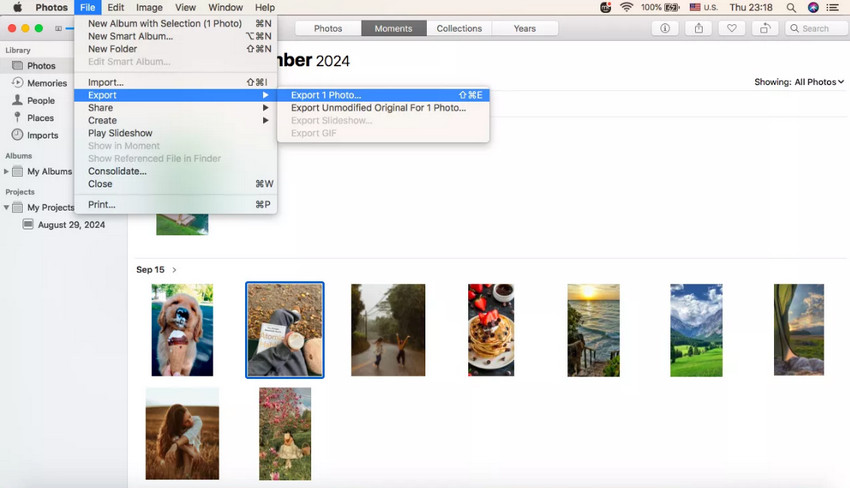
How to Resize Images on Mac in Photos App
If you use a Mac, the built-in Photos app lets you resize images when exporting them. Served as a photo editor on Mac, Photos is convenient if you want to share photos online, reduce file sizes, or prepare images for email, while keeping your Apple photo library organized.
Tutorial to Resize Images in Photos App:
Step 1: Open the Photos app on your Mac.
Step 2: Select the image(s) you want to resize.
Step 3: Go to the menu bar and click File → Export → Export [number] Photos…
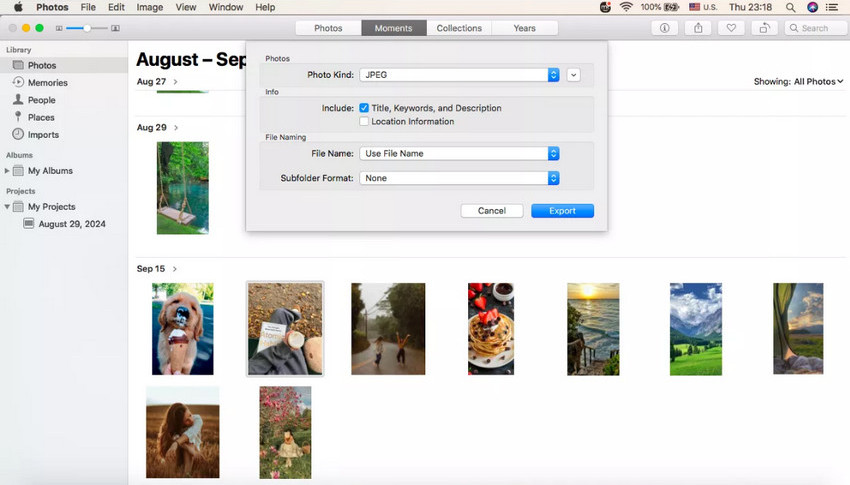
Step 4: In the export dialog, choose your preferred:
- Photo Kind: JPEG, PNG, or TIFF
- Quality: Low, Medium, High, or Maximum
- Size: Small, Medium, Large, or Custom (specify pixel dimensions)
Step 5: Click Export and choose the destination folder.
Best for: resizing photos while keeping your Apple photo library organized.
Limitations:
- Only resizes during export; original photos remain unchanged.
- Limited control over advanced compression or sharpening.
- No batch renaming or automated resizing presets beyond the export options.
Have you ever noticed that after cropping or resizing a photo on Mac using built-in tools like Preview or Photos, the image can become blurry, soft, or distorted? Cropping removes part of the original image data and pixels, while enlarging a photo stretches existing pixels without creating new detail. As a result, you may see blurred textures, jagged edges, reduced sharpness, or overall quality loss after resizing.
Many Mac users wonder if it’s possible to resize photos without losing quality. The short answer is yes, but not with traditional tools alone. To preserve or restore image quality during resizing, AI-based image enhancement tools are far more effective. That's where AI tools like Aiarty Image Enhancer come in.
Want to resize photo on Mac without blur? Download Aiarty Image Enhancer to resize photos after upscaling with decent details in seconds.
Aiarty Image Enhancer: Resize Photos on Mac Without Losing Quality
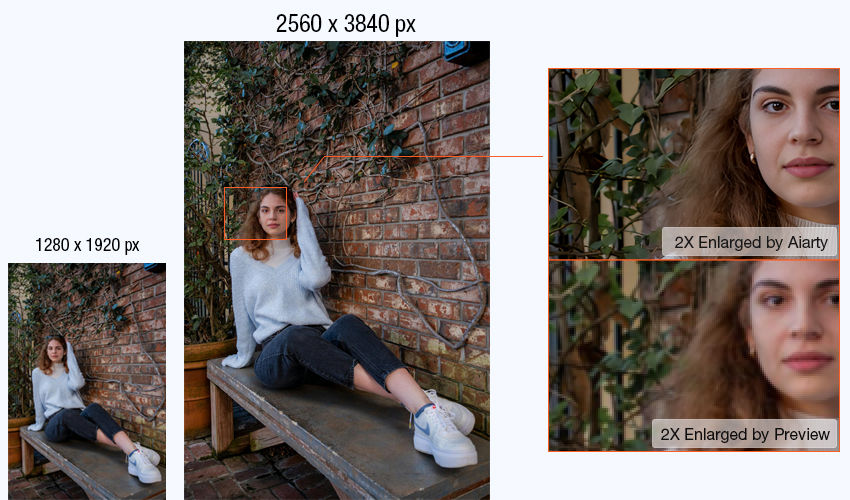
Aiarty Image Enhancer uses advanced AI technology to analyze image content and intelligently rebuild details, instead of simply stretching or compressing pixels like traditional tools. This makes it possible to resize photo on Mac without introducing blur, jagged edges, or loss of sharpness—something built-in apps often struggle with.
Whether you're learning how to resize a photo on Mac for printing, social media, or professional use, Aiarty provides a smarter and more reliable solution. It supports both upscaling and downscaling, allowing you to enlarge low-resolution images or reduce file size while preserving clarity, texture, and overall image quality.
What You Can Benifit from Aiarty Image Enhancer:
- Get sharper, clearer photos with enhanced details using advanced AI models.
- Crop photos to any aspect ratio while maintaining enhanced image quality and sharp details.
- Resize images to any resolution, from 1K to 32K or custom sizes, for printing, sharing, or professional use.
- Enlarge photos (1x, 2x, 4x, 8x) without blur or pixelation, keeping edges clean and natural.
- Process multiple images at once to quickly resize large batches and save time.
- Restore and improve faces while enjoying fast performance with GPU acceleration for a smoother workflow.
How to Resize Photos on Mac Without Losing Quality
Step 1: Launch Aiarty Image Enhancer on Mac
Download and launch the software on your Macbook Air/Pro, iMac, or Mac Mini.
Step 2: Import Your Image
Drag and drop your photo into Aiarty Image Enhancer to start. This is the first step if you want to resize or enlarge a photo on Mac without losing quality or introducing blur.
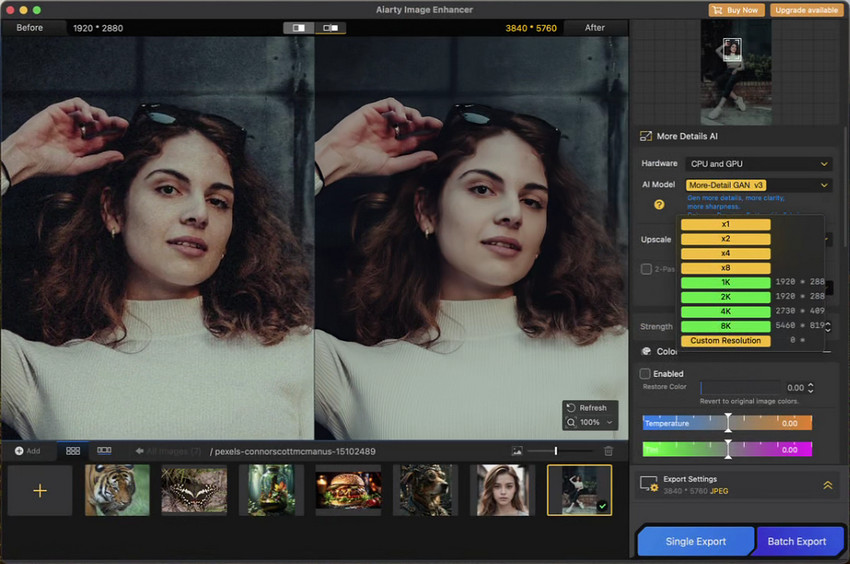
Step 3: Resize the Photo Size Based on Your Needs.
Enable the Edit option, and click on the Adjust Crop button. Now you can choose a Crop Ratio depending on your final use. When you're done, click on the Apply Crop to resize the photo size.
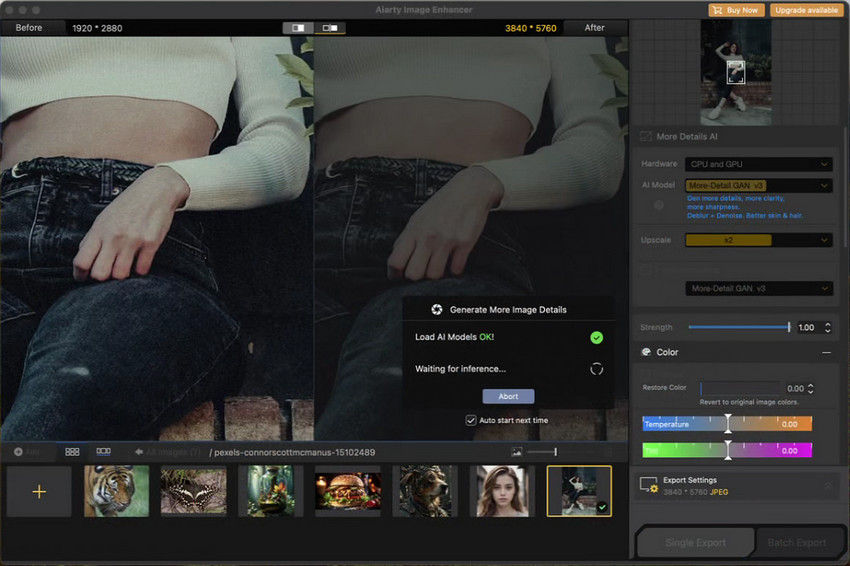
Step 4: Enhance the Photo Quality After Resizing.
Choose the most suitable AI model based on your image type, and determine the Upscale level as needed. Then click on the Start button and wait. This will help compensate for quality loss caused by cropping, reducing blur and preserving more visible detail during enlargement.
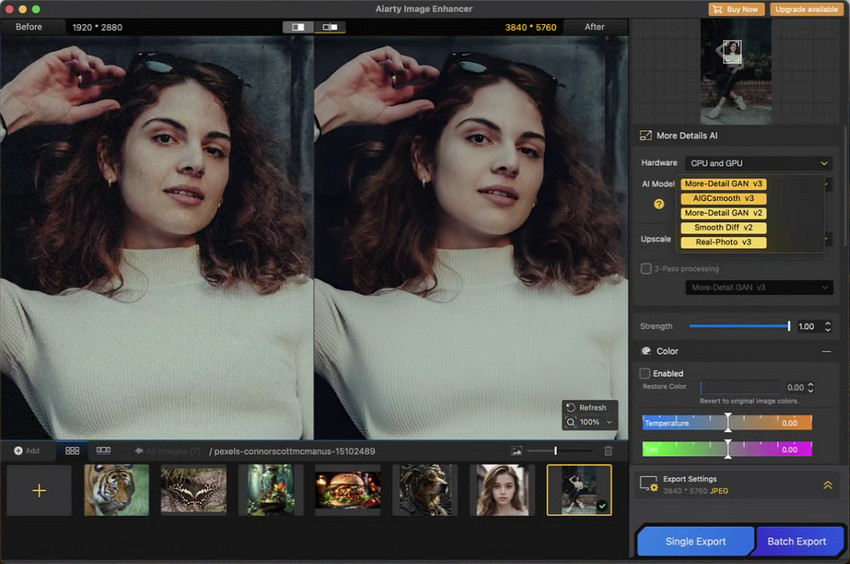
Step 4: Preview and Tweak Until the Optimal Result.
Preview the resized and enhanced photo at the preview window. If you find the result is a bit over-smoothed, you can adjust the Strenth value to make it more natural. You can also switch the AI model the experiment until you get the best balanced result.
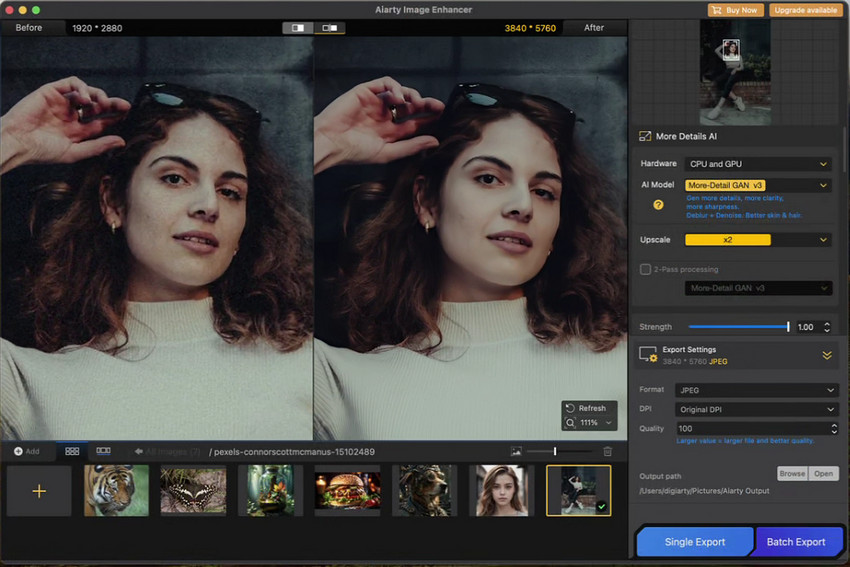
Step 5: Export the Resized Image
Expand the Export Settings panel to choose output format (JPEG, PNG, TIFF, DNG), quality, DPI etc. Then click Single Export or Batch Export to save your image in high quality. You now have a resized photo on Mac that retains clarity, sharpness, and professional-level detail.
With Aiarty Image Enhancer, you can confidently resize photos on Mac without losing quality or introducing blur, whether for social media, printing, or design projects.
How to Resize Images on Mac in Adobe Photoshop
For users who need more control over how images are resized on Mac, resize an image in Adobe Photoshop offers a professional-grade solution. Unlike basic tools, Photoshop provides multiple resampling algorithms and fine-tuning options, allowing you to adjust how pixels are added or reduced. This makes it a strong choice for designers and photographers who want precise results when resizing or enlarging images.
Beyond Preserve Details 2.0, Photoshop offers resampling options like Bicubic Smoother (for enlarging) and Bicubic Sharper (for reducing size). These give users precise control over resolution and detail, along with professional tools for sharpening and refining images after resizing.
Step-by-Step Guide to Resize Photo on Mac Using Photoshop
Step 1: Open Your Image in Photoshop
Launch Photoshop on your Mac and load the image you want to resize. You can drag it directly into the workspace or go to File > Open to select your file.
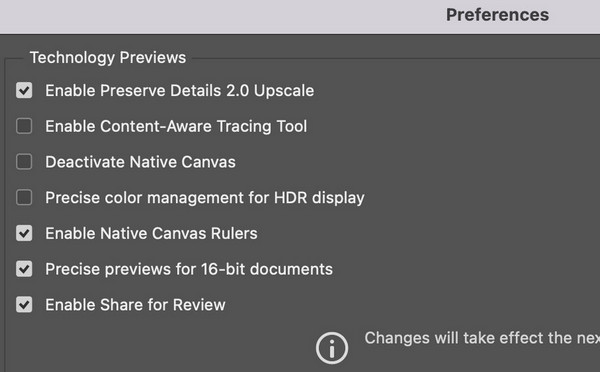
Step 2: Turn On Preserve Details 2.0
To get better results when you resize an image on Mac, enable Preserve Details 2.0 Upscale. Go to Edit > Preferences > Technology Previews, check Enable Preserve Details 2.0 Upscale, then restart Photoshop.
Step 3: Resize the Image
Go to Image > Image Size to open the resize panel. From the Resample dropdown, choose Preserve Details 2.0. Then enter your desired dimensions or adjust the resolution—Photoshop will upscale the image while attempting to keep details intact.
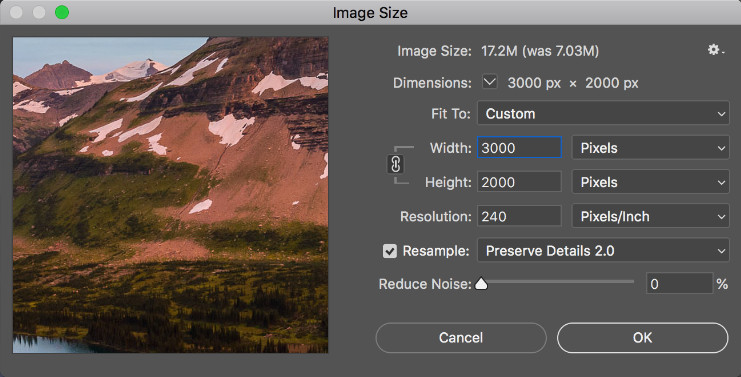
Step 4: Fine-Tune Noise and Sharpness
When enlarging, some noise or softness may appear. Use the Reduce Noise slider to balance detail and smoothness, helping your resized image look cleaner.
Step 5: Apply and Export
Click OK to apply the changes, then save your resized image via File > Save As. Choose a format like JPEG or PNG depending on how you plan to use the image.
Best for: advanced users, professional photographers, and designers who need precise control over image editing on Mac.
Limitations:
- Complex interface that can be overwhelming for beginners.
- Requires experience to choose the right settings and achieve optimal results.
- Paid software with a subscription model.
Related Search: How to Increase Resolution of Image in Photoshop
How to Resize a Photo on Mac Online
For users who want a fast and convenient solution without installing any software, online image resizers can be a practical choice. These tools let you upload an image, set new dimensions, and download the resized version within seconds. While convenient, most online resizers are limited in quality control, file size, and advanced features. AI-powered enhancement is usually not included, so enlarging images can sometimes lead to blur or pixelation.
Popular Free Online Resizers:
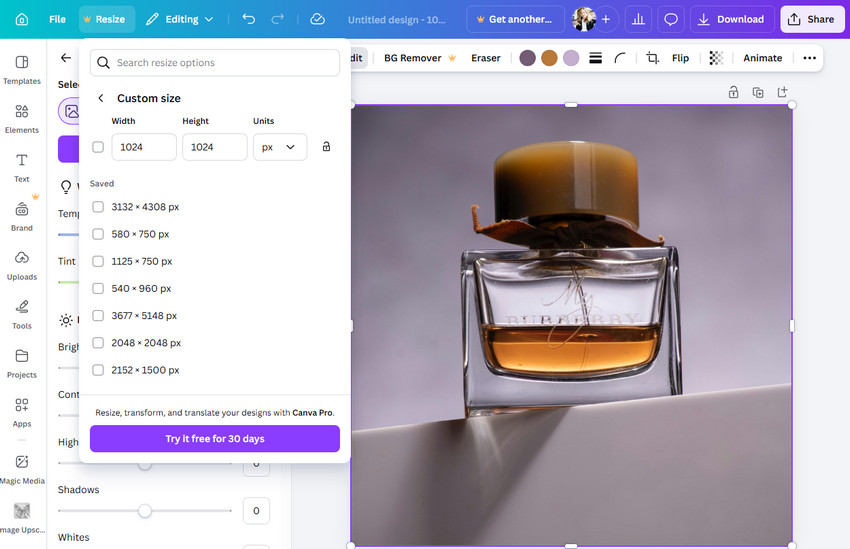
1. Canva
Canva allows users to resize images with an intuitive drag-and-drop interface. You can choose from presets for social media platforms like Instagram, Facebook, X, YouTube, and Pinterest, or set custom pixel dimensions. Canva also provides basic image adjustments such as cropping and compression, making it useful for quick edits and social media posts.
Related Search: What's Difference Between Canva and Photoshop? A Hands-On Comparison
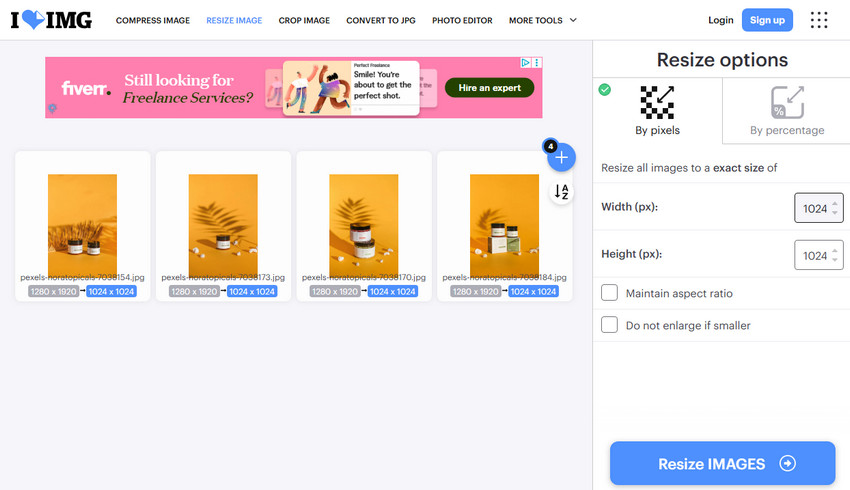
2. iLoveIMG
iLoveIMG supports common formats such as JPEG, PNG, and GIF, and lets you resize images by percentage or exact dimensions. Users can also compress images during the resizing process to reduce file size. The platform is simple and fast, making it suitable for casual resizing tasks.
Limitations of Online Image Resizers:
- Quality Loss: Without AI enhancement, images can become pixelated or blurry when enlarged.
- File Size Limits: Many platforms restrict maximum file size or resolution.
- Limited Batch Processing: Most free versions only allow one image at a time, and only few online image resizer allows batch resizing.
- Internet Dependency: Uploading and downloading large files can be slow and unreliable.
- Privacy Concerns: Some services process images on their servers, which may pose security risks.
While online resizers like Canva and iLoveIMG are convenient for quick adjustments, they may not deliver high-quality results for critical projects. For professional-grade resizing without losing detail, AI-powered tools such as Aiarty Image Enhancer provide superior clarity, sharper edges, and reliable output.
Which Is the Best Tool to Resize Photos on Mac (Comparison)
Before choosing a tool, it’s important to understand the difference between resizing and compressing an image. Resizing changes the image dimensions, while compression reduces file size. If you want to enlarge an image without losing quality, standard tools are limited—AI-based solutions work better.
When resizing photos on a Mac, the best tool depends on your needs, such as ease of use, speed, quality, or batch processing. Below is a comparison of popular options to help you choose the right one.
From this comparison, it’s clear that built-in tools like Preview, Quick Actions, and Photos are convenient for basic resizing but only offer medium-quality results. Photoshop provides the highest control and image fidelity but is more complex and less suited for batch processing. Online tools such as Canva are simple and fast, yet lack professional-level quality and AI enhancement.
Aiarty Image Enhancer stands out as a versatile solution for resizing photos on Mac without losing quality. It combines AI-based resizing with batch processing and ease of use, while also offering features like upscaling, denoising, and deblurring. Its models preserve fidelity, texture, and realistic details, ensuring resized images stay sharp and natural for any use.
Download Aiarty now and start resizing your photos faster, smarter, and without blur.
Tips to Resize Photos on Mac Without Losing Quality
Resizing images on a Mac is simple, but maintaining quality requires a few best practices. Whether you're preparing images for web, social media, or printing, the following tips can help you avoid blur, distortion, and detail loss.
- Keep the aspect ratio locked: This prevents your image from being stretched or squished, ensuring it maintains its original proportions.
- Avoid enlarging low-resolution images manually: Increasing size with basic tools often leads to blur and pixelation due to limited original data.
- Choose the right format (JPEG vs PNG): Use JPEG for smaller file sizes and web use, and PNG when you need higher quality or transparency.
- Use AI tools for upscaling: AI-powered software can intelligently add detail and improve clarity when enlarging images.
By following these tips, you can resize or enlarge photos on Mac while keeping them sharp, clear, and suitable for your intended use.
Conclusion
Resizing photos on Mac is easy with built-in tools, but the right method depends on your goal. Preview is ideal for quick edits, while Quick Actions works best for batch resizing multiple images. If you need advanced control and precision, Photoshop is a strong option. For the best quality, especially when enlarging images without blur, like Aiarty Image Enhancer deliver the most reliable results.
 FAQs about Image Resizing on Mac
Use AI tools like Aiarty Image Enhancer for the best results, as they preserve clarity and detail when enlarging or downscaling images.
Using Preview is the simplest method, allowing quick adjustments to image dimensions without complex settings.
Yes, use Quick Actions for batch resizing, which lets you adjust multiple images in one go efficiently.
Resizing with traditional tools stretches pixels instead of adding new detail, which often results in a blurry or soft appearance.
You May Also Like
This post was written by Brenda Peng who is a seasoned editor at Digiarty Software who loves turning ordinary photos into extraordinary works of art. With AI assistance for brainstorming and drafting, the post is reviewed for accuracy by our expert Abby Poole for her expertise in this field.