Is your gorgeous photo trapped in the wrong-sized digital outfit? Too big for that website upload? Tiny and pixelated when you try to print it? Wrestling with Photoshop's image resizing can feel like trying to fold a fitted sheet – frustratingly awkward.
How to resize an image in PhotoShop without distortion to fit Instagram or for printing, etc.? Think of this guide as your friendly neighborhood Photoshop whisperer, ready to demystify the magic of resizing. We'll ditch the confusing bits and get your images looking just right, no sweat (well, maybe a tiny bit of clicking). Ready to give your pixels the perfect fit? Let's get started!
😩 Photoshop Resize Got You Down? Hear the Pixel Pangs!
- Stretching images in Photoshop can turn your images into a blurry mess – nobody wants that!
- Upping the resolution ("Resample" ON) often leads to artificial-looking results.
- Batch resizing in Photoshop can feel like herding digital cats – time-consuming and fiddly.
Wish Your Resized Images Didn't Look Like They Went Through a Pixel Blender?
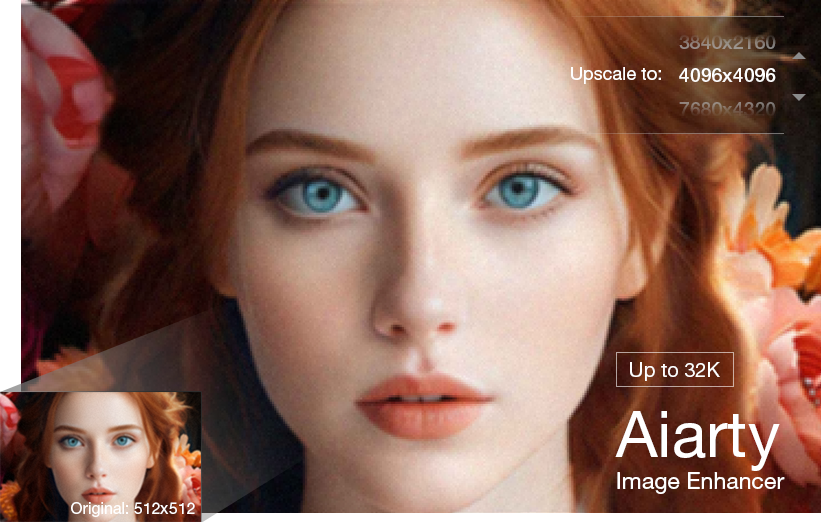
If you've ever felt the heartbreak of a once-sharp image turning into a fuzzy blob after resizing in Photoshop, we get you! That's where our superhero sidekick, Aiarty Image Enhancer, swoops in to save the day!
Aiarty can cleverly add details where they were missing, sharpen things up without that artificial crunch, and even upscale your photos to 32K without looking like they've been eating too much digital pie. Plus, it's a breeze to use and can handle 3000 images at once. So, ditch the pixel panic and say hello to beautifully resized, crystal-clear photos!
Ready to Unleash the Magic on Your Images? Grab Aiarty and See the Difference!

Resizing Images in Photoshop: A Clear and Simple Guide
So, you're looking to tweak the size of your image in Photoshop, huh? It's a common pitstop on the editing journey, but sometimes it feels like navigating a maze. Fear not! We've all been there, staring at those confusing options. Let's break down the steps in a way that actually makes sense, packed with little nuggets of wisdom I've picked up along the way.
Step 1: Access the Image Size Dialog
Begin by opening your image in Photoshop. Navigate to the top menu and select Image, then choose Image Size from the dropdown menu. This will open a window displaying the current image dimensions and resolution.
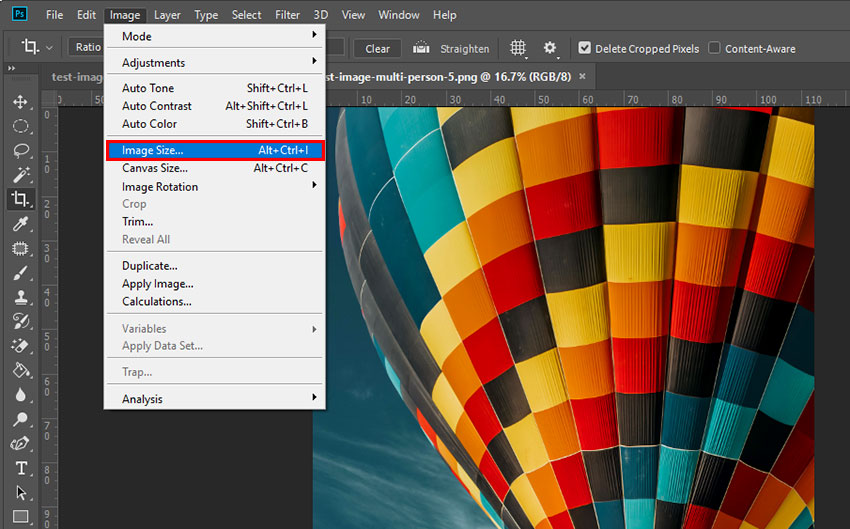
Want to jump to the 'Image Size' window faster? Just hit Alt + Ctrl + I (Windows) or Option + Command + I (Mac OS). It's a real time-saver.
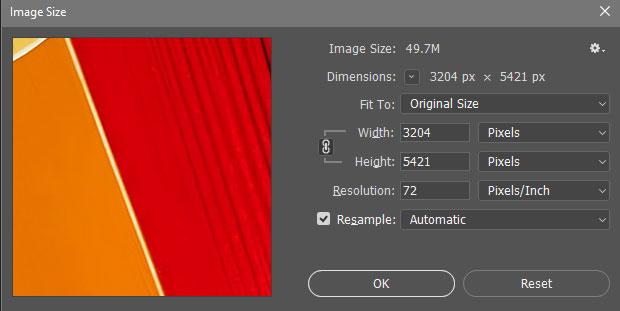
Step 2: Utilize the Preview Area
The Image Size dialog includes a preview of your image, allowing you to see the effects of your changes in real-time. You can interact with this preview in the following ways:
- To resize the preview window, drag any corner of the Image Size dialog box.
- To view different areas of the image, click and drag within the preview using the hand icon.
- To adjust the preview magnification, press Ctrl (Windows) or Command (Mac OS) and click to zoom in. Press Alt (Windows) or Option (Mac OS) and click to zoom out. The current magnification percentage will briefly appear at the bottom of the preview.
Step 3: Configure Resizing Parameters
The Image Size dialog offers several parameters to control how your image is resized:
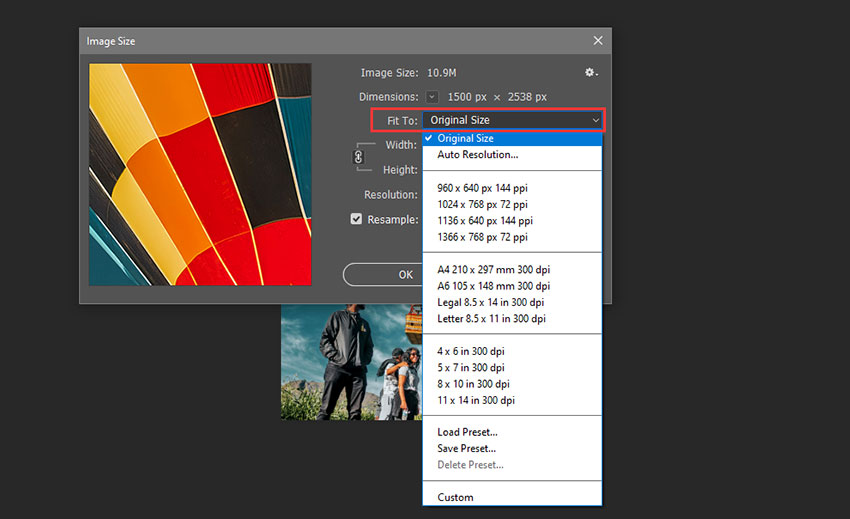
- Dimensions: Displays the current pixel width and height, as well as the resolution.
- Fit To: A dropdown menu containing predefined image sizes for various purposes.
- Constrain Proportions (Chain Icon): When active, this option maintains the original aspect ratio of the image.
- Width and Height: Enter your desired values for the image's width and height.
- Resolution (PPI): The number of pixels per inch, crucial for print quality (300 PPI) versus screen display (72 PPI).
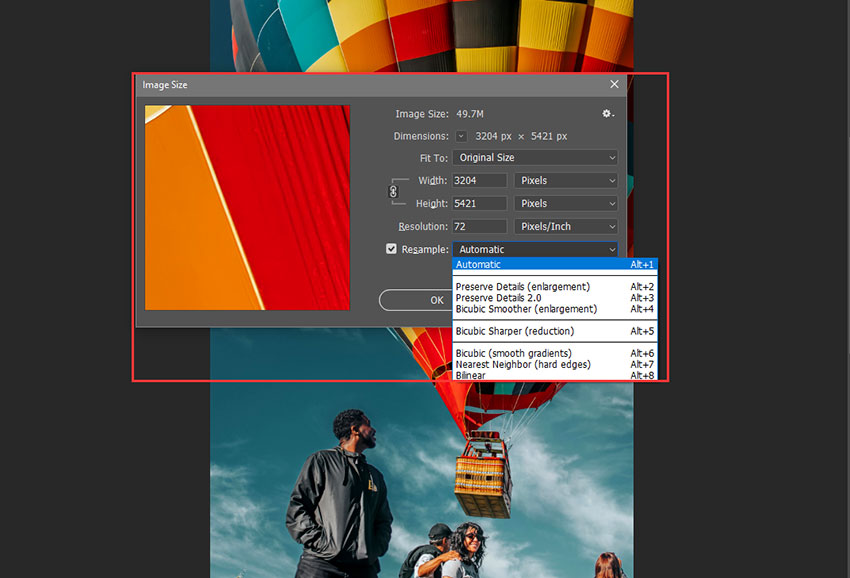
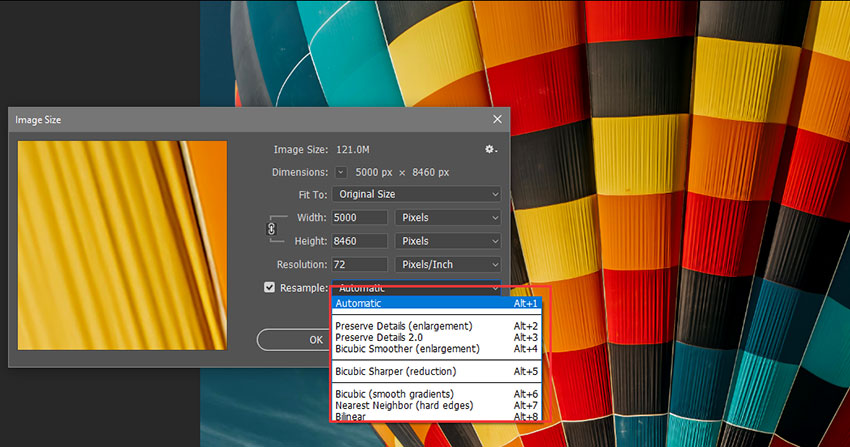
- Resample: This option determines whether Photoshop adds or removes pixels during resizing.
- Unchecked: The total number of pixels remains constant.
- Unchecked: The total number of pixels remains constant.
- Checked: Photoshop will add or remove pixels based on the selected resampling method:
- Bicubic Smoother: Recommended for enlarging images to minimize artifacts.
- Bicubic Sharper: Suitable for reducing image size while preserving some sharpness.
- Preserve Details 2.0: Often effective for upscaling while retaining finer details and reducing noise.
If your image contains layer styles and 'Constrain Proportions' is enabled, you can select 'Scale Styles' (often found under a gear icon) to ensure that effects are scaled proportionally with the image.
Tip: Oops! Didn't quite get it right? No worries! You've got a couple of 'undo' options: You can either hit Ctrl+Z (Windows) or Command+Z (Mac OS) right away, or, back in the 'Image Size' window, you can either choose 'Original Size' from the 'Fit To' menu or hold down Alt (Windows) or Option (Mac OS) and click the 'Reset' button to go back to the starting values.
Step 4: Apply Changes or Revert to Original
Once you have configured the desired settings, click OK to apply the image resizing. Photoshop will then update the image according to your specifications.
To revert to the initial settings displayed when you first opened the Image Size dialog, you can either select Original Size from the 'Fit To' menu or press and hold Alt (Windows) or Option (Mac OS) and click the Reset button.
Facing Photoshop Resize Headaches? Let's Troubleshoot!
Even with a clear guide on how to resize an image in PhotoShop, resizing images in Photoshop can sometimes throw you a curveball. Here are some common issues users encounter, along with potential reasons and how to tackle them.
1. Why Can't I Even Resize My Image?
Frustrating, right? Here are a couple of common culprits preventing you from adjusting those dimensions:
Locked Layers: Check your Layers panel (usually on the right). If the layer you're trying to resize has a little padlock icon next to it, that means it's locked. Click the padlock to unlock it and gain resizing freedom!
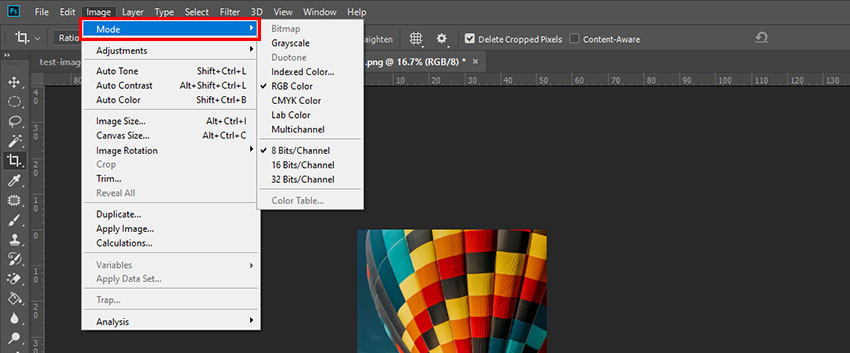
Unsupported Image Mode: Photoshop works in different "modes" (like RGB, CMYK, Indexed Color, etc.). Some modes have limitations. If 'Image Size' is greyed out or not working as expected, go to Image > Mode and ensure you're in a compatible mode like RGB Color (for web/screen) or CMYK Color (for print).
2. My Resized Image Looks Blurry or Pixelated - Help!
Ah, the dreaded loss of quality. Here's why it happens and how to fight back:
Enlarging Too Much: When you significantly increase the size of an image (upscaling) with 'Resample' checked, Photoshop has to invent new pixels. This process (interpolation) can often lead to a soft or blurry result, especially if the original image didn't have enough detail. Try to avoid extreme upscaling whenever possible.
Incorrect Resampling Method: As mentioned earlier, different resampling methods have different strengths. Experiment with 'Bicubic Smoother' for enlargement and 'Bicubic Sharper' or 'Preserve Details 2.0' for reduction to see which yields the best results for your specific image.
Saving Incorrectly: The file format you choose to save in can also impact perceived sharpness. For web, JPEGs can sometimes introduce compression artifacts (which can look like blurriness), especially at lower quality settings. PNGs are lossless but can have larger file sizes. For print, TIFF or high-quality JPEGs are generally recommended.
What to do about it:
- Avoid excessive upscaling. If you need a much larger image, consider starting with a higher-resolution source if possible.
- Experiment with different 'Resample' options. 'Preserve Details 2.0' can sometimes work wonders for upscaling.
- Use sharpening filters cautiously. After resizing (especially upscaling), you might try subtle sharpening using Filter > Sharpen > Smart Sharpen. Don't overdo it, or you'll introduce harsh edges and artifacts. Zoom to 100% to judge the sharpness accurately.
- Consider using AI-powered image upscaler (like the one we mentioned earlier!) which are specifically designed to add detail and reduce blur during upscaling.

3. Help! My Resized Image is Huge (or Tiny)! How Do I Control the File Size?
File size is a balancing act between image quality and practicality (especially for web use):
Resolution (PPI) for Web vs. Print: Remember, for displaying images on screens, a higher PPI (like 300) doesn't usually improve visual quality but drastically increases file size. Stick to 72 PPI for web. For print, 300 PPI is generally recommended for good detail.
Pixel Dimensions: The actual width and height in pixels are the biggest factor in file size. Smaller pixel dimensions mean smaller files. Resize your image to the actual size it needs to be displayed or printed. Don't keep it unnecessarily large.
File Format:
- JPEG: A "lossy" format, meaning it discards some data to achieve smaller file sizes. You can control the compression level (lower quality = smaller file). Use for web photos where file size is a concern.
- PNG: A "lossless" format, preserving all image data. It's great for graphics with sharp edges and transparency but can result in larger files than JPEGs for photos.
- GIF: Best for simple animations and graphics with limited colors.
- TIFF: A lossless format often used for professional printing. Files tend to be large.
Optimization: For web images, use Photoshop's File > Export > Save for Web (Legacy)... option. This tool allows you to preview different file formats and compression settings to find the best balance between quality and file size.

Conclusion
Resizing images in Photoshop doesn't have to be a pixel-pushing nightmare. By understanding the 'Image Size' dialog, paying attention to the 'Resample' option. Remember to keep an eye on that 'Constrain Proportions' checkbox to avoid unwanted stretching! And if you ever find your resized images looking a little less than their best, don't forget that AI-powered enhancers like Aiarty Image Enhancer are out there to lend a helping hand, bringing back the sharpness and clarity you deserve. Now go forth and resize with confidence!
External source:
- Website Image Size Guidelines for 2025 | Shopify
- How to Resize Images in Photoshop | Adobe
- What is Resampling | Adobe
You May Also Like
This post was written by Brenda Peng who is a seasoned editor at Digiarty Software who loves turning ordinary photos into extraordinary works of art. With AI assistance for brainstorming and drafting, the post is reviewed for accuracy by our expert Abby Poole for her expertise in this field.