If you've ever found yourself in a situation where your Photoshop files seem too large to handle or the print quality isn’t what you expected, you’re not alone.
For instance, one Adobe Community user needed to convert their wedding invitation designs from 600 PPI to 300 PPI because their third-party app only accepted PNG files at 300 PPI for better customer experience. Another Reddit user started a project at 72 PPI but later realized it should have been 300 PPI for high-quality printing. These are all real-world challenges faced by designers, photographers, and creatives alike.
In this guide, we’ll not only explain what PPI is and how it impacts your images, but also show you how to change PPI in Photoshop without sacrificing quality.
💡 What You Need to Know Before Changing PPI in Photoshop:
- Increasing PPI with "Resample" checked may cause quality loss or pixelation.
- Changing PPI without "Resample" checked won't impact image quality.
- Batch changing PPI in Photoshop requires extra steps and can be time-consuming.
Need to Enhance Image Quality After Changing PPI?
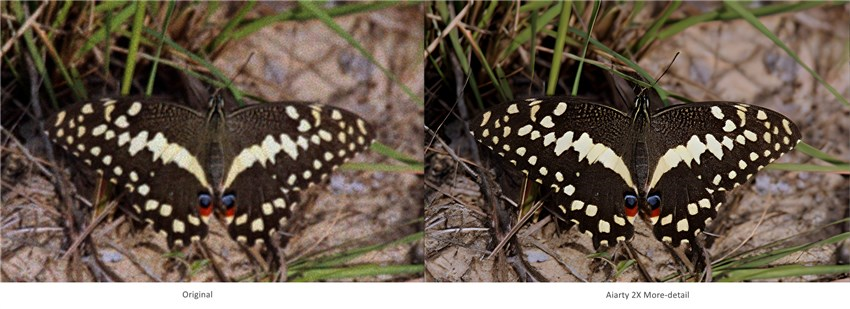
If you're looking to improve the sharpness and clarity of your image after adjusting PPI, the AI-powered Aiarty Image Enhancer can help. It can deblur, denoise, depixelate, upscale your image, and adjust the DPI for optimal print or display quality. Plus, it supports batch processing, saving you time on large projects.
Download Aiarty Image Enhancer and try it out for better image quality and faster results:
What Is PPI and How It Impacts Your Images?
PPI stands for pixels per inch, and it refers to the pixel density of an image when it’s displayed or printed. In simpler terms, it tells you how many pixels will be packed into each inch of a physical print. The higher the PPI, the more detail the image will have when printed—assuming the source image has enough resolution.
You might hear PPI and DPI used interchangeably, but they’re not exactly the same. While PPI applies to digital images and screen display, DPI (dots per inch) refers to the output resolution of a printer. That said, many people (and even some software tools) use the terms loosely, which adds to the confusion.
Here’s why PPI matters:
- For print, 300 PPI is considered the gold standard for sharp, professional-quality output.
- For digital use, such as web or social media, 72 PPI is generally sufficient, since screens have limited pixel density.
- For scanning or archiving, you might see files saved at 600 PPI or more to preserve maximum detail.
It’s important to remember that changing the PPI value alone doesn't necessarily change how the image looks on your screen—but it does impact how it prints and how large the file will be. That’s why understanding how to adjust PPI properly in Photoshop can save you from pixelated prints or unnecessarily massive file sizes.
How to Change PPI in Photoshop (Without Losing Quality)
Changing PPI in Photoshop is easy once you understand how it works—especially that little “Resample” checkbox, which determines whether your image keeps the same number of pixels or not. Follow the steps below to change PPI properly without degrading image quality.
Step 1: Open the Image Size Panel
Open your image in Photoshop, then go to the top menu and choose Image > Image Size. This will bring up a window showing the current width, height, and resolution (measured in pixels per inch, or PPI).
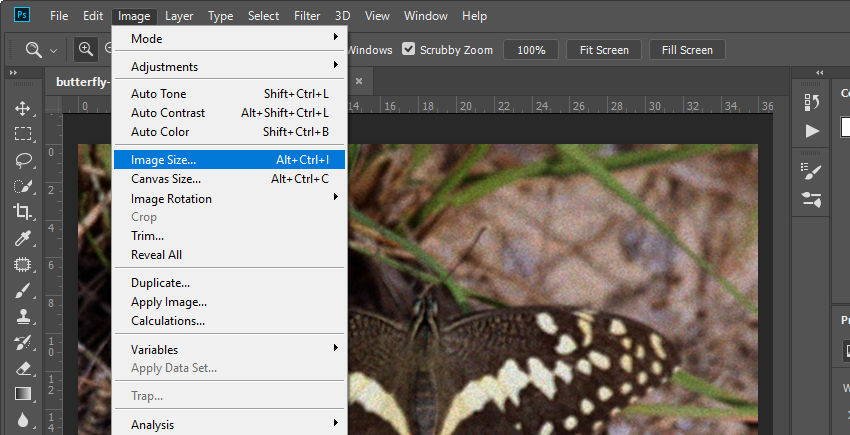
At this point, don’t worry about making changes yet—just take a look at the numbers so you can understand how your image is currently set up.
Step 2: Decide Whether to Resample
At the bottom of the Image Size window, you’ll see a checkbox labeled Resample.
- If you uncheck “Resample”, Photoshop will lock the total number of pixels. When you change the PPI, the physical dimensions (in inches or cm) will adjust accordingly, but the image quality remains intact. This is ideal when you're preparing for print and want to ensure sharp output.
For example: If your image is 3000 pixels wide at 300 PPI, it will print at 10 inches wide. Change it to 150 PPI, and the print size becomes 20 inches — but the pixel dimensions stay the same.
- If you leave “Resample” checked, you can freely change both PPI and pixel dimensions. Photoshop will add or remove pixels to match the new resolution, which is useful when resizing images for web or reducing file size—but it may cause some quality loss if you're increasing PPI.
Tip: If you're unsure, start by unchecking “Resample” to preserve quality, especially for print projects.
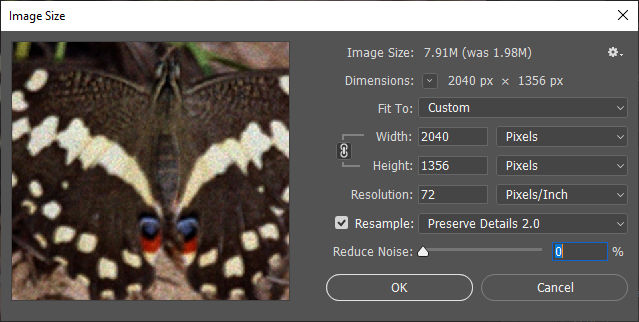
Step 3: Adjust the Resolution (PPI)
Now, in the Resolution box, type in your desired PPI—typically 300 PPI for high-quality printing, or 72 PPI for web use.
If “Resample” is unchecked, you’ll notice that the physical size updates automatically based on the new resolution.
If you checked “Resample,” changing the resolution will also affect the pixel dimensions. Photoshop gives you control over how it interpolates new pixels using the dropdown just below (e.g. “Automatic,” “Preserve Details 2.0,” or “Bicubic Smoother”).
Tip: When upscaling an image with resampling on, “Preserve Details 2.0” usually gives the best results.
Step 4: Optional – Use “Fit To” for Quick Resizing (Web-Oriented)
If you’re resizing for screen use or web sharing, Photoshop offers several presets under the “Fit To” dropdown in the Image Size window. These include commonly used resolutions like:
- 960 × 640 px at 144 PPI
- 1024 × 768 px at 72 PPI
- 1136 × 640 px at 144 PPI
- 1366 × 768 px at 72 PPI
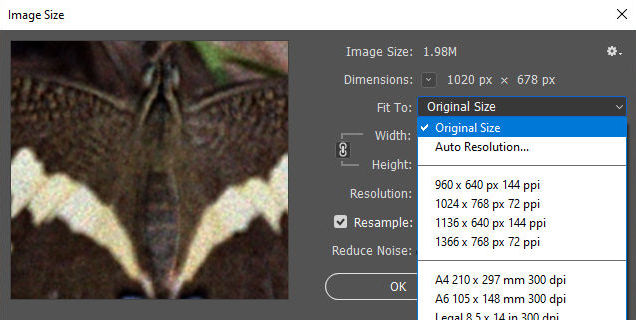
These presets adjust both pixel dimensions and PPI to match typical mobile and desktop screen resolutions. They're especially useful if you're preparing social media graphics, web images, or mobile app assets.
Tip: These are screen-optimized sizes. If you’re preparing files for print (like a photo book or physical invitation), it’s better to manually set the resolution to 300 PPI and define custom dimensions in inches or centimeters.
Step 5: Confirm and Save
Once everything looks good, click OK to apply the changes. Then go to File > Save As or Export > Export As depending on your desired output.
For printing, formats like TIFF or PDF are ideal. For web, JPEG or PNG works best.
Tip: After changing resolution—especially if you’ve upscaled—zoom in to 100% to check sharpness. If needed, use Filter > Sharpen > Smart Sharpen to clean up slight softness.
Want to Make Your Image Sharper After Changing the PPI?
If you’ve followed the steps above and changed the PPI with Resample enabled, you might notice that your image now has more pixels—but it doesn’t necessarily look sharper. That’s because Photoshop’s resampling process simply adds pixels using interpolation, rather than restoring real details. It makes the image larger in size, but not better in quality.
In other words, if your original image was soft or low-resolution, increasing the PPI alone won’t fix that. You’ll just get a bigger, blurry image.
This is where a tool like Aiarty Image Enhancer comes in.
Unlike Photoshop’s basic interpolation, Aiarty uses AI models that are trained to reconstruct lost details, enhance textures, and sharpen blurry elements. Whether you’re working with old photos, compressed images, or digital artwork that needs a resolution boost, Aiarty can upscale and enhance them simultaneously.
It also offers a DPI setting (72, 150, 300, etc.), so you can prepare your enhanced images for print or web as needed—without worrying about PPI calculations.
If you're aiming for both higher resolution and clearer, sharper images, Aiarty offers a quick and effective alternative to traditional PPI adjustment alone.
Here’s how you can use it:
Step 1: Download and Launch Aiarty Image Enhancer
First, download Aiarty and open the app on your device.
Step 2: Import Your Image
Click the +Add button or drag and drop your image into the interface. You can upload multiple images at once if you need batch enhancement.
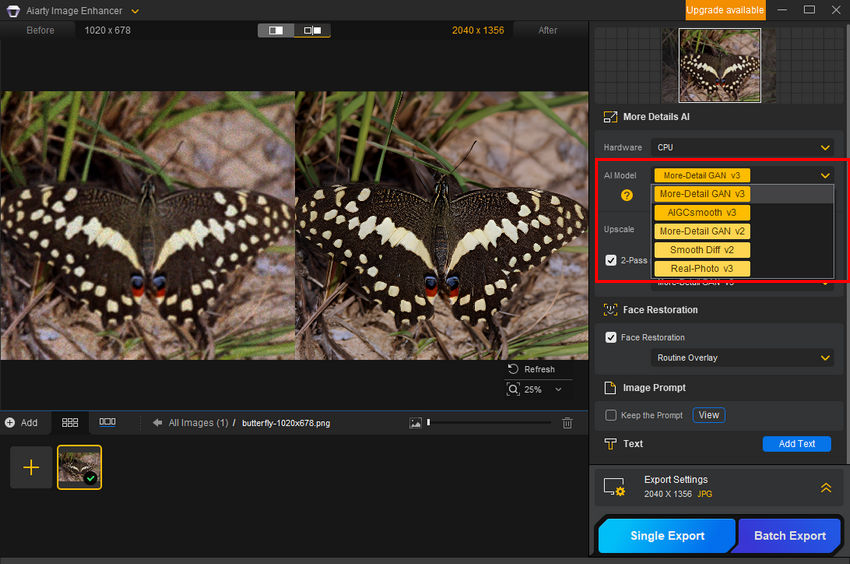
Step 3: Select the Best AI Model for Your Image
Aiarty provides several AI models optimized for different image types—such as real-life photography, anime, digital art, and more. Choose the one that fits your image style for the best results.
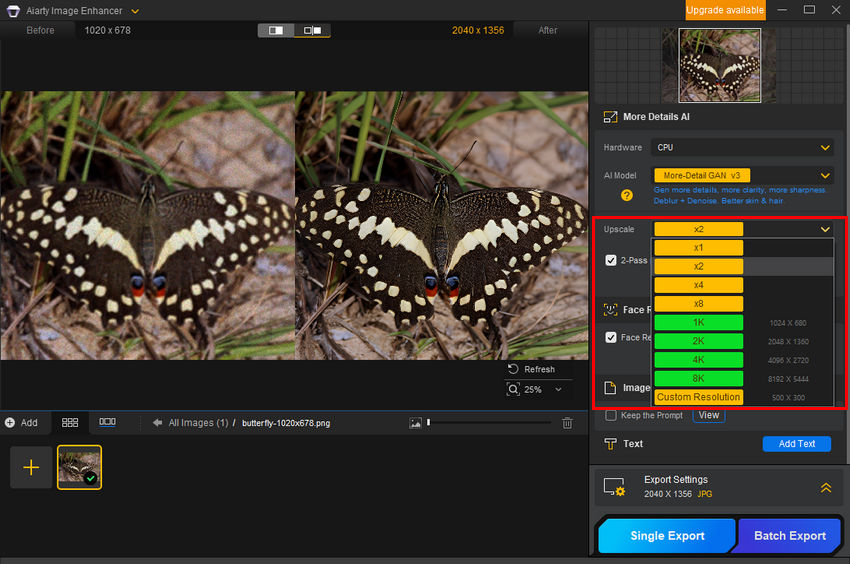
Step 4: Set the Upscale Level
From the Upscale menu, you can choose how much to enlarge your image—1x, 2x, 4x, up to 8x, or set a custom resolution.
Tip: If you only want to change the DPI without altering the size, select 1x to keep the original dimensions.
Once you’ve selected the AI model and upscale level, Aiarty will begin processing your image. During this step, it automatically enhances the image—removing blur, reducing noise, and recovering lost details—without any extra input needed.
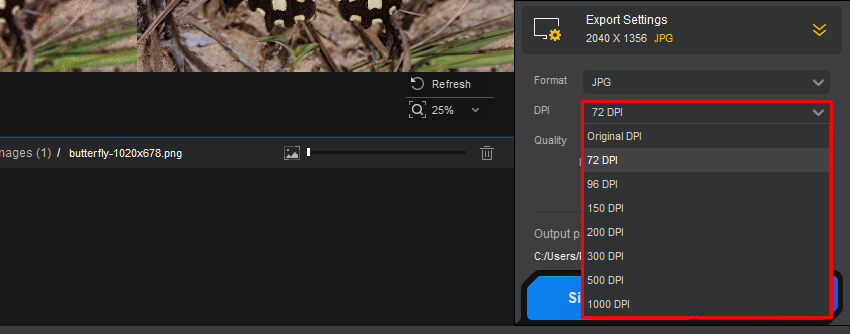
Step 5: Choose Your Desired DPI
Open the Export Settings section and choose the DPI value you want—such as 300 DPI for high-quality printing, or 72 DPI for web use.
Step 6: Export Your Enhanced Image
Click Single Export or Batch Export to save your enhanced, print-ready image.
 FAQs about Changing DPI
1. How many PPI is 1920x1080?
The PPI (pixels per inch) of an image depends on its physical print size. For example, a 1920x1080 image will have different PPI values depending on how large you print it. To calculate the PPI, divide the image dimensions by the print size. For instance, if you print a 1920x1080 image at 10x5.625 inches, the PPI will be 1920 ÷ 10 = 192 PPI (horizontal) and 1080 ÷ 5.625 = 192 PPI (vertical).
2. How do I know if my photo is 300 PPI?
To check if your image is 300 PPI, open it in Photoshop or another image editing software. In Photoshop, go to Image > Image Size, and you’ll see the PPI value next to the resolution field. If it’s 300 or higher, your image is set at 300 PPI. If it's lower, you might need to adjust the PPI or resample the image for printing.
3. Are PPI and DPI the same thing?
Although PPI (pixels per inch) and DPI (dots per inch) are often used interchangeably, they are not exactly the same. PPI refers to the resolution of an image on a screen (the number of pixels per inch), while DPI refers to the resolution of a printer (the number of dots a printer can produce per inch).
When preparing an image for print, a resolution of 300 PPI is commonly recommended to ensure high print quality, and printers interpret PPI as DPI for printing purposes. So, while they are related, they apply in different contexts—PPI for digital images and DPI for printing.
External source:
- What is PPI Resolution? | Adobe
- PPI vs. DPI: what’s the difference? | 99designs
- What is Resampling | Adobe
You May Also Like
This post was written by Brenda Peng who is a seasoned editor at Digiarty Software who loves turning ordinary photos into extraordinary works of art. With AI assistance for brainstorming and drafting, the post is reviewed for accuracy by our expert Abby Poole for her expertise in this field.