Sometimes, we need to increase image resolution for printing or other purposes, and this task can be easily accomplished using one of the most popular image editing tools—Photoshop.
In this guide, we’ll show you how to increase resolution in Photoshop step by step. You’ll learn how to adjust image size, choose the best resampling method, and enhance clarity.
But before any further, it’s important to acknowledge Photoshop’s limitations when it comes to increasing resolution of images, as some users on platforms like Adobe Community and Reddit have pointed out the challenges they face when upscaling images.
💡 Problems Using Photoshop to Increase Image Resolution:
- Loss of details – Photoshop’s upscaling often results in blurry or pixelated images.
- Noise and artifacts – Enlarging an image can introduce unwanted grain (see a discussion on this issue on Reddit).
- Lack of AI enhancement – Photoshop relies on traditional resampling methods, which struggle to reconstruct fine details.
- Time-consuming manual adjustments – Achieving the best results requires additional sharpening and noise reduction.
Want to increase resolution with better results but less effort?
Aiarty Image Enhancer uses advanced AI models to upscale images while preserving details, reducing noise, and sharpening edges automatically. No manual adjustments—just one click for high-quality results.
Download Aiarty Image Enhancer to increase resolution without losing quality:
How to Increase Photo Resolution in Photoshop
Method 1: Increase Resolution with Photoshop’s Image Size Tool
The most straightforward way to resize a photo larger in Photoshop is by using the Image Size dialog box. This method gives you full control over the image’s dimensions, resolution, and resampling method. While it doesn’t use AI like newer tools, it’s reliable for standard upscaling and works well when preparing images for both web and print.
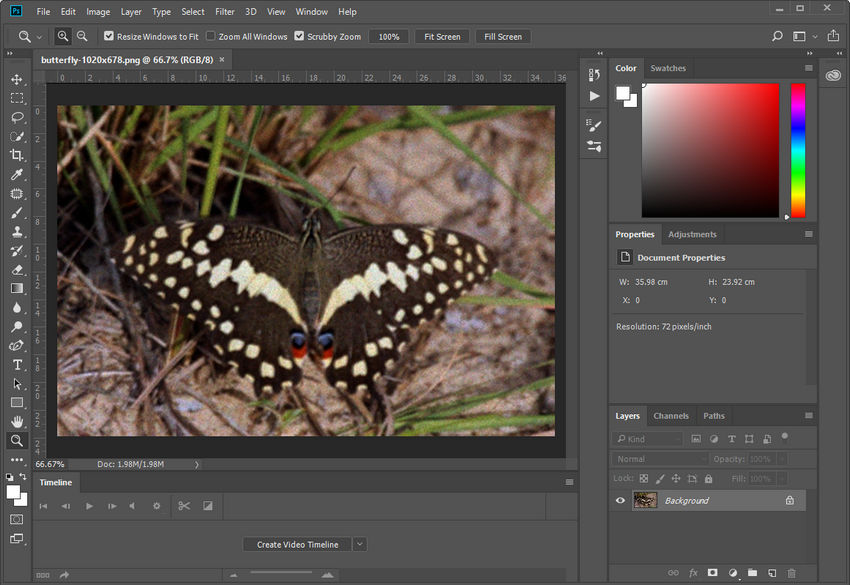
Step 1: Open the Image
Start by launching Photoshop and opening the image you want to enlarge. You can do this in two ways:
- Click File > Open, then select your image file.
- Drag and drop the image directly into Photoshop’s workspace.
Once your image is open, ensure you are working with the correct layer. If the image is locked as a Background layer, double-click on it in the Layers panel to unlock and convert it to an editable layer.
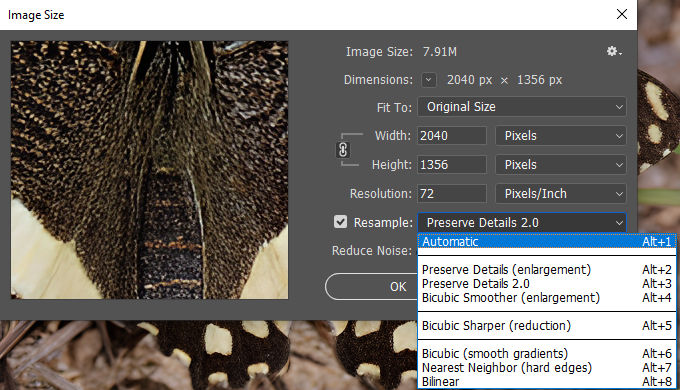
Step 2: Go to Image Size
To begin increasing resolution, navigate to Image > Image Size from the top menu. You can also use the shortcut Ctrl + Alt + I (Windows) / Command + Option + I (Mac).
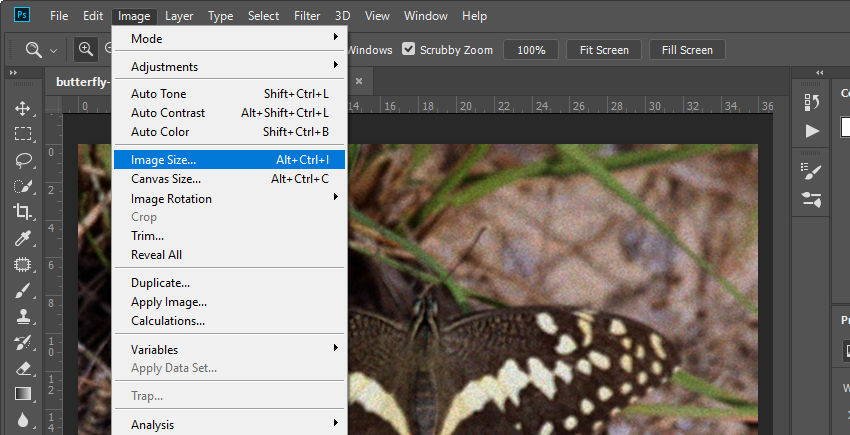
This will open the Image Size dialog box, which displays the following key parameters:
- Width & Height – These indicate the image’s dimensions in pixels. If you plan to enlarge your image, you’ll need to increase these values proportionally.
- Resolution – Measured in pixels per inch (PPI), this determines the image’s quality. 72 PPI is standard for web images, while 300 PPI is recommended for print.
- Resample – This option lets Photoshop create new pixels to increase the resolution. Without resampling, changing the image resolution only redistributes existing pixels without adding detail.
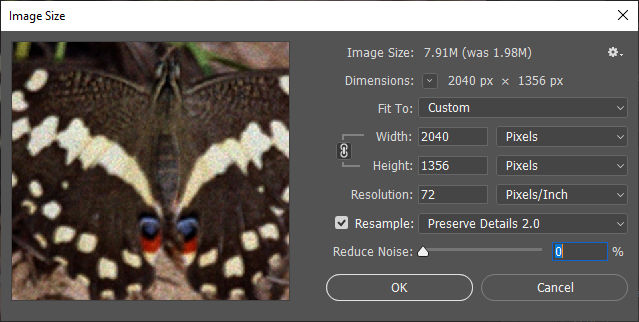
Step 3: Adjust Resolution
Now, it’s time to modify the resolution settings:
- Enable Resample – Check the Resample box to allow Photoshop to generate new pixels.
- Choose the Best Resampling Method – Click the dropdown menu next to Resample and select one of the following:
- Preserve Details 2.0 – Best for enlarging images while maintaining details. You can also adjust the Reduce Noise slider to refine the result.
- Bicubic Smoother (Enlargement) – Works well for general upscaling, reducing pixelation in enlarged images.
- Increase Resolution – Enter your desired Resolution (PPI) value. If increasing resolution for print, change 72 PPI to 300 PPI while ensuring the image size remains reasonable.
Keep in mind that increasing resolution does not magically add details—it only refines the image.
If the upscaled image looks slightly soft, go to Filter > Sharpen > Smart Sharpen to enhance edges.
If you notice unwanted artifacts or noise, use Filter > Noise Reduction to smooth them out without sacrificing too much detail.
Step 4: Apply and Save
Once you're satisfied with the adjustments, go to File > Export > Export As, select your preferred format, and set Quality to 100% for the best results.
By following these steps, you can effectively make low-resolution pictures high-resolution in Photoshop while preserving as much image quality as possible.
Method 2: Increase Resolution with Super Resolution in Photoshop
You've already learned how to use the traditional "Image Size" method, which is great for many tasks. However, for truly impressive results, especially with photos, you'll want to use Super Resolution. This is an AI-powered feature found in Adobe Camera Raw (ACR).
This technology is more advanced than simply stretching pixels. It intelligently analyzes your image and uses machine learning to create new ones, effectively doubling the width and height and quadrupling the total pixel count. Unlike older methods that often lead to blurry, mushy results, Super Resolution produces a cleaner, more detailed image by reducing noise and refining edges. While it's particularly effective for RAW files, it also works on JPEGs, PNGs, and TIFFs.
Keep in mind that it might take a moment to process, as it's doing some heavy lifting in the background.
This feature was introduced with Adobe Camera Raw version 13.2. To ensure you have it, make sure your Photoshop and Camera Raw are updated to the latest version.
Now, let’s get started.
Step 1: Open Your Photo in Photoshop
Start by opening the photo you want to enhance in Photoshop.
If it’s a RAW file, go to File > Open, select your image. It will launch directly in Adobe Camera Raw (ACR).
For JPEG, PNG, or TIFF files, go to File > Browse in Bridge.

In the Adobe Bridge window, navigate to your images and locate the one you want to enhance. Next, right-click on your image's thumbnail and choose "Open in Camera Raw". This will launch the image in the Camera Raw interface.

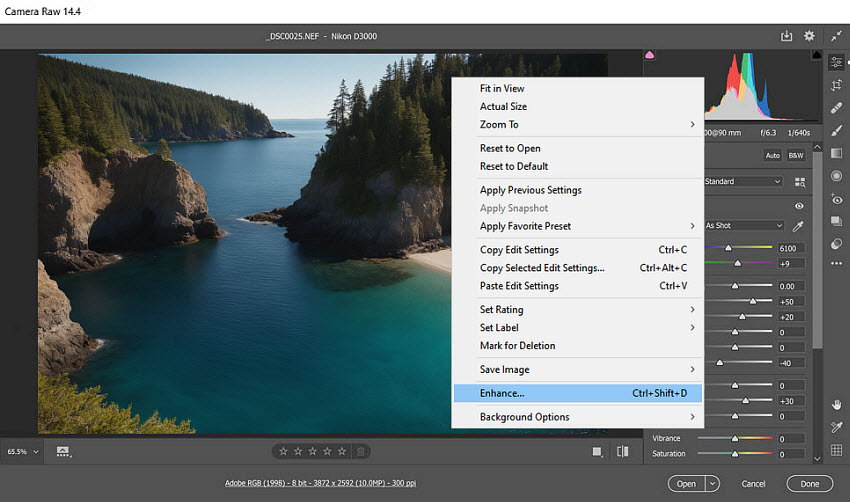
Step 2: Access the Enhance Option
Inside ACR, right-click on the image preview (or Control-click on Mac) and choose Enhance… from the menu that appears.
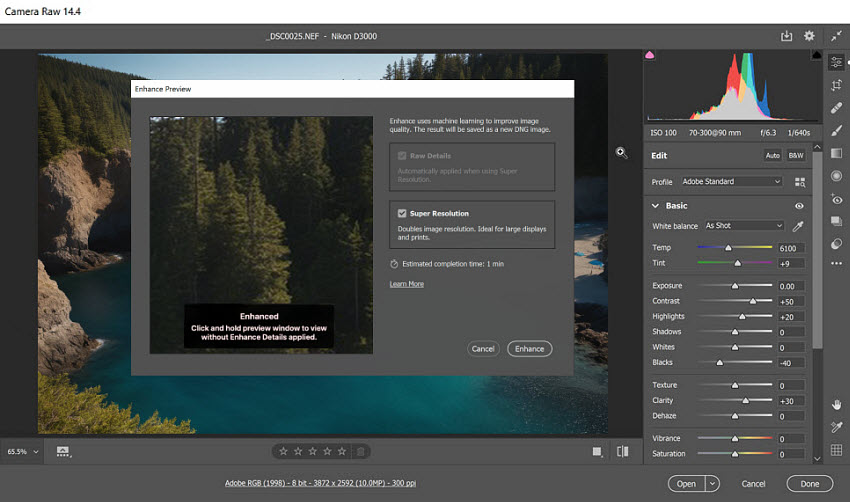
Step 3: Apply Super Resolution
In the pop-up dialog, check the box for Super Resolution. You’ll see a preview of the new dimensions, showing how much larger the file will become. Once you’re ready, click Enhance and let Photoshop process the image.
Step 4: Save the Enhanced File
When the enhancement is complete, a new DNG file will be created. This is your higher-resolution version. You can open it in Photoshop for more editing or export it directly as a JPEG, TIFF, or PNG.
Method 3: Increase Resolution with Photoshop’s Generative Upscale
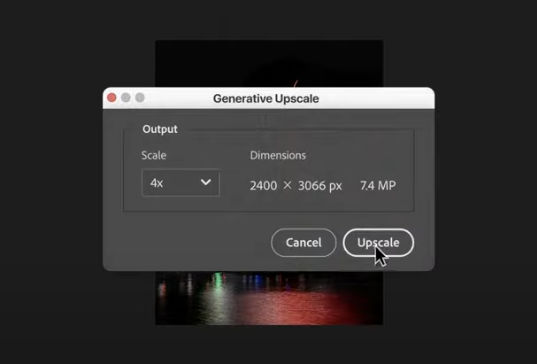
Generative Upscale is a new feature powered by Adobe’s Firefly generative AI. It can boost image resolution by up to eight megapixels, with scaling options of 2x, 3x, or 4x. Adobe describes it as “bringing high-quality resolution enhancements up to 8 megapixels without sacrificing image clarity”.
At the moment, it’s available in Photoshop (beta) on both desktop and web.
Right now, Generative Upscale is capped at 4,096 pixels in both width and height. If your chosen scale would exceed that limit, Photoshop prompts you to adjust the size before proceeding.
How to Use Generative Upscale on the Web
Step 1: Open Photoshop on the web and click Upload your photo to load the source image.
Step 2: From the left-hand panel, choose the creativity level and select a scale factor (2x, 3x, or 4x).
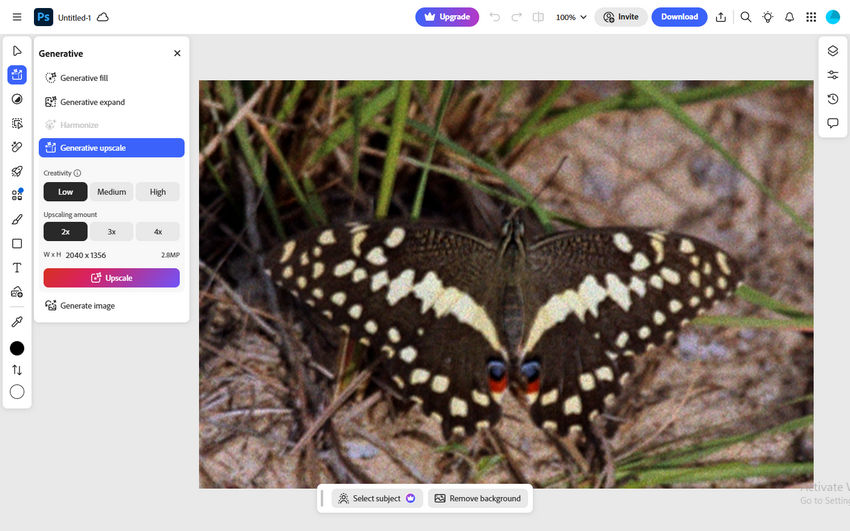
Step 3: Click Upscale, and Photoshop will generate a new high-resolution version of your image in a separate document. When it’s ready, hit Download on the top menu bar to save it to your computer.
How to Use Generative Upscale on Desktop
Step 1: Open the latest Photoshop (beta) on your computer and load the image you want to enlarge.
Step 2: From the top menu, go to Image > Generative Upscale. In the dialog box, choose a scale factor.

Step 3: Click Upscale, and Photoshop will generate a new high-resolution file in a separate document.
Real-World Performance
While Adobe positions this as a major step forward, results aren’t always as impressive in practice. In my own test, the upscaled photo didn’t show much noticeable quality improvement.
Some users have also reported that the tool doesn’t simply upscale—it tends to reimagine details, sometimes altering textures, backgrounds, or even objects. For example, one user noted that fine details from an old family photo were lost, replaced with overly smooth, “plastic” results. Others felt that the AI-generated additions made the image look different from their original photo, rather than just a higher-resolution version.
Limitations of Using Photoshop to Increase Resolution
While Photoshop provides tools to increase image resolution, it has some limitations that can affect the final quality, especially when working with low-resolution images. Here are the main challenges:
Loss of Detail
When upscaling an image in Photoshop, new pixels are generated based on surrounding ones, but no new details are actually created. This can result in a soft or artificially smoothed look, especially in images with fine textures, facial features, or intricate patterns. If the original resolution is too low, Photoshop’s resampling methods may struggle to reconstruct missing details effectively.
Over-Sharpening or Blurriness
Depending on the resampling method used, upscaling can introduce unwanted artifacts. For example:
- Using Bicubic Smoother may result in a slightly blurred image, requiring additional sharpening to regain clarity.
- Preserve Details 2.0 attempts to retain more details but can sometimes introduce noise or an unnatural sharpened effect, particularly around edges.
Balancing sharpness and smoothness requires manual adjustments, which can be time-consuming.
Manual Adjustments Required
Unlike AI-based upscaling tools that automatically analyze and enhance images, Photoshop requires multiple manual tweaks to achieve the best results. Users often need to:
- Experiment with different resampling methods.
- Apply sharpening or noise reduction to improve clarity.
- Manually adjust contrast and textures to compensate for lost details.
This makes Photoshop less efficient for quick or large-scale upscaling tasks, especially for beginners who may not be familiar with fine-tuning image quality.
Because of these limitations, users who need high-quality upscaling with minimal effort may find AI-powered image enhancement tools to be a more effective alternative.
A Smarter Way to Increase Resolution: A Photoshop Alternative
While Photoshop allows you to manually increase resolution, the process can be time-consuming and may not always yield the best results. If you’re looking for a more efficient way to upscale images while preserving details, Aiarty Image Enhancer offers an AI-powered solution that eliminates the need for extensive manual adjustments.
Unlike traditional upscaling methods in Photoshop, Aiarty Image Enhancer uses AI technology to analyze and reconstruct image details, ensuring a sharper and more natural result. Instead of simply stretching pixels, it intelligently enhances textures, edges, and fine details that would otherwise be lost in standard resampling.
How to Use Aiarty Image Enhancer to Increase Resolution
Before getting started, you need to download and install Aiarty Image Enhancer.
Step 1: Upload Your Image
Open Aiarty Image Enhancer and drag and drop your low-resolution image into the tool. It supports various formats, including JPG, PNG, and more, and allows batch processing for multiple images at once.
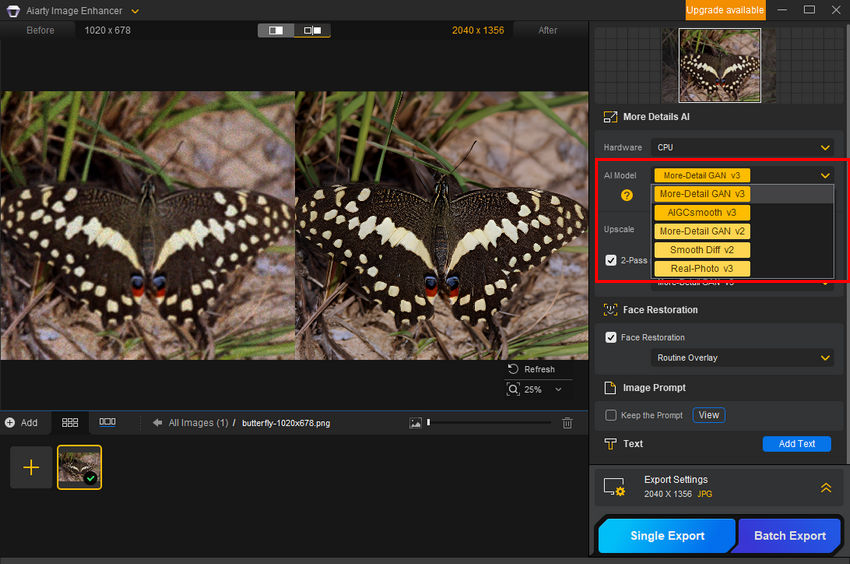
Step 2: Choose an AI Model
Aiarty offers five AI models, each optimized for different image types:
- More-Detail GAN v3 – Enhances details, clarity, and sharpness. Best for upscaling images by 2x or 4x (with 2-pass processing).
- AIGCsmooth v3 – Designed for AI-generated images, improving clarity and texture while maintaining original characteristics.
- More-Detail GAN v2 – Ideal for removing blur and noise, particularly effective for hair, fur, feathers, landscapes, and architectural textures.
- Smooth Diff v2 – Focuses on smoother, clearer restoration, best suited for cartoons, animations, and line drawings, as well as portraits.
- Real-Photo v3 – Optimized for high-quality photos, restoring fidelity and enhancing real-world images, including old photos.
Step 3: Select Upscaling Level
In the Upscale dropdown menu, choose a preset resolution: 1K, 2K, 4K, or 8K, or scale by 1x, 2x, 4x, or 8x. If you need a specific resolution, use Custom Resolution to set your preferred dimensions.
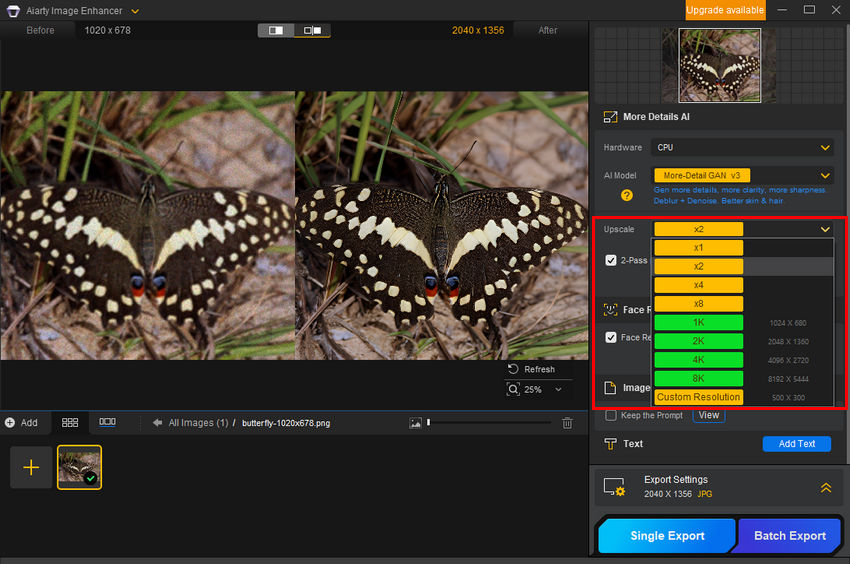
Once selected, Aiarty will process the image. After processing, preview the upscaled result. If satisfied, proceed to the next step.
Tips for better upscaling results:
- Try a different AI model. If the result doesn’t look right, switching to another model can make a noticeable difference.
- Experiment with the upscale method. Upscaling an image directly to ×4 may produce different results than applying ×2 twice to reach the same size. In some cases, a two-step upscale delivers more natural details.
- Adjust the Strength slider. If the image looks over-sharpened or unnatural, lowering the strength can help restore a more balanced and realistic appearance.
- Enable Color Correction if needed. If the subject’s colors look off after upscaling, turn on the color option and fine-tune it to improve color accuracy and overall visual consistency.
Step 4: Adjust Export Settings and Save the Image
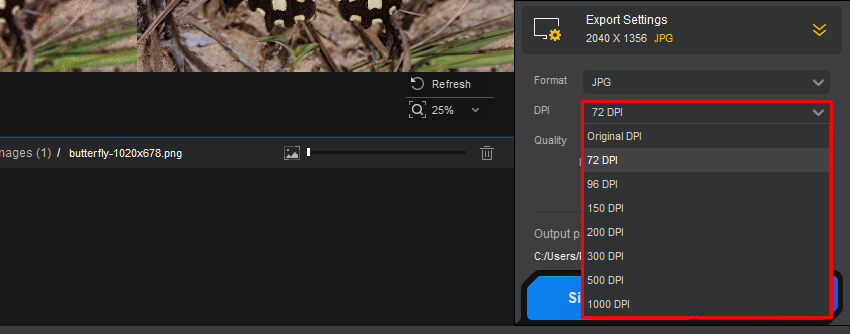
Under the Export Settings section, you can customize the DPI (dots per inch) for better print or digital display quality. By default, Aiarty keeps the original DPI, but you can select from 72, 96, 150, 200, 300, 500, or even 1000 DPI, depending on your needs. A higher DPI is recommended for printing, while 72 or 96 DPI is typically sufficient for web use.
After finalizing the settings, click Single Export or Batch Export to save the enhanced images.
Using Aiarty Image Enhancer simplifies the process of increasing resolution without requiring manual tweaks, making it a great alternative to Photoshop’s traditional upscaling methods.
Not only that, but according to our tests, Aiarty also delivers superior image quality.
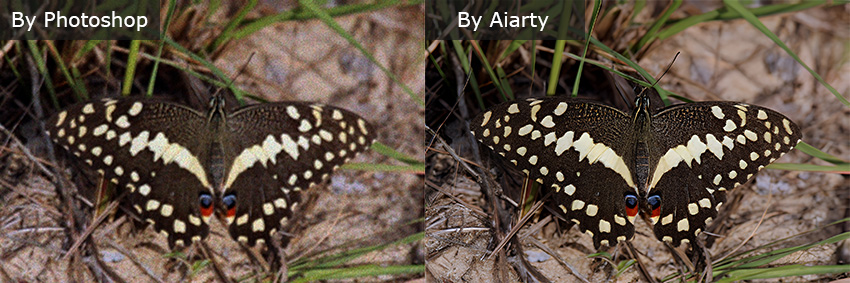
Earlier in this article, we included a comparison of an original butterfly image with a resolution of 1020x678, upscaled to 2040x1356 using both Photoshop and Aiarty.
As seen in the comparison, Aiarty preserves intricate details, especially in the butterfly’s wings, resulting in sharper and more defined edges. In contrast, the Photoshop-upscaled version appears blurry, with noticeable detail loss. Additionally, the Photoshop-upscaled image introduces graininess and noise, whereas Aiarty effectively reduces noise, producing a cleaner and more natural-looking result.
Conclusion
While Photoshop offers a traditional method for increasing image resolution, it often struggles with detail preservation, leading to blurry and grainy results.
In contrast, Aiarty Image Enhancer provides a more advanced solution with AI-powered upscaling, effectively enhancing clarity, reducing noise, and maintaining intricate details.
As demonstrated in our comparison, Aiarty delivers noticeably sharper and more natural-looking results, making it a smarter and more efficient alternative for upscaling images. If you're looking for a hassle-free way to improve image resolution without compromising quality, Aiarty is the way to go.
 FAQs about Image Resolution in Photoshop
Not necessarily. Increasing resolution adds more pixels, but it doesn't create new details. The quality improvement depends on the upscaling method. Traditional tools like Photoshop use interpolation, while AI tools like Aiarty reconstruct details more intelligently.
For high-quality prints, 300 PPI (pixels per inch) is generally recommended. This ensures your image appears sharp and detailed on paper, especially for photos and professional prints.
Photoshop can upscale images using methods like "Preserve Details 2.0", but it often requires manual sharpening and noise reduction. It may struggle with very low-resolution images or intricate details.
Open your image in Photoshop, go to Image > Image Size, and increase the pixel dimensions or resolution. Make sure to select a suitable Resample method like "Preserve Details 2.0" for better results. This helps Photoshop generate new pixel data to upscale the image.
Super Resolution is available in Adobe Camera Raw (ACR). Open your image in ACR (right-click > Open in Camera Raw), right-click on the image, then select Enhance > check Super Resolution. Photoshop will create a new DNG file with 2× the linear resolution (4× the pixel count).
Go to Image > Image Size, uncheck Resample, and change the resolution value to 300 Pixels/Inch. This won't change the total pixel count—only the print resolution. If you want to keep the size and make the image sharper for print, leave Resample checked and Photoshop will adjust the pixel dimensions accordingly.
Photoshop Super Resolution uses Adobe’s AI to analyze the image and generate new pixels based on learned patterns, which often results in cleaner edges and better fine detail. Traditional resampling methods, like Bicubic or Preserve Details, rely on mathematical interpolation only, so enlarged images can look softer and lose texture more easily.
For print, go to Image > Image Size and set the resolution to 300 PPI. If you need to add pixels, enable “Resample” and choose Preserve Details 2.0. Then adjust the dimensions to match your print size. This helps ensure the image stays sharp when printed.
An image becomes blurry when enlarged because there aren’t enough original pixels to support the new size. Photoshop has to estimate and create missing pixels, which often softens edges and reduces clarity. The more you scale up, the more noticeable this loss of detail becomes.
72 DPI is typically used for on-screen display, such as websites and social media, while 300 DPI is the standard for printing. A 300 DPI image contains more pixels per inch, which makes it appear sharper and more detailed on paper. Using a 72 DPI image for print usually results in a soft or pixelated output.
External source:
You May Also Like
This post was written by Brenda Peng who is a seasoned editor at Digiarty Software who loves turning ordinary photos into extraordinary works of art. With AI assistance for brainstorming and drafting, the post is reviewed for accuracy by our expert Abby Poole for her expertise in this field.