How to Change Image Resolution Without Losing Quality (Why Resizing Often Fails)
Updated on
If you’ve ever tried to change an image’s resolution by resizing it online, adjusting DPI in Photoshop, or exporting it at a higher resolution, only to find that the image still looks blurry, you’re not alone. This is one of the most common frustrations with image editing: you change the resolution, but the quality doesn’t actually improve.
The reason is simple, but often misunderstood: Changing Image Resolution ≠ Improving Image Quality
When most people search for “change image resolution”, what they really want is one of these:
- A blurry photo to look sharper
- A small image to meet platform requirements (Amazon, Etsy, print)
- An AI-generated image to be usable at a larger size
- A cropped or scanned image to regain lost details
But changing image resolution, at least in the traditional sense, usually only changes numbers, not image quality. For example, increasing DPI doesn’t add new details, resizing an image just stretches existing pixels, online resizers often duplicate pixels or smooth them out.
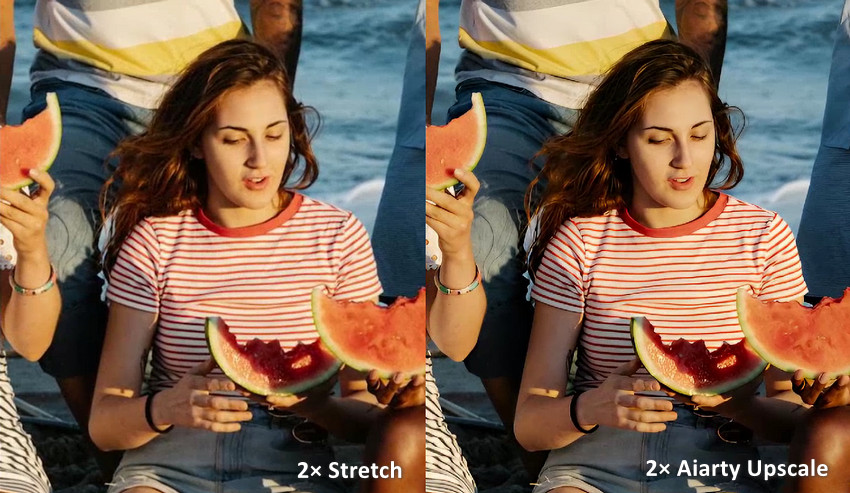
So if your image still looks blurry after all of that, the issue isn’t the tool you used—it’s the method itself. This is where AI image enhancers like Aiarty Image Enhancer come in, using trained models to reconstruct missing details rather than simply stretching what’s already there.
How to Change Image Resolution: What Works, What Fails, and Why
Option 1: Online Image Resizers — Fast, but Fundamentally Limited
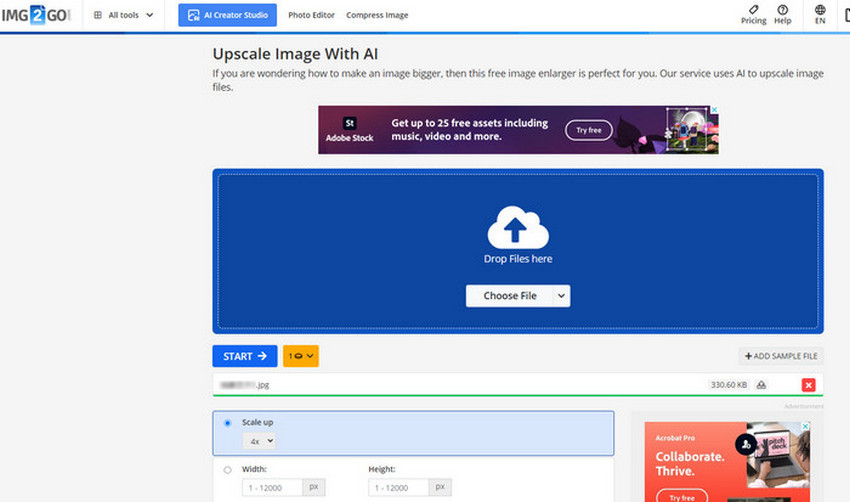
Online image resizers are often the first solution people try. They’re quick, accessible, and require no installation. Tools like Img2Go let you change image dimensions, DPI, or scale by percentage in just a few clicks. For simple formatting needs, this works. But when the goal is better image quality, online resizers hit a hard limit.
Where Online Resizers Fall Short
Most online resizers resize images by duplicating or interpolating pixels, apply basic smoothing to reduce visible artifacts, and compress files to reduce server load. As a result, the enlarged images still look soft, fine details (text, hair, textures) don’t recover, and quality degrades further after export.
This is why images resized online often look acceptable at first glance, but fall apart when viewed closely or used professionally. Online tools are designed for convenience, not for restoring lost detail.
Take Img2Go as an example, the following is how to change image resolution online with Img2Go.
- Visit the Img2Go website.
- Click "Choose File" to upload your image or simply drag and drop it into the browser window.
- Choose to change image resolution by pixel, percentage, or aspect ratio.
- Select the format and DPI (dots per inch) if relevant to your print project.
- Click "Start" to initiate the resizing process.
- Download the resized image once the process is done.
Option 2: Photoshop — Precise Control, Same Pixel Limitation
Photoshop offers far more control over image resolution. You can resize image pixel dimensions, DPI, and resampling methods, making it a go-to choice for professionals. However, even Photoshop can’t escape a core limitation: Traditional resampling doesn’t create real detail.
Update: Photoshop’s Super Resolution can double linear resolution using machine learning, making it useful for cropped or low-megapixel images. However, its fixed scaling and limited flexibility mean dedicated AI image enhancers are often better suited for larger upscales and batch processing.
Why Photoshop Preserve Details Still Can’t Fix Blurry Images
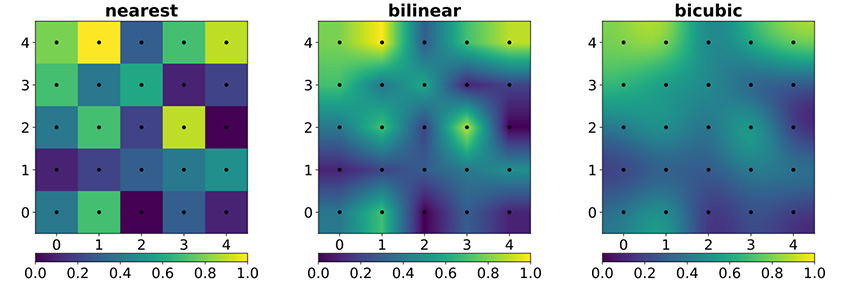
When you increase image resolution in Photoshop, pixels are mathematically redistributed Interpolation algorithms estimate transitions, and no new visual information is introduced. Even advanced options like Preserve Details can only smooth edges, but cannot reconstruct missing textures.
That’s why a low-resolution photo still looks soft after resizing, and increasing DPI doesn’t magically sharpen the image. Even worse, over-resampling often introduces halos or artifacts.
Photoshop is excellent for editing. It’s not designed to recover detail that never existed.
Anyway, here's how to change image resolution in Photoshop.
- Open your image in Photoshop.
- Go to "Image" > "Image Size" to bring up the Image Size dialog box with Width, Height, and Resolution settings.
- Type a new value into the Resolution field to change image resolution: increase image resolution or lower image resolution.
- Ensure Resample is unchecked to maintain the current number of pixels.
- If you need to enlarge dimensions for print, check Resample and choose an interpolation method such as Bicubic Smoother or Preserve Details.
- After making your adjustments, click OK to apply the changes.
- Click "File" > "Save As" to save the adjusted image.
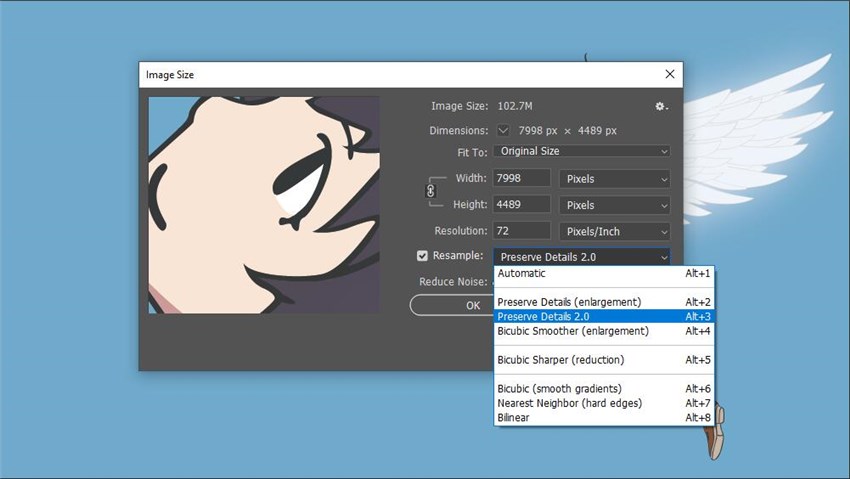
Resample: When checking the Resample option by default, Photoshop will adjust image dimensions by increasing (upsampling) or decreasing (downsampling) pixels from the Width and Height. When unchecked, Photoshop will resize or change image resolution by redistributing existing pixels.
PPI: Traditionally, 72 ppi is the go-to resolution for screen use, while 300 ppi is the standard for print.
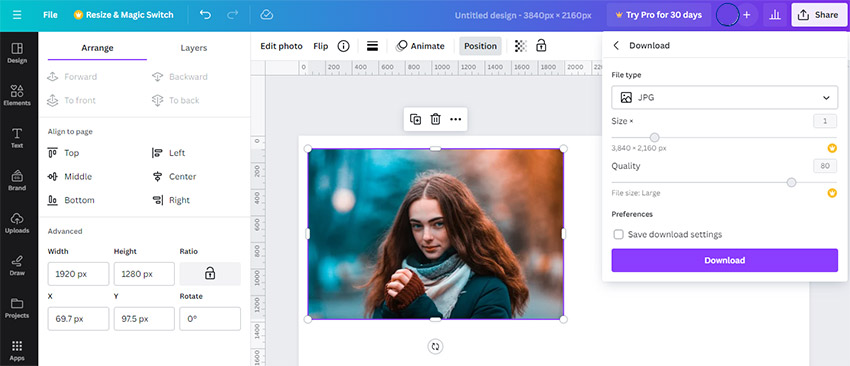
Option 3: Canva — Easy Exports, Limited Image Recovery
Canva makes it easy to export images at different sizes and resolutions, which is useful for social media, presentations, and quick designs. But Canva’s resolution controls are output-focused. You choose dimensions Canva scales the image to fit. There’s no mechanism to rebuild textures, restore clarity, and enhance fine details.
So while Canva is convenient for layout and design, it doesn’t solve the core problem when image quality is already compromised.
Also see: Best photo enlargement software to change resolutions
Here's how to change image resolution in Canva.
- Open Canva and create a design in your desired image resolution.
- Upload the image then drag and drop it to your project.
- Click and select the image.
- Go to Position > Arrange > Advanced on the top toolbar.
- Enter the pixel values in the Width and Height fields.
- You can also drag the resize handles when locking the Ratio to keep its proportion.
- Click Share to download the resized image or post directly on social media.
Online tools, Photoshop, and Canva all rely on the same principle: They rearrange existing pixels. They don’t create new ones. If the original image lacks detail, these methods can’t bring it back—no matter how high you set the resolution. At this point, most users assume: “The image is just bad. There’s nothing I can do.” That’s not true.
Aiarty Image Enhancer: The Only Logical Next Step to Change Resolution
If changing resolution and resizing haven’t worked, the problem isn’t your workflow—it’s the approach. Aiarty Image Enhancer works differently. Instead of stretching pixels, it analyzes structures, edges, and textures, predicts missing details based on learned patterns, and generates new pixels that visually integrate with the original image.
This is why AI upscaling is especially effective for small or cropped images, AI-generated artwork, compressed JPEGs and old photos or scans.
Why Aiarty Image Enhancer Fits This Gap
Aiarty Image Enhancer is designed specifically for situations where traditional tools stop working. What makes it a practical step forward:
- AI models trained on diverse image types (photos, illustrations, CGI, anime).
- AI image upscaling that focuses on detail reconstruction, not just size.
- Outputs that look natural instead of overly sharpened.
- Batch processing for real-world workflows.
In other words, it doesn’t just change image resolution, it enhances what the resolution represents.
How to Increase Image Resolution with AI (Practical Workflow)
Step 1: Launch Aiarty Image Enhancer and drag and drop your images into the interface.
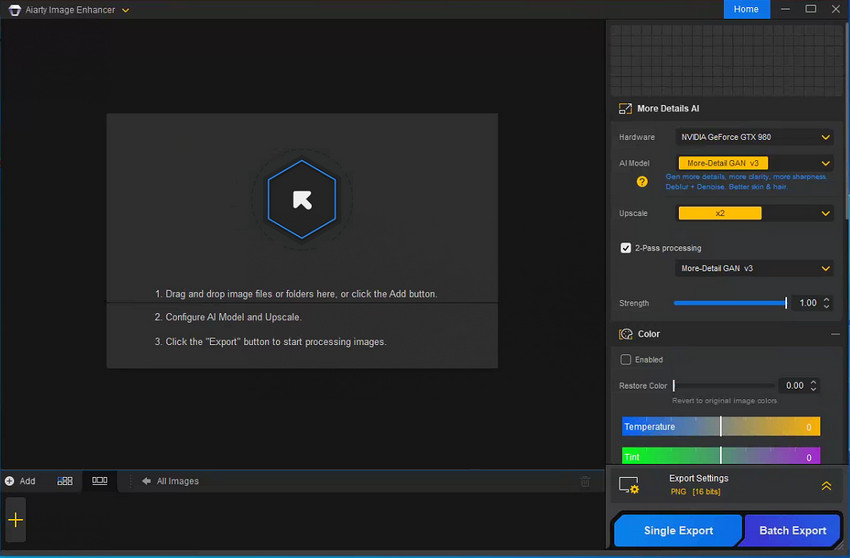
Step 2: Choose an AI model based on your specific image type and enhancement needs.
Step 3: Select the desired upscale option (x1, x2, x4, x8 or 1K, 2K, 4K, 8K) from the Upscale drop-down list.
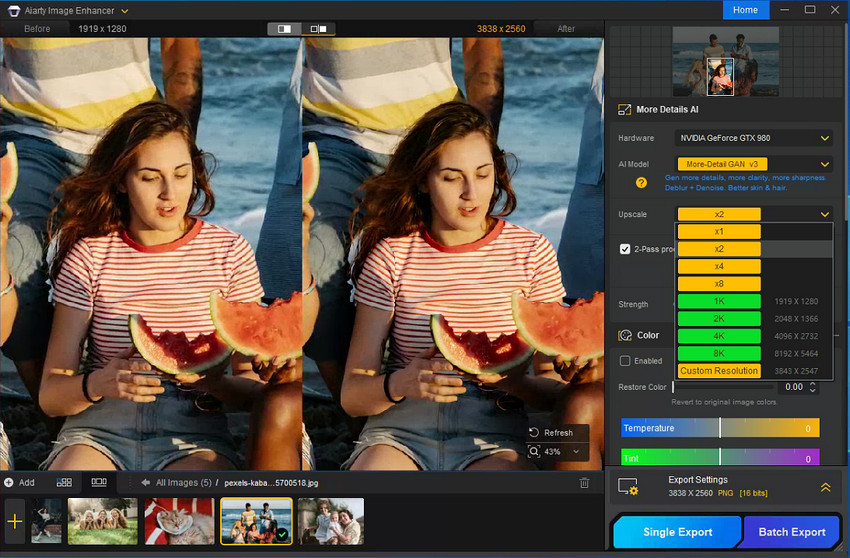
Step 4: Set the output format and adjust the quality level as needed.
Step 5: Click Single Export to increase image resolution with AI.
Final Thoughts
If changing image resolution hasn’t improved your image before, it wasn’t because you did it wrong. It’s because: resizing only changes numbers, while AI enhancement changes image quality. Once you understand that difference, the path forward becomes clear.
Try Aiarty Image Enhancer to actually improve your photos, not just their size.
 FAQs about Image Resolution Adjustment
1. Why does my image still look blurry after increasing the resolution?
Because most traditional methods don’t add real detail. Changing resolution values (like width, height, or DPI) usually just redistributes existing pixels. If the original image lacks detail, resizing it only makes the blur more visible—especially at larger sizes. To actually improve clarity, new visual information needs to be reconstructed, not stretched.
2. Is increasing DPI the same as improving image quality?
No. Increasing DPI mainly affects how an image is printed, not how much detail it contains. If the pixel dimensions stay the same, raising DPI won’t make the image sharper on screen or restore lost textures. This is why images often look unchanged—or still soft—even after DPI adjustments.
3. Can Photoshop fix low-resolution images?
Photoshop is excellent for editing, but traditional resizing and resampling don’t recover missing details.
Adobe’s Super Resolution does use machine learning and can produce better results than standard resampling, especially for cropped or low-megapixel RAW files. However, its scaling options and workflow flexibility are limited compared to dedicated AI upscalers, particularly for larger upscales or batch processing.
4. Are online image resizers enough for professional use?
Online tools are convenient for quick size adjustments, but they prioritize speed and accessibility over quality. They typically rely on basic interpolation and compression, which makes them unsuitable when image clarity matters—such as for printing, e-commerce listings, or AI-generated images that need to scale cleanly.
5. When does AI image upscaling actually make sense?
AI upscaling becomes necessary when:
- The image is too small but must remain sharp
- Details were lost due to compression or cropping
- Resizing produces visible blur or artifacts
Instead of stretching pixels, AI models analyze patterns and reconstruct plausible details, which is why they perform better in these scenarios.
6. Will AI upscaling make images look fake or over-sharpened?
It can—if the model or settings are poorly chosen. Modern AI image enhancers are designed to balance realism and clarity, focusing on texture recovery rather than aggressive sharpening. The key is using models suited to the image type (photo, illustration, AI art) and avoiding excessive upscaling beyond what the source image can support.
You May Also Like
Brenda Peng is a seasoned editor at Digiarty Software who loves turning ordinary photos into extraordinary works of art. With years of experience behind the lens and in front of the computer, Brenda shares her passion for photography, image enhancement, and editing through easy-to-follow tutorials.