How to Increase Image Resolution While Keeping Images Natural
Updated on
You increase the resolution. The image gets bigger. But faces suddenly look waxy, edges become over-sharpened, and textures start looking artificial instead of clearer.
That’s because increasing image resolution and restoring real detail are not the same thing.
Most upscaling tools can only generate new pixels based on guesses. If the original image already contains blur, compression artifacts, noise, or missing detail, those problems often become even more obvious after enlargement.
In this guide, we’ll explain why image upscaling sometimes fails, which types of images respond best to AI upscaling, and how to increase resolution without making photos look unnatural.
Why Increasing Resolution Often Makes Images Worse
Many people expect a higher-resolution image to automatically look clearer and more detailed. But after upscaling, the result often looks strangely artificial instead. Faces become waxy, textures appear over-sharpened, and noise or JPEG artifacts suddenly become much more visible. That’s because increasing resolution is not the same thing as restoring real image detail.
Most AI upscalers can only estimate what missing pixels should look like. If the original image already contains blur, compression artifacts, or missing texture, those flaws often become even more obvious after enlargement.
1. Resolution ≠ Real Quality
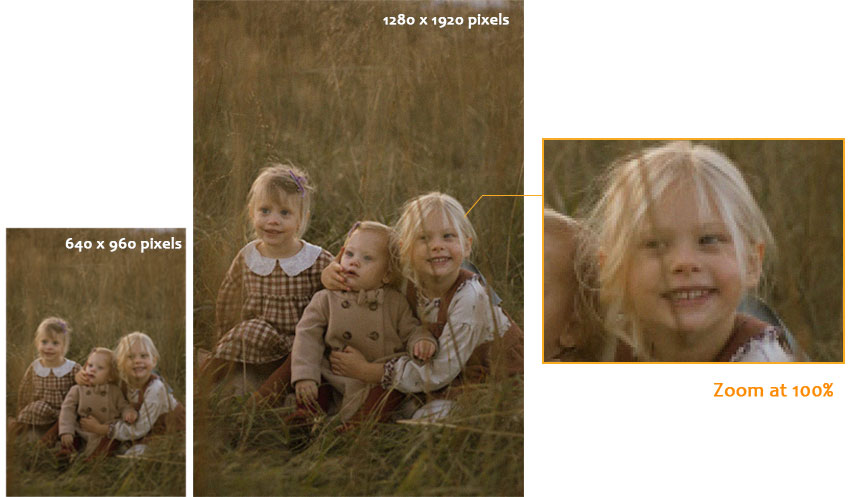
Increasing resolution only adds pixels. It does not automatically recover real detail that was never captured in the original image. That’s why a blurry 800px image can become a larger 3200px image while still looking soft or artificial.
2. Portraits Often Become Waxy and Oversharpened
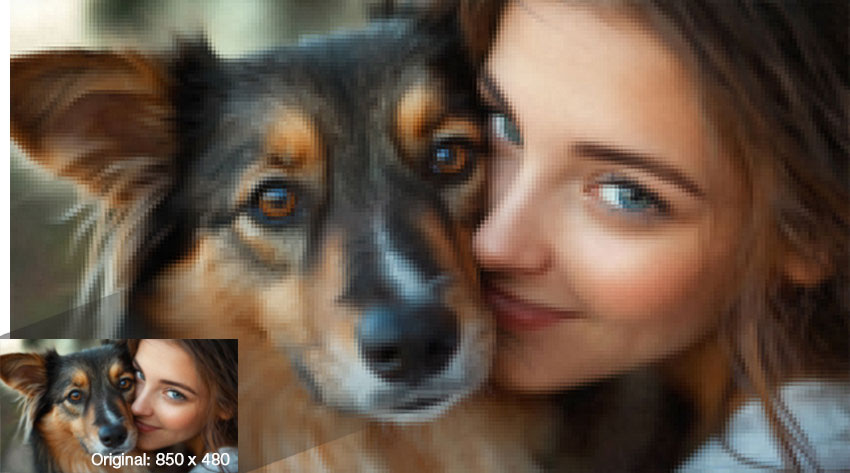
Portraits are one of the easiest image types to overprocess. Many AI enhancers aggressively smooth skin while sharpening eyes, eyelashes, and facial edges. The image may initially look “cleaner,” but zooming in often reveals plastic-looking skin, unnatural hair texture, and overly sharp eyes that no longer look realistic. Hair is especially difficult for AI models to reconstruct naturally, particularly in compressed selfies or low-quality social media photos.
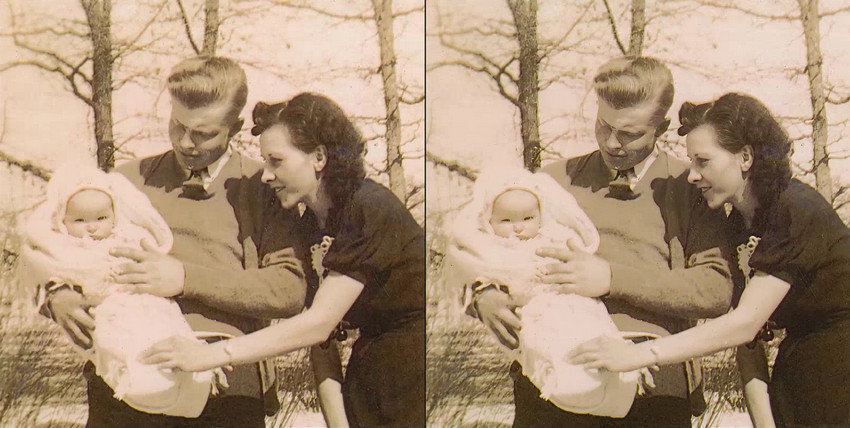
3. Old Photos Can Amplify Grain and Scratches
Restore old photos often involves working with faded textures, film grain, scratches, and uneven sharpness. Upscaling can sometimes improve perceived detail, but aggressive enhancement may also exaggerate existing damage. Small scratches and grain patterns can become more noticeable after enlargement. In many cases, moderate restoration with light sharpening produces more natural results than extreme upscaling alone.
4. JPEG Screenshots Usually Lack Enough Real Detail
Screenshots and compressed web images are difficult to upscale because much of the original detail has already been lost. After photo enlargement, text may become distorted, edges can develop halos, and JPEG artifacts often become more noticeable instead of disappearing.
5. AI-generated Images Can Develop Fake Textures
AI-generated images often contain synthetic textures before upscaling even begins. Additional enhancement can create exaggerated detail patterns, making skin, fabric, or backgrounds look unnaturally sharp or inconsistent.
6. Low-light Photos Often Become Noisier After Upscaling
Low-light images already contain visible noise and muddy shadows. After enlargement, these imperfections often become even more obvious. Strong photo denoising may help, but excessive cleanup can also remove natural texture and make images look overly soft.
What Actually Helps Increase Image Quality
Improving image quality is not just about increasing resolution. In many cases, cleaner and more natural-looking results come from balancing sharpness, noise reduction, and texture preservation together.
- Cleaner source images usually upscale better than blurry or heavily compressed files.
- Moderate upscaling often looks more natural than aggressive 8X enlargement.
- Noise reduction is just as important as sharpness, especially for low-light photos.
- Different image types require different enhancement styles and sharpening strength.
How to Increase Image Resolution for Different Upscaling Scenarios
Not all AI image upscalers are designed for the same type of images. Some tools perform better on portraits and old photos, while others are more suitable for cleaner digital images. Choosing the right tool depends less on features and more on how the image behaves in real-world conditions.
Below is a practical breakdown based on typical use cases rather than feature comparisons.
AI Upscalers (Best for Most Low-Resolution Photos)
AI upscalers are usually the best option for improving low-resolution images because they combine enlargement with sharpening, denoising, and texture enhancement at the same time. However, different tools still behave very differently depending on the image type.
1. Aiarty Image Enhancer
Aiarty Image Enhancer is designed to prioritize natural-looking results rather than aggressive sharpening. In most cases, it enhances clarity while keeping skin texture and overall structure relatively realistic, especially in portraits and scanned photos. Compared to more “sharpness-heavy” tools, it is less likely to produce overly waxy skin or artificial-looking detail.
- Noisy or low-light photos
- Old scanned images and faded prints
- Portraits and general photo enhancement where natural results matter
- Mixed image types (JPEG, PNG, RAW, WebP, digital art, and AI-generated images)
- Extremely compressed JPEG images with heavy artifact loss
- Heavily blurred or low-information screenshots
- Images that require full reconstruction rather than enhancement
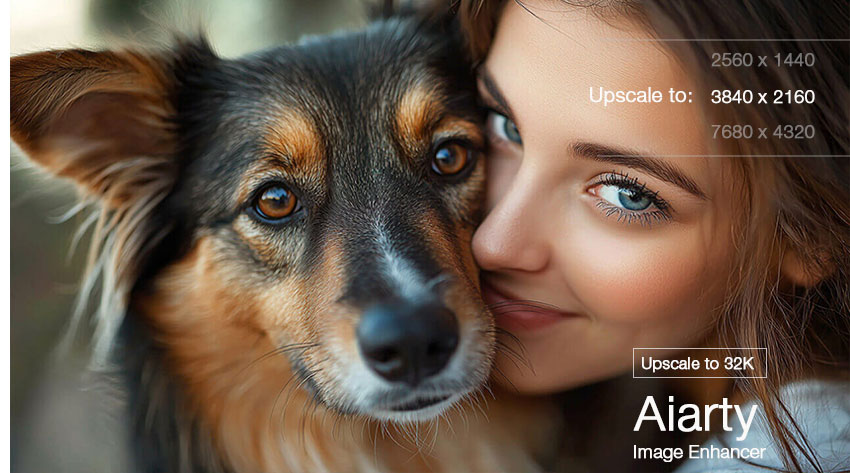
Quick Steps to Increase Image Resolution in Aiarty Image Enhancer
- Drag and drop to load your photo(s) into the AI image upscaler.
- Choose an AI model that suits your photo type. Usually More-Detail model works best for skin, hair, fur, and textured images, adding sharper and clearer detail during upscaling.
- Decide the Upscale factor (x1, x2, x4, x8, 2K, 4K, 8K or your custom resolution), and wait the interferring.
- Tap "Single Export" or "Batch Export" to save the upscaled photo(s).
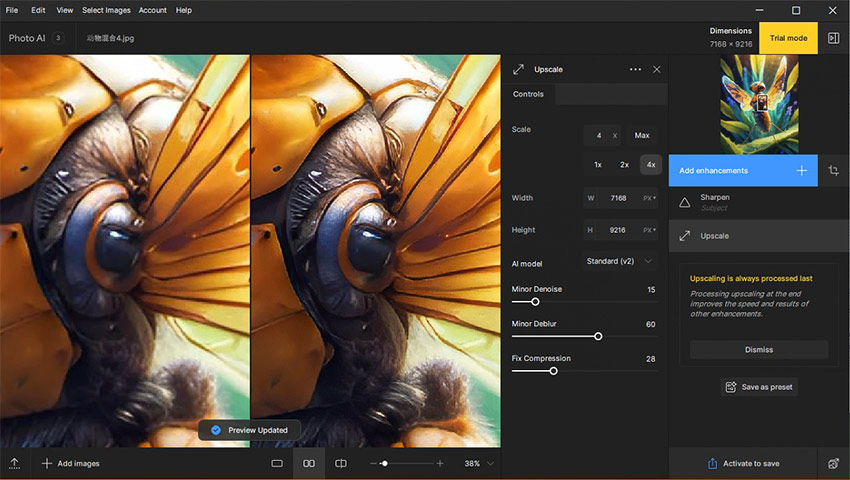
2. Topaz Photo AI
Topaz often produces sharper and more dramatic results, particularly when trying to convert low-resolution image to high resolution for detailed textures like fur, grass, and architecture. However, stronger enhancement can sometimes create oversharpened edges or artificial-looking detail on portraits and low-quality JPEG images.
- Landscape photos
- Wildlife and texture-heavy images
- Users wanting stronger sharpening control
- Overprocessing facial texture
- Aggressive sharpening on compressed images
Easy Steps to Enlarge Image Resolution with Topaz Photo AI
- Load your photo by dragging it into Topaz Photo AI or using the file browser.
- Select the Upscale tool to enlarge an image resolution up to 4X.
- Adjust sharpening, denoise, and upscale strength using the sliders, or use Autopilot for automatic enhancement.
- Export the final image in your preferred format and quality.
What About Photoshop and Online Upscalers?
Traditional editors like Photoshop still work well for manual control and light resizing, especially for print workflows and professional editing.
Online upscalers such as Canva, Let’s Enhance, and Pixelcut are convenient for quick fixes, but they usually offer less control over sharpening, denoising, and texture preservation compared to dedicated AI enhancement tools.
Can AI Really Restore Lost Detail?
AI upscaling can improve perceived detail, but it cannot perfectly recover information that never existed in the original image. In many cases, AI models generate believable textures instead of reconstructing authentic detail. Hair may appear sharper, skin may look smoother, and edges may become cleaner, but some of those details are still AI-generated estimates rather than true recovered information.
That’s why some upscaled images look impressive at first glance but start appearing artificial when viewed closely. This becomes especially noticeable in:
- skin texture
- eyelashes and hair strands
- distant objects
- text and fine lines
- low-light shadows
The lower the quality of the original image, the more the AI has to “guess” missing detail during enlargement.
This does not mean AI upscaling is ineffective. In many situations, it can make low-resolution images look cleaner, sharper, and more usable for printing, editing, or sharing online. But the best-looking results usually come from realistic enhancement rather than extreme sharpening or aggressive enlargement.
Final Words
Increasing image resolution is not just about making an image bigger. The real challenge is improving clarity without introducing fake textures, oversharpening, or amplified noise. Different images respond very differently to upscaling. Portraits, old photos, screenshots, and low-light images each require a different balance between sharpness, texture preservation, and noise reduction.
In many cases, moderate enhancement produces more natural-looking results than aggressive enlargement alone.
Try Aiarty Image Enhancer on Different Image Types
Portraits, old family photos, compressed JPEGs, and AI-generated images all behave differently during upscaling. Testing different enhancement models on your own images is often the easiest way to find the right balance between sharpness and realism without making photos look overprocessed.
You May Also Like
Brenda Peng is a seasoned editor at Digiarty Software who loves turning ordinary photos into extraordinary works of art. With years of experience behind the lens and in front of the computer, Brenda shares her passion for photography, image enhancement, and editing through easy-to-follow tutorials.