How to Enlarge Image Without Losing Quality
Updated on
Quick Answer: The best way to enlarge an image without losing quality is to use an AI image upscaler. Unlike traditional resizing, AI tools can generate new details, restore textures, and reduce blur. Among the tools tested, Aiarty Image Enhancer delivers the most natural and high-fidelity results, especially for low-resolution, compressed, or old photos.
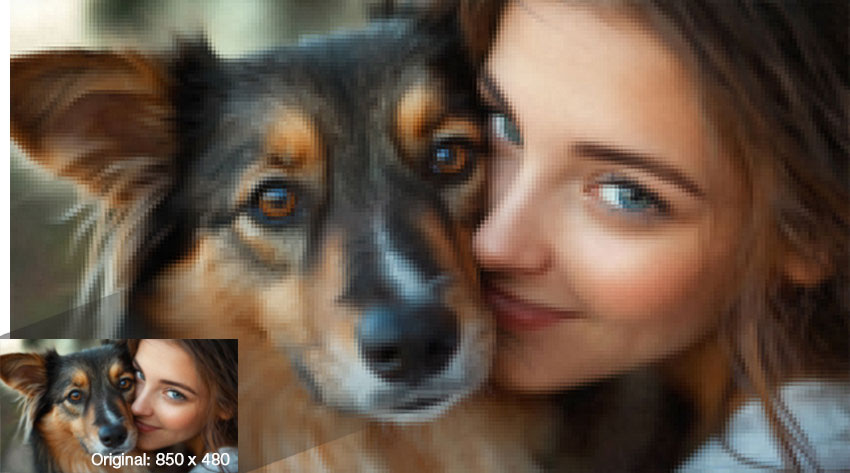
When people ask how to enlarge an image without losing quality, the real concern is not resolution, but whether important details can be preserved. Traditionally, enlarging an image almost always leads to blur, noise, or jagged edges, because the software simply stretches existing pixels. No new visual information is created.
AI image enlargement works differently. Instead of resizing pixels, modern AI upscaling models analyze patterns, textures, and edges using neural networks trained on millions of high-resolution images. Based on this learned knowledge, AI can reconstruct missing details, not just interpolate them. This raises an important question many users ask: Does AI upscaling really avoid quality loss, or does it just create “fake details”?
In this guide, we’ll explain how AI image enlargement preserves details, when it works, when it fails, popular AI image upscaling tools, and how AI compares with traditional tools like Photoshop.
AI vs Traditional vs Online Methods for Enlarging Images
Whether you’re enlarging images for high-resolution printing, restoring compressed JPEGs, or enhancing product shots, enlarging an image without losing quality requires precision. The following three methods, ranging from manual resizing to advanced AI image upscaling, show how to increase image resolution while maintaining edge definition, color accuracy, and fine detail.
1. AI Image Upscaler (Best for Maximum Detail Restoration)
AI image upscalers are designed to enlarge low-resolution imagess without losing quality based on AI, automatically reconstructing details using trained neural networks. Popular options include Aiarty Image Enhancer, Topaz Photo AI, and HitPaw.
How to use:
- Upload your image and select the appropriate model (portrait vs. real detail) and scale (2×, 4×, or custom).
- Preview at 100% and adjust settings if needed (reduce smoothing for skin or texture).
- Export in high-quality formats like TIFF or PNG.
Best for: low-res photos, compressed JPEGs, or when you need to restore texture and fine detail for large prints.
Pick a high-quality AI image upscaler like Aiarty Image Enhancer, which is designed specifically for enlarging images without losing quality.
2. Traditional Method with Photoshop (Best for Control & Print Work)
Manual resizing in Photoshop gives you precise control over edges, colors, and sharpness, but it does not “invent” new details.
How to use:
- Open image in Photoshop. Choose Image → Image Size.
- Enable Preserve Details 2.0 (Interpolation) and set the target dimensions or resolution (e.g., 300 DPI for printing).
- Apply selective Smart Sharpen or High Pass (blend mode: Overlay) on problem areas.
Best for: images where you need precise control (print, product photos). Photoshop preserves edges well but won’t “invent” missing texture.
3. Free Online Resizer (Best for Simple Needs)
Free online tools (ResizePixel, IMG2GO, etc.) offer easy, no-install enlargement, but detail preservation is limited.
How to use:
- Use a reputable free site (ResizePixel, IMG2GO, or similar).
- Upload your image and choose a proportional scale (e.g., 200% or 400%).
- Select any “enhance” or “sharpen” option if offered, then download as PNG or high-quality JPG.
Best for: blog images, quick sharing, non-critical prints. Expect modest improvements but limited detail recovery.
How AI Image Upscaling Preserves Details Without Quality Loss
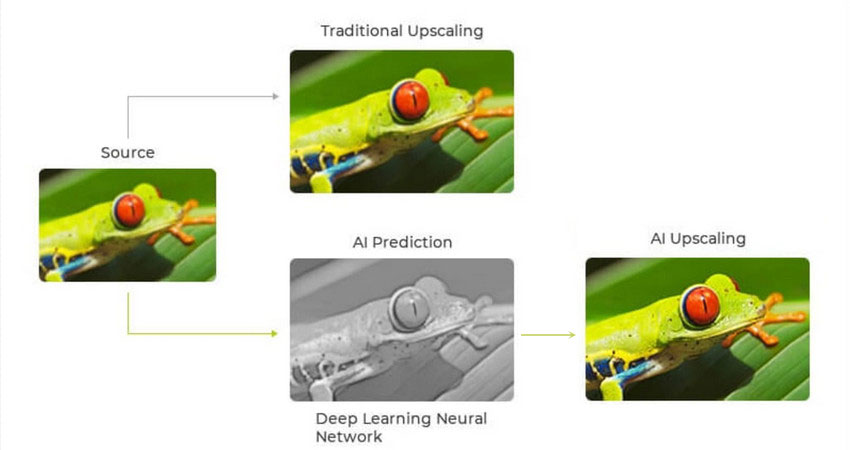
Neural network AI image upscaling does not simply enlarge pixels. Instead, it predicts how high-resolution details should look based on learned visual patterns. For example, when enlarging hair, fabric, or text edges, AI models analyze surrounding context and reconstruct sharper boundaries rather than stretching blurred ones. This is why AI-upscaled images often appear clearer than those resized with traditional methods.
However, AI does not recover original details that never existed. In extreme enlargements or heavily compressed images, the model may generate approximated textures, which can look artificial. Understanding this limitation is crucial when evaluating whether AI upscaling truly “preserves quality.”
Best Tools to Enlarge Image Without Losing Quality (Real Test Review)
#1. Aiarty Image Enhancer
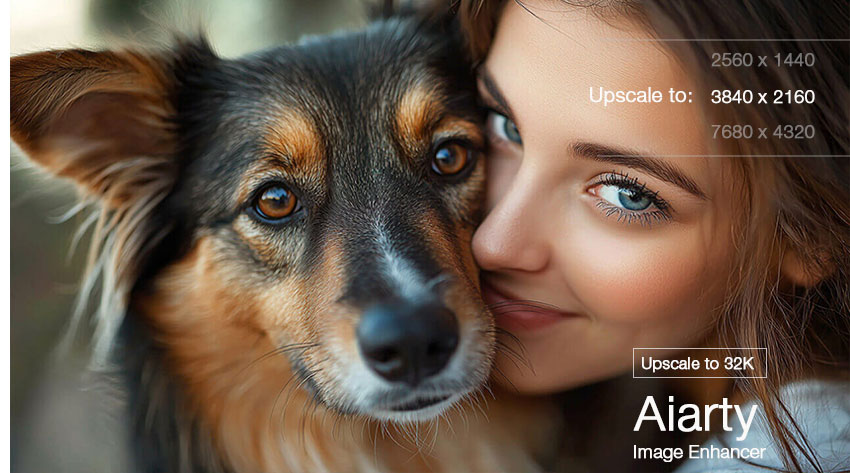
In most cases, AI upscaling tools like Aiarty Image Enhancer provide the best results for enlarging images without losing quality. It's a professional AI image enhancer designed to enlarge images without quality loss. Whether you're enhancing print resolution or fixing pixelated images, Aiarty can upscale photos up to 32K with stunning clarity. Compared to traditional resizing, Aiarty not only increases resolution but also reconstructs missing details.
Key Highlights:
- Upscale images to 4K, 8K, or 32K without pixelation or artifacts
- Recover and enhance compressed or low-res JPEGs
- AI models for portraits, smooth design, or detail generation
- Batch process supported – perfect for large projects
Price Plans: $75/yearly for 3 PCs, $99/lifetime for 3 PCs
[Step-by-Step] How to Enlarge Images without Losing Quality in Aiarty
Step 1. Install and open the AI image enlarger. Free download and install Aiarty Image Enhancer on your computer. Launch it to get started.
Step 2. Load your image(s) to be enlarged. Drag and drop your target image(s) or the whole image folder to Aiarty Image Enhancer. It starts automatically analyzing the image.

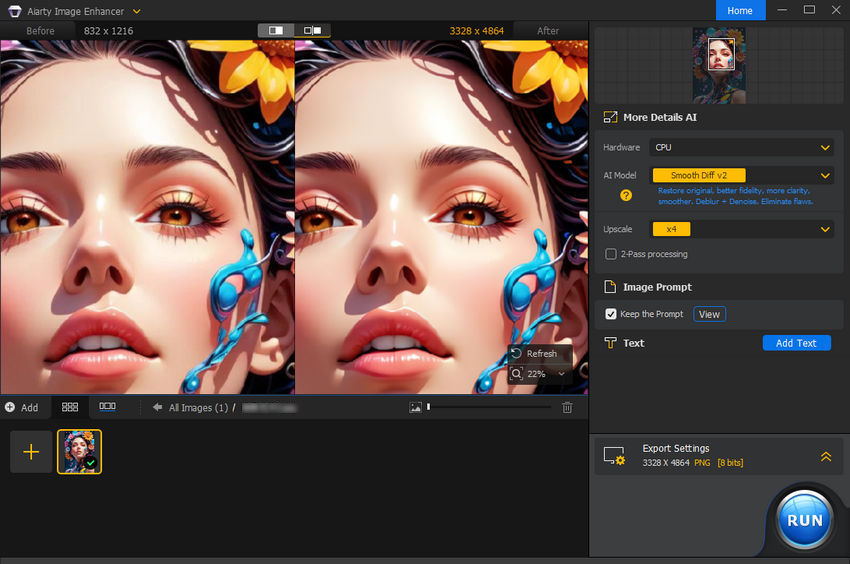
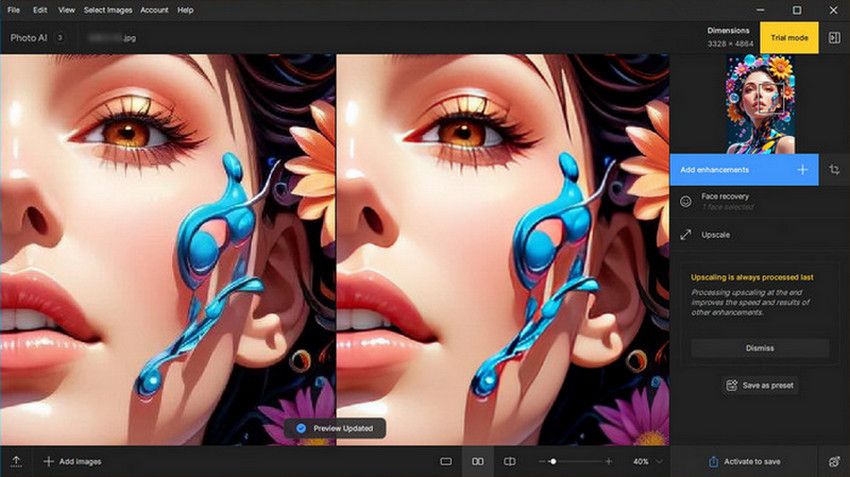
Step 3. Select AI Model and Upscale factor. At the right panel, you can choose Hardware, AI Model, and the scale of Upscale based on your needs. For example: CPU, Smooth Diff v3, and 4X.
- Hardware: CPU or the specific GPU on your computer to process the image.
- AI Model: More-detail GAN to generate more details, Smooth Diff for the original image that’s smooth and flawless, and Real-Photo specially used for photo restoration.
- Upscale: 1X, 2X, 4X, 8X, 1K, 2K, 4K, 8K. Max. 32K on Windows, and 16K on Mac.
- Fine-tune Color (optional): Use Color controls to correct faded or yellowed images and fine-tune tones after AI processing for a natural, polished look if necessary.
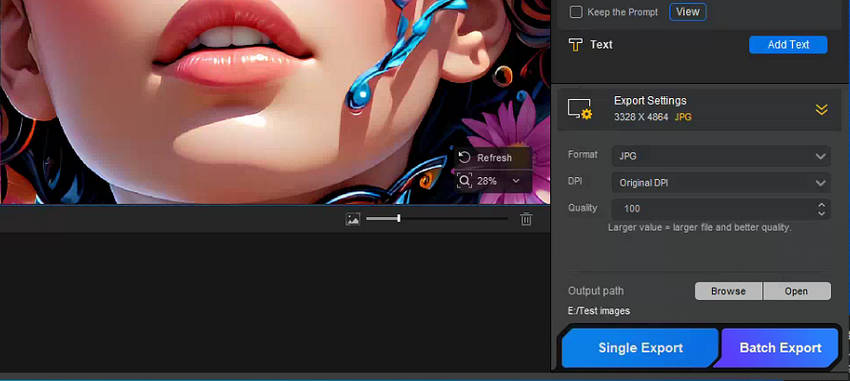
Step 4. Export the Enlarged Image. Expand Export Settings to select output format, and output path. Press Single Export or Batch Export button to start processing image enlarging without losing quality.
📊 Test Results:
- Image 1: Source: File size 330KB, Resolution 832 x 1216 pixels
4X enlarged: File size 23.4MB, Resolution 3328 x 4864 pixels - Image 2: Source: File size 1.09MB, Resolution 976 x 1000 pixels
4X enlarged: File size 19.2MB, Resolution 3904 x 4000 pixels
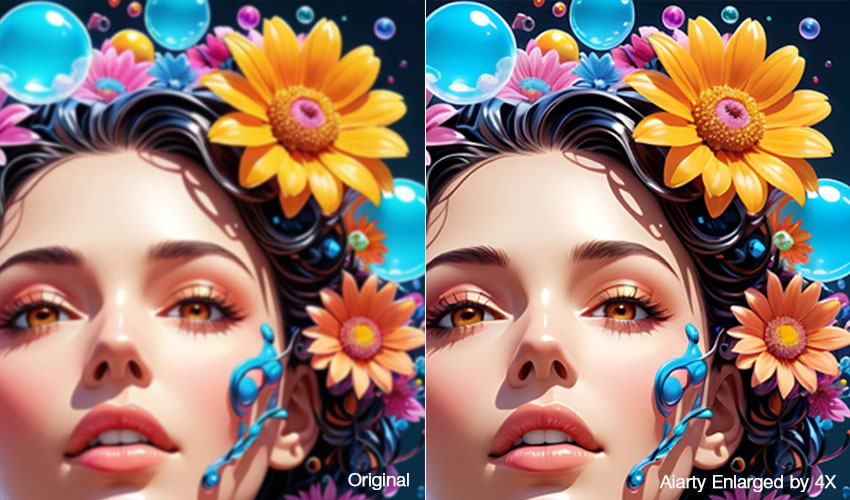
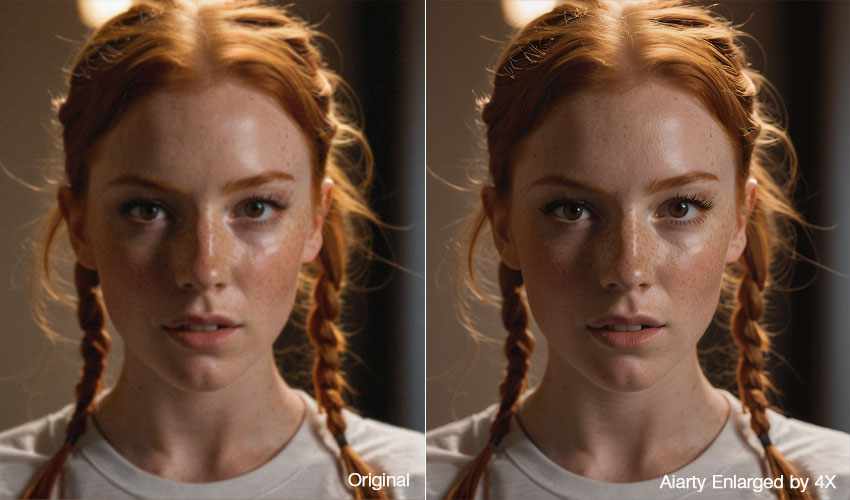
Output Quality: Compared to the original images, the images enlarged using Aiarty Image Enhancer are significantly clearer, removing blur and repairing artifacts caused by JPEG compression. In Image 1, the colors are brighter, the saturation and contrast are higher, achieving unparalleled clarity. In Image 2, skin blemishes, pores, and hair are well-processed, and even more details are generated based on the blurred original image, making the image clearer and more vivid.
Who should use Aiarty Image Enhancer? Ideal for users who need ultra-high-quality enlargement for printing, restoration of old or compressed JPEGs, or detailed portrait enhancement. Great for designers, photographers, and eCommerce sellers who demand premium output.
#2. Topaz Photo AI
We all know how frustrating it can be when you try to enlarge a photo and it ends up blurry or pixelated. That’s where Topaz Photo AI comes to the rescue. Using smart AI technology, it effortlessly upscales your images while keeping every detail sharp and clear, making your photos look professional without any extra hassle.
Key Features:
- AI-powered upscaling to resize images larger up to 6x their original size without introducing artifacts or distortions.
- Eliminates noise and sharpens images, ensuring that enlarged images retain crispness and clarity.
- Raw image processing, enabling users to work with the highest level of detail and dynamic range.
- Boasts an intuitive and straightforward interface, making it accessible to users of all skill levels.
Price Plans: The Personal plan starts at $21/month ($252/year), with Pro ($58) and Studio ($37) costing even more.
Learn More: The Ultimate Topaz Photo AI AI Review: Is It Worth the Hype?
How to Enlarge Image without Losing Quality Using Topaz Photo AI
Step 1. Free download and install Topaz Photo AI on your computer. Then open it up.
Step 2. Drag and drop to import the image(s) that you want to enlarge with high quality.
Step 3. Click on the Upscale option to determine the enlarge times you want.
Step 4. Click the Export image icon to access a new window, where you can rename the image, choose the output format and folder path.
Step 5. Tap the Save button to export the enlarged image without sacrificing quality.
📊 Test Results:
- Image 1: Source: File size 330KB, Resolution 832 x 1216 pixels
4X enlarged: File size 40.9MB, Resolution 3328 x 4864 pixels - Image 2: File size 1.09MB, Resolution 976 x 1000 pixels
4X enlarged: File size 11.8MB, Resolution 3904 x 4000 pixels

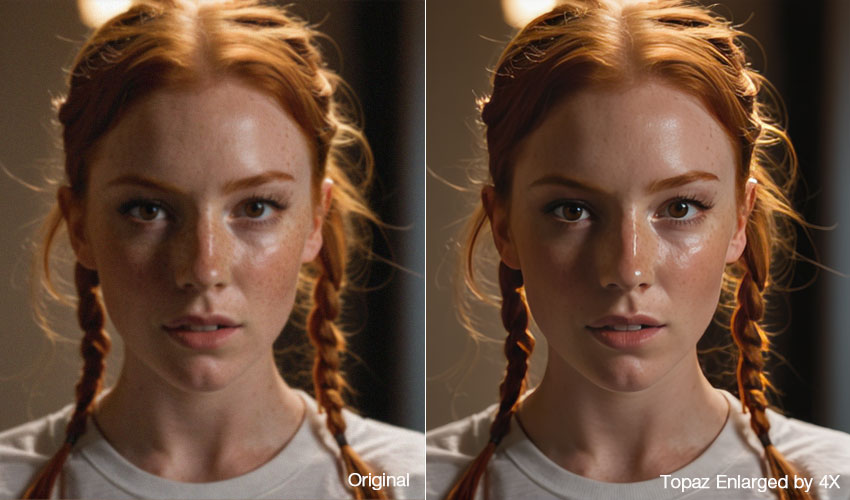
Output Quality: The actual file size of the photos increased quite a bit. In our tests, image 1 looked great when enlarged, with sharp details and clear quality. The image 2, however, lost a lot of detail when zoomed in, had a heavy skin-smoothing effect, and the overall clarity improvement wasn't as impressive as we'd hoped.
Who should use Topaz Photo AI? This is a great choice for photographers working with RAW images or users who want advanced sharpening and noise reduction during upscaling.
Hot Search: Aiarty Image Enhancer vs Topaz Photo AI AI: Which Delivers Better Results and Value?
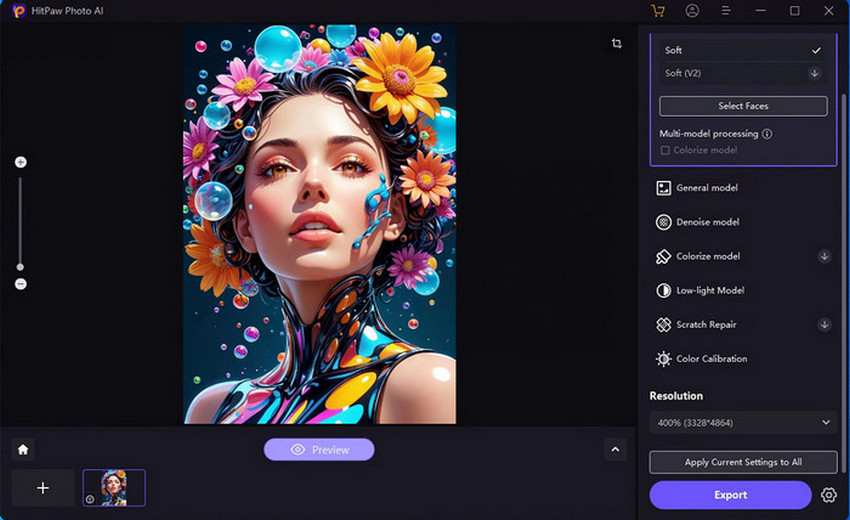
#3. HitPaw Photo AI
HitPaw Photo AI takes the frustration out of resizing photos! This user-friendly software utilizes cutting-edge AI to enlarge your images without sacrificing quality. Unlike traditional methods that lead to blurry pixels, HitPaw Photo AI intelligently increases the file size and sharpness, preserving the pristine detail in every corner of your photo. It's a nice solution for anyone who needs to upscale images for printing, presentations, or online sharing.
Key Features:
- Advanced AI algorithms to significantly enlarge images, with some sources claiming up to 800% increase, while preserving details and sharpness.
- Noise reduction and sharpening ensures that enlarged images remain crisp and clear, free from unwanted artifacts or blurriness.
- Streamlines your workflow by allowing you to process multiple images simultaneously.
Price Plans: Monthly: $21.99 per month, Yearly: $89.99 per year, Perpetual: $129.99
HitPaw Photo AI Tutorial - How to Upscale an Image without Losing Quality
Step 1. Get HitPaw Photo AI on your computer, install and open it up.
Step 2. Click on Choose files option, or drag and drop to import the images that you want to enlarge. Multiple images are allowed for batch processing.
Step 3. At the right panel, move the slider to find Resolution, drop it down and choose the scale of amplification, for example 400% here.
Step 4. Click the Preview on the preview window, the image upscaler starts analyzing and enlarging the image. After then, you’ll see a before and after comparison of the image.
Step 5. Click the Export icon to export the enlarged image.
📊 Test Results:
- Image 1: File size 330KB, Resolution 832 x 1216 pixels
4X enlarged: File size 1.19MB, Resolution 3328 x 4864 pixels - Image 2: File size 1.09MB, Resolution 976 x 1000 pixels
4X enlarged: File size 13.3MB, Resolution 3904 x 4000 pixels

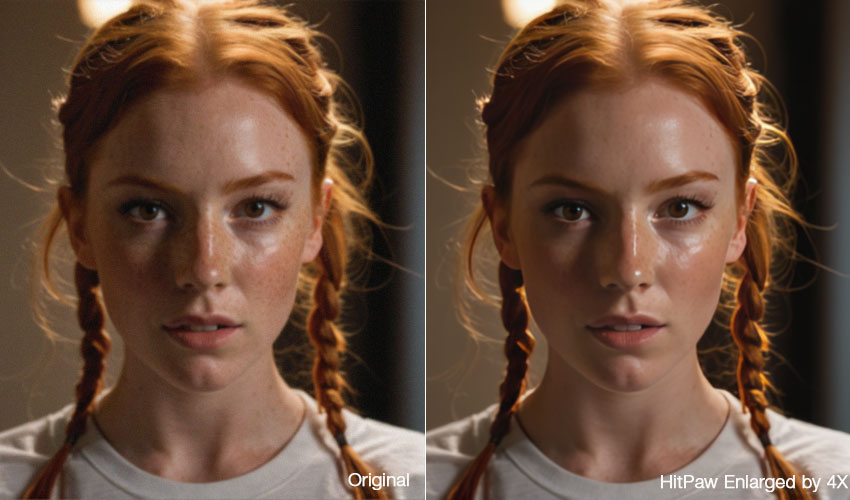
Output Quality: In terms of the final file size of the enlarged images, HitPaw Photo AI adds a smaller size. However, this also means lower quality. As we can observe, Image 1 exhibits noticeable blurriness upon enlargement, while Image 2 undergoes excessive skin smoothing, resembling an artificial depiction. Despite its claims, HitPaw fails to deliver on its promise of enlarging images without compromising quality.
Who should use HitPaw Photo AI? Best for beginners or casual users who need a fast, user-friendly tool for enlarging photos. It's especially helpful for basic upscaling and batch processing, though less suited for high-detail requirements.
#4. Luminar Neo
Popular with both beginners and pros, Luminar Neo takes photo editing to a new level with powerful AI tools. One game-changer is the AI Image Upscale extension, effortlessly enlarging photos up to 6x while preserving high-quality resolution. This simplifies upscaling like never before, letting you create print-ready masterpieces in a snap.
Key Features:
- Enlarge your photos up to 6x their original size without sacrificing detail or introducing artifacts.
- Luminar Neo prioritizes maintaining natural and enhanced resolution during the upscaling process, ensuring your enlarged images remain crisp and clear.
- The user-friendly interface streamlines the upscaling process.
- Even at larger sizes, Luminar Neo preserves the intricate details and subtle nuances within your photos.
Price Plans: $11.95/month, $119.00 for 24 months, and $79.00 for 12 months
Tutorial on How to Enlarge Images in Luminar Neo with No Quality Loss
Step 1. Open Luminar Neo and drag an image into the workspace. Or you can import images by clicking the Add Photos option.
Step 2. Drop down the Upscale at the right panel, and choose 4X for example to enlarge your image.
Step 3. Click Upscale to enlarge your image by 4X.
Step 4. Tap the Export option at the top right corner to save the enlarged image.
📊 Test Results:
- Image 1: File size 330KB, Resolution 832 x 1216 pixels
4X enlarged: File size 14.8MB, Resolution 3328 x 4864 pixels - Image 2: File size 1.09MB, Resolution 976 x 1000 pixels
4X enlarged: File size 10.3MB, Resolution 3904 x 4000 pixels

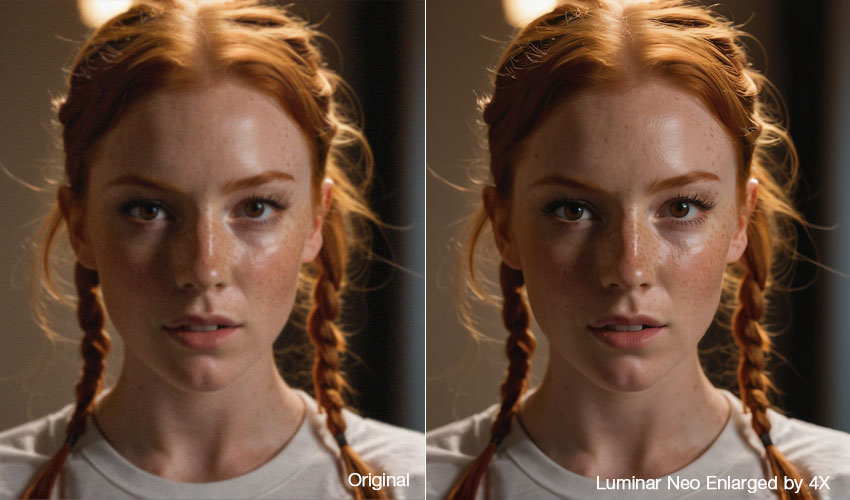
Output Quality: Images enlarged using Luminar Neo exhibit a significant increase in size while maintaining exceptional quality. Upon close inspection, no discernible loss in quality is apparent. Images 1 and 2 demonstrate a slight enhancement in brightness, while detail preservation remains impressive. However, in terms of generating more details, Luminar Neo falls short compared to Aiarty.
Who should use Luminar Neo? Ideal for creatives, hobbyists, or content creators who want to quickly enhance images and upscale them within a broader photo editing suite. Great for aesthetic improvements, though less focused on technical detail restoration.
#5. Photoshop
Widely used by both beginners and professionals, Photoshop brings powerful photo editing tools to the table. One standout feature is its image resizing capabilities, allowing you to enlarge photos while keeping quality as high as possible. With careful adjustments, Photoshop upscaling becomes manageable, helping you create print-ready images with precision.
Key Features:
- Enlarge your photos without significantly losing detail or introducing artifacts when using the right settings.
- Photoshop prioritizes maintaining natural resolution during the upscaling process, keeping your images crisp and clear.
- The familiar interface allows for precise control over image size and quality.
- Even at larger sizes, Photoshop preserves most intricate details and subtle nuances within your photos.
Price Plans: $20.99/month (Adobe Creative Cloud Photography plan), or $52.99/month for full Photoshop subscription
Tutorial on How to Enlarge Images in Photoshop with Minimal Quality Loss
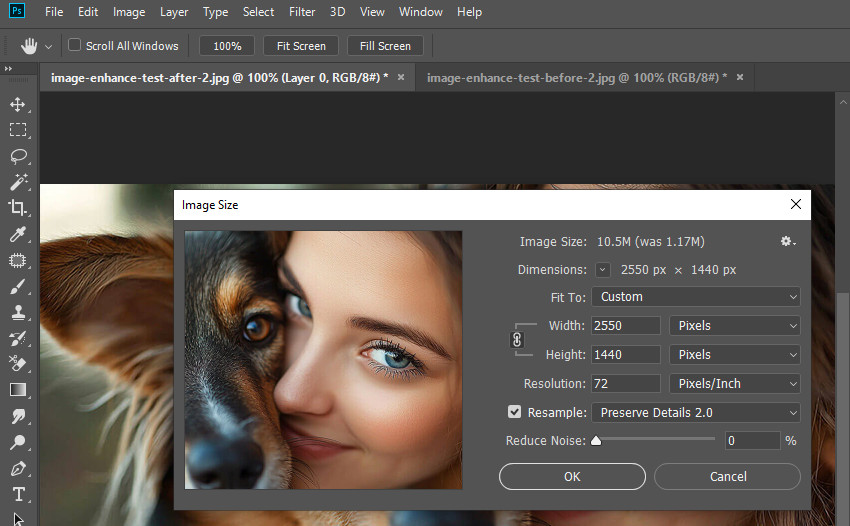
Step 1. Open Photoshop and import your image via File > Open or drag it into the workspace.
Step 2. Go to Image > Image Size, then choose the desired dimensions or scale percentage to enlarge your image.
Step 3. Make sure Resample is checked and select Preserve Details 2.0 for optimal quality.
Step 4. Click OK to apply the enlargement, then use File > Export > Export As to save your image.
Free even more high quality image enlargement, you can use Photoshop Super Resolution to upscale images while preserving detail and clarity
📊 Test Results:
- Image 1: File size 330KB, Resolution 832 x 1216 pixels
Enlarged 4X: File size 13.9MB, Resolution 3328 x 4864 pixels - Image 2: File size 1.09MB, Resolution 976 x 1000 pixels
Enlarged 4X: File size 9.8MB, Resolution 3904 x 4000 pixels
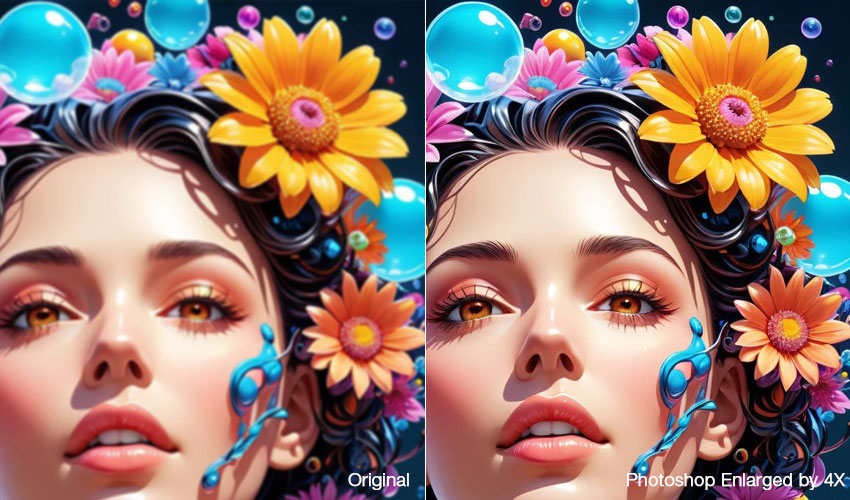

Output Quality: Images enlarged in Photoshop show a significant increase in size while retaining good overall quality. While most details are preserved, some fine textures may soften slightly compared to AI-specific upscaling tools like Aiarty.
Who should use Photoshop? Ideal for photographers, designers, and content creators who want precise control over image enlargement within a comprehensive editing suite. Best for maintaining visual fidelity while also performing broader photo edits.
#6. ResizePixel
ResizePixel is a free online image editor that allows users to easily edit their images by cropping, resizing, rotating, and converting them. By using it, you can easily resize and enlarge image without losing quality online. There are two options available: resize the image proportionally or enter a specific resolution. By the way, users can also compress images and change them to black and white.
Key Features:
- Crop images to specific dimensions or aspect ratios
- Resize images to different sizes proportionally or through specific width and height.
- Rotate images left, right, or 180 degrees
- Convert images to different formats, including JPG, PNG, GIF, and SVG
- Compress images to reduce their file size
- Change images to black and white
Price Plans: Free
How to Enlarge Images Online in ResizePixel without Losing Quality
Step 1. Navigate to https://www.resizepixel.com/ on your browser.
Step 2. Click Upload Image to upload a target image to be enlarged.
Step 3. Make sure you’ve selected Resize. Then type your preferred width and height of the enlarged image. Or slide the % on, and type the proportion you want to enlarge your image to, for example, 400%.
Step 4. Click Resize to start processing the image magnification.
Step 5. Click Go to Download to save the enlarged image on your device.
📊 Test Results:
- Image 1: File size 330KB, Resolution 832 x 1216 pixels
4X enlarged: File size 2.12MB, Resolution 3328 x 4864 pixels - Image 2: File size 1.09MB, Resolution 976 x 1000 pixels
4X enlarged: File size 8.00MB, Resolution 3904 x 4000 pixels
Output Quaity: Compared to the original images, those enlarged using ResizePixel exhibit a noticeable improvement in sharpness. However, the minimal increase in file size also translates to a loss of detail. For abstract art images like Image 1, where detail is not a primary focus, the results appear satisfactory. However, for detail-rich images like Image 2, there is still room for improvement.
Who should use ResizePixel? Perfect for users seeking a free, easy, online resizing solution without needing software installation. Best for simple use cases like blog image resizing, presentations, or personal use.
#7. VanceAI
You can also upscale an image without losing quality, taking your blurry photos to stunning high-res with VanceAI Image Upscaler. This online tool lets you upscale images up to 8x, breathing new life into low-resolution content. If you need even more detail, their downloadable software extends that limit to a staggering 40x. Plus, VanceAI offers various AI models specifically designed for different image types, like anime, text, or artwork.
Key Features:
- Upscale photos up to 40x (software only) with VanceAI's powerful AI technology.
- Choose from various levels of enlargement (2x, 4x, 8x, 40x) to fit your needs.
- Tailors its AI processing to specific image types (anime, text, art) for optimal results.
- Maintain sharp details and clarity even with significant upscaling.
- Upscale on-the-go online or use the downloadable software for more control.
Price Plans:
Online services: $4.95/100 credits, $7.95/200 credits, $12.95/500 credits, $17.95/1000 credits
Desktop version: $39.90/month, $99.90/year, $129.90 for lifetime
VanceAI Guide - How to Enlarge Image without Losing Details
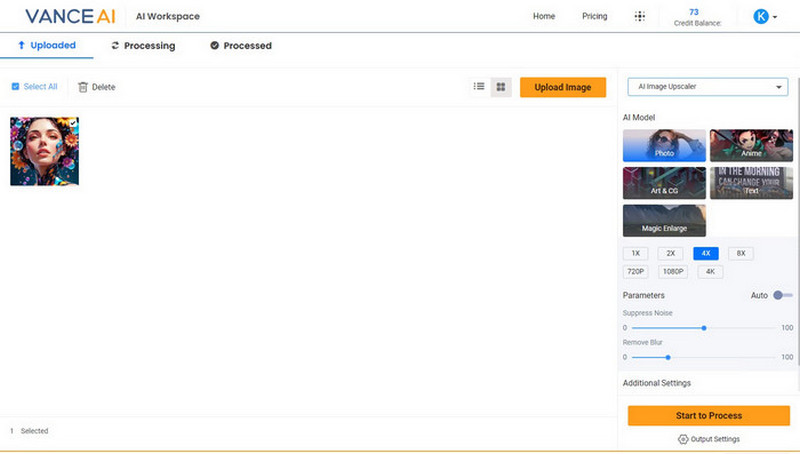
Step 1. Visit VanceAI Image Upscaler, and click Upload Image to upload your image to it. This will redirect you to its workspace.
Step 2. Choose the AI Model based on your image. For example, Art & CG for abstract art images.
Step 3. Choose from various upscaling factors (2x, 4x, 8x) or specify a precise resolution to achieve your desired image size.
Step 4. Press Start to Process button to process the AI upscaling image right now.
📊 Test Results:
- Image 1: File size 330KB, Resolution 832 x 1216 pixels
4X enlarged: File size 1.95MB, Resolution 3328 x 4864 pixels - Image 2: File size 1.09MB, Resolution 976 x 1000 pixels
4X enlarged: File size 19.9MB, Resolution 3904 x 4000 pixels

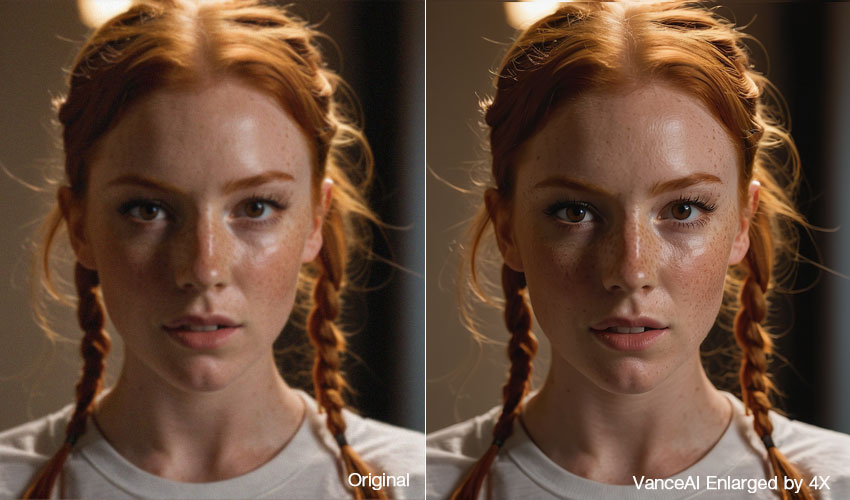
Output Quality: In Image 1, the minimal size increase results in subtle color alterations but maintains the image quality without apparent loss of detail. Image 2 exhibits enhanced overall sharpness; however, closer inspection reveals a rougher handling of fine details like hair strands, pores, and freckles.
Who should use VanceAI? Recommended for users looking for flexible upscaling, especially for anime, art, text, or product images. Its specialized models make it useful for creative projects that demand more than standard enlargement.
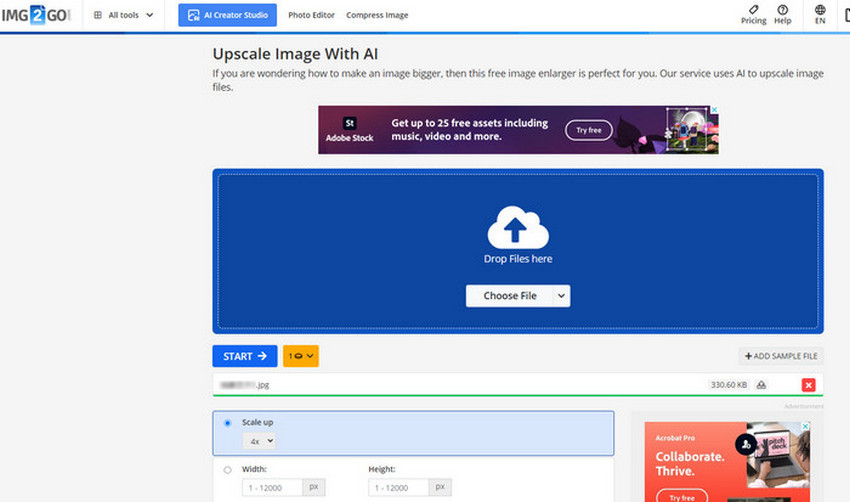
#8. IMG2GO
IMG2GO is an online upscale image tool to upscale image from low-resolution to high-resolution. This tool transforms low-res images into clear, visually stunning masterpieces. Expect brighter pictures with richer colors and sharper details after processing. IMG2GO even helps define and refine previously blurry elements. Conveniently choose your desired upscaling percentage, or simply resize to increase the image's resolution and dimensions to your liking.
Key Features:
- Sharpen blurry photos and boost resolution with IMG2GO's AI tech.
- Upscaling automatically enhances color vibrancy for a more captivating image.
- IMG2GO clarifies blurry areas and refines previously obscured details.
- Choose your ideal upscaling percentage to achieve the desired size.
- Increase image resolution and dimensions directly with the resize function.
Price Plans: $6.50/month for 60 credits, $22.25/month for 400 credits, $68.50/month for 1600 credits, and custom pricing for enterprise.
How to Upscale Image Online in IMG2GO [No Quality Loss]
Step 1. Visit IMG2GO Upscale Image page. Drop your image into the blue area or click Choose File to upload it.
Step 2. Choose the times of Scale up, like 2X or 4X. Or you can also set the value of width and height, or scale up by percentage.
Step 3. Click START button to start processing the enlarged image.
Step 4. Click Download to save the image on your device.
📊 Test Results:
- Image 1: File size 330KB, Resolution 832 x 1216 pixels
4X enlarged: File size 3.41MB, Resolution 3328 x 4864 pixels - Image 2: File size 1.09MB, Resolution 976 x 1000 pixels
4X enlarged: File size 15.1MB, Resolution 3904 x 4000 pixels

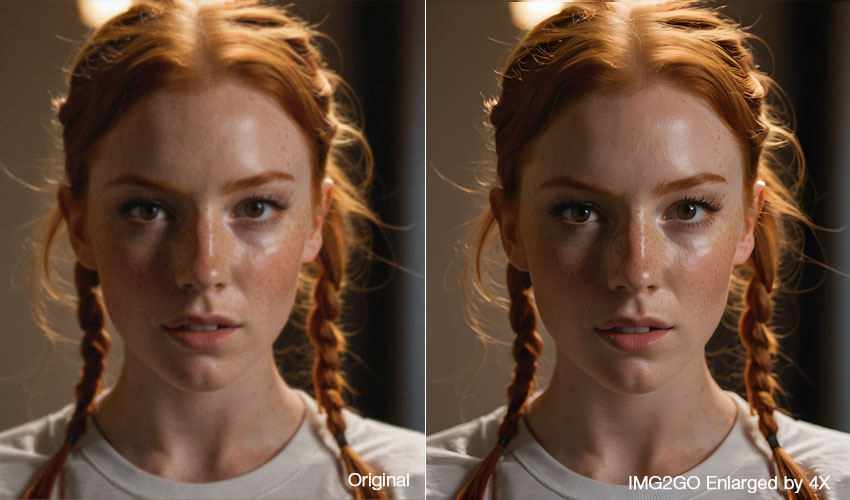
Output Quality: Image 1's upscaling results in heightened color saturation, increased brightness, and preserved or enhanced image quality even when enlarged. Image 2 demonstrates substantial color brightening and noticeable clarity improvement, with decent detail retention. However, some freckle removal is observed, which might not appeal to all users.
Who should use IMG2GO? Suitable for casual users who want to quickly upscale images online without installing software. It’s a simple drag-and-drop tool best for basic clarity improvement and quick sharing.
Conclusion: Which Is the Best Tool to Enlarge Images Without Losing Quality?
| AI Tool | Max Upscale | AI Models | Batch | Free | Best For |
|---|---|---|---|---|---|
| Aiarty Image Enhancer | 32K (Windows) 16K (macOS) |
GAN, Smooth Diff, Real-Photo | ✔️ | ✔️ | Print, portraits, JPEG recovery |
| Topaz Photo AI | 6X | AI Enhance, Sharpen | ✔️ | ❌ | RAW images, pro photo editing |
| HitPaw Photo AI | 800% | Default AI | ✔️ | ✔️ | Beginner use |
| Luminar Neo | 6X | Photo AI Model | ✔️ | ❌ | Creatives, photo enhancement |
| Photoshop | Up to 400% | Preserve Details 2.0 | ❌ | ❌ | Professional photo editing and resizing |
| ResizePixel | Custom | Manual Resize | ❌ | ✔️ | Basic resizing online |
| VanceAI | 40X (App), 8X (Online) | Anime, Art, Real, Text | ✔️ | ✔️ (limited) | Flexible upscaling, image types |
| IMG2GO | Custom | Auto AI | ❌ | ✔️ | Simple online enhancement |
Best Tool to Enlarge Images Without Losing Quality?
After testing multiple image enlargement tools, Aiarty Image Enhancer consistently delivers the best results. It restores fine details, removes compression artifacts, and produces natural-looking photos without the “plastic AI” effect.
While Topaz Photo AI is a strong alternative for professional photographers, free online tools like ResizePixel and IMG2GO are suitable for quick and simple enlargement—but none match Aiarty’s combination of quality and realism.
✅ Download Aiarty Image Enhancer and upscale your photos with no quality loss now
 FAQs: Enlarge, Resize & Upscale Images Without Losing Quality
The most effective way is to use AI upscaling tools. Tools like Aiarty Image Enhancer can enlarge images while preserving detail, reducing noise, and generating realistic textures.
You can’t fully avoid quality loss with traditional tools. However, AI tools like Aiarty Image Enhancer can upscale small images like 256×256 without distortion, restoring details and producing a sharp, high-resolution result.
Increase image size safely with Aiarty Image Enhancer, which uses AI to maintain proportions, textures, and clarity, ensuring no stretching or blurring.
With Aiarty Image Enhancer, AI upscaling preserves quality by restoring lost details and reducing artifacts, unlike traditional enlargement methods that stretch pixels.
You can increase image resolution intelligently using tools like Aiarty, Luminar Neo, or online platforms, potentially revealing more detail. Remember, it's always best to start with the highest quality image available, but these tools can more or less breathe new life into your existing JPEGs.
You May Also Like
Brenda Peng is a seasoned editor at Digiarty Software who loves turning ordinary photos into extraordinary works of art. With years of experience behind the lens and in front of the computer, Brenda shares her passion for photography, image enhancement, and editing through easy-to-follow tutorials.