While natural-language-based editing with AI is all the rage these days, besides burning all the credits to edit photos in ChatGPT, using AI apps to remove person from photos, you might be surprised to find that the native Photos and Preview apps on Mac have also evolved with powerful new features.
In this blog, we cover all the essential tutorials and shortcuts for editing photos on Mac, along with practical tips to preserve and enhance image quality so you can revive and make the most of your photo assets.
Besides editing photos with the free apps on Mac, there are occasions you also need to upscale these images, fix grainy, blurry old photos, and enhance quality with details and natural sharpness.
Aiarty Image Enhancer does it all, and offers free license code here.
- Denoise low-light images, fix blurry photos, but keep good "grains"
- Upscale images to 1K, 2K, 4K, and even 32K, with realistic details
- Restore compression artifacts, fix softness, enhance image clarity
- Process safely offline, 100% security ensured
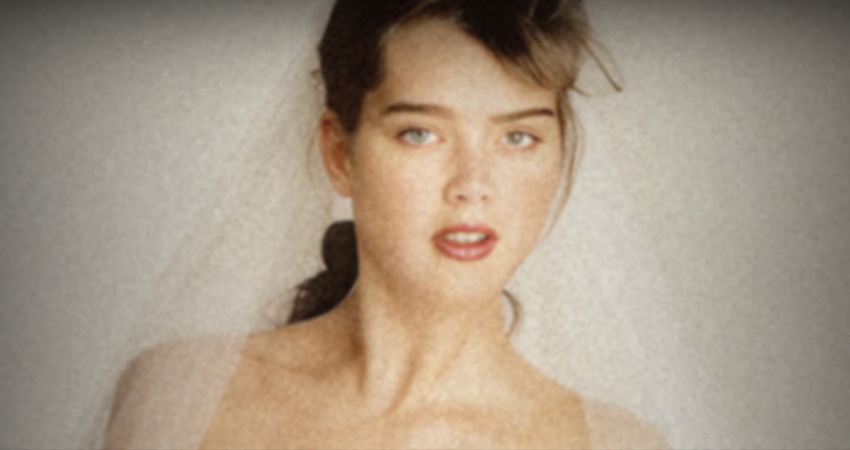
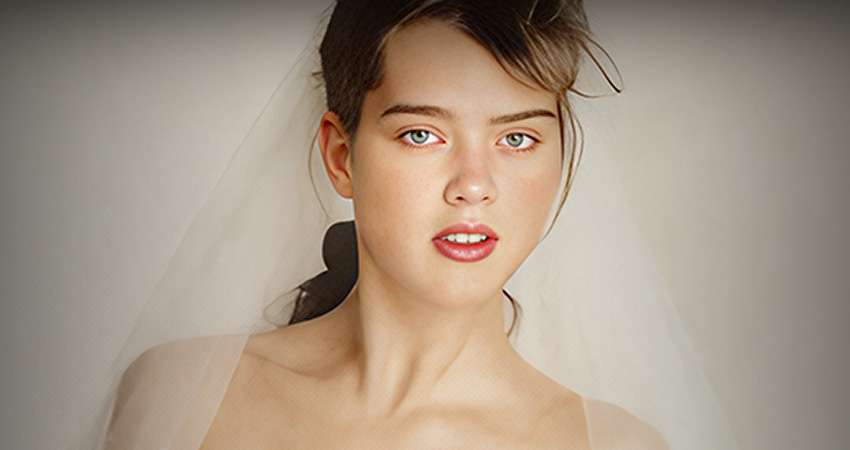
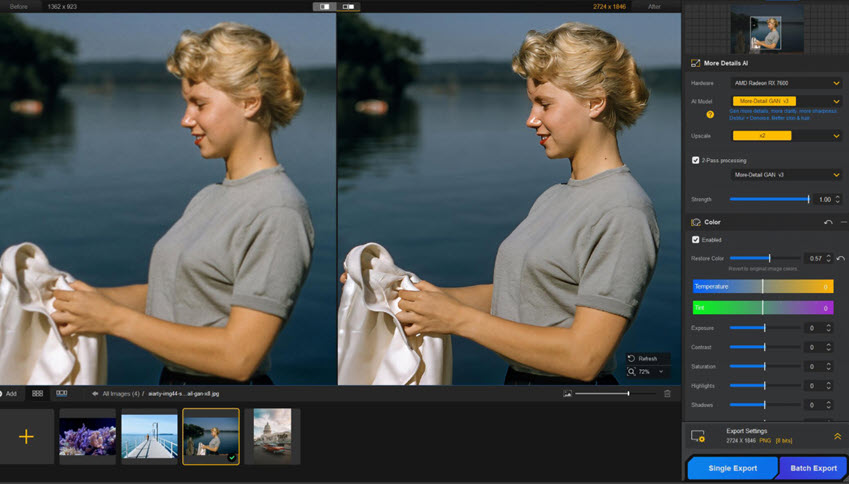
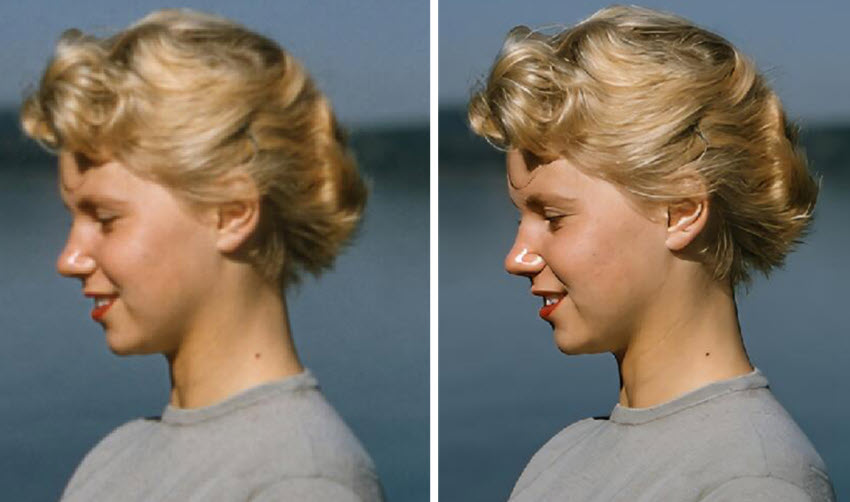
For instance, for the old portrait photo above, use the More-Detail Model in Aiarty, upscaling x4, enable Face Restoration feature, and export. Optionally, you can repeat the enhancement process: apply More-Detail model, and upscaling x2. Gradual upscaling helps preserve more detail, and you can also adjust the enhancement strength slider to keep the result natural and avoid over-sharpening.
How to Edit Photos on Mac with Photos App
The built-in Photos app on macOS is more powerful than it looks. It covers most everyday photo-editing needs, including cropping, color correction, retouching, filters, and even AI-assisted object removal, while always preserving the original image.
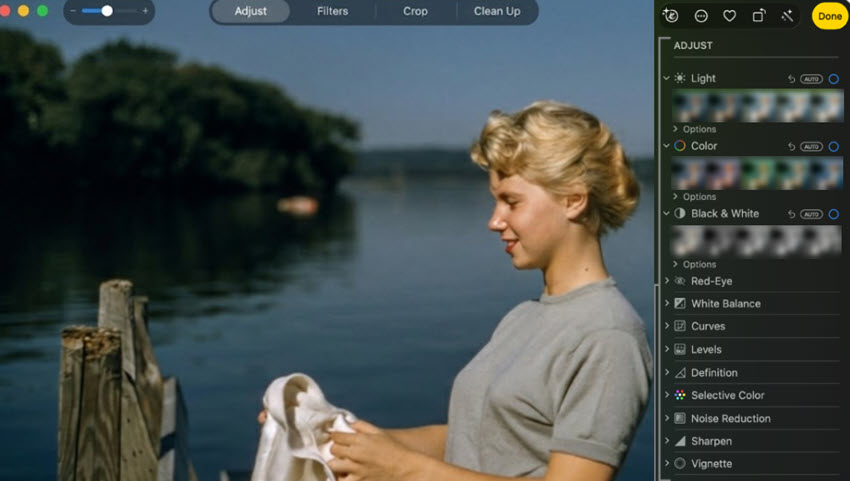
1. Adjust white balance, light, exposure, color in photos
Start here for almost every photo. These tools fix lighting and color problems first.
Best practice: Fix white balance first, then light, then color.
Auto buttons under Light, Color, and White Balance are good starting points.
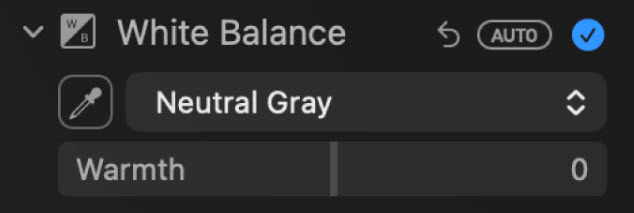
White Balance removes color casts from lighting. Here's how to adjust the white balance of a Photo:
- Find White Balance, use the eyedropper.
- Click something that should look white.
You can also use the eyedropper on a neutral gray area, skin tone, or manually adjust Temperature and Tint. Stop when whites look neutral, not yellow or blue.
Light controls overall brightness and contrast. You can fine-tune with Exposure, Highlights, Shadows, Brightness, Contrast, and Black Point.
Tip:
- Double-click any slider to reset just that adjustment.
- Hold the M key to see the original. Release it to see your edits.
2. Adjust specific colors in photos
Use Selective Color when only certain colors need changes.
Step 1. Go to Edit > Adjust > Selective Color.
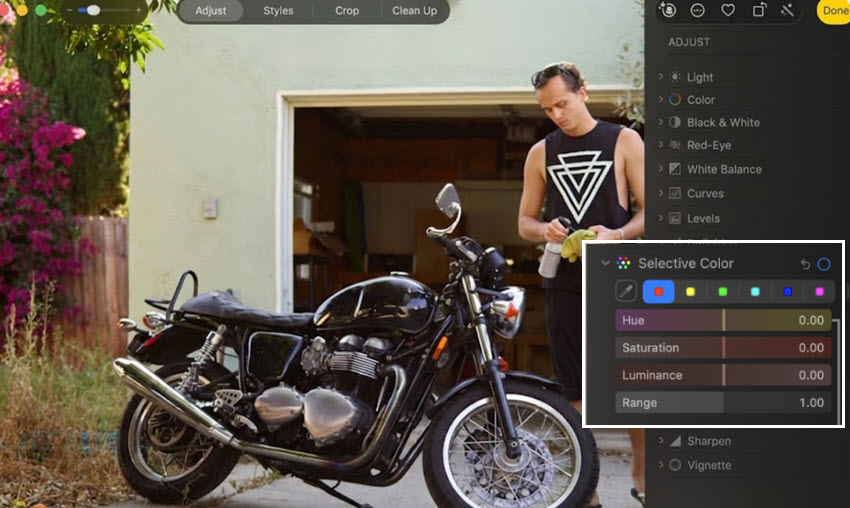
Step 2. Pick a color from the photo.
You can click an empty color well, then using the eyedropper and click the color on photo you want to change. For better result, please choose a clean area, not a shadow or highlight.
Step 3. Fine tune settings.
Each slider controls one thing, you can experiment as follows:
- Hue to shift the color.
- Saturation to make it stronger or more muted.
- Luminance to make it brighter or darker.
- Range to control how many similar colors are affected.
Best practice: Keep changes subtle to avoid unnatural results. Use this when only one color looks wrong.
Good examples include skies, grass, or clothing.
Step 4. Make safe adjustments, compare and refine.
You can start with Saturation and Luminance, and adjust Range* last.
*Increase it to affect similar colors, or decrease it to limit the change.
Turn the checkmark on and off to compare until you are satisfied with the look.
3. Remove red eye, blemish, and other imperfections from photos
Besides basic photo editing on Mac, the Photos app also includes features to fix flawed photos to enhance quality.
1) Remove red eye
Red eye often appears in flash photos, and can be detected with the Photos App on Mac.
- Go to Edit > Adjust > Red Eye.
- Click Auto and let Photos scan the image.
If red eye remains, you can adjust the size circle, and clicking directly on the red pupil to fix it.
Please note this tool works on people, not red eye from animals.
2) Remove small blemishes
For small blemishes, pimples, or sensor dust, use Retouch feature.
- Go to Photos > Edit > Retouch.
- Adjust the brush size and drag over the blemishes and imperfections.
3) Remove unwanted objects
To edit out objects, use the Clean Up tool in Photos on Mac.
Similar to the retouch feature, you can brush over the objects or distractions to remove it from your photos.
Mac Photos App fills the area using nearby details, but the results depend on the background.
For better results, use the smallest brush that covers the problem, then work slowly and zoom in often. Stop when the photo looks natural, as over-cleaning can make images look fake.
4. Sharpen photos
Sharpening makes edges look clearer and more defined. Use it near the end of your edits.
How to sharpen a photo
- Go to Edit > Adjust > Sharpen.
- Drag the sliders slowly while watching the image.
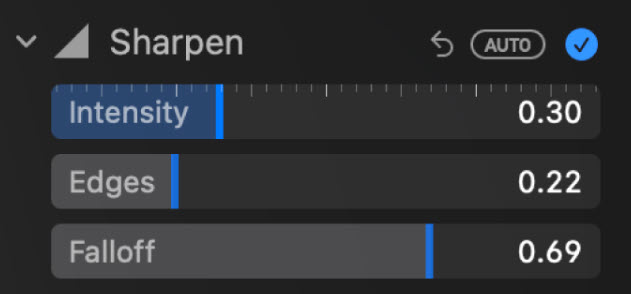
Each slider has a different role:
- Intensity controls how strong the sharpening looks.
- Edges decides what counts as an edge.
- Falloff controls how soft or harsh the effect feels.
Personally, I start with Intensity, use light sharpening for portraits, and apply sharpen a bit more for landscapes and buildings. I tweak with Adjust Edges and Falloff only if needed, and stop as soon as edges look clear.
5. Add filters or vignette to Photos
Filters and vignette effects change the mood of a photo. Use them as finishing touches, not fixes.
Find filters in Photos > Edit > Filters.
For vignette: Photos > Adjust > Vignette.
- Strength controls how dark or light the edges look.
- Radius controls how wide the effect spreads.
- Softness controls how smooth the edges feel.
6. Crop or straighten photos
Cropping and straightening help fix framing and alignment. Use these tools after color and detail edits.
Cropping removes unwanted edges and improves focus. Besides dragging the corners of the frame, you can also choose an aspect ratio for different social media or for printing.
Straightening changes angles of the photos, for instance, it can fix tilted horizons or leaning buildings.
- Drag the Straighten slider slowly.
- Watch the edges of the photo as you adjust.
For finer control, use Vertical and Horizontal sliders.
These help correct photos taken at an angle.
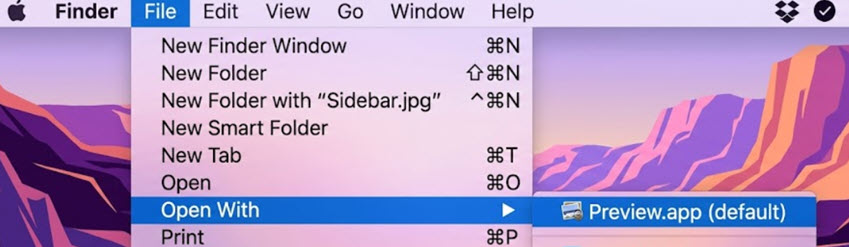
How to Edit Photos on Mac with Preview App
While most Mac users are familiar with the Photos app for organizing and editing pictures, Apple's built-in Preview is an often-overlooked but powerful tool for quick photo edits, especially when you don't need a full-blown editor.
Preview comes preinstalled on every Mac and is best known as a PDF viewer (and I am impressed with that liquid-glass Magnifier simulator on iPadOS 26), but it also offers a helpful suite of basic photo editing tools for simple tasks.
Crop and Rotate:
Select an area and press Command-K to crop.
Tools > Adjust Size or Tools > Rotate Left/Right, or press Command-R.
Also Check: How to Resize A Photo on Mac >>
Annotate and Mark Up:
Click the Markup button to add text, shapes, sketches and signatures, as you do on iPhone after screenshots.
Adjust Colors:
Editing photos on Mac with Preview also supports simple color adjustments, including exposure, contrast, highlights, shadows, saturation, tint, temperature, etc.
Copy and Paste Edits to Multiple Photos:
To enhance your workflow, you can go to Image > Copy Edits (Command-Shift-C) to copy the editing, then select another photos to paste the edits (Command-Shift-V).
Bonus: Edit Photos on Mac and Enhance Quality with AI
Both the Photos app and Preview utility on Mac offers free ways to edit photos quickly. After the basic processing, many content creators, photographers, or user dealing with family photos still need a tool for these scenarios:
- Upscale low-resolution photos to meet the target higher resolutions
- Restore old photos to clearer quality with natural details
- Fix compressed images, restore artifacts, and reduce blockiness
- Adjust enhancement strength, retain the natural look
- Batch enhance photos, offline secured processing
This lead to the widely loved desktop application Aiarty Image Enhancer, an AI-powered photo quality enhancer to upscale, denoise, deblur, sharpen, and restore natural clarity to photos and images, with options to adjust colors, erase unwanted objects with AI, and process in batch.
You can follow the steps below to quick edit and enhance photos on Mac with Aiarty:
Step 1. Install Aiarty Image Enhancer on Mac, launch it and add photos.
Step 2. Choose an AI model and target resolution.
For upscaling, select factor such as x2, x4, or designate a target resolution such as 4K, 8K.
If you only need to enhance quality, select x1 to maintain the original resolution.
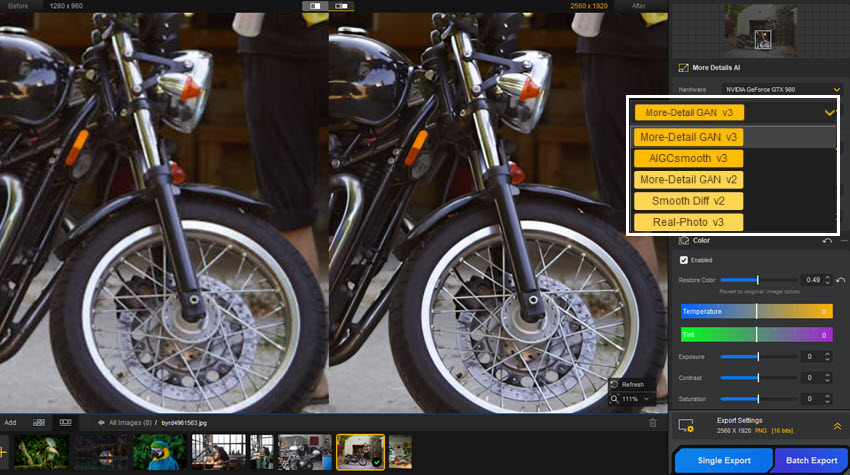
Switch among AI models and preview in real-time, stay with one that delivers best results of your specific photos. Generally, you can follow these tips as the starting point:
- Choose More-detail model to restore details for skin, surface textures, and intricate patterns.
- Pick AIGCsmooth for anime, digital art and anything you need a smooth finish.
- Go with Real-photo model for portrait, wildlife, landscape, product shots and general photos.
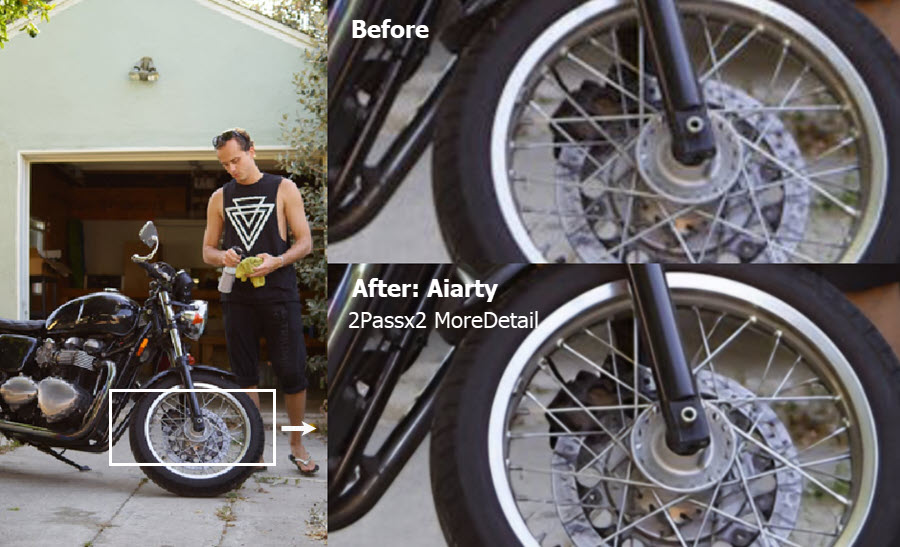
As you can see, photos become clearer after enhancement with Aiarty while remaining natural and photorealistic, with preserved details.
Step 3 (optional). Adjust colors or applied other enhancements.
Aiarty also include basic color adjustment panel, so you don't need to jump to another applications.

The latest version also includes AI eraser tool, with which you can remove blemishes or unwanted objects from photos. The results are natural and seamless with AI inference.
FAQs
Does Mac have a free photo editor?
Yes, both the Photos app and Preview app on Mac include basic photo editing features. Besides cropping, color adjustment, sharpening, you can even remove objects and change colors with the Photos app.
How to edit pictures on Mac for free?
For simple edits, using the Photos app and the Preview app on Mac is free without charge. If you need advanced editing and AI-powered photo quality restoration, follow methods above in this blog.
Can I use Photos on Mac to remove objects?
Yes. Double-click a photo and hit Edit > Clean Up in the default Photos app. Choose the brush to paint over unwanted objects to remove it. You can adjust the Zoom slider or pinch on the trackpad to adjust brush size.
How to edit photos on Mac without Photoshop?
You can use Photos app, Preview app, Gimp, Aiarty, and many other free photo editors on Mac, without subscribing for Photoshop. If you don't mind shilling out a small amount monthly, you can join the newly released Apple Creators Studio, and using Pixelmator Pro for advanced image editing. The Creators Studio subscription also includes popular media tools, such as Final Cut Pro, Logic Pro, Motion, Compressor, etc.
You May Also Like
This post was written by Brenda Peng who is a seasoned editor at Digiarty Software who loves turning ordinary photos into extraordinary works of art. With AI assistance for brainstorming and drafting, the post is reviewed for accuracy by our expert Abby Poole for her expertise in this field.