


Quick Answer: To fix “Error Retrieving Frame” in Premiere Pro, clear the Media Cache, check the source clip, GPU settings, effects, and VFR footage. If the error persists, transcode the clip and re-import it.
If transcoding reduces video quality, enhance the converted footage before bringing it back into Premiere Pro.
If Premiere Pro shows “Error Retrieving Frame”, it usually means Premiere is having trouble reading, decoding, or processing one or more frames in your video. The cause can range from problematic footage and variable frame rate (VFR) video to media cache issues, GPU decoding, effects, storage access, or damaged frames.
Start with simple fixes such as clearing the Media Cache, checking the source file, and moving the footage to a local drive. If the problem is related to the video's codec or frame rate, transcoding the footage to a more editing-friendly format can also help.
If transcoding fixes the error but makes the footage look softer, noisier, or less detailed, you can use a video enhancer such as Aiarty Video Enhancer to improve the converted footage before bringing it back into Premiere Pro.
What Does “Error Retrieving Frame” Mean in Premiere Pro?
The “Error Retrieving Frame” message means Premiere Pro could not successfully retrieve or process a particular video frame. You may encounter the error during video playback, scrubbing through the timeline, rendering, exporting, importing or processing certain clips.
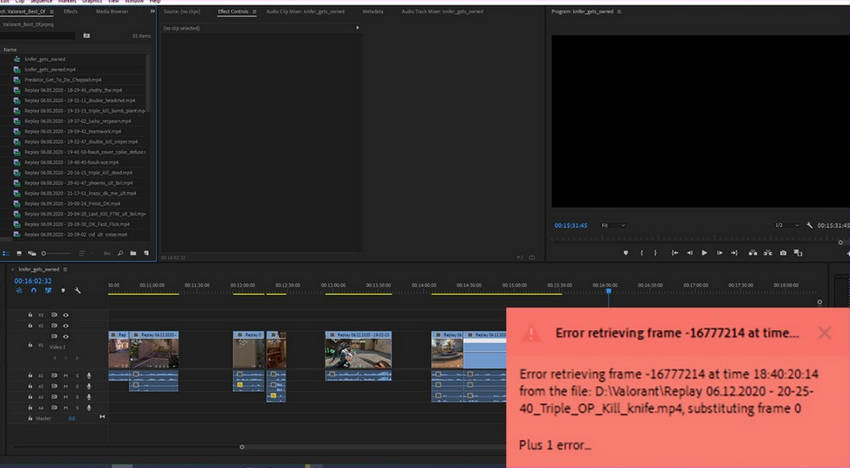
The problem may affect an entire project, but it can also happen with just one clip or even at a specific point in a video. For example, Premiere may work normally with most of your footage but stop when it reaches a particular frame in one H.264, HEVC, MXF, or other video file.
Importantly, an “Error Retrieving Frame” message does not automatically mean the entire video file is corrupted. Premiere may be having trouble with the way the footage is encoded, decoded, cached, or processed.
Learn more: How to Denoise Grainy Video in Premiere Pro
Why Does Premiere Pro Say “Error Retrieving Frame”?
There is no single cause for this error. Common possibilities include:
This is why it is better to troubleshoot the footage and Premiere environment step by step rather than immediately assuming the video is damaged.
How to Fix “Error Retrieving Frame” in Premiere Pro
Try these solutions from the simplest checks to more involved fixes.
1. Restart Premiere Pro and Reopen the Project
Start with the simplest solution.
Save your project, close Premiere Pro completely, and open it again. Then check the clip that previously triggered the error. If the problem was caused by a temporary processing or cache issue, restarting Premiere may be enough to clear it.
If the same clip produces the error again, continue with the steps below.
2. Clear the Premiere Pro Media Cache
Premiere Pro stores temporary media data in its cache. If cached data becomes outdated or problematic, it can sometimes interfere with playback or processing. Try clearing the Media Cache and then restart Premiere Pro. Here's how to do it:
Step 1: Open Adobe Premiere Pro, go to Edit > Preferences > Media Cache.
Step 2: Click Delete next to Remove Media Cache Files.
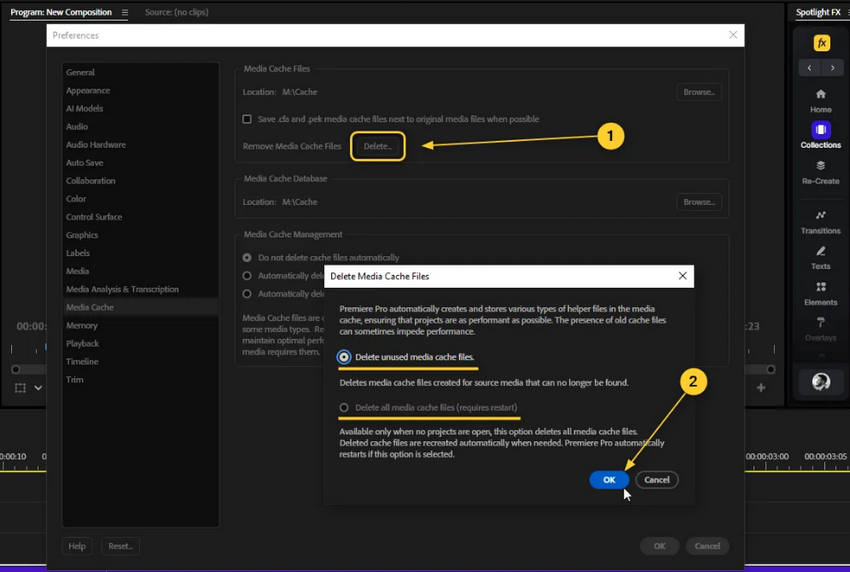
After reopening the project, test the problematic clip again. If the error disappears, the problem may have been related to cached media rather than the source video itself.
3. Check the Source Video
Before changing more settings, determine whether the problem is limited to a particular file.
Ask yourself:
- Does the video play normally in another media player?
- Does Premiere fail at the same timestamp every time?
- Does the error happen with only one clip?
- Does another copy of the same video work?
- Can you import a different video from the same camera or device?
If the error consistently occurs at the same point, note the timestamp. A specific frame or section of the source file may be causing the problem. If multiple unrelated clips trigger the same error, the problem may instead involve Premiere's cache, decoding, GPU settings, or project environment.
4. Move the Footage to a Local Drive
If your footage is stored on an external hard drive, NAS, network drive, cloud-synced folder or removable storage device, copy the problematic video to a local SSD or internal drive and reconnect it in Premiere. This helps rule out file-access interruptions as a cause. If the local copy works normally, the issue may not be with the video itself. Premiere may simply have been unable to access the original file consistently.
5. Check GPU Acceleration and Hardware Decoding
Premiere Pro can use GPU acceleration and hardware decoding to improve performance. However, testing a different decoding or rendering configuration can help determine whether GPU-related processing is involved.
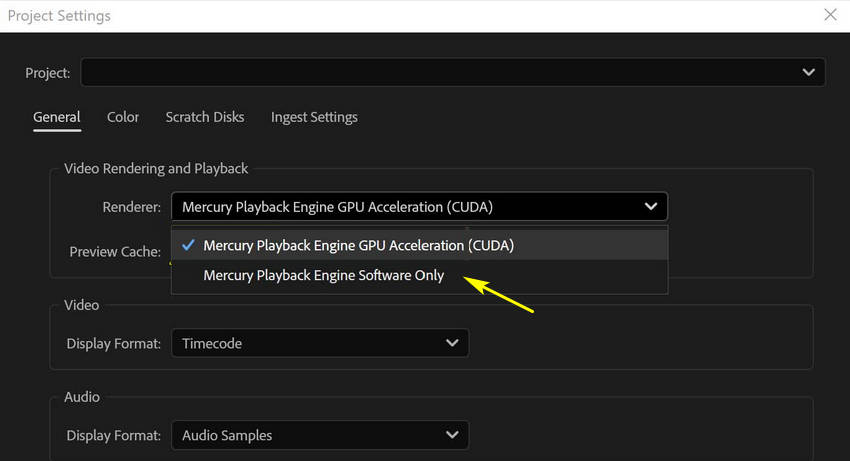
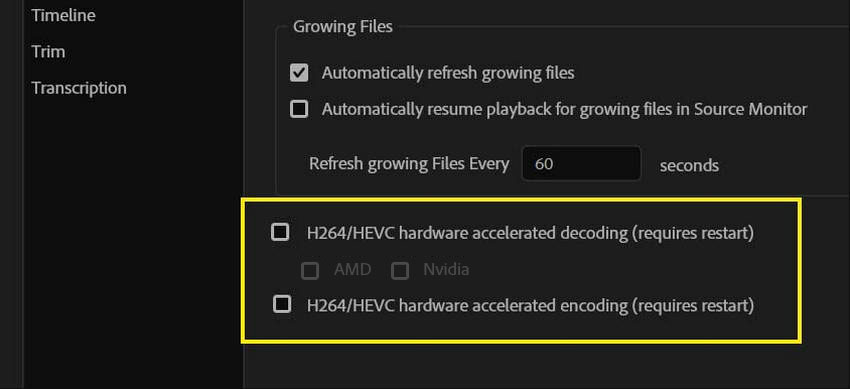
If the error started after a driver, Premiere, or hardware change, temporarily testing another renderer or decoding setting can be useful. The goal here is diagnosis rather than automatically disabling GPU acceleration permanently. You can turn on Hardware Acceleration in Premiere Pro after the error fixed. If changing the setting makes the problematic clip work, you have a stronger indication that the issue is related to hardware-accelerated processing.
Step 1: Go to File > Project Settings > General, open the Renderer menu, and select Software Only.
Step 2: Go to Edit > Preferences > Media, then uncheck H.264/HEVC hardware-accelerated decoding and H.264/HEVC hardware-accelerated encoding.
6. Check Whether the Footage Uses a Variable Frame Rate
Variable frame rate (VFR) footage is another possible source of editing problems. VFR video does not maintain exactly the same frame rate throughout the entire clip. This is common with some footage recorded by smartphones, screen recording software, webcams, streaming or conferencing applications, or certain consumer cameras.
If the problem occurs mainly with phone or screen-recorded footage, check the source video's frame-rate behavior. If it is VFR, transcoding it to a constant frame rate can make it easier for Premiere Pro to process.
Related Reading: How to Change Frame Rate in Premiere Pro
7. Disable Problematic Effects or Plugins
If the error appears only after adding an effect, transition, adjustment, or third-party plugin, temporarily disable it. Try this workflow:
- Disable the suspected effect or plugin.
- Preview the affected section again.
- Render or export the section.
- Check whether the error returns.
If the error disappears, the effect or plugin may be contributing to the problem. You can then update the plugin, replace the effect, or find another way to process that section.
8. Create Proxies for Difficult Footage
Proxies are lower-resolution working copies that make demanding footage easier for Premiere Pro to edit. They can be useful for 4K/8K, high-bitrate, HEVC/H.265, RAW, or multi-camera footage.
Step 1: In the Project panel, select the clip or clips you want to create proxies for.
Step 2: Right-click the selected clips and choose Proxy > Create Proxies.
Step 3: Choose your preferred Format and Preset, then click OK to create the proxies.
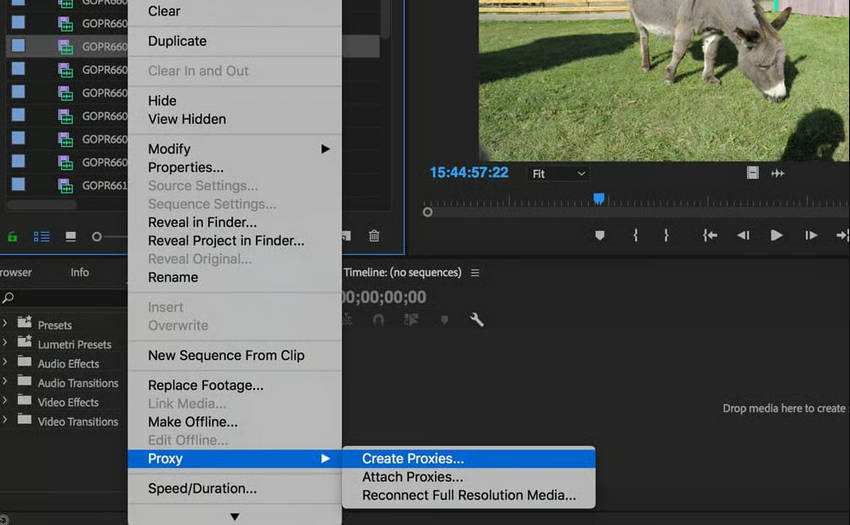
Once the proxies are ready, Premiere Pro can use them as lower-resolution editing copies while keeping the original media linked to the project. However, proxies mainly improve editing performance. They may not fix an “Error Retrieving Frame” issue caused by problematic source footage or decoding compatibility. In that case, transcoding the original clip may be a better option.
9. Transcode the Problematic Footage
If Premiere consistently fails to process one particular video, transcoding or re-encoding the footage can sometimes solve the problem. This is especially worth trying when the original footage uses variable frame rate, a problematic codec, an unusual container, or a codec that causes decoding issues in the current workflow.
The general process is: Original footage → Transcode/re-encode → Import the converted file into Premiere
After transcoding, test the new file before replacing the original footage throughout the project.
Transcoding creates a new video file with different encoding characteristics. A file that Premiere struggles to decode may become easier to import, play, edit, or export after being re-encoded. However, transcoding is not a universal fix. If the underlying problem comes from cache, storage, GPU processing, an effect, or damaged source data, you may need to address that issue instead.
What If Transcoding Fixes the Error but Reduces Video Quality?
This is a separate issue from “Error Retrieving Frame”. You may successfully transcode a clip and import it into Premiere Pro, only to find that the new file looks softer, noisier, more compressed, or less detailed. Fine details such as faces, hair, textures, and distant subjects may be particularly affected, especially in low-light or heavily compressed footage.
At this point, the problem has shifted from editing compatibility to video quality. Premiere Pro can now process the footage, but the converted file may need additional enhancement to restore clarity and detail.
Enhance Transcoded Video Before Bringing It Back to Premiere Pro
If transcoding makes a problematic clip editable but reduces its perceived quality, you can enhance the converted footage before importing it back into your Premiere project.
Aiarty Video Enhancer can be used as a separate enhancement step after transcoding. It can help with common quality issues that become noticeable after re-encoding, including:
- Reduce video noise: Clean up noise and grain, especially in low-light footage.
- Reduce compression artifacts: Minimize blockiness and other artifacts from re-encoding.
- Refine soft details: Recover fine details lost or softened during transcoding.
- Improve perceived sharpness: Make edges and textures look clearer and more defined.
- Enhance low-light footage: Improve clarity and detail while keeping noise under control.
- Upscale low-resolution video: Increase resolution for larger timelines, displays, or final output.
Fix “Error Retrieving Frame” and Restore Video Quality: A Practical Workflow
When crafting video ads for the Facebook Feed, understanding the best Facebook video size is key to capturing attention. These guidelines ensure your content displays effectively across various devices.
1. Troubleshoot and transcode the problematic clip in Premiere Pro
Identify the clip causing “Error Retrieving Frame,” then check the cache, source file, storage, GPU settings, effects, and frame rate. If needed, transcode the footage into a format that Premiere Pro can process more reliably. After transcoding, check whether the new file has lost sharpness, detail, or clarity.
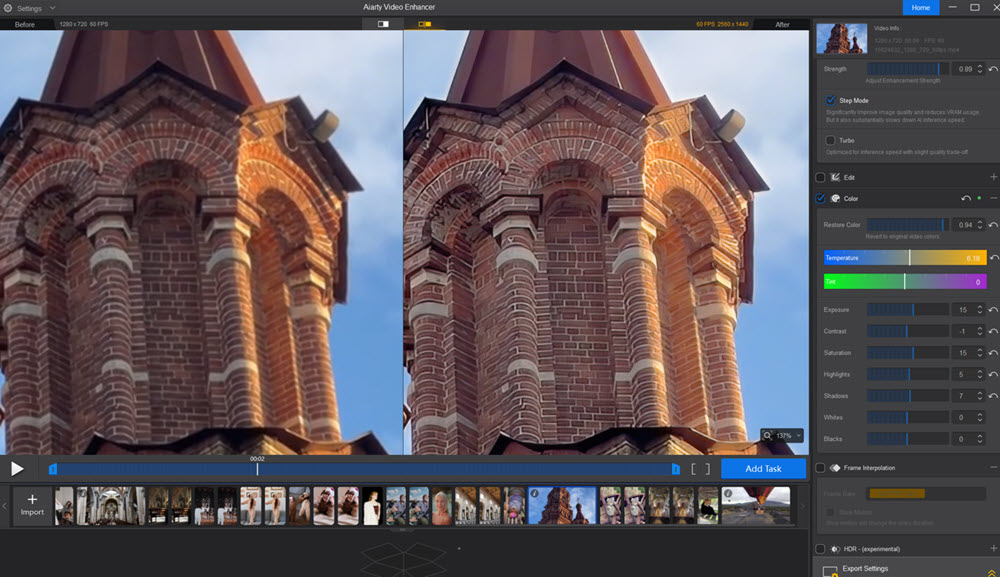
2. Enhance the transcoded footage in Aiarty Video Enhancer
- Import the converted clip into Aiarty Video Enhancer.
- Choose an AI model based on the footage, such as moDetail v3 for detail-required footages, SuperVideo HQ for noisy, low-light clips.
- Upscale the video if a higher resolution is needed.
- Adjust the Strength, preview the result, and fine-tune the settings for clear, natural-looking detail.
- Export the enhanced clip in a format compatible with your Premiere Pro workflow.
3. Re-import the enhanced video into Premiere Pro
Bring the enhanced clip back into Premiere Pro and replace the problematic or lower-quality version in your project. You can then continue editing and exporting as usual.
Conclusion
“Error Retrieving Frame” in Premiere Pro is usually a footage, decoding, cache, GPU, effect, or file-access problem rather than a problem that can be solved by a single setting. Start with basic troubleshooting, check VFR and codec compatibility, and transcode the problematic clip if necessary.
If transcoding solves the Premiere problem but leaves the footage looking softer, noisier, or less detailed, treat that as a separate quality issue. Aiarty Video Enhancer can be used at this stage to reduce noise, refine details, and upscale the converted footage before bringing it back into Premiere Pro.
 FAQs
FAQs
It means Premiere Pro cannot successfully retrieve or process one or more frames from the source footage. The issue is usually related to the clip, encoding, frame rate, cache, hardware processing, effects, or file access.
It can help when the original codec, container, or frame-rate behavior is causing compatibility problems. However, transcoding does not guarantee a fix for every cause of the error.
Re-encoding can soften fine details, add compression artifacts, or make noise more noticeable. The effect depends on the source footage, codec, resolution, and transcoding settings.
A video enhancer can help reduce noise and compression artifacts, refine soft details, improve perceived sharpness, or upscale the converted footage when needed.
Yes. You can enhance the converted clip first, export it in a Premiere-compatible format, and then import the enhanced version back into your project for further editing.
You May Also Like


This post was written by Brenda Peng who is a seasoned editor at Digiarty Software who loves turning ordinary photos into extraordinary works of art. With AI assistance for brainstorming and drafting, the post is reviewed for accuracy by our expert Abby Poole for her expertise in this field.
