Summary: This post guides you through enabling GPU acceleration in Adobe Premiere Pro to enhance editing speed, rendering, and export efficiency by utilizing your graphics card. It explains selecting the proper renderer and updating drivers for optimal performance. Additionally, it introduces Aiarty Video Enhancer , an AI-powered tool that complements GPU acceleration by upscaling, denoising, and sharpening videos quickly, helping you achieve professional-quality results with ease and improved workflow.
GPU acceleration in Adobe Premiere Pro refers to the software's ability to use your computer's graphics card (GPU) alongside its central processing unit (CPU) to enhance performance during various tasks. This collaborative approach, also known as GPU-accelerated computing, leverages the parallel processing capabilities of the GPU, which are designed to handle graphics-related tasks more efficiently than the sequential processing of a CPU.
When GPU acceleration is enabled in Premiere Pro, the software offloads specific computationally intensive tasks from the CPU to the GPU. This allows the CPU to handle other tasks more efficiently, resulting in a smoother and faster video editing workflow.

Benefits of GPU Acceleration
- Faster Rendering and Exporting: GPU acceleration can significantly speed up the rendering and exporting of videos, particularly for high-resolution footage and complex effects.
- Improved Playback and Real-Time Editing: It enhances the smoothness of timeline playback and real-time editing, even when working with demanding projects.
- Enhanced Performance of Effects and Transitions: Many of Premiere Pro's built-in effects and transitions are GPU-accelerated, and using these effects can reduce CPU load and improve performance during editing.
- Hardware-Accelerated Encoding and Decoding: GPU acceleration enables hardware-accelerated decoding and encoding of video codecs like H.264 and HEVC, further speeding up export times.
- Smoother Editing with Complex Projects: Enabling GPU acceleration can redistribute the processing load, making it easier to work with projects containing numerous effects and demanding processes like VR effects and color correction.
How to Turn On GPU Acceleration in Premiere Pro
Step 1. Open your project in Premiere Pro. Launch Adobe Premiere Pro and open the project you're working on.
Step 2. Access project settings. Navigate to File > Project Settings > General.
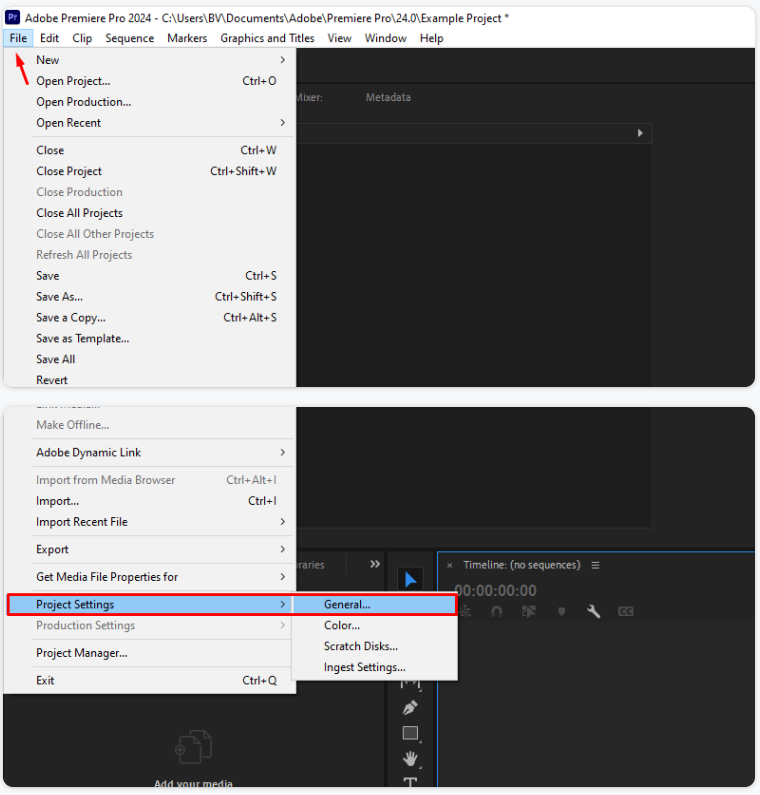
Step 3. Choose the renderer. Under the "Video Rendering and Playback" section, locate the "Renderer" dropdown menu. Here's where you choose how Premiere Pro utilizes your GPU.
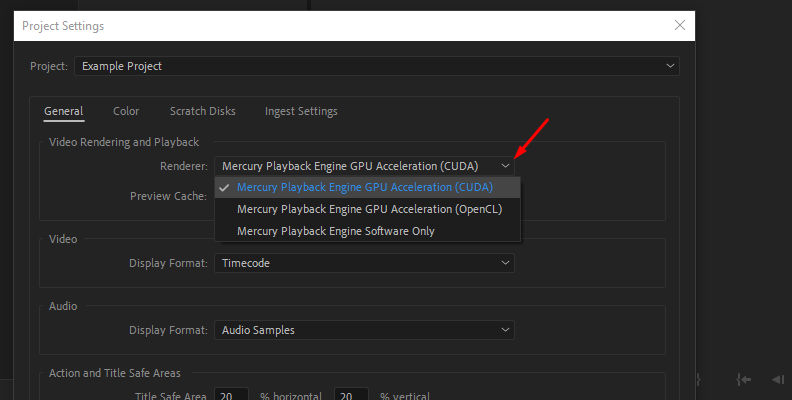
You'll see options like "Mercury Playback Engine GPU Acceleration (OpenCL/CUDA/Metal)".
- CUDA: Choose this option if you have an NVIDIA graphics card.
- OpenCL: Select this if you have an AMD graphics card.
- Metal: Select this if you have an Apple computer.
Important: Premiere Pro might already be set to "Mercury Playback Engine Software Only," meaning it's only using your computer's main processor (CPU) and not the GPU.
Step 4. Confirm and save. Click "OK" to apply your changes and close the Project Settings window.
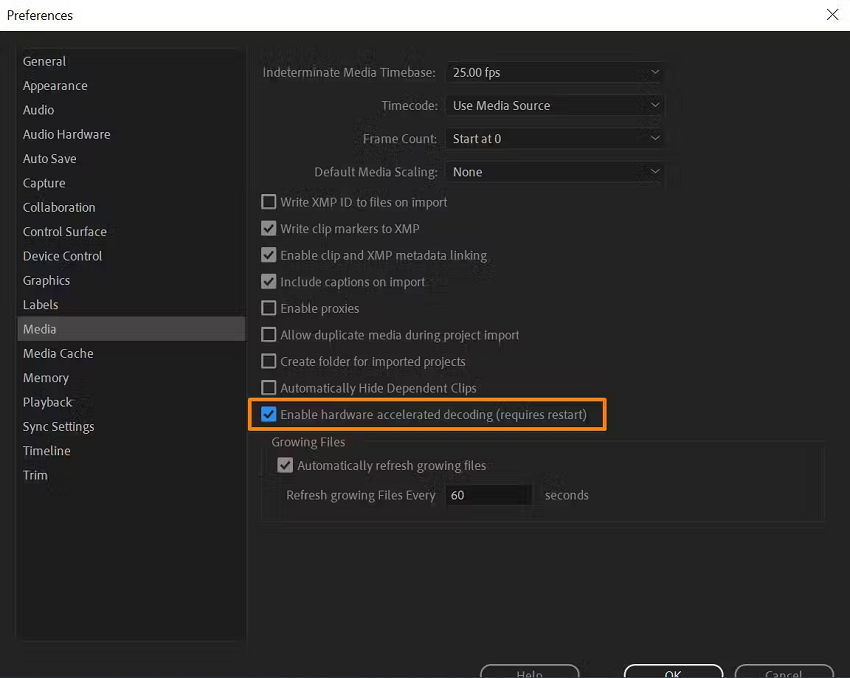
Step 5. Enable hardware acceleration for decoding/encoding (optional but recommended). This can further boost performance, especially for certain video formats like H.264 and HEVC.
- Go to Edit > Preferences > General and then Media.
- Enable the available hardware acceleration encoding and decoding options.
- Restart Premiere Pro for these changes to take effect.
Step 6. Update your graphics drivers. Outdated drivers can prevent Premiere Pro from recognizing and fully utilizing your GPU. It's crucial to keep them up-to-date.
- Identify your graphics card (NVIDIA, AMD, or Intel).
- Visit the manufacturer's website and download the latest drivers for your specific card.
- Perform a clean installation of the drivers, if available, to remove any potential conflicts.
- Reboot your computer and then restart Premiere Pro.
Step 7. Troubleshooting (if needed). If the GPU Acceleration option isn't available or you encounter issues, here's what to check:
- GPU compatibility and VRAM: Ensure your graphics card meets the minimum VRAM requirements for Premiere Pro, especially for demanding tasks like 4K editing or VR effects. Adobe recommends at least 4GB of VRAM for GPU acceleration with 1080p video, 6GB for 4K video, and 8GB or more for higher resolution videos and intensive GPU-accelerated effects. If your GPU is outdated or lacks sufficient VRAM, upgrading might be necessary.
- Driver installation: If updating the drivers doesn't solve the issue, try a clean installation to remove any potential conflicts from older driver files.
- GPU Sniffer (Windows): In rare cases, Premiere Pro might fail to detect your graphics card. You can try forcing detection by running the GPUSniffer.exe file located in the Premiere Pro installation folder.
- Reordering effects: Sometimes, the order of effects applied to a clip can cause conflicts. Try reordering them to see if it resolves the issue.
💡 Bonus Tip: Enhance Your Videos Further with Aiarty Video Enhancer
While enabling GPU acceleration in Adobe Premiere Pro boosts your editing and export speeds, pairing it with Aiarty Video Enhancer takes your video quality to the next level.
Aiarty uses cutting-edge AI models and GPU optimization to upscale videos up to 4K, automatically remove noise, sharpen details, and restore textures - all with minimal setup and rapid processing times.
Whether you're working with old footage, low-light clips, or want to achieve professional-grade enhancements effortlessly, Aiarty complements Premiere Pro's workflow perfectly, offering a smart, intuitive solution that maximizes the power of your graphics hardware. Try Aiarty Video Enhancer to accelerate your video enhancement process and deliver stunning results faster.
Conclusion
Enabling GPU acceleration in Adobe Premiere Pro significantly enhances your video editing workflow by leveraging your computer's graphics card for faster rendering, smoother playback, and quicker export times. By selecting the appropriate renderer in the preferences and ensuring your GPU drivers are up to date, you can take full advantage of hardware-accelerated encoding and decoding for formats like H.264 and HEVC. Remember to restart Premiere Pro after making these changes to apply them effectively.
Following these steps will help you optimize performance and make your editing experience more efficient and enjoyable.
You May Also Like
This post was written by Brenda Peng who is a seasoned editor at Digiarty Software who loves turning ordinary photos into extraordinary works of art. With AI assistance for brainstorming and drafting, the post is reviewed for accuracy by our expert Abby Poole for her expertise in this field.