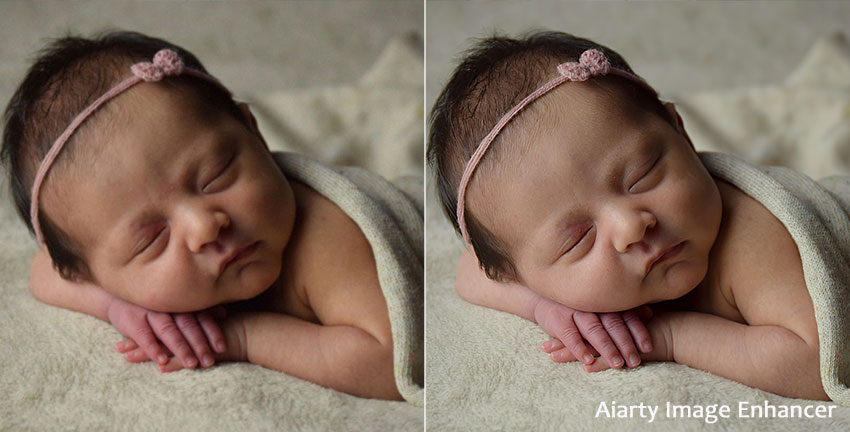
You can’t re-take the newborn stage, but you can fix the photo! The newborn stage passes in a blink. One day you’re holding a tiny, sleepy bundle with impossibly small fingers, and the next you’re scrolling through your camera roll wondering how time moved so quickly. Then you open the photo you thought captured everything perfectly, and something feels off.
Maybe it’s slightly blurry; the skin looks too red; the lighting is grainy. Or maybe it’s an old baby photo you recently rediscovered, too small and faded to print clearly.
For many parents, newborn photo editing feels intimidating. Photoshop sounds complicated. Professional retouching sounds expensive. And there’s always that worry: what if I over-edit and ruin the softness? The good news is that editing newborn photos doesn’t have to be technical or overwhelming. With modern AI photo editing tools like Aiarty Image Enhancer, you can gently enhance clarity, correct skin tones, remove noise, and even restore old baby photos in minutes without advanced editing skills.
This guide will show you how.
Why Newborn Photos Often Need Editing
Newborn photography is emotionally powerful, but technically difficult. Most baby photos are taken indoors, often in soft window light or under warm lamps. Cameras respond by increasing ISO, which introduces grain. Even tiny movements from a sleeping baby can create slight blur. Warm lighting can shift skin tone toward red or yellow.
As a result, many newborn images suffer from:
- Slight motion blur
- Visible noise or grain
- Red or yellow skin tones
- Soft focus from phone cameras
- Compression artifacts from messaging apps
- Low resolution when enlarged
Newborn photo editing focuses on correcting these issues while preserving natural softness. It’s not about changing how your baby looks. It’s about helping the photo reflect what you actually saw and felt in that moment.
The Easiest Way to Edit Newborn Photos (For Parents)
If you’re a parent or casual photographer, the most practical approach today is AI-based enhancement. Instead of manually adjusting layers, masks, curves, and sharpening filters, AI analyzes the image and restores detail intelligently.
A tool like Aiarty Image Enhancer combines several essential functions in one workflow:
- Detail restoration for soft areas, enhancing eyelashes, lips, and tiny fingers while keeping skin smooth.
- Noise reduction that preserves skin texture, removing indoor or low-light grain without looking artificial.
- Deblur correction for slight softness, fixing minor motion blur or focus issues.
- AI upscaling to increase resolution, making baby features sharper without over-sharpening.
- Compression artifact removal, cleaning up distortions from shared or low-quality photos.
- Natural color adjustment, correcting skin tone while keeping the warm, soft look of the newborn photo.
This means you can fix blur, clean up grain, and correct skin tones in just a few steps without needing technical knowledge.
Let’s break down how to edit newborn baby photos use this approach step by step.
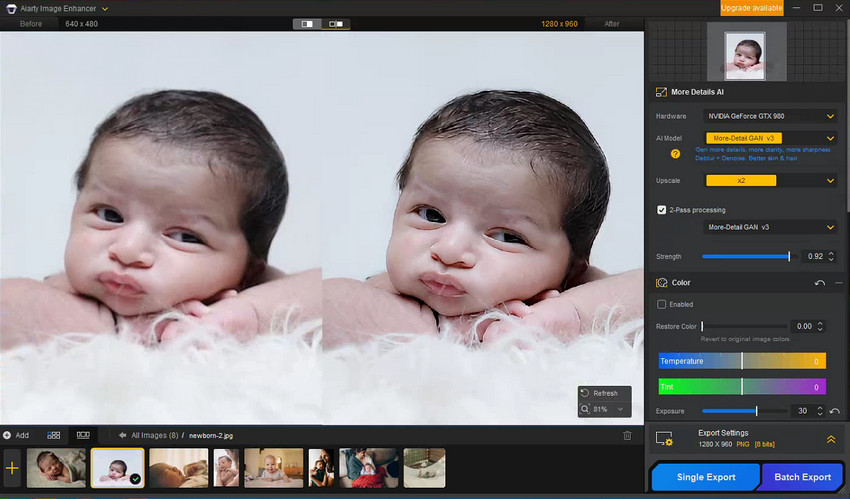
1. Fixing Blurry or Low-Resolution Baby Photos
Slight blur is extremely common in newborn photography. Babies move subtly, lighting is often dim, and phone cameras struggle in low light. Traditional sharpening only increases edge contrast, which can make baby skin look harsh. AI upscaling works differently. It doesn’t just stretch pixels; it reconstructs missing detail.
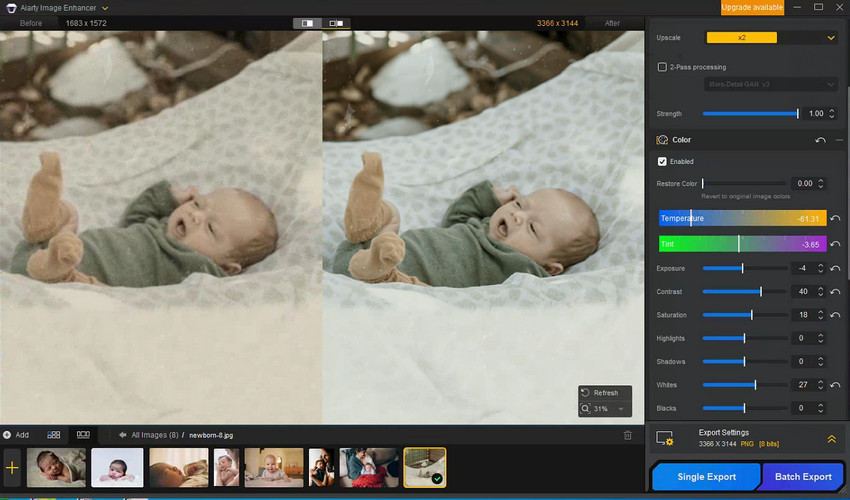
When enhancing a newborn photo with Aiarty Image Enhancer, you’ll typically notice:
- Clearer eyelashes
- More defined lips
- Sharper fingers and toes
- Improved overall clarity without harsh edges
This is especially helpful if you want to print the image or enlarge it for framing in target size. It also makes a noticeable difference when working with older, low-resolution digital files.
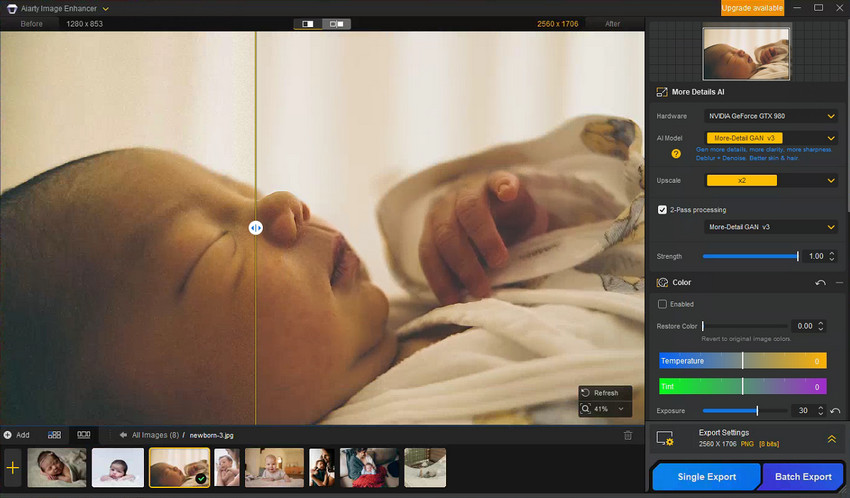
2. Removing Noise Without Losing Softness
Indoor newborn photos often appear grainy, especially in shadow areas. High ISO settings introduce digital noise, which becomes more obvious on smooth baby skin.
Manual noise reduction tools require careful balancing. Too little, and grain remains. Too much, and the skin looks waxy.
AI-based noise reduction detects random noise patterns and removes them while protecting real texture. The result feels softer and cleaner, but still natural. For newborn photo editing, this balance is critical. Babies should look soft, not airbrushed.
3. Correcting Red or Yellow Skin Tone
Newborn skin frequently appears red, especially in the first weeks. Indoor lighting can also create a yellow cast.
The key is subtle correction. Instead of dramatically whitening the skin, focus on small white balance adjustments and gentle color refinement. AI-assisted color tools simplify this by automatically balancing tones while maintaining realistic undertones.
A natural newborn photo should still feel warm and intimate, just not overly tinted.
4. Restoring Old Newborn Photos
Many people searching for newborn photo editing are actually trying to restore older baby photos.
You might be working with:
- Printed photographs from albums
- Early digital camera files
- Small, low-resolution images
- Slightly faded or soft pictures
If your newborn photo editing is starting from a print, then using photo scanner app to scan it at a high resolution (around 600 dpi). Once digitized, AI restoration can significantly improve clarity and detail.
Aiarty Image Enhancer is especially powerful here because they reconstruct missing detail rather than simply sharpening what remains. This can make an old, soft baby photo look noticeably clearer and more printable. Subtle color correction can also revive faded tones without making the image look artificial.
Restoring old newborn photos is less about perfection and more about preservation. Even moderate improvements can make a cherished memory frame-worthy again.
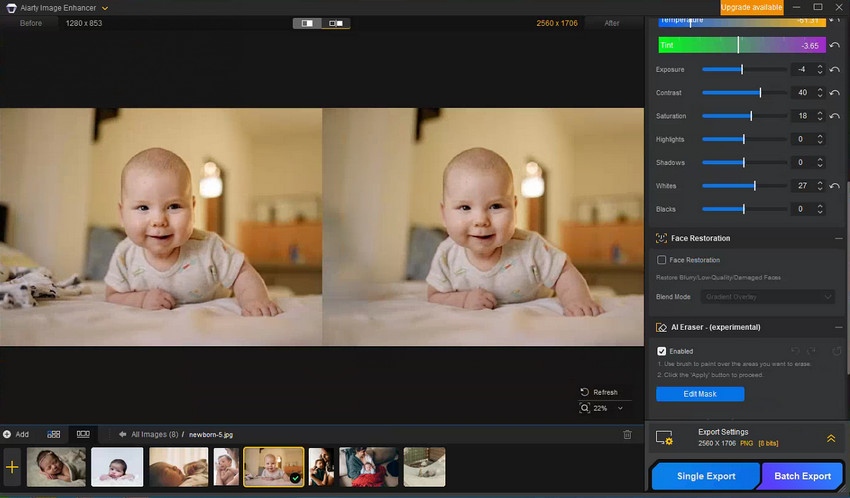
5. Remove Background Distractions
Newborn photos can often have distracting elements in the background that take away from the subject, like blanket wrinkles, harsh shadows, or minor objects in the frame.
The key to a clean, professional-looking photo is removing these distractions without altering the image’s natural softness. AI tools can automatically detect and minimize these issues, ensuring the baby remains the focal point of the image.
For example, blanket wrinkles can be smoothed out, harsh shadows can be softened, and small unwanted objects can be removed, all while preserving the integrity of the image.
How Newborn Photo AI Editing Compares with Manual Editing
Photoshop and Lightroom remain powerful editing tools. Professional photographers often use them for precise masking, advanced retouching, and creative control.
However, they require time and technical knowledge.
Here’s a simple comparison:
For professional newborn photographers, manual tools may offer greater artistic control. For parents who simply want clearer, natural-looking baby photos, AI newborn photo editing is usually faster and safer.
Ready to enhance your newborn photos in minutes? Try Aiarty Image Enhancer and see the difference instantly.
Common Mistakes When Editing Newborn Photos
Even with good tools, it’s easy to overdo adjustments. The most common mistakes include:
- Over-smoothing skin
- Making the baby’s complexion too white
- Adding excessive clarity or contrast
- Over-sharpening fine details
- Applying heavy filters
The guiding principle is simple: enhance the memory, don’t transform it. Subtle changes almost always produce the most timeless results.
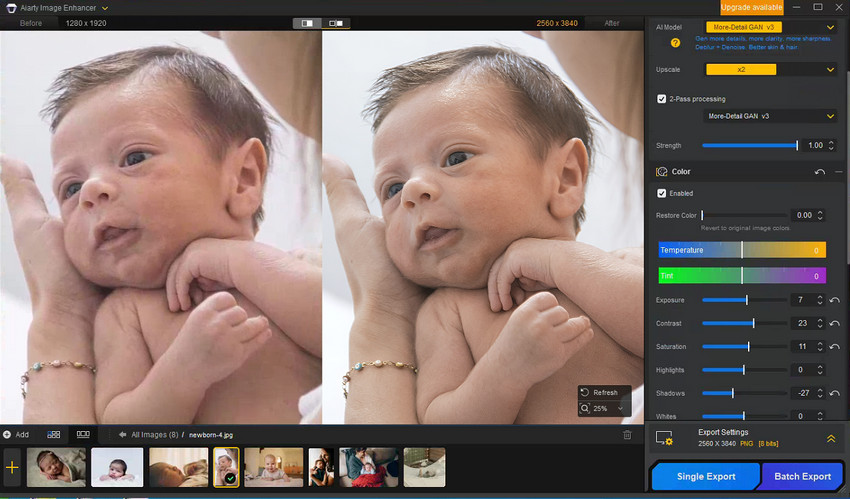
Best Settings to Edit Newborn Photos for Natural-Looking Results
For a soft, timeless newborn look, the key is subtlety. You want to enhance the beauty of the moment without overpowering the image. Here are some settings in Aiarty Image Enhancer that will help you achieve a natural, professional finish:
- Use 2x upscale for standard print sizes to ensure your baby’s features are sharp and clear, but avoid making them overly detailed or artificial.
- Choose the right AI model, such as moreDetail v3. If the results don’t meet expectations, switch models to find the one that works best for your image.
- Adjust the Strength slider — usually, a moderate noise reduction and deblurring setting will work well. This helps eliminate noise and blur without creating that “plastic” effect often seen with over-processing.
- Consider using 2-pass processing. This adds an extra x1 enhancement step to create richer textures and clearer details. Test this feature to see which setting works best for your image.
- Make subtle color and exposure adjustments to remove yellow or red tints while keeping the image looking natural and soft.
- Use face restoration sparingly. This is perfect for images where facial features are clear, but the quality is a bit lacking. It can restore sharpness, but it might not recover extremely blurry or distant faces.
These settings ensure that your newborn photos stay natural and soft, with a gentle yet professional finish. With Aiarty Image Enhancer, you can achieve stunning results without complicated edits.
Final Thoughts: Preserving What Matters Most
Newborn photos are not about flawless lighting or perfect focus. They are about a moment that can never be repeated. Editing shouldn’t feel stressful or technical. It should feel like gently polishing a memory so it lasts.
With today’s AI-based newborn photo editing tools, you can fix blur, remove noise, correct skin tone, and restore old baby photos, all while keeping the image natural and true to the moment. Because in the end, it’s not about creating a perfect picture. It’s about protecting a memory you can never recreate.
 FAQs
FAQs
Professionals typically correct exposure, refine white balance, gently retouch skin, remove distractions, and enhance fine details. Many now use AI tools to speed up denoising and detail restoration.
Yes, especially if the blur is slight. AI-based deblur and upscaling technologies can restore clarity far better than traditional sharpening.
Start with small white balance adjustments and subtle color correction. Avoid drastic whitening or heavy saturation changes.
Yes. Modern AI restoration tools can improve resolution, reduce blur, remove noise, and correct faded colors without manual layer editing.
You May Also Like
This post was written by Brenda Peng who is a seasoned editor at Digiarty Software who loves turning ordinary photos into extraordinary works of art. With AI assistance for brainstorming and drafting, the post is reviewed for accuracy by our expert Abby Poole for her expertise in this field.