Quick Answer: Standard picture frame sizes include 4×6, 5×7, 8×10, 11×14, 16×20, 18×24, and 24×36. For example, an 8×10 photo typically uses an 11×14 frame with a mat or an 8×10 frame without a mat.
Choosing the right picture frame size is one of the most important steps in creating a clean, balanced, and visually appealing wall display. Whether you're filling a blank wall, designing a gallery layout, or simply framing a favorite photo, knowing the differences between photo size, mat size, and frame size can save you a lot of guesswork.
This guide walks you through the most common picture frame sizes, how to pick the right size for your wall, and how to ensure your images are sharp enough for high-quality printing.
What’s the Difference Between Picture Frame Size and Photo Size?
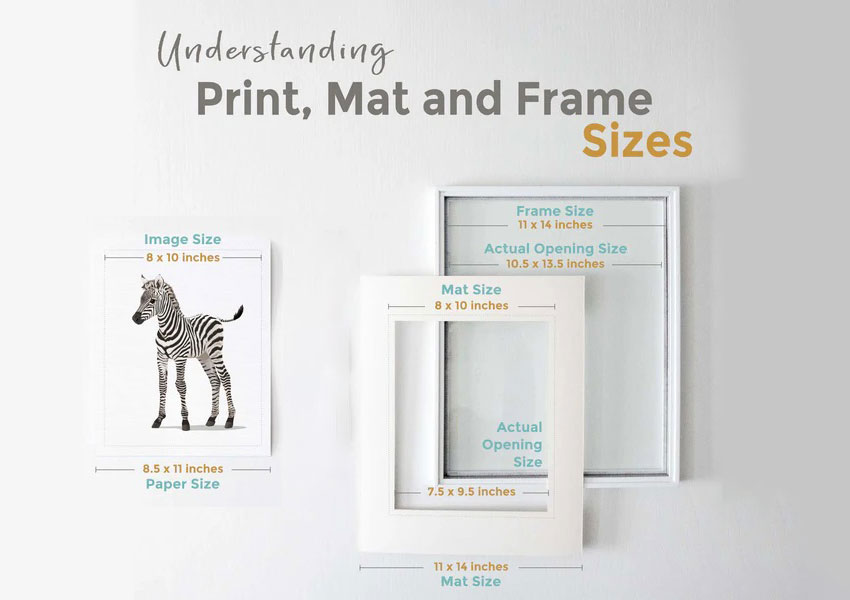
Picture frame sizing can be confusing because it involves three related but different measurements: photo size, frame size, and mat opening size.
- Photo Size: The dimensions of the image itself (e.g., 5×7, 8×10).
- Frame Size: The inner dimensions of the frame that the photo fits into.
- Mat Opening Size: The visible area of the photo when using a mat, usually slightly smaller than the image.
Understanding how these measurements work together helps you avoid choosing the wrong frame or ending up with a print that doesn’t fit.
Related reading: How to Print 2x3 Wallet Size Photos from Your iPhone
Standard Picture Frame Sizes for Home and Wall Display
Picture frames are generally grouped into small, medium, and large formats, each suited for different spaces and purposes. Understanding the typical uses for each category can help you choose frames that not only fit your photos but also complement your room’s layout and style.
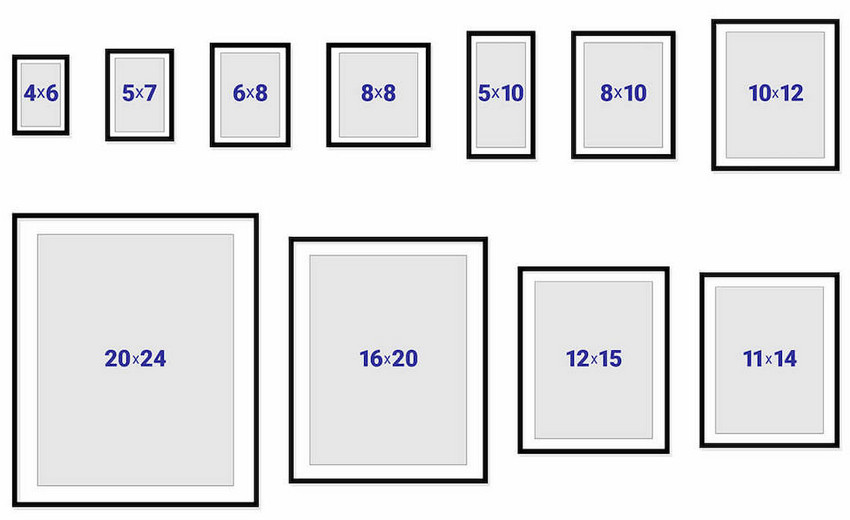
Small Frame Sizes
- Common small frame dimensions include: 4×6, 5×7, 6×8
- These work well for desks, shelves, bedside tables, and small wall accents.
Medium Frame Sizes
- Popular mid-range frame dimensions include: 8×10, 11×14, 12×16
- These are ideal for hallways, bedrooms, and gallery wall clusters.
Large and Oversized Frame Sizes
- Common large frame dimensions include: 16×20, 18×24, 24×36
- These sizes are perfect for creating a focal point in living rooms, offices, or feature walls.
Larger frames demand high-resolution images to ensure crisp, clear prints. Photos that don’t meet 300 DPI requirements at these sizes may appear pixelated or blurry. This is where Aiarty Image Enhancer can help, by upscaling your images while maintaining sharpness and detail, making them ready for professional-quality large prints.
Using the right frame size ensures that your photos look proportionate and visually balanced, whether you’re filling a small wall or designing a striking, oversized display.
Why Your Photo Doesn’t Fit Picture Frame Sizes (Common Mistakes)
One of the most common mistakes when choosing a frame is confusing photo size with frame size. These two are related, but they are not the same.
Photo size refers to the actual dimensions of your image (for example, 8×10 or 5×7). Frame size, on the other hand, refers to the inner dimensions of the frame that the photo fits into.
If you are not using a mat, the frame size usually matches the photo size exactly. For example, an 8×10 photo fits an 8×10 frame. However, when using a mat, the frame size will be larger than the photo size. This creates a border around the image for a more professional and balanced look.
- 8×10 photo → 11×14 frame with mat
- 11×14 photo → 16×20 frame with mat
- 16×20 photo → 20×24 or 24×36 frame with mat
The mat opening is slightly smaller than the photo size to hold the image in place without slipping. This means a small portion of the edges will be covered.
Understanding this difference helps you choose the correct frame, avoid sizing mistakes, and create a more polished final display.
Standard Picture Frame Sizes and Dimensions Chart
The table below shows standard picture frame sizes, including recommended frame sizes with or without a mat and their typical placement.
Quick reference: The most common picture frame sizes are 4×6, 5×7, 8×10, 11×14, 16×20, and 24×36.
In general, smaller frame sizes like 4×6 and 5×7 are best for desks and compact spaces, while medium sizes such as 8×10 and 11×14 are commonly used for gallery walls. Larger sizes like 16×20 and 24×36 are ideal for creating focal points in living rooms or large wall displays.
How to Choose the Right Frame Size
1. Measure Your Wall First
Before selecting a frame, take careful measurements of your wall space. A simple guideline is:
Ideal artwork width = wall width × 0.6
This ensures the piece will feel proportionate and balanced within the room. Keep in mind the surrounding furniture, trim, and other wall elements so the frame doesn’t overwhelm or feel too small for the space.
2. Decide Between a Single Large Frame or a Gallery Wall
Consider the impact you want to create. A single large frame works well as a focal point for a statement piece, while a gallery wall of smaller frames adds rhythm and visual interest. Mixing frame sizes, orientations, and mat colors can create depth, but keep spacing consistent for balance.
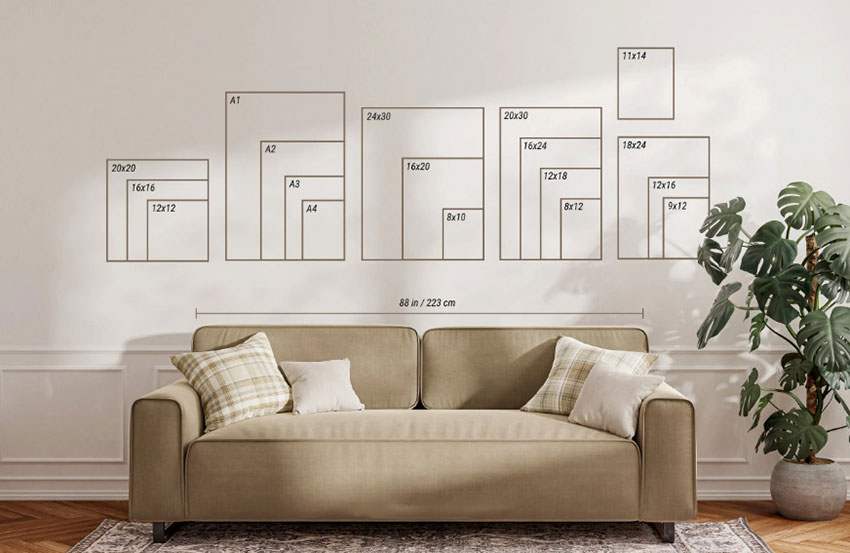
3. Portrait vs Landscape Orientation
Choose the frame orientation based on the shape and layout of your wall space. Portrait-oriented frames suit tall, narrow walls or spaces between furniture, while landscape-oriented frames work better on wide walls or above sofas and consoles. For gallery walls, mixing orientations can add dynamic interest, but always balance the overall composition so no single section feels overcrowded or lopsided.
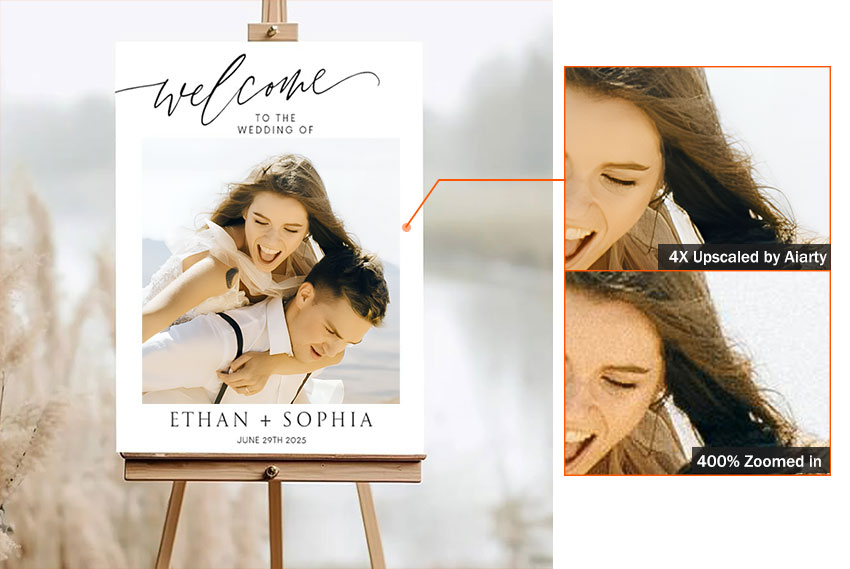
Why Image Resolution Matters for Large Frame Sizes
When printing photos for larger frames like 16×20 or 24×36, image resolution becomes critical. Low-resolution images may appear blurry or pixelated when enlarged. For high-quality prints, your image should meet the 300 DPI requirement. If your photo doesn't have enough pixels, you may need to enlarge it before printing.
AI-based tools can help increase image resolution while preserving detail, making them useful for preparing photos for large-format prints.
DPI Guide for Picture Frame Sizes (300 DPI Explained)
To achieve professional-quality prints, your image must meet the minimum pixel requirements for 300 DPI. This ensures the final print remains sharp, clear, and free from visible pixelation.
Learn more: How to Print iPhone Photos and How Big Can You Print?
Many smartphone photos, especially standard 12MP images, may not contain enough resolution for larger prints such as 16×20 or 24×36 at 300 DPI, which can result in soft or blurry details. If your photo doesn’t meet the required pixel dimensions for a specific picture frame size, AI tools like Aiarty Image Enhancer can upscale and increase the DPI of the image while preserving clarity and fine detail, making it suitable for high-quality printing.
How to Prepare Photos for Large Picture Frame Sizes
Before everything, look at your photo’s pixel dimensions to see whether it matches the 300 DPI requirement for your target print size. If not, go ahead to upscale picture resolution with Aiarty Image Enhancer.
Step 1. Load your pictures to Aiarty Image Enhancer.
Install and open up Aiarty Image Enhancer. Drag and drop to load your pictures into the program. If you haven't install it, download the package below.
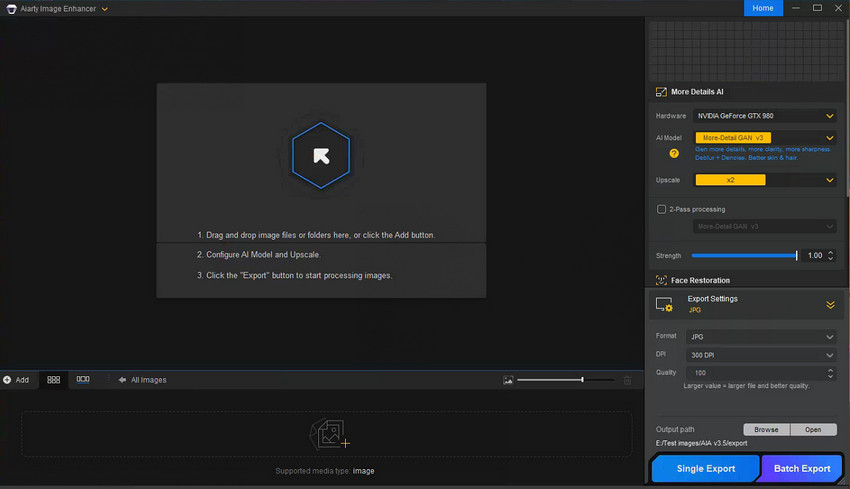
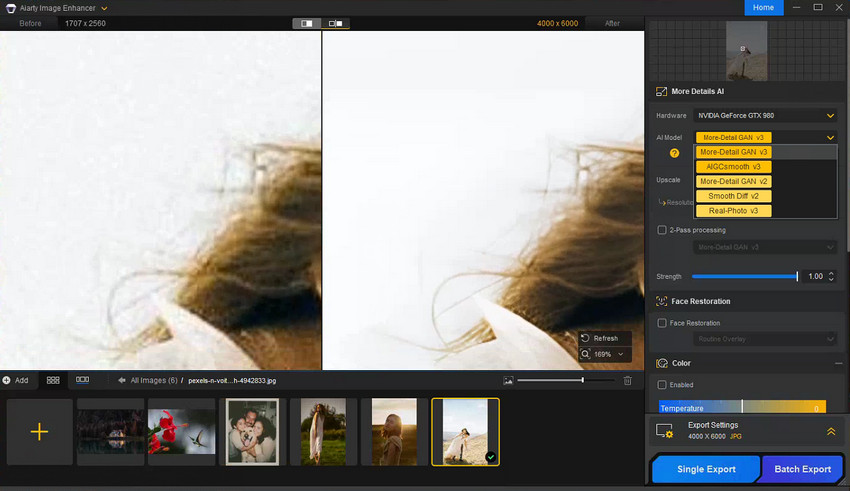
Step 2. Choose an AI model.
At the right panel, set your hardware to GPU if possible. Then choose an AI model that best fit with your picture, usually more-Deatil GAN v3 for generating more details, clarity and sharpness, AIGCsmooth v3 for AI arts and anime images, and Real-Photo for restoring photorealistic details.
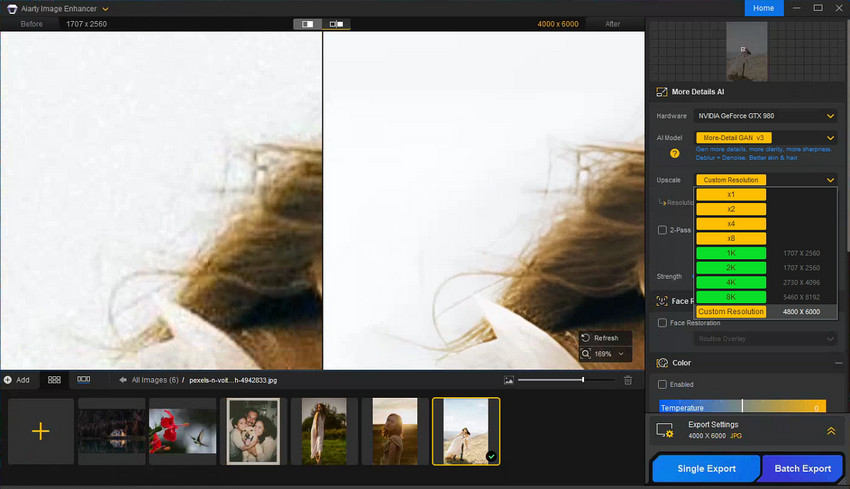
Step 3. Set the upscale factor.
Choose the target resolution from the upscale dropdown menu according to your picture frame size. Aiarty allows you to enlarge image by 1x, 2x, 4x, 8x, directly in 2K, 4K, 8K, and customize to your frame size required resolution.
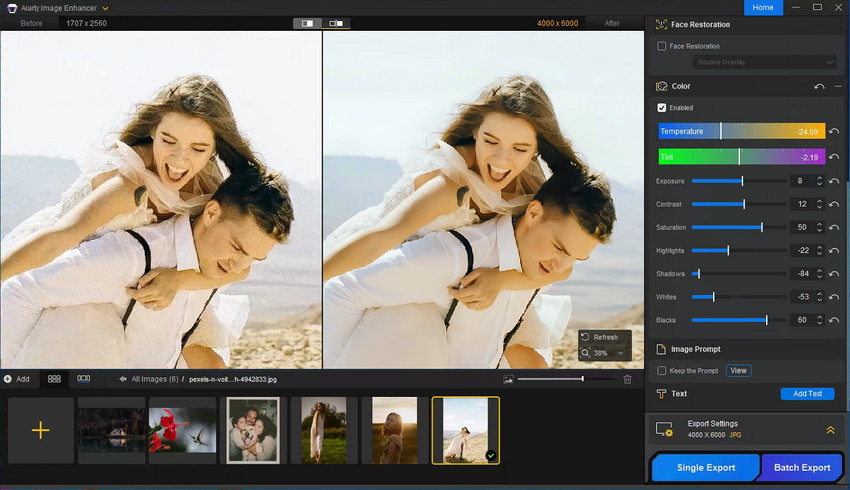
Step 4. Correct Color and Sharpness
Expand the Color panel, and tick on the Enable box. Then you are able to adjust exposure, contrast, white balance, and clarity before printing for a polished look.
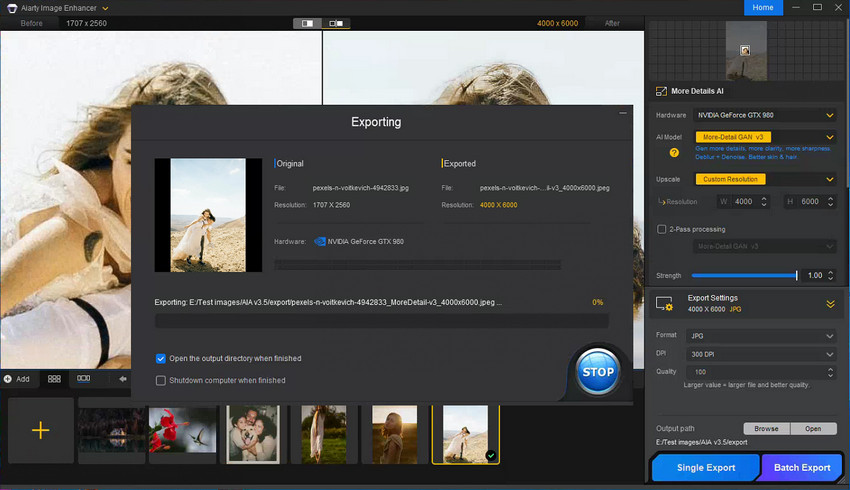
Step 5. Export in Correct Format
For most prints, a high-quality JPEG is perfectly suitable and widely accepted. Expand the Export panel, and choose output format as JPEG, 300 DPI, 100 quality, and set the destination folder. When you're done, tap the Single Export to save the upscaled image individually or Batch Export to save multiple images at once.
Conclusion
Choosing the right frame size can completely transform how your photos look on the wall. With a clear understanding of picture frame sizes, wall layout strategies, and 300 DPI print requirements, you can confidently build a display that feels balanced and professional. And if your images lack resolution, Aiarty Image Enhancer makes it easy to upscale and enhance your photos for sharp, high-quality prints—no matter how large your frame is.
 FAQs
FAQs
The most commonly used frame sizes are 8×10, 11×14, and 16×20. These sizes fit well in living rooms, bedrooms, offices, and gallery wall layouts.
You can place an 8×10 photo in an 8×10 frame (no mat) for a clean fit, or choose an 11×14 frame with a mat if you prefer a more polished, gallery-style presentation.
Most modern smartphone photos (around 12MP) print well up to 11×14 or even 16×20. For anything larger, you may need to upscale your image to avoid visible softness or pixelation.
Check that your image meets the 300 DPI resolution requirements for the print size you want. If it falls short, you can use Aiarty Image Enhancer to upscale and improve clarity before printing.
A 5×7 photo fits perfectly in a 5×7 frame without a mat. If you want a more professional look, you can use an 8×10 frame with a mat, which adds visual balance and creates a gallery-style presentation.
Yes, using a larger frame with a mat is very common. The mat creates a border around your photo, allowing you to place a smaller image inside a bigger frame—for example, an 8×10 photo in an 11×14 frame with a mat.
A 16×20 photo fits a 16×20 frame without a mat. If you want a more decorative or professional look, you can choose a 20×24 or 24×36 frame with a mat to create additional visual space.
You May Also Like
This post was written by Brenda Peng who is a seasoned editor at Digiarty Software who loves turning ordinary photos into extraordinary works of art. With AI assistance for brainstorming and drafting, the post is reviewed for accuracy by our expert Abby Poole for her expertise in this field.