


Lightroom presets let you save a combination of photo editing adjustments and apply the same look to other images with just a few clicks. Whether you want consistent colors across a photo series, a signature editing style for your portraits, or a faster way to process everyday photos, creating your own preset can make your workflow more efficient.
In this guide, you'll learn how to make a preset in Lightroom Classic, Lightroom Desktop, and Lightroom Mobile. We'll also cover which settings to include, how to test a preset on different photos, and how to update or delete presets you no longer need.
What Is a Lightroom Preset and How Does It Work?
A Lightroom preset is a saved collection of editing settings that you can apply to other photos. It can include adjustments such as exposure, contrast, white balance, tone curves, color grading, sharpening, and effects.
Instead of repeating the same adjustments for every image, you can save your preferred combination as a preset and reuse it whenever needed. For example, you might create a warm, muted preset for lifestyle photography, a high-contrast black-and-white preset for street photography, or a soft color treatment for portraits.
However, a preset doesn't save a finished photo or permanently change the original image. It stores editing parameters that Lightroom applies to the selected photo. You can continue adjusting individual settings after applying a preset to suit the lighting, subject, and exposure of each image.
Lightroom presets are also different from export presets. Develop or editing presets control how a photo looks, while export presets save output preferences such as file format, image dimensions, resolution, and compression.
Learn More: Best Lightroom Export Settings for Web, Print, and Instagram
How to Make a Preset in Lightroom Classic
Lightroom Classic lets you create a Develop preset from the adjustments you've made to a photo. You can choose exactly which settings to include, organize presets into groups, and apply them to other images in your catalog.
Follow these steps to create your own preset in Lightroom Classic.
Step 1. Choose a Photo as Your Editing Reference
Start by selecting a photo that represents the type of images you want your preset to work with. A well-exposed portrait, landscape, or street photo can serve as a useful reference, depending on the style you're creating.
Ideally, choose an image with balanced exposure, sufficient detail, and a subject that reflects your usual photography. This gives you a more reliable starting point for developing a preset that can be applied to similar photos.
Improve Image Quality Before Creating a Preset
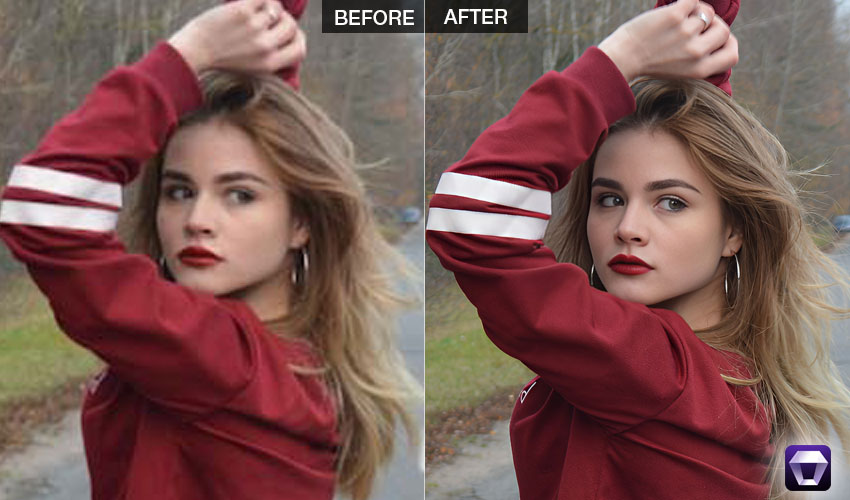
If your chosen reference photo is blurry, noisy, or low in resolution, consider improving its image quality before adjusting its colors and tones. Lightroom presets can apply a consistent editing style, but they don't replace dedicated tools for restoring details or reducing significant noise.
Aiarty Image Enhancer can help reduce noise, improve clarity, restore facial details, and upscale low-resolution photos. After enhancement, import the image into Lightroom Classic and develop the look you want to save as a preset.
Once you've selected a suitable reference photo, import it into Lightroom Classic and open the Develop module to begin editing.
Step 2. Edit the Photo to Create Your Desired Look
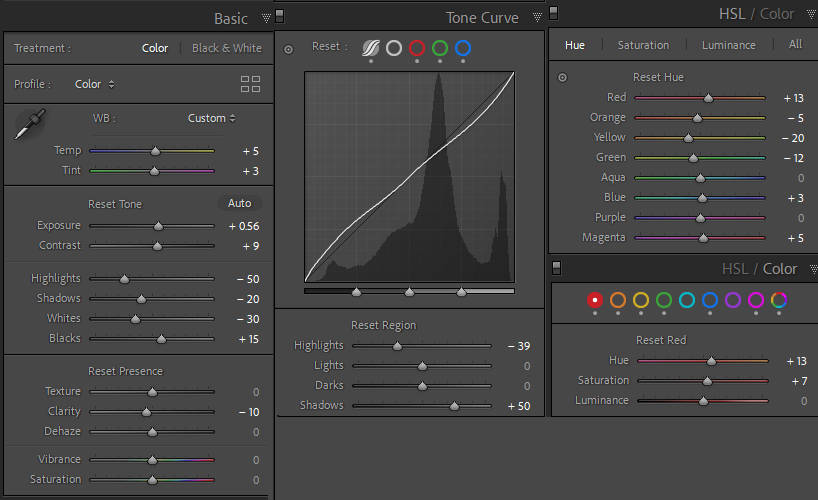
Make the adjustments you want to reuse on other photos. Start with basic corrections, then refine the colors and overall appearance to develop your preferred style.
- Basic adjustments: Adjust contrast, highlights, shadows, whites, and blacks to establish the overall tonal appearance.
- White balance: Change temperature and tint to create a warmer, cooler, or more neutral color balance.
- Tone Curve: Adjust highlights, midtones, and shadows to create a softer, punchier, or more cinematic contrast.
- Color Mixer: Modify individual color ranges to control the appearance of specific colors, such as greens, blues, and oranges.
- Color Grading: Add color to shadows, midtones, and highlights to create a consistent color mood.
- Effects: Adjust texture, clarity, dehaze, vignette, or grain to achieve the desired finish.
Take your time with this stage. The goal is to develop a look that you can reasonably reuse, rather than simply making one photo look good under its specific lighting conditions.
Step 3. Open the Create Preset Dialog
Once you're happy with the edits, go to the Presets panel in the Develop module.
- Find the Presets panel on the left side of the Develop workspace.
- Click the + icon at the top of the panel.
- Select Create Presets from the dropdown menu to add a new preset.
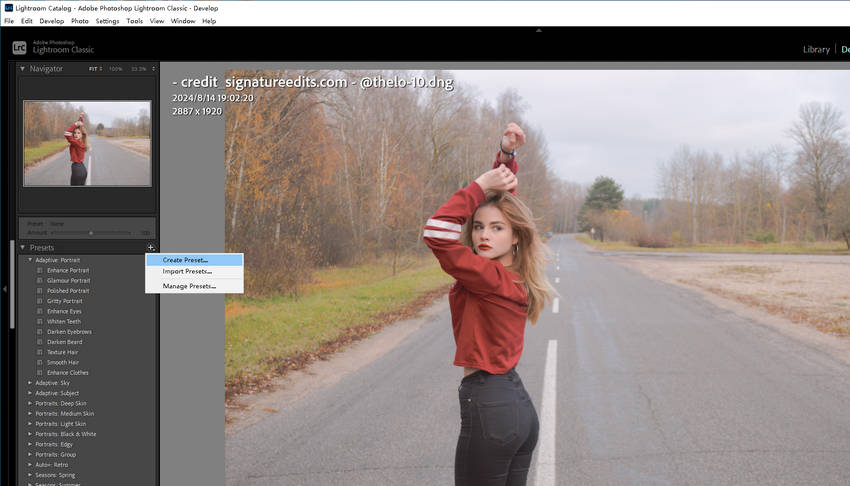
Lightroom Classic will open the New Develop Preset dialog, where you can name your preset, choose a group, and select the adjustments to save.
Step 4. Choose Which Settings to Include
This is one of the most important steps when creating a reusable Lightroom preset. If you select every setting without considering how it will affect other photos, the preset may produce inconsistent results when applied to images with different lighting or subjects.
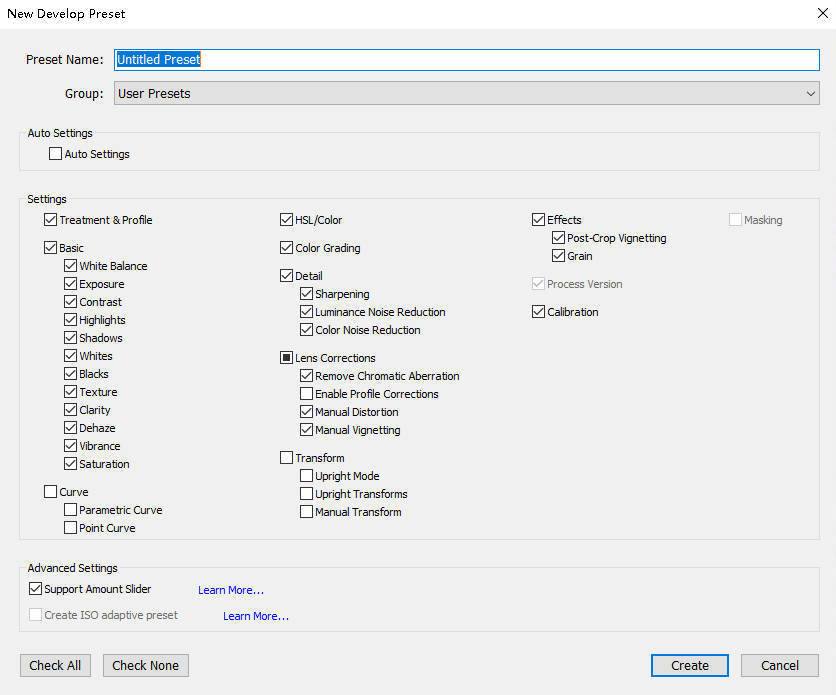
For a general-purpose creative preset, consider the following settings:
These are starting recommendations rather than strict rules. For example, if you're creating a preset specifically for a series of photos taken under the same lighting, including white balance or exposure may make sense.
In the New Develop Preset dialog:
- Click Check None to clear the default selections.
- Check the individual setting groups you want to save.
- Expand a group when necessary to select or deselect individual adjustments.
- Enter a descriptive name in the Preset Name field.
- Select an existing group or create a new group to organize your preset.
- Click Create.
Your custom preset will now appear in the Presets panel under the selected group.
Step 5. Apply Your New Preset to Other Photos
Creating a preset is only the first part of the process. Before using it across an entire collection, test it on several photos with different subjects, lighting conditions, and exposure levels.
- Open another photo in the Develop module.
- Find your custom preset in the Presets panel.
- Hover over the preset to preview its effect, then click to apply it.
- Check the exposure, white balance, colors, shadows, and highlights.
- Make additional adjustments if the preset doesn't suit the new image.
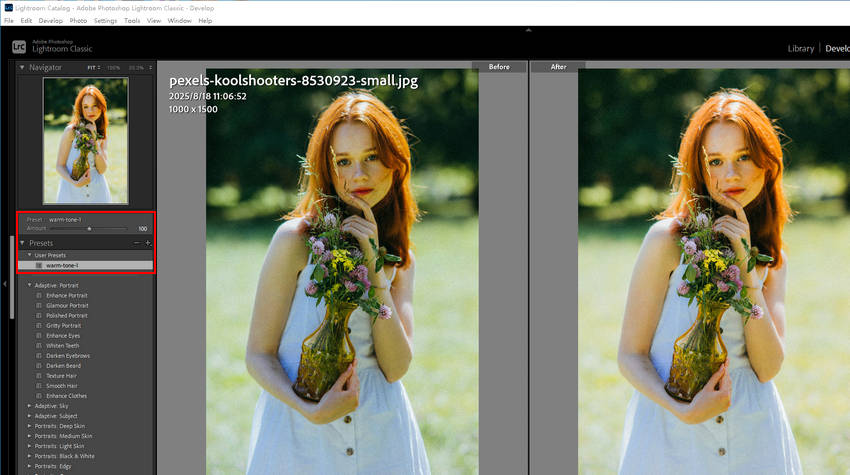
A good general-purpose preset should provide a consistent starting look without forcing every photo into exactly the same tonal or exposure settings. You may still need to make individual corrections after applying it.
How to Create a Preset in Lightroom Desktop
Lightroom Desktop (the cloud-based Lightroom application, rather than Lightroom Classic) also lets you save your editing adjustments as custom presets. The process is similar, although the interface and menu locations are different.
Step 1. Edit a Photo
Open Lightroom Desktop and select a photo from your library. Use the Edit panel to adjust light, color, effects, detail, and other settings until you achieve the look you want to save.
Step 2. Open the Presets Panel
Open the Presets panel in the editing workspace. Navigate to the Yours section to access your custom presets and preset management options.
Step 3. Create a New Preset
- Open the Presets panel and select the three-dot menu or Options menu.
- Choose Create Preset.
- Enter a name for your new preset.
- Choose an existing preset group or create a new group.
- Select the editing settings you want to include.
- Click Save to finish.
Your custom preset will be available in the Yours section of the Presets panel. You can select it to apply the saved adjustments to other photos in your Lightroom library.
How to Create a Preset in Lightroom Mobile
You can also create and save custom presets directly in Lightroom Mobile on an iPhone or Android device. This is useful if you mainly edit photos on your phone or want to develop a consistent look for mobile photography.
Step 1. Edit a Photo on Your Phone
Open the Lightroom Mobile app and select a photo from your library. Make the adjustments you want to save, such as exposure, contrast, color, tone, and effects.
Step 2. Open the Presets Panel
In the Edit panel, tap Presets to open the preset options.
Step 3. Select Create Preset
- Open the Options menu in the Presets panel.
- Tap Create Preset.
- Enter a name in the Preset Name field.
- Choose User Presets or create a new preset group.
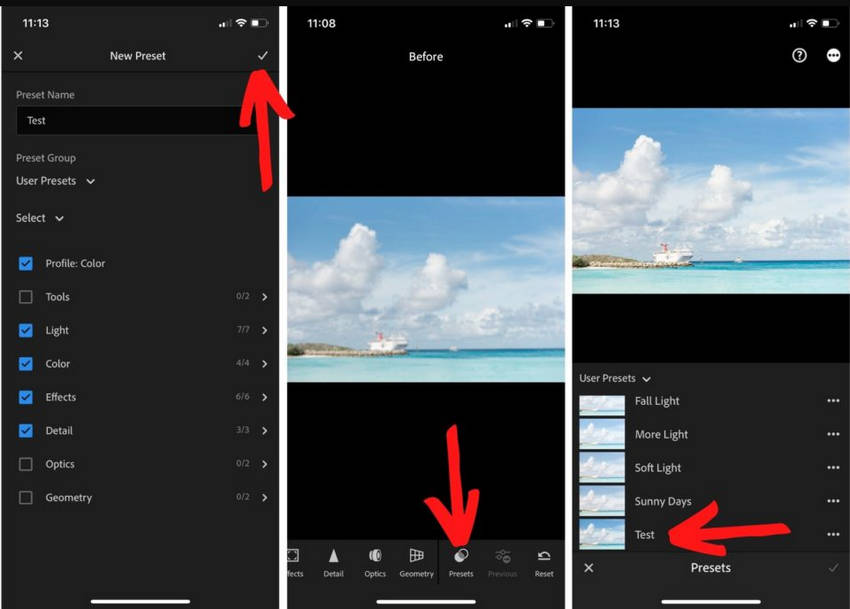
Step 4. Select the Settings and Save
Tap the Select dropdown menu to choose which editing settings to include. Lightroom Mobile provides several selection options:
- All: Selects all available editing setting groups.
- Default: Selects the default set of settings, excluding certain adjustments such as masking, lens blur, and geometry.
- Modified: Selects the settings that have been changed on the current photo.
- None: Clears all selections so you can choose individual settings.
For a reusable style preset, review the selected groups carefully. In particular, consider excluding photo-specific exposure and lighting corrections if you plan to apply the preset to images taken under different conditions.
When you're satisfied with the selection, tap the Done icon to save your preset.
Your new preset will appear under Yours in the Presets panel and can be used on other photos in your Lightroom Mobile library.
How to Make a Lightroom Preset Work on Different Photos
A good Lightroom preset should create a recognizable editing style without making every photo look exactly the same. To achieve this, start with a suitable reference photo, build your look with consistent editing settings, and test the preset under different shooting conditions.
1. Start with a Representative Reference Photo
Choose a reference photo that reflects the type of images you expect to edit with the preset. For example, use a naturally lit portrait when creating a preset for outdoor portraits, or a landscape with a balanced range of colors when developing a preset for travel photography.
Ideally, the image should have reasonably balanced exposure, accurate white balance, and enough detail to support the look you want to create. This gives you a more reliable starting point for judging how your adjustments affect the image.
2. Build Your Preset Style with Specific Editing Settings
Once your reference photo is ready, decide on the visual style you want to create. For example, a soft warm preset can combine gentle contrast, warm highlights, muted greens, and natural-looking skin tones.
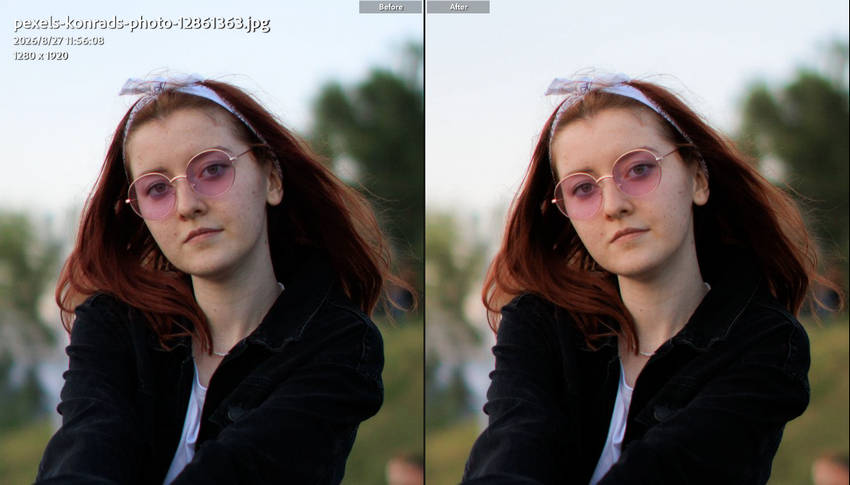
These values are illustrative starting points, not a universal preset recipe. Their appearance can vary with the reference photo, camera profile, and lighting conditions. Adjust them while checking the overall image, especially skin tones, highlights, and greens. You can also add subtle Grain or Vignetting if these effects are part of your intended style.
3. Keep Photo-Specific Corrections Separate
A reusable preset should preserve your preferred editing style, not necessarily every adjustment made to the reference photo. Some settings depend heavily on the original shooting conditions and may produce inconsistent results when applied elsewhere.
For example, a high Exposure value that works for a dark portrait may make a brighter outdoor photo look washed out. Similarly, a warm White Balance adjustment that suits a sunset image may create an unwanted yellow cast in daylight.
For a general-purpose style preset, you can usually include settings such as Tone Curve, HSL, Color Grading, and Camera Calibration. Exposure and White Balance are often better adjusted for each photo. Other settings, such as Lens Corrections, Transform, and masking adjustments, should be included only when they are intended to be part of your reusable workflow.
You don't have to exclude every Basic adjustment. Contrast, Highlights, Shadows, Whites, and Blacks can contribute to a consistent style. The key is to avoid saving values that only correct the exposure or lighting of one particular photo.
4. Test and Refine the Preset on Different Photos
Don't judge a preset by how it looks on just one image. Apply it to a small selection of photos, including portraits, landscapes, indoor shots, and outdoor scenes if those are part of your usual workflow.
Pay attention to recurring problems:
- Skin tones become too orange, red, or pale. Check the Orange and Red settings in the HSL panel.
- Greens and blues look oversaturated or shift to unwanted hues. Revisit their Hue and Saturation values.
- Highlights lose detail or shadows become too dark. Review the Basic panel and Tone Curve.
- Contrast makes already dark photos look muddy. Reduce the contrast or soften the darker regions of the Tone Curve.
- Grain, texture, or clarity effects become too pronounced. Reduce their intensity or leave them out of a general-purpose preset.
If the same issue appears across several photos, revisit the relevant preset settings and refine them. If the problem only affects one image, adjust that photo individually rather than changing the entire preset.
After refining the settings, test the preset again on your sample images. This helps you build a more consistent editing style while leaving room for photo-specific adjustments.
How to Update or Delete Presets in Lightroom
As your editing style changes, you may want to refine an existing preset, rename it, or remove presets you no longer use. Lightroom provides preset management options, although the exact steps vary by version.
Update or Delete a Preset in Lightroom Classic
In Lightroom Classic, open the Develop module and locate the custom preset in the Presets panel. Then right-click the preset on Windows or Control-click it on macOS to access its management options.
- To update a preset: Apply it to a photo, make the adjustments you want to keep, then right-click the preset and select Update with Current Settings, if available. Review the settings and confirm the changes. To preserve the original, save your adjustments as a new preset instead.
- To delete a preset: Select Delete from the context menu and confirm. This removes the preset from your collection but does not undo adjustments already applied to photos.
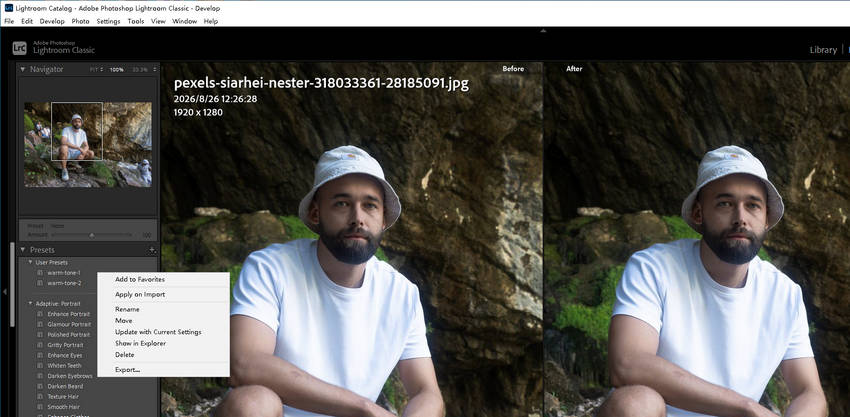
Important: Lightroom Classic does not allow you to delete built-in presets. Use the preset's context menu rather than the Delete key on your keyboard, which may delete a selected photo instead.
Final Thoughts
Making your own Lightroom preset is a straightforward way to save time and develop a consistent editing style. Start with a representative photo, make the adjustments that define your preferred look, and select only the settings that make sense to reuse. Then test the preset on different photos and refine it as needed.
Remember that a preset is a starting point, not a one-click solution for every image. For photos with blur, noise, low resolution, or limited facial detail, improve the image quality first when necessary. Tools like Aiarty Image Enhancer can complement Lightroom by handling these quality-related issues, leaving Lightroom to do what it does best: fine-tune colors, tones, and creative style.
Frequently Asked Questions
Creating custom presets is a built-in Lightroom feature, but access depends on the Lightroom application, account, and subscription or plan you use. Some editing and preset features may be available without a paid subscription, while other features and syncing options require an eligible plan. Check your current Lightroom plan for the features available to you.
Yes. You can use an already edited photo as the basis for a custom preset. Open the photo, choose Create Preset from the Presets panel, and select the editing settings you want to save. You can then apply those settings to other photos.
Yes, custom presets can be used across Lightroom applications through supported syncing or preset import methods. When signed in with the same Adobe ID and using an eligible subscription, Lightroom presets can sync across supported devices. You can also transfer compatible preset files when automatic syncing isn't available. Some settings may behave differently depending on the application and version.
A preset applies the same saved adjustments to each photo, but the starting conditions are different. Exposure, white balance, lighting, camera settings, subject colors, and image quality can all affect the result. For more consistent results, avoid including photo-specific corrections in general-purpose presets and test your preset on several images before using it on a larger collection.
Yes. Deleting a custom preset removes the saved preset from your preset library, not the photos where you previously applied it. Those photos retain their existing editing adjustments unless you manually reset or change them.
You May Also Like


This post was written by Brenda Peng who is a seasoned editor at Digiarty Software who loves turning ordinary photos into extraordinary works of art. With AI assistance for brainstorming and drafting, the post is reviewed for accuracy by our expert Abby Poole for her expertise in this field.
