


To save a preset in Lightroom, edit a photo, open the Presets panel, and choose Create Preset. Give it a name, select a group, choose the adjustments to include, and confirm. Lightroom Classic uses a Create button; Lightroom desktop uses Save, and the mobile app uses a confirmation icon.
A preset stores selected editing instructions that you can apply to another photograph. The useful part is choosing which instructions should travel with it: a color treatment may work across a collection, while the exposure correction for one dark frame may not. Follow the steps for your app below; Lightroom and Lightroom Classic have different interfaces and preset-sync behavior.
How to Save a Preset in Lightroom Classic
In Lightroom Classic, create a preset from the selected photograph in the Develop module. You can save a complete treatment or a limited set of adjustments for a particular task.
- Open and edit a photo. Select an imported photograph and switch to Develop. Make the adjustments you want the preset to reproduce.
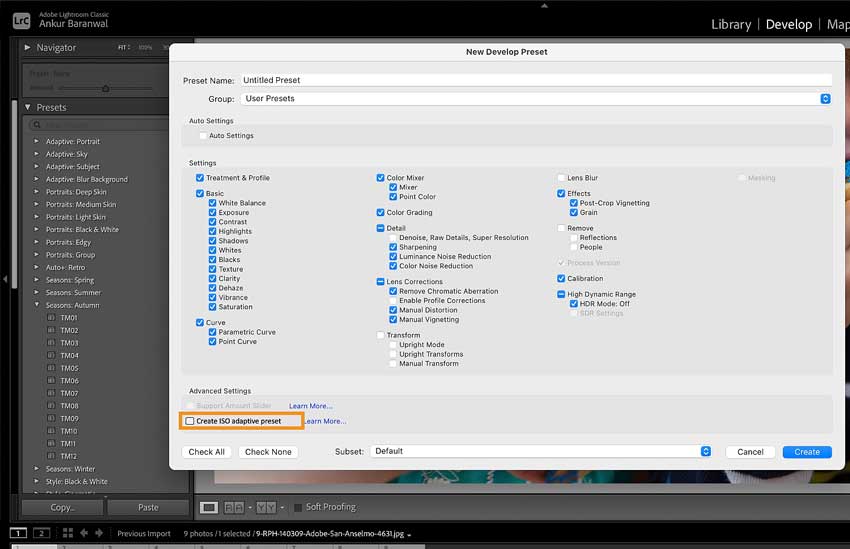
- Open the creation dialog. In the Presets panel on the left, click the + button and choose Create Preset.
- Name it and choose a group. Enter a descriptive Preset Name, such as “Warm Color — Gentle Contrast.” Choose User Presets or create a group for related treatments.
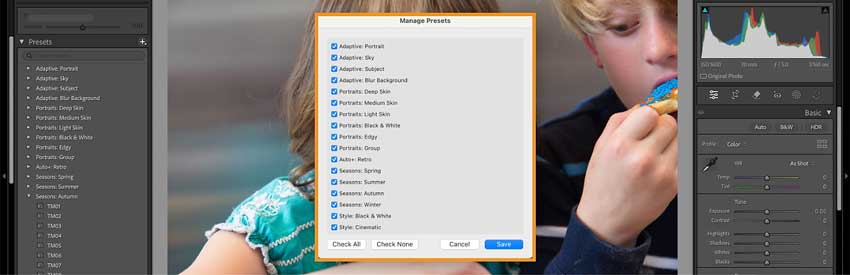
- Select the settings to include. Click Check None if you want to build the selection deliberately, then enable the relevant settings. An unchecked setting is excluded; a checked setting can carry its current value even when that value is zero.
- Click Create and test it. Open the selected group to find the preset, then apply it to a different photograph. Check both the overall rendering and the settings it changed.
How to Save a Preset in Lightroom Desktop
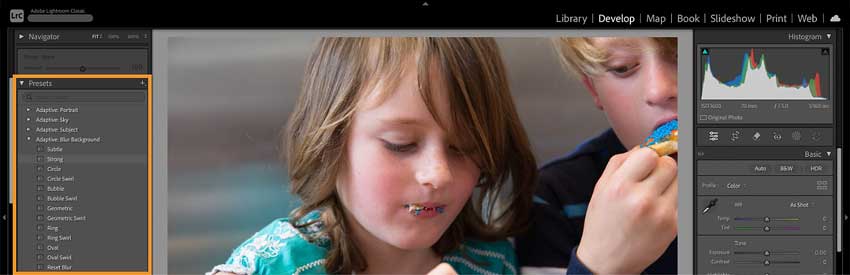
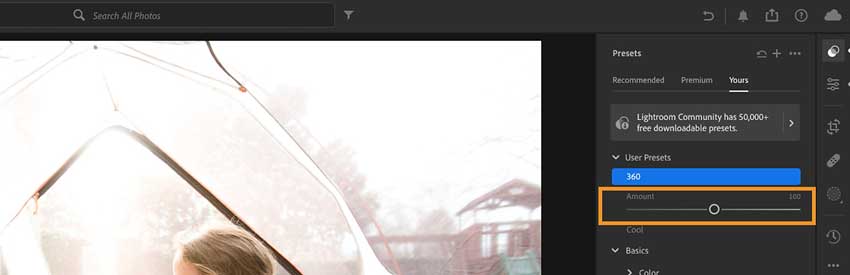
In the Lightroom desktop app, open Presets and use the panel's three-dot menu to create a custom preset. These instructions apply to Lightroom, the application with Recommended, Premium, and Yours preset categories.
- Open a photograph and make the edits you want to reuse.
- Click the Presets icon, shown as two overlapping circles.
- Open the three-dot menu in the Presets panel and choose Create Preset.
- In New Preset, enter a name, choose a preset group, and review the adjustments included in the selection. Expand setting groups when you need finer control.
- Click Save, then find the preset under Yours in the group you selected.
Keep a style preset focused on the treatment you want to repeat. A useful test is to apply it to a photograph whose exposure and white balance are already corrected, then see whether those corrections remain intact. Our comparison of Lightroom and Lightroom Classic explains the broader differences between the two applications.
How to Save a Preset in Lightroom Mobile on iPhone and Android
You can create a preset directly in Lightroom Mobile on either iPhone or Android. Start with the edited photograph; transferring a preset from a computer is optional.
- Open the edited photo. Enter the photo's Detail view and open Presets from the editing controls.
- Open the preset options. In the Presets panel, open Yours, tap the three-dot options menu, and choose Create Preset.
- Enter a name and group. Use Preset Name and Preset Group to identify and organize it. User Presets is the default group, or you can create a new one.
- Choose the adjustments. Review the Select menu and the individual setting groups. Modified selects settings applied to the photograph; None clears the selection so you can choose explicitly.
- Confirm the preset. Tap the Done or checkmark confirmation icon. Return to Yours and open the group you selected to find it.
The Select menu also offers All and Default. Default is a predefined selection, so check it before saving a treatment that depends on masks or other specialized adjustments.
Which Settings Should You Include in a Lightroom Preset?
Include the adjustments that serve the preset's purpose, then leave unrelated corrections out. Selecting everything can make a preset reproduce one photograph's settings more completely, but it also gives it more opportunities to override work on another image.
Save the Adjustments That Define Your Look
For a reusable color treatment, begin with the tone curve, Color Mixer, Color Grading, and any intentional effects such as grain. Include contrast or saturation changes when they belong to the treatment, and review the result on skin, foliage, and neutral surfaces. A preset that looks convincing on one sunset may behave quite differently on an indoor portrait.
Detail settings deserve their own decision. Sharpening and noise reduction depend on the source image, its existing processing, and the intended output; a JPEG may already contain substantial sharpening. If you include them, inspect the effect at 100% and use our guide to Lightroom sharpening controls to distinguish edge sharpening from actual detail recovery.
Decide Whether to Include Exposure and White Balance
For a general-purpose style preset, leaving Exposure and White Balance unchecked often makes the treatment easier to reuse. For a consistent sequence under the same lighting, including them can be appropriate, provided you still check individual frames. Decide whether you are saving a look or a correction for a particular shooting situation.
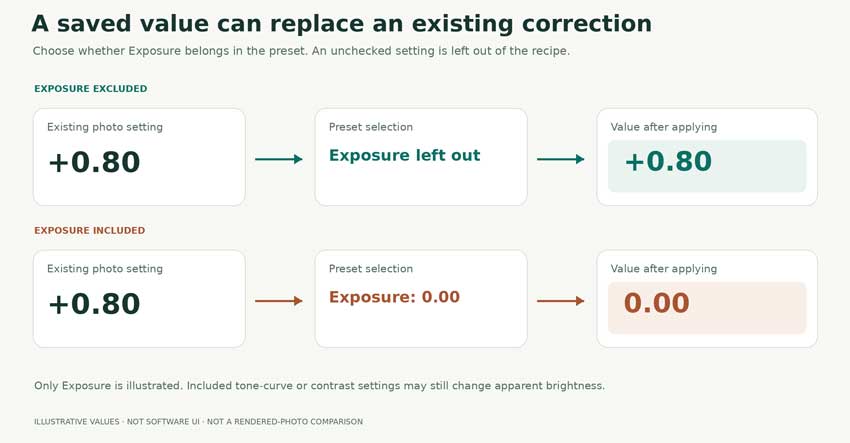
An ordinary fixed Exposure setting replaces the destination slider value; it does not add that value to the existing correction. If a photograph already has Exposure at +0.80 and the preset includes Exposure at 0.00, applying it can replace +0.80 with 0.00. Leaving Exposure unchecked preserves that slider value, although included contrast or curve settings can still change the photograph's apparent brightness.
White balance also interacts with the file type. RAW files and rendered JPEGs offer different adjustment latitude and can respond differently to the same treatment. Test a preset on the kinds of files you intend to edit, rather than assuming one reference photo represents the whole collection.
Check Masks and Profile Compatibility
A Lightroom preset can include masks when you select Masking during creation. AI subject or sky masks can be recalculated for the destination photograph, while a brush or gradient may require repositioning or refinement. Check the actual selection after applying it, especially around hair, branches, transparent objects, and small subjects.
A profile can also affect compatibility. A preset that depends on a particular camera profile or RAW-only treatment may be unavailable or only partially compatible with another file. If the profile is essential to the look, test that dependency; if it is incidental, leave it out when saving the preset. Similarly, the Masking checkbox for local adjustments is distinct from the sharpening Masking slider in the Detail controls.
How to Find, Apply, and Update Your Saved Preset
Find and Apply Your Preset
In Classic, expand the group you chose in the Develop module's Presets panel. In Lightroom desktop or Mobile, open Presets → Yours, then the selected group. Choose another photograph and apply the preset; if you used a custom group, it will be there rather than necessarily inside User Presets.
Review exposure and white balance, check any masks, and inspect detail before applying the treatment to a large set. Applying the preset to its source image again verifies very little: that image already contains the settings from which it was created. A second photograph reveals whether the preset carries unintended corrections.
A matching color treatment can still leave uneven image quality across a set. One frame may contain more noise, while a heavy crop may leave too few pixels for a large print. Lightroom provides its own detail-processing tools; additional enhancement is a separate decision from saving or applying a look.
Aiarty Image Enhancer is one option when a file needs dedicated denoising, deblurring, or AI upscaling. It processes images locally, using trained models to estimate a cleaner or higher-resolution result, with enhancement-strength controls and batch processing for groups of files. Use enhancement at the existing dimensions when more pixels are unnecessary, or select an enlargement appropriate to the output. Judge fine texture and edges at 100%; plausible reconstructed detail is not proof of what the camera originally recorded.
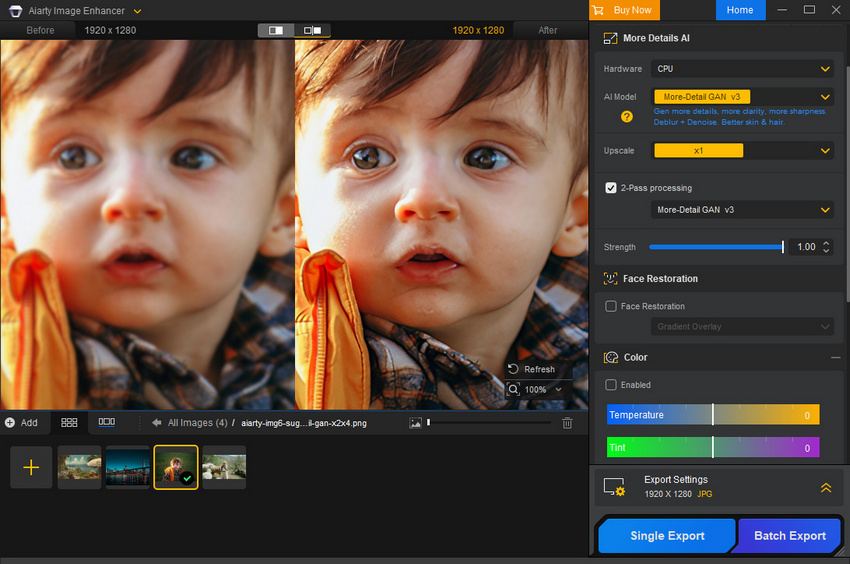
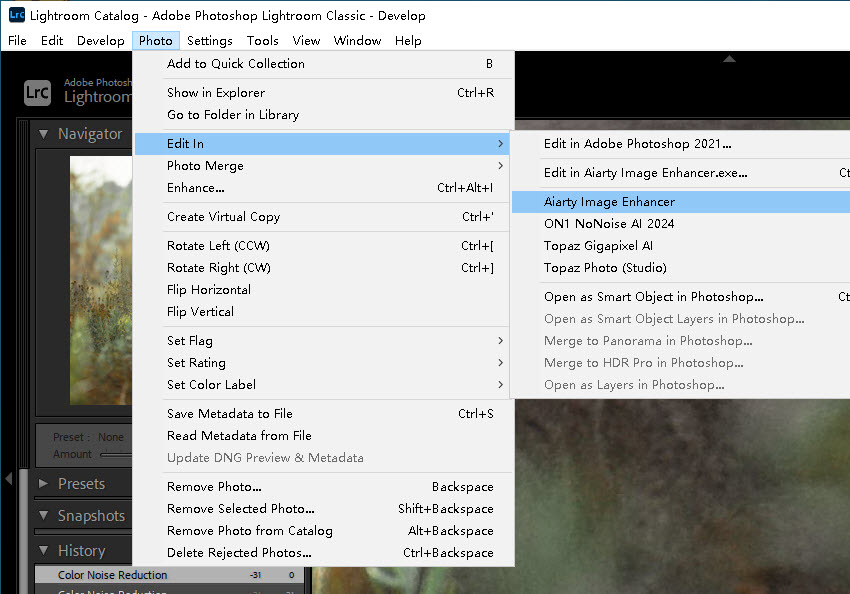
In a Classic workflow, send a rendered copy with the Lightroom adjustments included when those edits should be preserved. Once the external-editor entry is configured, the handoff is Photo → Edit In → Aiarty Image Enhancer; the available copy options depend on the source format. The external-editor workflow guide explains the return-file behavior. Keep the source and check the returned result before further grading, since a rendered copy already includes the look applied before the handoff. Those pixel-level enhancement results are not stored inside the Lightroom preset.
Update an Existing Preset
To revise a preset, apply it to a representative photo and make the intended changes. In Classic, right-click the preset, choose Update With Current Settings, select the settings to include, and click Update. In Lightroom desktop, right-click the user preset and choose Update With Current Settings; check the source photo's edits before doing so.
On Mobile, open Yours and the options beside the preset. The iPhone workflow uses Update with current settings; Android uses Replace. Review the setting selection and confirm. Editing the photograph alone does not update the saved preset, and updating it does not retroactively change photographs to which you previously applied it.
How to Export or Back Up a Lightroom Preset
Export a Preset from Lightroom Desktop or Classic
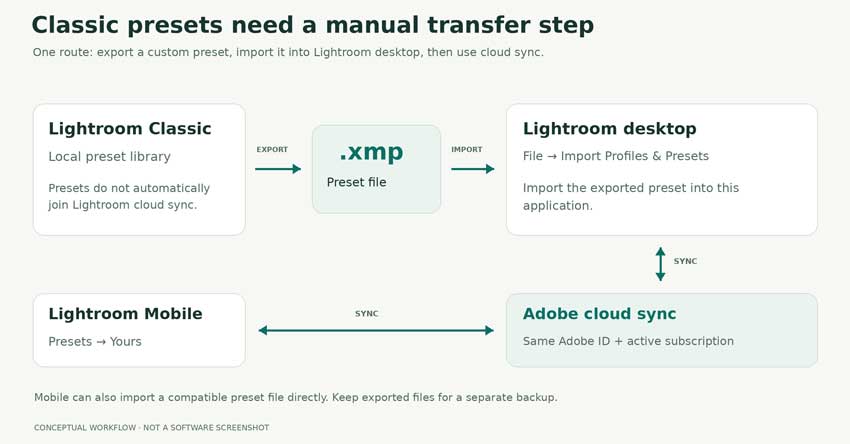
To save a reusable preset as a separate file, right-click the custom preset and choose Export, then select a destination. Lightroom desktop exports an XMP file; current Classic Develop presets also use XMP. In Classic, right-clicking a preset group provides Export Group for backing up a collection.
Use a custom preset for this workflow: Classic does not export its built-in presets. Keep the exported files with your other editing resources, and retain any custom profiles on which they depend. A preset export preserves editing instructions; it is not a backup of your photographs or their complete editing history.
Share Preset Settings from Lightroom Mobile
For a DNG-based transfer, open a photo containing only the settings you want to share, choose Share → Export as, select Preset from the Settings menu, and choose DNG as the file type. Confirm the export and save or share the resulting file.
This DNG carries the current photograph's editing settings, so check for additional corrections made after applying the preset. Recipients can import the DNG and create their own preset from its settings. Use a photograph you are comfortable sharing, because this transfers an image file rather than only an XMP recipe.
Lightroom Preset Not Showing Up? What to Check
Start by checking the selected photo, preset group, and app. A hidden group or incompatible profile can make a saved preset appear to be missing even though it was created successfully.
Lightroom desktop and Mobile can sync presets through the same Adobe account with an active subscription. Lightroom Classic is outside that automatic preset-sync path, even when you also sync photographs from Classic. Transferring a photograph's edits and transferring a reusable preset file are separate operations.
 FAQs About Saving Lightroom Presets
Yes. Open the three-dot menu on a Recommended preset's thumbnail and choose Save to your presets. On Mobile, the saved recommendation can be found under Yours → Saved from Community. This saves an existing recommendation; Create Preset instead builds a preset from the editing settings on your current photograph.
Yes, when the photograph contains Lightroom editing settings to save. Edit a JPEG normally, or open a DNG supplied with editing instructions, then create a preset from the selected adjustments. A flattened JPEG downloaded from a website does not reveal the original slider settings: creating a preset from an unedited copy will not extract the color treatment already baked into its pixels.
No. A preset saves selected instructions for reuse; exporting a photograph produces a file with the rendered appearance. Creating a preset does not export a JPEG or TIFF, and exporting a photograph does not automatically create a reusable preset. Keep your original image and its Lightroom editing records if you need to revisit the work.
In Classic, choose File → Export, configure the output, and click Add beneath the Export dialog's preset list. Name the preset and click Create. This stores output choices such as format, dimensions, and quality, rather than Develop adjustments; our Lightroom export settings guide covers the workflow in detail.
You May Also Like


This post was written by Brenda Peng who is a seasoned editor at Digiarty Software who loves turning ordinary photos into extraordinary works of art. With AI assistance for brainstorming and drafting, the post is reviewed for accuracy by our expert Abby Poole for her expertise in this field.
