


A good Lightroom export keeps the detail and color you worked on while giving the next application an appropriate file. A website needs a reasonably small image that loads quickly; a client may need all the pixels available after cropping; a print lab needs a file prepared to its specifications. Using the same export preset for all three can leave you with unnecessarily large uploads or files that are too small for their intended use.
For routine online sharing, start with an sRGB JPEG at Quality 80–90, sized for its destination, with Screen output sharpening at Standard. For final client delivery, retain the available pixel dimensions and consider Quality 90–100. Printing and further editing need more specific choices, explained below. Check a representative photograph before saving a preset for a whole batch.
This guide covers photo export settings and presets that save those settings. Editing presets, which save adjustments such as exposure and color grading, belong to a separate workflow.
Best Lightroom Export Settings at a Glance
Choose the destination first, then set the file format, dimensions, compression, color space, and sharpening in Lightroom together. The table below assumes an ordinary SDR photo workflow. Use the quality ranges to make a first export, then refine them for the image and delivery requirements.
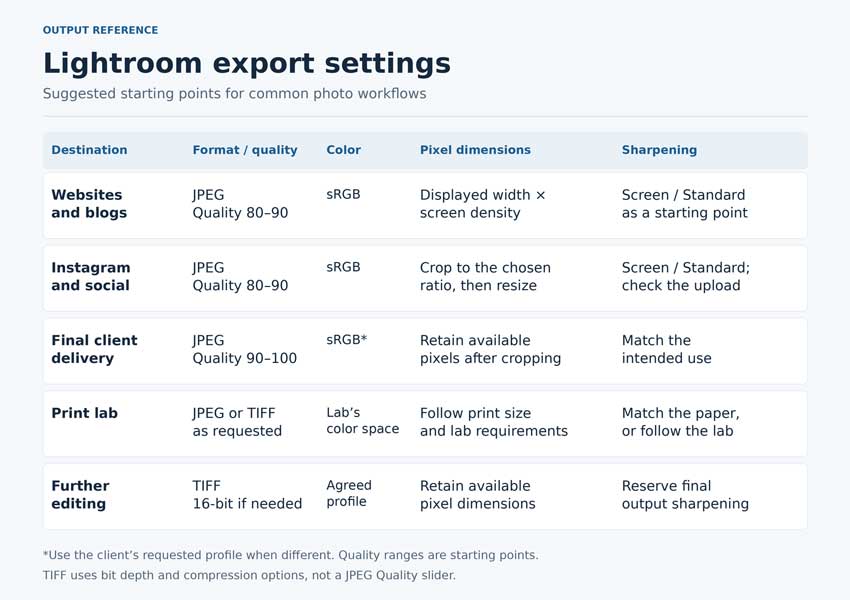
For a full-size export in Lightroom Classic, leave Resize to Fit unchecked. In Lightroom desktop or mobile, select the corresponding full-size or largest-available-dimensions option. This preserves the pixels available in the edited image; it does not undo a crop or add detail to a small source.
Where to Find Export Settings in Lightroom
The settings have similar purposes across Lightroom applications, but their menus and available controls differ. Use the instructions for your application rather than searching for a Classic-only panel in the cloud-based desktop or mobile app.
Lightroom Classic: File > Export
Select the photographs you want to deliver, then choose File > Export. For a normal folder export, choose Hard Drive at the top of the dialog and set a destination under Export Location. The expandable panels contain naming, file settings, image sizing, sharpening, metadata, and other output options. Adobe's Classic export workflow explains the complete sequence.
Lightroom Desktop: Share > Custom Settings
Open the Share menu and choose Custom Settings, or use File > Export. Select the file type, dimensions, and quality, then expand More Options for controls such as color space and output sharpening. The quick JPG options are convenient, but custom settings give you more control over the delivered file.
Lightroom Mobile: Share > Export as
Select a photo, open Share, and choose Export as to configure its file type, dimensions, and quality. Adobe distinguishes this configurable export from Save copy to device, which uses default settings. Some options depend on the format and operating system, so check the available controls before exporting a batch.
Lightroom Export Settings Explained
Several controls influence the appearance of a delivered photograph, but they do different jobs. Pixel dimensions determine how large an image can be displayed or printed; JPEG quality controls compression; PPI relates pixels to physical print dimensions. Sharpening adjusts the appearance of edges and detail for the chosen output.
File Format and JPEG Quality
JPEG is a practical delivery format for websites, social posts, and many client galleries. TIFF is useful when another editor or a print provider needs a substantial working file, particularly when higher bit depth is appropriate.
Lightroom's JPEG Quality value controls compression. Quality 100 does not mean that a photograph is lossless, nor does it increase its pixel dimensions. A small export at Quality 100 remains small. When storage or upload speed matters, compare a few quality settings at the same dimensions instead of assuming the largest file is necessary.
Leave Limit File Size To off unless there is an actual upload limit to meet. A restrictive size ceiling can force a different compromise than the quality setting you intended. If a submission must be under a particular number of kilobytes, inspect fine detail, gradients, and any text after export.
Choose Original when you need the source-format file. For an original RAW export, Lightroom adjustments are not rendered into the sensor image as they are in a JPEG or TIFF; compatible software must interpret the accompanying edit information. For a client who simply wants to open the finished photograph, export a rendered file.
Color Space: sRGB, Adobe RGB, and ProPhoto RGB
For ordinary web and social delivery, sRGB is a sensible default because it provides a straightforward, widely compatible handoff. Wider-gamut spaces can be useful in a managed editing or printing workflow, but the recipient needs to handle them correctly. Sending a wider-gamut file does not automatically improve its appearance in every application.
Use Adobe RGB when the receiving workflow specifically calls for it. ProPhoto RGB can be appropriate for a high-bit-depth working file passed to a compatible editor. For printing, follow the lab's instructions; its requested file color space and a printer-and-paper profile used for soft proofing may serve different purposes.
Image Sizing: Pixel Dimensions, Long Edge, and Don't Enlarge
First decide how many pixels the destination needs. Long Edge is convenient for a mixed gallery because the same value applies to the longer side of each image. Short Edge applies to the shorter side. Width & Height fits the image inside the specified bounds while preserving its aspect ratio; it does not crop every image to the exact rectangle you enter.
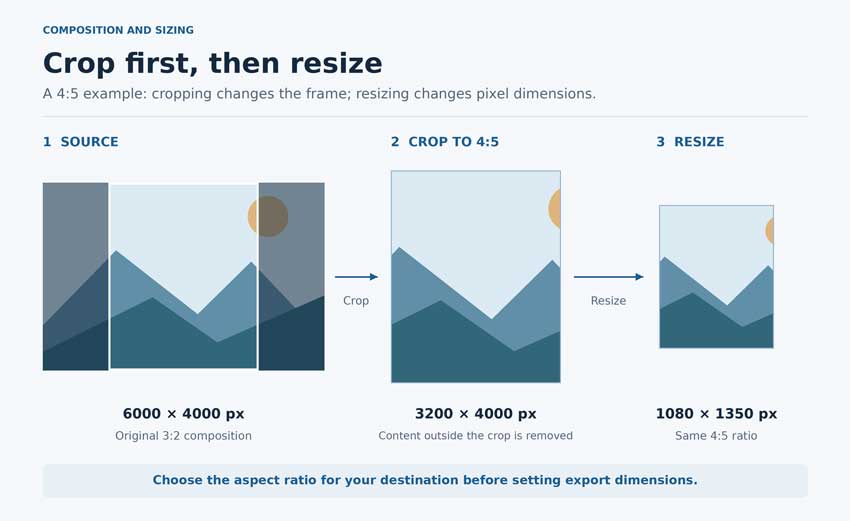
For example, a 3:2 landscape image fitted within 1080 × 1350 pixels becomes 1080 × 720 pixels. To produce a 1080 × 1350 portrait, crop to 4:5 during editing, then export at those dimensions. Cropping changes the composition; resizing changes how many pixels represent it.
Check Don't Enlarge when a small source should remain at its available size. If a destination needs more pixels than the source contains, treat enlargement as a separate decision and examine the result carefully. For a full-resolution delivery, keep resizing off.
Resolution: PPI vs. Pixel Dimensions
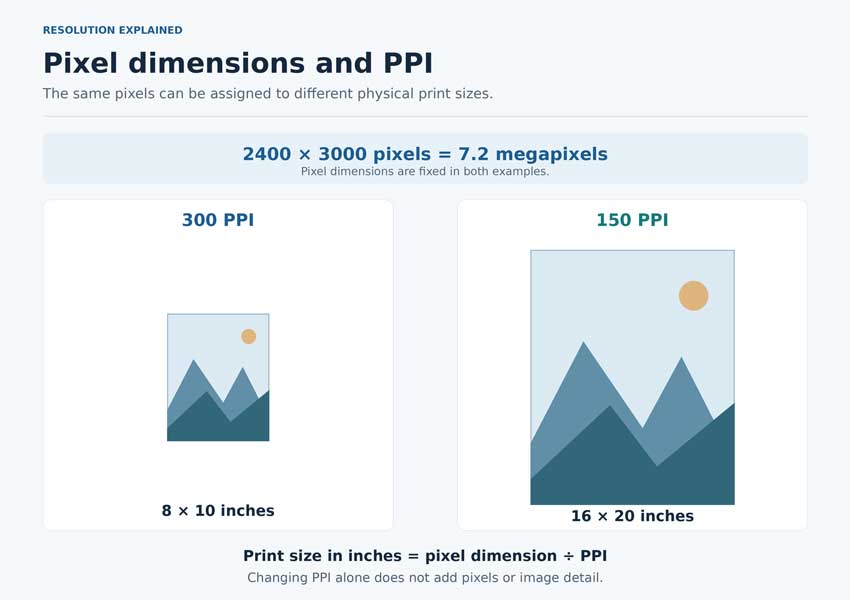
PPI describes how many image pixels are assigned to one inch of a print. Changing the PPI value alone does not create additional image detail. If the pixel dimensions remain 2400 × 3000, the file still contains 7.2 million pixels, regardless of the print-resolution value attached to it.
The calculation is simple: print dimension in inches = pixel dimension ÷ PPI. A 2400 × 3000 file corresponds to 8 × 10 inches at 300 PPI, or 16 × 20 inches at 150 PPI. The larger print spreads the same pixels over a greater area.
For screen delivery, control the pixel dimensions rather than choosing between 72 and 300 PPI as a quality setting. A higher PPI value does not make an otherwise identical file sharper on a screen. When comparing PPI alone, keep other processing fixed: Lightroom output sharpening can depend on the selected output resolution.
Output Sharpening: Screen, Matte Paper, and Glossy Paper
Output sharpening is the final treatment for the intended viewing medium. It can work alongside sharpening applied while editing.
For digital viewing, Screen/Standard is a useful starting point. For prints, choose the matching paper category if you are responsible for final sharpening. Assess the actual output rather than increasing the amount whenever an image looks soft: strong edges, halos, or exaggerated grain are reasons to reconsider the setting.
If the next application will continue editing the photograph, leave final output sharpening until the delivery stage. For a fuller explanation of the available options, see Lightroom output sharpening.
Export Location, File Naming, Metadata, and Watermarks
Separate exports by purpose so that a print file cannot be mistaken for a small web copy. A naming pattern such as project-001-web.jpg and project-001-full.jpg can make a large delivery easier to manage. Check how existing filenames will be handled before repeating an export into the same folder.
Keep copyright or contact information where appropriate, and review whether location or personal information should travel with a public file. Apply watermarks to the versions that need them, such as proofs; make that choice deliberately for final deliveries. These settings support the handoff and should be saved alongside the image-quality choices.
HDR note: The recommendations here assume ordinary SDR output. If you edit in HDR, check whether the receiving application, display, and file format support the intended presentation.
Best Lightroom Export Settings for Web and Instagram
Lightroom Export Settings for Websites and Blogs
Start with JPEG, sRGB, Quality 80–90, and a pixel width appropriate to the page. A photograph displayed at 800 CSS pixels wide may need a 1600-pixel source for a 2× screen, provided the website serves that image appropriately. That is a sizing example, not a rule that every image on the site should be 1600 pixels wide.
Check what happens after upload. A content-management system may create additional sizes, convert formats, or serve a smaller version than expected. If the file looks good locally but soft on the published page, inspect the image actually delivered by the website before changing the Lightroom preset.
For a gallery, export representative photographs first: fine foliage, smooth skies, and detailed fabric can reveal different compression trade-offs. Choose a quality level that holds up at the intended display size, then apply the settings to the remaining images. File size depends on the photograph as well as the chosen quality and dimensions.
Lightroom Export Settings for Instagram and Other Social Platforms
Use an sRGB JPEG and crop to the composition intended for the post. Practical examples include 1080 × 1080 for a square image and 1080 × 1350 for a 4:5 portrait. These are working export examples, not a complete list of supported Instagram formats or a claim that 4:5 is the maximum permitted ratio.
Quality 80–90 and Screen/Standard provide a reasonable first export to assess. Increasing quality may help a particular image, but no Lightroom setting guarantees that a platform will leave the uploaded file untouched. Check the posted result at a normal viewing size, and avoid judging it only from a magnified screenshot.
Keep the exported file intact during transfer to your phone. Sending it through a service that compresses images can create an additional problem before Instagram receives it. For other social platforms, use their requirements for the specific placement; a feed image, banner, and story should not automatically share one preset.
Best Lightroom Export Settings for Print
Match Pixel Dimensions to the Print Size
Ask the printer or lab for its file requirements before deciding on export resolution. A 300 PPI target is common for photographs viewed up close, while larger prints viewed from a distance can tolerate different densities.
For an 8 × 10-inch print at 300 PPI, the arithmetic gives 2400 × 3000 pixels. Crop to the intended proportions before sizing the export. If the edited image has substantially fewer pixels, entering 300 in the Resolution field does not solve that shortage; evaluate resizing, enhancement, or a different print size.
For a lab that requests full-resolution files, leave Resize to Fit off and let its workflow handle sizing. If it requests exact print dimensions, enter those dimensions and the required PPI. Confirm that the resulting file meets the specification rather than relying on the preset name.
Choose the Format, Color Space, and Paper Sharpening Your Lab Requires
Use the requested JPEG or TIFF format and color space. Avoid converting into a printer-and-paper profile merely because it is available: a profile used to preview output may differ from the file profile the lab expects. Lightroom Classic's soft proofing can help you assess output, but it requires the appropriate profile and a suitable viewing setup.
Agree on sharpening responsibility. If the lab will resize and sharpen the file, follow its instructions about output sharpening. If you are preparing the final file yourself, choose the matching paper option and assess a test print.
Exporting a file for a lab also differs from printing directly through Lightroom's Print module. The latter includes page layout and printer controls.
Lightroom Export Settings for High Resolution and Client Delivery
Full-Resolution JPEGs for Client Delivery
For final JPEG delivery, retain the pixels available after editing and cropping, use the agreed color space, and consider Quality 90–100. The choice should reflect what the client will do with the photographs. A downloadable archive, a viewing gallery, and a small proof set can have different requirements.
Avoid carrying a web-size limit into the final export. Check one representative file's dimensions, filename, and appearance before delivering the batch. If the client also needs web copies, provide them separately with clear names or folders so that the smaller files are not used for prints by mistake.
TIFF Files for Further Editing
When another editor will continue substantial work, a full-size, 16-bit TIFF can provide a useful intermediate file. Select a color space the next application supports and reserve output sharpening for the final destination. TIFF compression and bit-depth choices differ from JPEG quality; ZIP compression is an option when lossless TIFF compression is wanted.
Lightroom Classic also provides an external-editing workflow for compatible applications. Its External Editing preferences control the working file's format, color space, bit depth, and compression. An exported TIFF records a rendered stage of the photograph; retain your source files and Lightroom editing records if you need to revisit the original edit.
How to Save Lightroom Export Settings as a Preset
Create an Export Preset in Lightroom Classic
Once a configuration works for a particular destination, save it rather than rebuilding it for every delivery. In Lightroom Classic:
- Open File > Export and configure the output.
- Click Add beneath the Preset panel on the left.
- Enter a descriptive name and click Create.
Names such as Web – 1600px – sRGB or Client – Full Size – JPEG tell you more than High Quality. Check whether the saved location and naming choices will suit future jobs.
Reuse Export Presets and Understand Export with Previous
Choose the saved preset from the Export dialog or File > Export with Preset. Review any job-specific choices, such as destination and filename, before starting the export. Export with Previous repeats eligible settings from the most recent export session; a named preset is easier to identify when several output configurations are in regular use.
Classic also supports exporting the same selection through multiple selected presets, which can be useful for separate web and full-size deliveries. Make the destinations distinct so that the outputs remain easy to recognize.
These presets save output configurations. They do not save a photograph's Develop adjustments or serve as a method for distributing an editing look.
Why Do Lightroom Exports Look Blurry or Different?
Blurry Exports: Check Size, Quality, and Output Sharpening
Open the actual exported file before inspecting the social post or website. Check its pixel dimensions, then compare it at a sensible viewing size with the edited source. If the output is smaller than intended, examine the resizing settings. If detail breaks up or gradients look rough, check compression and any file-size ceiling.
Review sharpening after the final size is established. A file that looks correct locally but changes after upload points toward another stage in the delivery process: transfer compression, website resizing, or platform processing. Keep a known-good local export so that these stages can be compared separately.
Color Shifts: Check Color Space, the Viewer, and HDR Compatibility
Confirm the selected color space, then compare the exported file in a color-managed viewing application on the same display. Comparing Lightroom on a calibrated monitor with an image on a different phone introduces more variables than the export setting alone. Brightness, viewing software, and HDR support can all affect the comparison.
For an HDR edit, check that the chosen file and viewer can present the intended result. For a lab print, revisit the requested file profile and proofing conditions. Changing every export to a different color space without identifying the receiving workflow can make the diagnosis harder.
Source Photo Quality: When Export Settings Are Not Enough
An export preset cannot by itself resolve missed focus, heavy noise, or a crop that leaves too few pixels for the planned output. Handle those problems during image preparation, then judge the processed photograph before applying final sizing and sharpening. Enhancement results should be checked for texture, edges, and color rather than accepted solely because the output contains more pixels.
Aiarty Image Enhancer is one option for a separate preparation stage. Its desktop workflow supports AI denoising, deblurring, JPEG-artifact reduction, and upscaling, with TIFF input and output available for an editing handoff. The Strength control moderates enhancement intensity, while Restore Color can move the result toward the source colors. Compare detail at 100% and reduce the treatment if skin, foliage, lettering, or edges start to look unnatural.
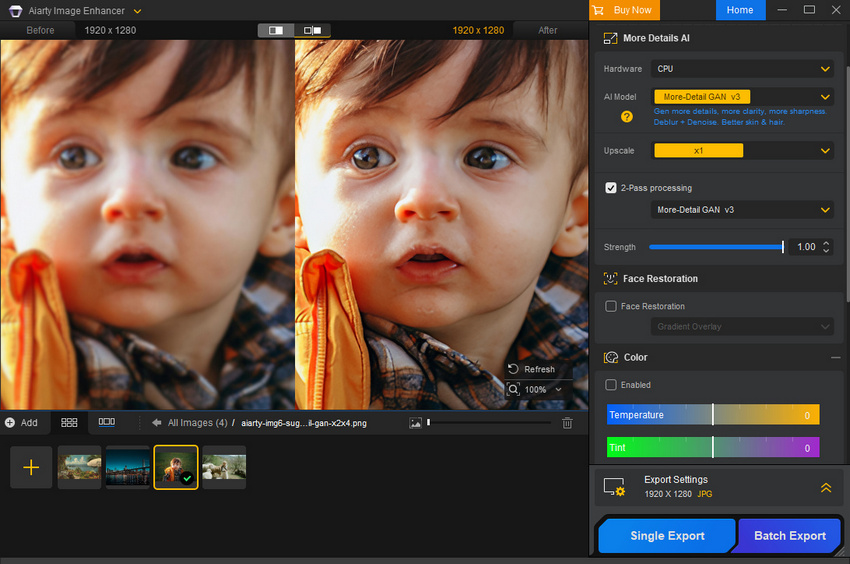
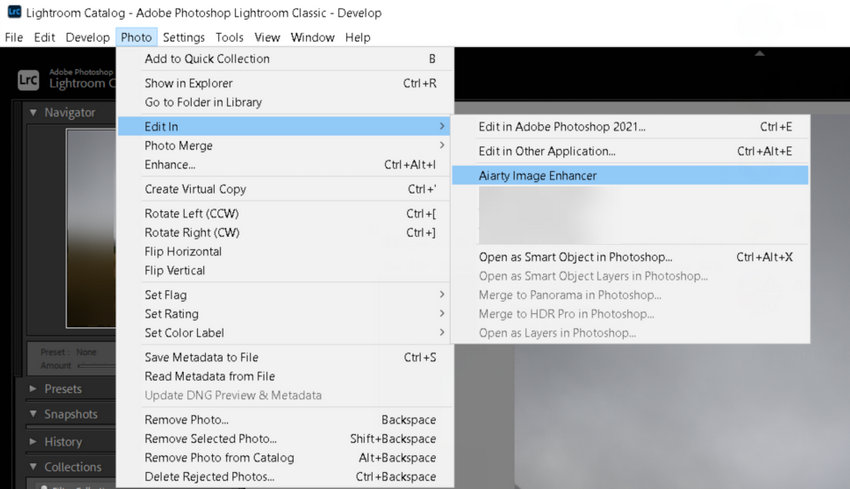
For a manual handoff, export a full-size TIFF from Lightroom, enhance that copy in Aiarty, then import the result for final inspection and delivery. Lightroom Classic can also send a file through Photo > Edit In > Aiarty Image Enhancer when the external editor is configured. Use a copy that includes Lightroom adjustments when the processed file should reflect your edit; available choices depend on the source format. Aiarty's external-workflow guide describes its return-to-source-path behavior, so decide which copy is being processed before using that route.
AI enhancement estimates detail and can change a photograph's appearance. Keep the original available and compare the processed version with it, particularly when faithful texture or lettering matters.

This post was written by Brenda Peng who is a seasoned editor at Digiarty Software who loves turning ordinary photos into extraordinary works of art. With AI assistance for brainstorming and drafting, the post is reviewed for accuracy by our expert Abby Poole for her expertise in this field.
