If you’re searching for how to edit photos on Windows, the built-in Microsoft Photos app is usually the easiest place to start. Available on both Windows 11 and Windows 10, it has evolved from a simple image viewer into a surprisingly capable photo editor with cropping tools, color adjustments, filters, markup features, and newer AI-powered enhancements.
This guide breaks down exactly how the Windows 11 Photos app works for editing images, based on the latest features, and also covers what you can use if you need more advanced results.
Try Aiarty Image Enhancer - Enhance blurry, noisy, or low-resolution images with realistic details.
- One-stop AI image enhancer, denoiser, deblurer, and upscaler.
- Fix image noise, blur, pixelation, compression artifacts, etc.
- Crop images, adjust colors, SDR to HDR converter, erase objects.
- Support AI batch processing. No CPU or RAM overloads.

1. Open the Photos App in Windows
To begin editing a photo in Windows 11/10:
- Locate the image on your computer
- Double-click the photo to open it in the Photos app
- Or right-click the image and choose Open with → Photos
Once the image opens, click the Edit image button at the top toolbar. You can also press Ctrl + E as a shortcut to quickly enter photo editing mode in Windows 11/10. After entering the editor, the Windows 11/10 Photos app displays a clean and beginner-friendly workspace. The editing tools are organized into several sections, making it easy to improve photos even if you have no editing experience. You’ll typically see tools for:
- Crop & rotate
- Adjustments
- Filters
- Markup
- AI/Background tools (Windows 11)
2. Core Photo Editing Tools in Windows 11/10 Photos
The built-in Windows 11/10 Photos app is designed for fast and practical photo editing. Instead of overwhelming users with complicated professional controls, it focuses on the editing tools people use most often for everyday images, screenshots, social media posts, and personal photography.
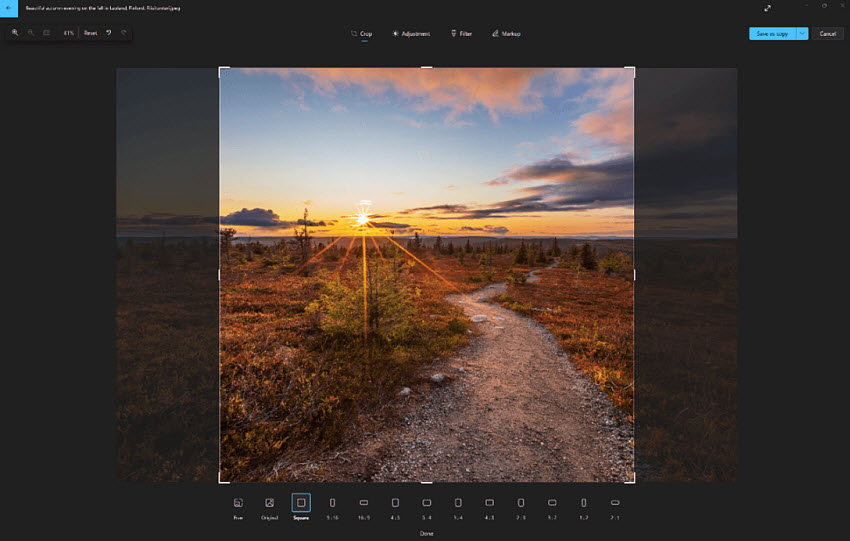
How to Crop, Rotate, and Straighten Photos in Windows 11/10
One of the most commonly used features in the Windows 11/10 photo editor is the Crop & Rotate tool. It allows you to quickly improve composition and fix framing problems without needing advanced editing software.
First, open your image in the Windows 11/10 Photos app, click Edit image. Then click the Crop button in the top toolbar. From there, you can immediately begin adjusting your photo. With this tool, you can:
- Crop unwanted edges to remove distractions or focus on the main subject
- Rotate or flip images if a photo was captured sideways or upside down
- Straighten tilted photos by adjusting the horizon line manually
You can find preset aspect ratios such as 1:1, 4:3, 16:9, and more for different uses. You can also click Free and use the handles on the corners and sides to adjust the ratio manually.
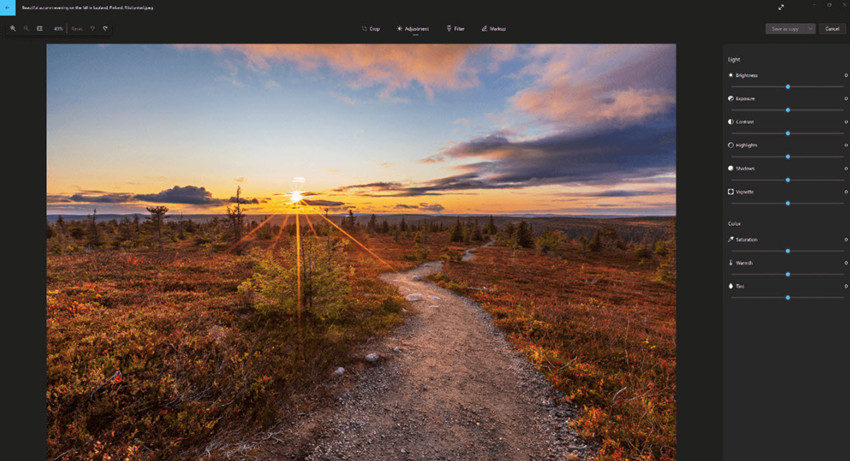
How to Adjust Light and Color in Windows 11 Photos
Color adjustment is an important part in how to edit photos on Windows 11/10. This section helps improve overall image quality by correcting lighting, colors, and tone balance. Instead of using complicated professional tools, Windows 11 provides beginner-friendly sliders that make photo enhancement simple and intuitive.
To adjust color settings in Windows 11/10, open your photo in Edit image mode, then click into the Adjustments tab. You’ll see a set of sliders that let you fine-tune the image instantly. The adjustment tools include brightness, contrast, exposure, highlights, shadows, saturation, etc.
Once you adjust the slider, Photos app also previews edits in real time, making it easier for beginners to understand how each adjustment affects the image.
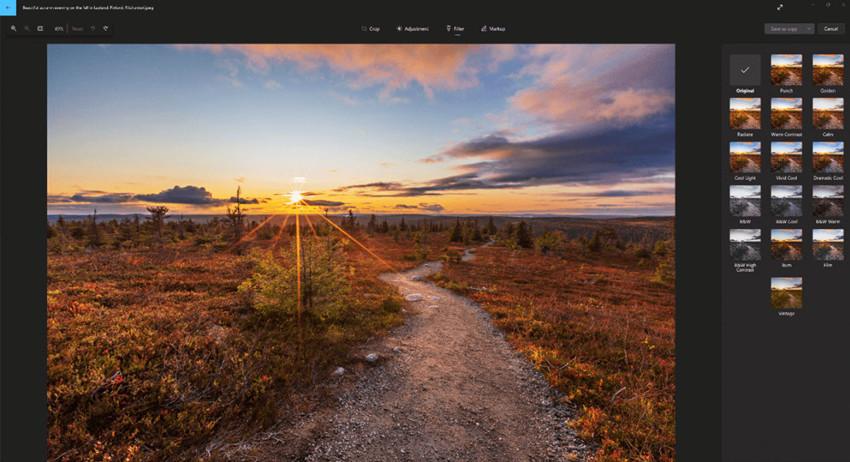
How to Add Filters for Quick Photo Styling in Windows 11 Photos
One of the fastest ways to improve a photo in the Microsoft Photos app is by using the built-in Filters feature. Filters provide instant visual styling, allowing you to quickly change the mood, tone, and overall appearance of an image without manually adjusting multiple editing settings.
In the Edit image mode in the Photos app, switch to the Filters tab in the editing toolbar. Once you are in the filters section, browse through the available filter presets. Each filter shows a live preview, so you can instantly see how your photo will look.
- Click a filter to apply it immediately
- Compare different styles such as cinematic, vintage, or black-and-white
- Adjust filter intensity if the app allows fine tuning
- Preview changes in real time before saving
After choosing the style you like, simply save the edited version or export a copy of the image. This makes it very easy to apply filters on photos in Windows 11 Photos app without needing advanced editing skills.
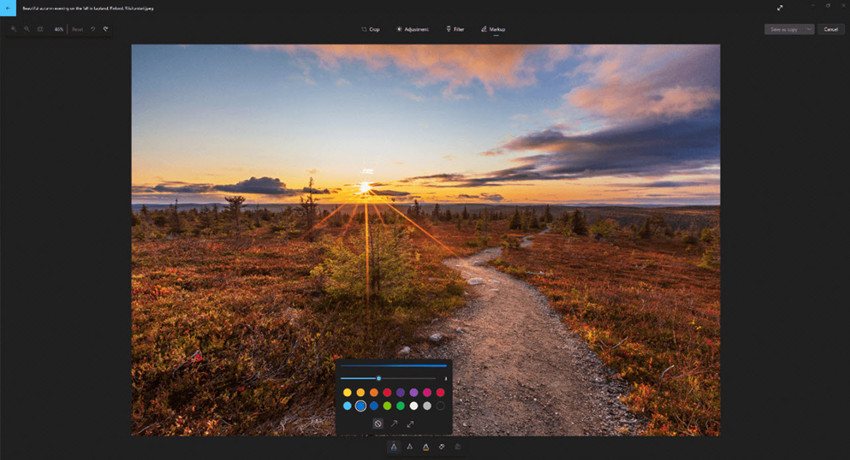
How to Draw and Annotate Photos
The Markup tools in the Windows 11/10 Photos app make it easy to draw, highlight, and add notes directly on images. This feature is especially useful when you want to explain something visually, point out details in a screenshot, or create quick visual instructions without using separate annotation software.
To start drawing or annotating a photo in Windows 11/10 Photos, switch to the Markup section from the editing toolbar. Inside the markup interface, choose a drawing tool such as a pen, pencil, or highlighter. Then select the brush size and color depending on how visible you want the annotation to be.
- Draw freehand directly on the photo to point out details
- Highlight specific areas by dragging over them
- Add quick handwritten notes or arrows for explanation
- Combine multiple marks to create step-by-step visual guides
After you finish annotating, you can preview the result and save it as a copy so the original image remains unchanged.
3. AI-Powered Editing Features in Windows 11 Photos
One of the biggest upgrades in the modern Microsoft Photos app is the addition of AI-powered editing tools that go far beyond basic cropping or color correction. In Windows 11, these features can automatically enhance images, remove distractions, blur or replace backgrounds, and even upscale low-quality photos, making photo editing much faster and more intuitive.
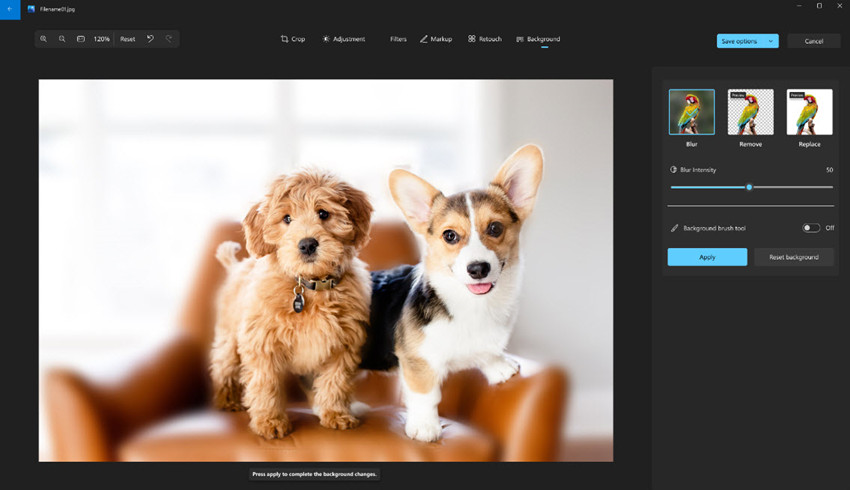
How to Blur or Remove Background in Windows 11 Photos
To remove background in Windows 11 Photos app, select the background tool from the editing panel in the Edit image mode.
Once you activate it, the workflow is very simple. First, the Photos app automatically detects the subject in your image using AI. You don’t need to manually trace edges or make precise selections. After the subject is identified, you can choose how to adjust the background.
- You can blur the background to create a portrait depth effect
- You can remove the background completely for a clean cutout
- You can replace it with a solid color for product or profile use
This AI separation happens automatically, so even beginners can achieve professional-looking results in seconds. For more detailed adjustments, you can also use the background brush tool. This lets you manually refine the selection by adding or subtracting areas, which is helpful if the AI detection is not perfectly accurate.
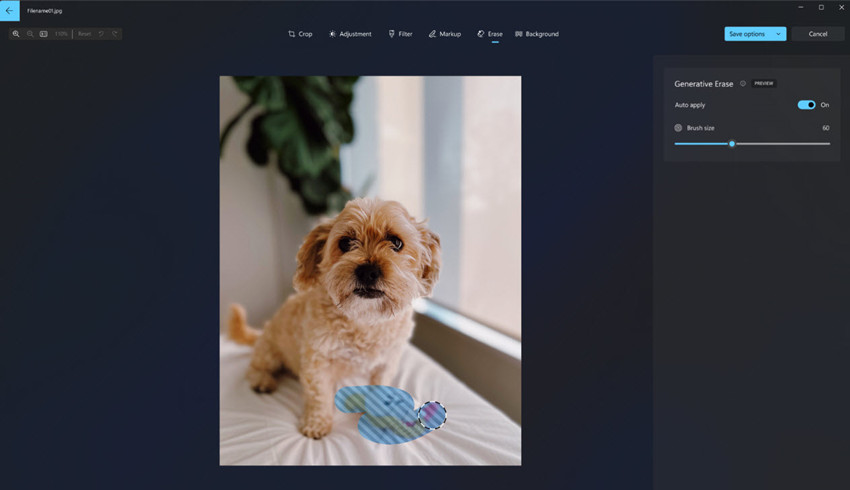
How to Remove Objects in Windows 11 Photos
The Windows 11 Photos app includes an AI-powered object removal tool designed for quick cleanup.
To use it, open your image in edit mode and select the erase tool from the toolbar. Then brush over the object you want to remove, such as removing texts, a person, sign, or distracting element in the background. Next, confirm the selection, and the AI will automatically process the image.
- It removes unwanted people or objects
- It fills the empty area using surrounding textures
- It blends the result to keep the image natural
This makes it easy to fix common photo problems like tourists in the background or distracting objects in travel shots. Users can clean up photos in Windows 11 without Photoshop, since this feature provides a much faster alternative for everyday editing tasks.
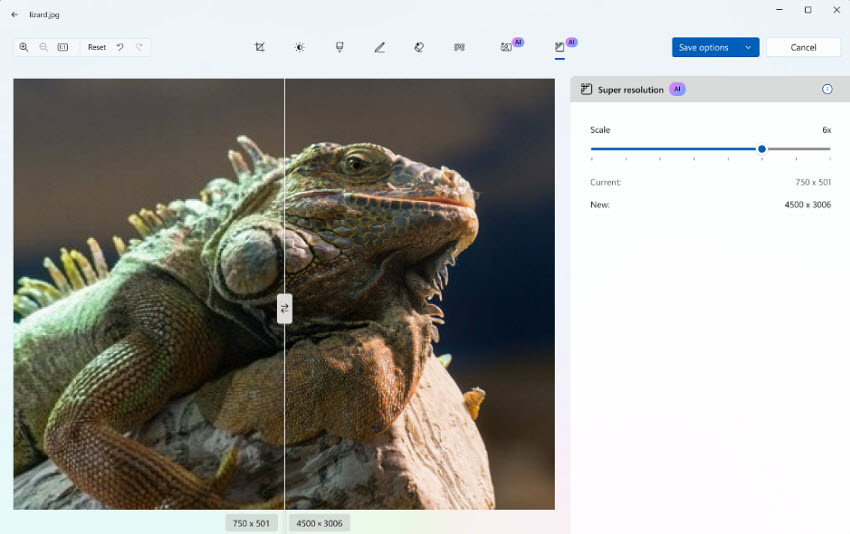
How to Upscale Images in Windows 11 using AI
For users wondering how to upscale images on Windows 11, Microsoft Photos now includes AI Super Resolution on supported Copilot+ PCs.
Open a low-resolution image in the Photos app and choose the upscale or enhance option. The system will then begin processing the image using AI. You can adjust the slider to increase the resolution by up to 8x. It delivers real-time preview.
This is especially useful for old photos, compressed social media images, or small screenshots that need to be enlarged for presentations or printing. For even stronger restoration results, especially for heavily compressed or low-quality images, you may combine with color adjustment or 3rd-party dedicated tools.
How to Edit Photos on Windows 11 for Better Quality
If your main goal is not just editing but improving image quality, the first recommendation is Aiarty Image Enhancer. Unlike traditional editors, Aiarty focuses on AI-driven enhancement rather than manual editing. It is especially useful when Windows 11 Photos tools are not enough for restoring or upgrading image quality. It's able to:
- Upscale low-resolution photos to up to 32K on Windows with AI;
- Restore blurry or noisy images to crisp quality with realistic details;
- Adjust color settings like contrast, lighting, saturation, exposure, etc. and create HDR-like visuals;
- Remove unwanted objects and elements from images without changing background;
- Basic editing tools like crop, flip, rotate, add texts.
This makes it a strong companion tool when you already know how to edit photos on Windows 11/10, but want higher-quality output than built-in tools can provide.
Step 1. Import low-resolution images
First, install and launch Aiarty Image Enhancer, then import the images you want to improve. This can be low-resolution photos, blurry images, or pictures that need upscaling or cleanup.
Step 2. Choose AI model and upscale settings
Next, pick an AI model depending on your photo type. Then set your enhancement mode. Choose x2 / x4 / 4K / 8K for upscaling images or select x1 if you only want quality enhancement without changing size. If your photo contains portraits or close-up faces, you can also enable Face Restoration to recover facial details and improve sharpness in eyes, skin texture, and overall clarity.
Compared to the built-in Windows 11 Photos app, it is significantly more effective at restoring blurry, noisy, or low-quality photos, especially when the original image has lost detail or was compressed.

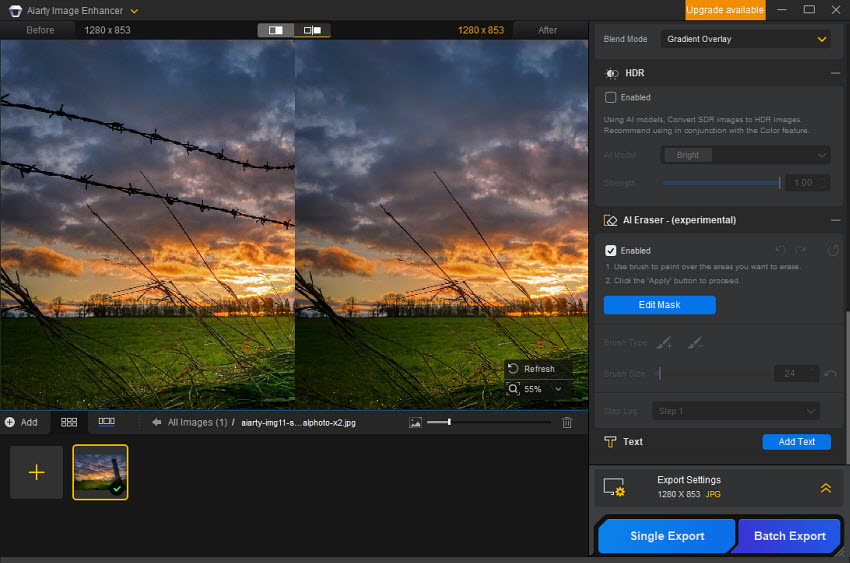
Step 3. Enhance color and fine-tune
After upscaling, you can use the built-in adjustment tools to improve overall image quality. This includes basic controls like brightness, contrast, saturation, and exposure. It allows you to refine the look of your photo without switching to another editing app, keeping the workflow simple and efficient.

Step 4. Remove unwanted objects
If your image contains distractions, switch to the AI Eraser tool. Simply brush over the object you want to remove, and the AI will reconstruct the background to blend naturally.
Step 5. Export the final image
Once all enhancements are complete, preview the result and export your image in high quality. You now get a sharper, cleaner, and more detailed version compared to standard Windows 11 Photos edits.
Best Alternatives for Editing Photos on Windows 11/10
If you need more control or higher-quality output beyond the built-in Windows 11 Photos app, there are several strong alternatives that range from beginner-friendly editors to professional-grade tools. Choosing the right one depends on whether you want fast enhancement, AI upscaling, or full professional editing workflows.
Below are the most recommended options for users searching how to edit photos on Windows 11/10 with advanced tools.
1. GIMP (Best free professional alternative)
A widely used option when searching how to edit photos on Windows 11/10 with free advanced tools is GIMP. It is an open-source photo editor often considered the closest free alternative to Photoshop.
To edit photos in GIMP on Windows 11, the typical workflow is more structured than the Photos app. You open your image, then usually create layers for different adjustments, apply retouching tools, perform color correction, or use selection tools for precise edits, and finally export the image in high quality formats like PNG or JPEG.
GIMP is powerful because it supports:
- Layer-based editing for complex compositions
- Advanced selection tools for precise cutouts and edits
- Professional retouching and photo compositing
- Plugin extensions that expand editing capabilities
However, when comparing it with Windows 11 Photos or simpler editors, GIMP has a noticeably steeper learning curve. It is better suited for users who want full manual control over photo editing on Windows 11, rather than quick enhancements or AI-assisted edits.

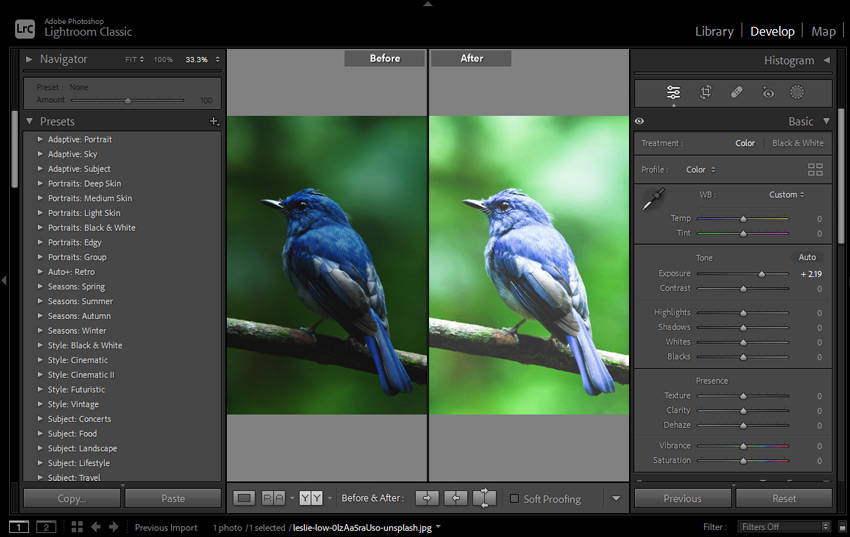
2. Adobe Photoshop / Lightroom (Professional standard)
For users searching how to edit photos professionally on Windows 11, Adobe tools remain the industry standard, especially Photoshop and Lightroom.
The typical workflow depends on the tool. In Lightroom, you import images (often RAW files), adjust exposure, color, tone, and apply presets or manual grading, then export final versions. In Photoshop, you work more in layers, combining images, retouching details, and performing advanced edits.
These tools are widely used for:
- Professional photography editing
- Commercial product and advertising images
- Advanced color grading and visual styling
- High-end creative and design work
They offer the most control and precision compared to Windows 11 Photos, but they also require a subscription and more time to master. For many users, they represent a step up once basic editing in Windows Photos is no longer enough.
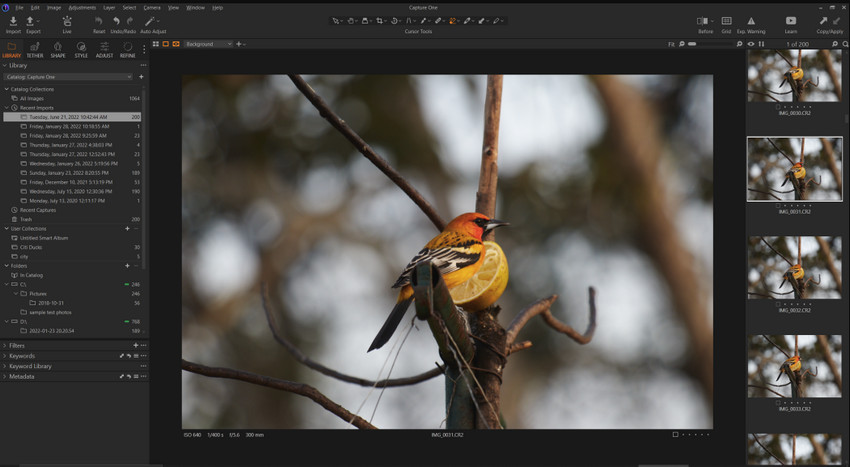
3. Capture One (pro-level RAW and studio editing)
Capture One is another professional-grade alternative often mentioned when discussing advanced photo editing on Windows 11, especially for photographers working with RAW files and studio setups.
The workflow usually starts by importing RAW images into sessions or catalogs, then organizing files before applying detailed adjustments. Users then perform color grading, exposure correction, and use local adjustment layers for precise edits.
Capture One is known for:
- Extremely accurate and natural color rendering
- Advanced tethered shooting support (widely used in studios)
- Powerful layer-based and local adjustment tools
- High-quality RAW processing engine
Compared to Lightroom, many professionals prefer Capture One for its color accuracy and control, especially in commercial photography workflows where consistent color output is critical.
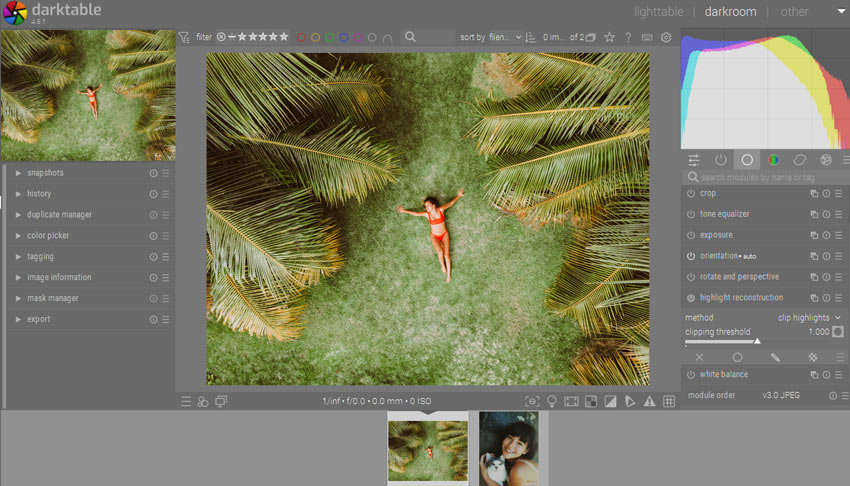
4. Darktable (best free Lightroom alternative)
For users looking for how to edit photos on Windows 11/10 for free with RAW support, Darktable is a strong open-source alternative to Lightroom.
The editing process typically involves importing RAW images, then working through modules for exposure, contrast, color correction, and detail refinement. Each adjustment is applied in a non-destructive workflow, meaning the original image remains untouched.
Darktable is valued for:
- Completely free and open-source usage
- Strong RAW image development tools
- Advanced exposure and color control modules
- Non-destructive editing workflow
It is powerful for photography-focused editing, but it does require time to learn, especially for users transitioning from simpler tools like the Windows 11 Photos app.
Final Thoughts
The built-in Windows 11/10 Photos app has evolved into a surprisingly capable photo editor for everyday use. Whether you want to crop images, adjust lighting, apply filters, remove backgrounds, or use AI-powered enhancement tools, it offers a fast and beginner-friendly workflow directly inside Windows 11/10.
For casual editing, social media content, and quick image improvements, the Photos app is often more than enough. However, if you need higher-quality upscaling, professional color grading, RAW workflows, or advanced retouching, combining it with more powerful tools can deliver much better results.
For example, many users pair the Photos app with professional editors like Lightroom or Capture One, while AI-focused tools such as Aiarty Image Enhancer are increasingly popular for restoring detail, improving sharpness, and enhancing low-quality photos automatically.
Ultimately, the best photo editing workflow on Windows 11/10 depends on your needs, but with today’s combination of built-in AI tools and advanced alternatives, creating high-quality images is easier than ever.
You May Also Like
This post was written by Brenda Peng who is a seasoned editor at Digiarty Software who loves turning ordinary photos into extraordinary works of art. With AI assistance for brainstorming and drafting, the post is reviewed for accuracy by our expert Abby Poole for her expertise in this field.