High-quality visuals play a crucial role in property marketing. Studies consistently show that real estate listings with professional photos receive significantly more views, clicks, and buyer inquiries compared to listings with poorly edited images. On platforms like MLS, Zillow, and Realtor.com, buyers often decide within seconds whether to click on a listing. Well-edited images can dramatically increase the visibility and attractiveness of a property listing.
That’s why learning how to edit real estate photos properly is essential for photographers, real estate agents, and property marketers who want their listings to stand out in competitive markets. In this guide, you'll learn the full real estate photography editing workflow, including how to edit bracketed real estate photos, perform real estate picture editing efficiently, and even use modern AI real estate photo editing tools to speed up your workflow.

Why Newborn Photos Often Need Editing
Why Real Estate Photo Editing Is Essential for Property Listings
Real estate photography is challenging because indoor environments often have complex lighting conditions. A single room may contain multiple light sources, such as daylight from windows, ceiling lights, and lamps, all with different color temperatures.
Without proper real estate photo enhancement, images may appear:
- Too dark or underexposed
- Overexposed near windows
- Yellow or blue due to mixed lighting
- Distorted from wide-angle lenses
Real estate photos are not just images, they are marketing assets for property listings. When buyers browse real estate websites, high-quality images help listings stand out among dozens of similar properties.
Professional real estate photo editing improves brightness, clarity, and composition so that listing photos immediately capture attention. Well-edited photos can make rooms appear more spacious, highlight architectural details, and encourage buyers to explore the full property gallery.
This is why real estate photography editing is considered one of the most important steps in real estate marketing.
How to Edit Real Estate Photos Workflow (Step-by-step Guide)
Professional photographers follow a consistent workflow when performing real estate photography editing. This structured approach ensures that all listing photos look consistent and professionally polished.
Tools you will need:
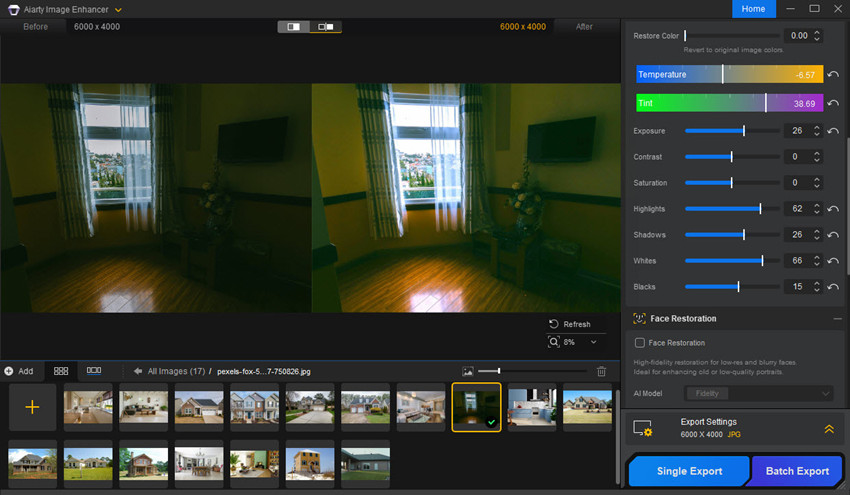
Aiarty Image Enhancer: It can simplify real estate photo enhancement with AI-powered functions. Instead of manually adjusting multiple parameters, the software can automatically improve image clarity and quality with minimal effort.
Key essential AI real estate photo editing tools are combined in one workflow:
- AI noise reduction, deblur, and artifact removal to clean grain from low-light interiors, sharpen slightly soft images, and remove compression distortions from listing photos.
- Enhance real estate photos to up to 32K with sharper and clearer textures in floors, walls, furniture, and architectural elements.
- Remove small distractions such as cables, stains, or clutter that may appear in real estate photos.
- Adjust color settings like exposure, highlights, color tones, etc. while upgrading images to HDR.
- Batch process up to 3000 real estate images at once within 1 hour, saving editing time for large property shoots.
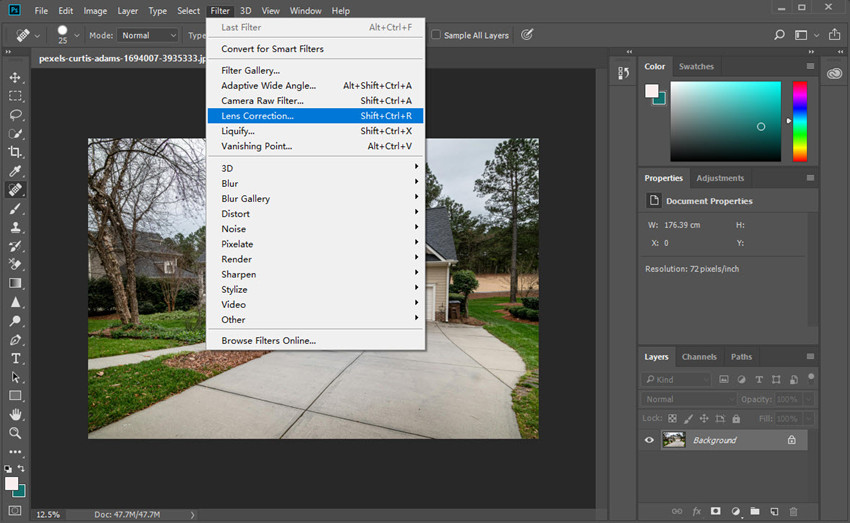
Adobe Photoshop: Photoshop is commonly used in real estate photo editing for advanced adjustments such as object removal, window pull blending, perspective corrections, and sky replacement in exterior property photos.
Adobe Lightroom: Lightroom is widely used in real estate photography editing to organize large photo sets, merge bracketed exposures into HDR images, correct lens distortion, and apply batch adjustments across multiple listing photos.
Also see: Real Estate Editors that You May Need
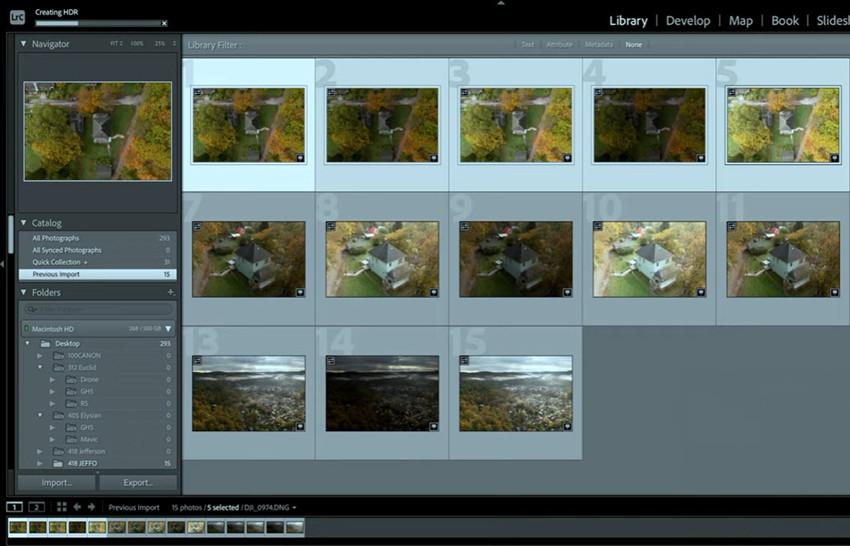
1. Import and Organize Your Photos
The first step in real estate picture editing is importing and organizing your images. Real estate shoots often produce dozens of photos, especially when using exposure bracketing. Proper organization saves significant time during real estate photography photo editing, especially when working with large property galleries.
Many photographers use Lightroom to organize and manage large photo sets before starting the actual real estate photography editing process. Most real estate photographers capture 3 to 7 bracketed exposures per scene, which are later merged during editing.
- Import images into editing software such as Adobe Lightroom.
- Sort photos by room (living room, kitchen, bedroom).
- Remove unwanted or duplicate shots.
- Group bracketed exposures together.
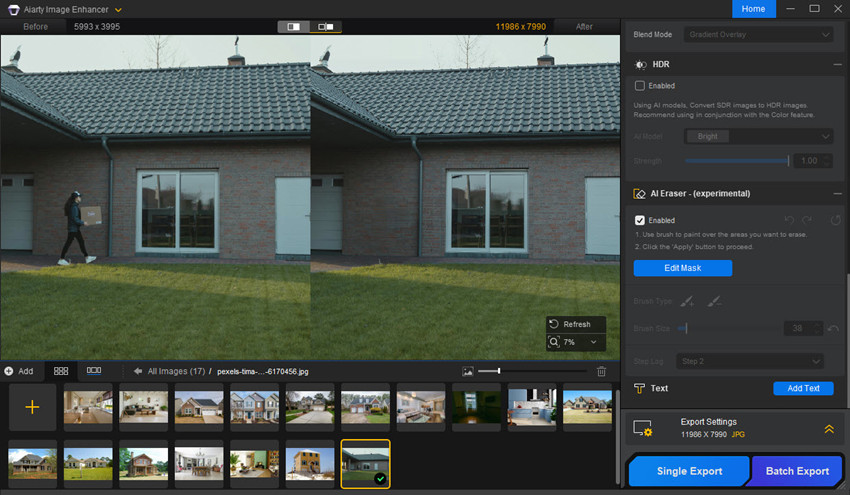
2. Remove Distractions and Unwanted Objects
A clean and visually organized image is essential for effective real estate photo editing. When buyers browse property listings online, clutter or small distractions in photos can easily draw attention away from the space itself. Removing these minor imperfections helps create a more polished and professional presentation.
When you edit real estate photos, typically review each image carefully and remove small elements that do not contribute to the overall appeal of the property, such as wall stains, electrical cords, sensor dust, small clutter items, etc. The goal is not to alter the property itself, but to remove temporary distractions that were unintentionally captured during the shoot.
Tip: AI tools can make this process much faster. For example, Aiarty Image Enhancer’s AI Eraser can quickly remove people or small unwanted objects while keeping the surrounding textures natural.
How to do it:
- Open the image in Aiarty Image Enhancer.
- Select the AI Eraser tool and brush over the unwanted object.
- Apply the edit and let the AI automatically fill the area with matching textures.
This quick adjustment helps create cleaner real estate listing photos that keep viewers focused on the property’s key features.
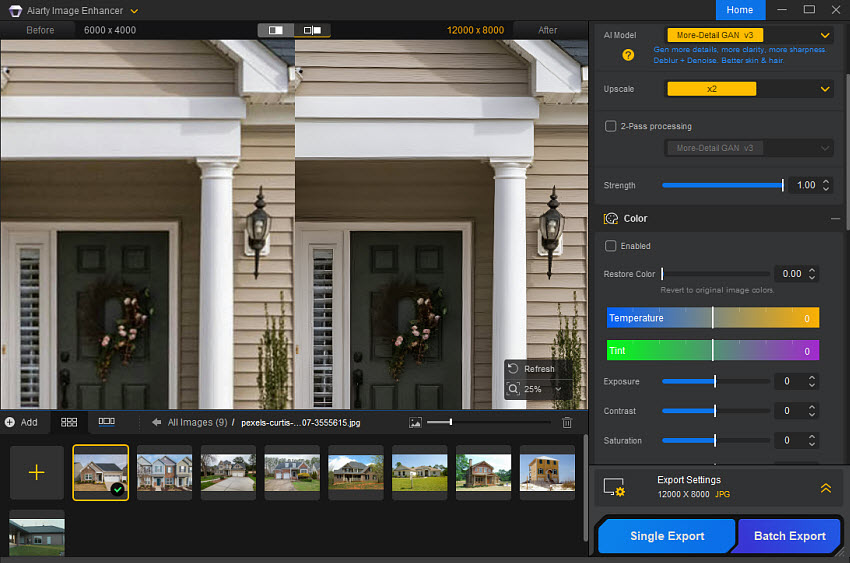
3. Enhance Details and Quality
An important step to edit photos for real estate is improving overall image clarity and detail. Interior photos, especially those taken in low light, can sometimes appear slightly soft, noisy, or lacking fine detail.
Common real estate photo enhancement techniques include:
- Enhancing clarity to add definition to edges and textures
- Reducing image noise in darker areas such as ceilings, corners, or hallways
- Sharpening slightly blurry details caused by handheld shooting or low light
- Enhancing textures in materials like wood floors, countertops, tiles, or fabrics
Improving clarity and detail is in real estate picture editing because buyers often zoom in to examine features such as flooring, cabinets, and interior finishes. Clean and sharp images help highlight the quality of the property and make listing photos appear more professional.
However, it is important to apply sharpening and noise reduction carefully during real estate photo editing. Excessive sharpening can introduce halos or unnatural textures, while too much noise reduction may remove fine details.
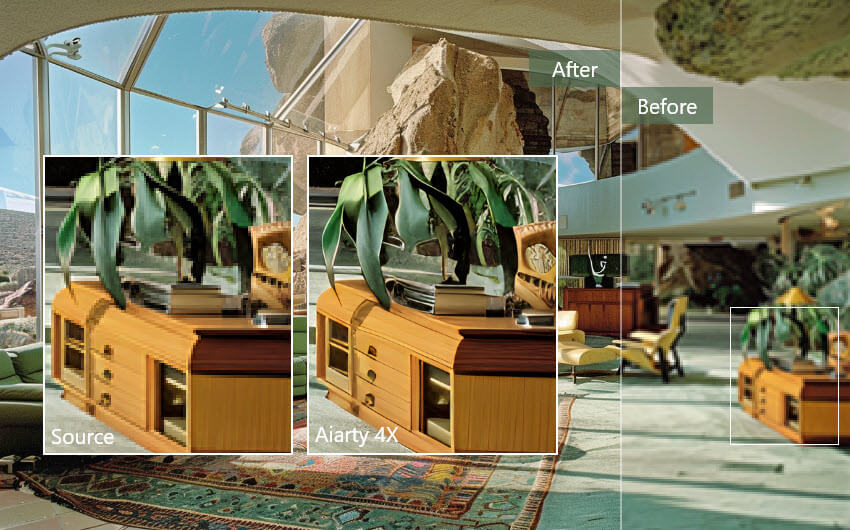
Tip: AI-powered tools can simplify this process. For example, Aiarty Image Enhancer can automatically sharpen soft images, reduce noise, and upscale resolution to 4K, 8K, 32K to recover fine details in real estate photos.
- Open the image in Aiarty Image Enhancer.
- Choose an AI upscale or enhancement model to improve clarity and resolution.
- Apply the enhancement and export the sharpened, high-resolution image.
4. Adjust Exposure and Lighting
How to edit real estate photos with proper lighting and natural look? That’s what to do with exposure adjustment. If some areas of the image appear slightly too dark or too bright, so fine-tuning the exposure helps ensure that lighting across the entire room looks even and visually pleasing.
Key adjustments typically include:
- Increasing overall exposure slightly to brighten the room
- Reducing highlights to recover details in bright areas such as windows or light fixtures
- Raising shadows to reveal details in darker corners or furniture
- Adjusting whites and blacks to improve contrast and depth
These adjustments help ensure that both the interior space and window views remain visible. In professional real estate photography editing, the goal is to create images that feel bright, clean, and inviting without looking artificially overexposed.
Balanced lighting plays a crucial role in real estate photo enhancement, as it helps highlight the layout, interior design, and atmosphere of the property while maintaining a natural appearance.
Tip: AI-powered tools can also help streamline exposure and color adjustments. For example, Aiarty Image Enhancer can help optimize lighting balance and color tones, making dark photos appear brighter and more natural with minimal manual adjustment.
5. Merge Bracketed Photos (HDR Editing)
A common question for beginners is how to edit bracketed real estate photos. Bracketed photos are multiple images of the same scene taken at different exposure levels to capture details in both bright and dark areas. For example, a typical set may include one normal exposure, one darker exposure to preserve details in windows, and one brighter exposure to reveal shadowed areas.
During real estate photography editing, these bracketed images are merged into a single HDR photo, which balances highlights and shadows while maintaining a natural look. Learning how to edit bracketed real estate photos is essential for professional real estate photo editing, as it allows you to create bright, clear, and visually appealing images that accurately represent the property and perform well on listing platforms like MLS, Zillow, or Realtor.com.
After you merge the bracket photos, you can use tools like Aiarty Image Enhancer to automatically improve dynamic range and upgrade photos toward a more balanced HDR-like result, helping recover details in both bright windows and darker interior areas.
6. Correct White Balance and Color
Color accuracy is a key part of real estate photography photo editing, as indoor spaces often have mixed lighting that can create unwanted color casts. Tungsten bulbs can make rooms appear yellow, fluorescent lights may add green tones, and daylight from windows often looks bluish. These variations can make a property appear different from reality.
When learning how to edit real estate photos, start by setting the white balance on a neutral surface such as a wall or countertop. Then adjust temperature and tint, and fine-tune colors with HSL controls if needed. Properly balanced images not only look more professional but also help buyers understand the true colors and atmosphere of a property. Effective real estate photo enhancement ensures rooms appear natural, inviting, and ready for listing platforms like MLS or Zillow.
7. Correct Lens Distortion and Perspective
Wide-angle lenses are widely used in real estate photography because they capture more of the room. However, they often introduce distortion, making walls appear curved or tilted. Straight vertical lines are extremely important in real estate photography editing, as crooked walls or leaning cabinets can immediately make photos look unprofessional.
Luckily, most editing programs provide tools such as Lens Profile Correction, Transform, Vertical Correction, or Perspective Warp to fix these issues. For example, Adobe Lightroom offers automatic lens profile corrections that can remove common barrel distortion, while Photoshop provides more advanced perspective tools for fine adjustments.
To correct these distortions during real estate photo editing, you may need to:
- Enabling lens profile corrections
- Fixing barrel distortion
- Adjusting vertical perspective
- Aligning walls and door frames
8. Improve Window Views (Window Pull Technique)
One common challenge in real estate photo editing is maintaining visible detail outside windows. Without proper editing, windows often appear completely white due to overexposure, which can make the image look flat and unrealistic.
The window pull technique solves this problem by blending a darker exposure of the window area with the main image so that both the interior and the outdoor view remain visible. This technique is commonly performed using layer masking and exposure blending in editing software like Photoshop.
Typical adjustments include:
- Masking the window region to isolate the bright area
- Reducing highlights and exposure to recover outdoor details
- Blending a darker exposure if additional window detail is needed
When done correctly, this technique allows viewers to see outdoor scenery, such as gardens, city views, or landscapes, while keeping the interior space properly lit. This step is a common part of professional real estate photography editing, helping listing photos look more natural and visually balanced.
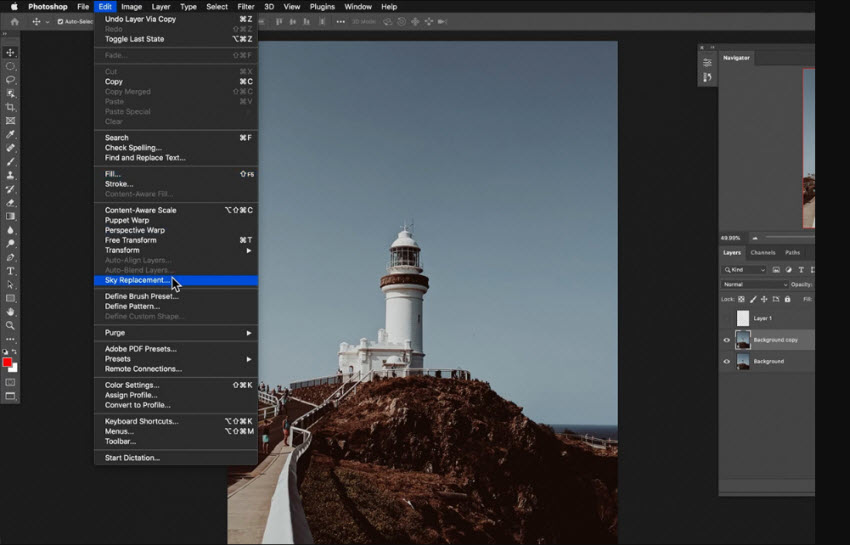
9. Enhance Outdoor Views with Sky Replacement
In addition to improving window views, editors sometimes enhance exterior property photos using sky replacement. When shooting real estate, weather conditions or time of day can result in dull, gray, or overexposed skies that make the property look less appealing.
During real estate photo enhancement, sky replacement allows editors to replace an uninteresting sky with a brighter and more attractive one while keeping the rest of the image natural. A clear blue sky or a soft sunset background can make exterior shots look more inviting and help the property stand out on listing platforms. Many editing tools, including Photoshop Sky Replacement and other AI-assisted editing software, can automatically detect the sky area and blend a new sky into the scene.
When applying sky replacement, it is important to keep the lighting direction, color tone, and brightness consistent with the rest of the image. Subtle adjustments ensure the final result looks realistic rather than overly edited. Used carefully, this technique can significantly improve the overall impact of exterior photos in real estate photography editing.
10. Crop, Straighten, and Finalize Composition
The final step in real estate photography editing is refining the overall composition to ensure the image looks clean and professionally framed. Even small adjustments at this stage can improve visual balance and make the property appear more polished in listing galleries.
Common adjustments include:
- Straightening horizons so walls and floors appear level
- Cropping distractions near the edges of the frame
- Aligning vertical lines such as walls, cabinets, or door frames
- Improving framing to highlight the most important features of the room
Most real estate listing platforms prefer images with standard aspect ratios such as 3:2, 4:3, or 16:9, which display well across websites and mobile devices.
A well-composed final image is an important part of real estate picture editing, ensuring property photos look clean, balanced, and visually appealing when viewed on real estate listing sites like MLS, Zillow, or Realtor.com.
Final Tips for Professional Real Estate Photos
Even with the right workflow and tools, achieving professional results in real estate photo editing requires attention to detail and consistency. The following tips can help you edit real estate photos more effectively and create listing images that look clean, natural, and appealing to potential buyers.
1. Keep the Editing Natural
When you edit real estate photos, the goal is to enhance the property while keeping the image realistic. Avoid excessive HDR effects, overly saturated colors, or extreme sharpening. Balanced adjustments help ensure that your real estate photography editing reflects the property accurately while still looking bright and inviting.
2. Maintain Straight Lines and Proper Perspective
Straight vertical and horizontal lines are critical in real estate picture editing. Walls, windows, cabinets, and door frames should appear aligned and natural. Always check perspective corrections before exporting your final images to avoid crooked architecture that may look unprofessional in property listings.
3. Balance Interior Lighting Carefully
Lighting plays a key role in successful real estate photo enhancement. Make sure highlights are not blown out and shadows still retain visible detail. A well-balanced exposure helps rooms appear spacious and comfortable, which is exactly what buyers expect when viewing real estate photos online.
4. Be Consistent Across the Photo Set
Consistency is important when editing multiple images of the same property. Try to keep similar brightness, color temperature, and contrast across all photos. Consistent real estate photo editing helps the entire property listing feel cohesive and professionally presented.
5. Optimize Images for Online Listings
After you finish editing, export images with proper resolution, color space, and file size so they load quickly on real estate platforms. Efficient export settings ensure your edited real estate photos display correctly on MLS listings, Zillow, and other property websites.
6. Use AI Tools to Improve Efficiency
Modern AI tools can help simplify parts of the real estate photo editing workflow. Tasks like noise reduction, upscaling, object removal, and color enhancement can often be automated, allowing photographers to edit large sets of real estate photos more efficiently while maintaining high visual quality.
Final Thoughts
Effective real estate photo editing plays a key role in making property listings more attractive and professional. By learning how to edit real estate photos properly, such as adjusting exposure, correcting color, enhancing details, and fixing perspective, you can create images that clearly showcase the space and highlight the property’s best features.
At the same time, good real estate photography editing should always aim for a natural and balanced look. Consistent lighting, accurate colors, and clean compositions help ensure that edited real estate photos appear polished while still representing the property realistically. With the right workflow and tools, you can produce high-quality images that make listings stand out and capture buyers’ attention online.
 FAQs
FAQs
Yes, AI tools can assist with several parts of the real estate photo editing workflow, such as noise reduction, image upscaling, object removal, and color enhancement. These tools can speed up editing and help photographers process large sets of real estate photos more efficiently.
The time required for real estate photo editing depends on the number of images and the complexity of the adjustments. Basic edits such as exposure correction, color adjustment, and cropping may take a few minutes per photo. However, more advanced tasks like HDR merging, window view enhancement, or sky replacement may take longer. Professional photographers often use batch editing or AI tools to speed up the workflow.
Most real estate platforms recommend images with a long edge between 2000 and 3000 pixels in JPEG format with the sRGB color space. This resolution keeps photos sharp while ensuring they load quickly on listing platforms like MLS or Zillow. Proper export settings are an important part of the real estate photo editing process.
Real estate photo editing services typically cost between $1 and $10 per image, depending on the complexity of the edits. Basic adjustments such as exposure correction and color balancing are usually less expensive, while advanced edits like HDR blending, object removal, and sky replacement may cost more.
You May Also Like
This post was written by Brenda Peng who is a seasoned editor at Digiarty Software who loves turning ordinary photos into extraordinary works of art. With AI assistance for brainstorming and drafting, the post is reviewed for accuracy by our expert Abby Poole for her expertise in this field.