


To crop in Photopea, open your image with File > Open, select the Crop Tool (C), and adjust the crop boundary around the area you want to keep. Click the checkmark in the options bar, then use File > Export as to save the result.
That method changes the document’s canvas. If you want to crop just one layer in a layout, use a selection and a layer mask instead. A circular crop uses the same masking approach, with an elliptical selection to define the visible area.
How to Crop an Image in Photopea
Step 1. Open Your Image
Open Photopea and choose Start using Photopea if the landing page appears. In the editor, select File > Open and choose your photograph. Keep the original file so you can return to the full frame later.
For a single photo, opening it as a separate document keeps the workflow straightforward. Open & Place inserts an image into an existing document, which is useful for layouts but adds a layer rather than opening a separate canvas. If you need help identifying the panels, this introduction to the Photopea workspace and layers explains the basics.
Step 2. Select the Crop Tool
Choose Crop Tool from the left toolbar, or press C when you are not editing a text field. In the options bar, select Free for an unrestricted crop. Photopea displays a crop boundary with handles around the image.
Leave Content Aware off for a straightforward crop. To retain off-canvas layer content in an editable document, leave Delete Cropped Pixels unchecked and save a PSD copy. A separate original is still useful, particularly if you later resize, flatten, or otherwise change the document.
Step 3. Adjust the Crop Area
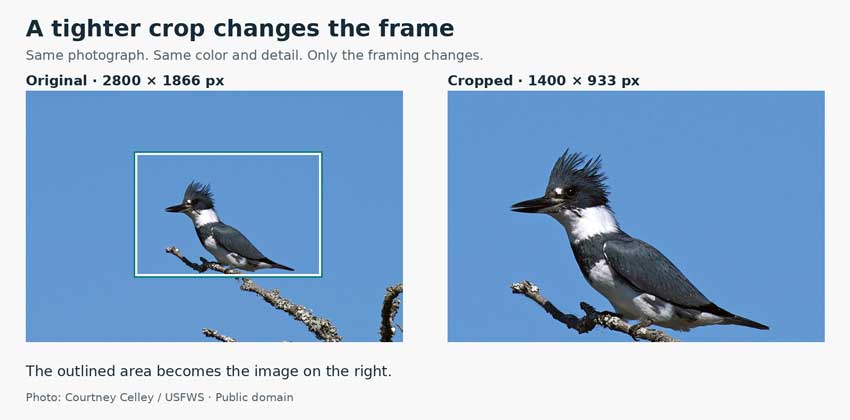
Drag the edges or corners inward to remove unwanted space. Move the crop boundary to refine the framing, keeping the subject inside the area you intend to retain. If the photograph is tilted, you can rotate the boundary by dragging near its edge before applying the crop.
Judge the space around the subject as carefully as the subject itself. For the kingfisher below, leaving room in front of the beak makes the tighter composition feel less cramped. Check the edges for clipped tails, hands, or other details that may be easy to overlook at a small zoom level.
Step 4. Apply the Crop and Export
Click the checkmark in the top options bar to confirm. Then select File > Export as > JPG for a regular photograph, or File > Export as > PNG when you need transparency. Check the export width and height before saving; changing them at this stage also changes the output’s pixel dimensions.
Use File > Save as PSD for an editable working copy. The PSD preserves document structure, including layers and masks; a JPG or PNG export does not preserve that editing structure.
How to Crop to a Specific Size or Aspect Ratio in Photopea
An aspect ratio describes a shape. Pixel dimensions specify its size. A 1:1 crop could be 500 × 500 pixels or 3000 × 3000 pixels, so choosing a square preset alone does not produce a particular output resolution.
Crop to a Fixed Aspect Ratio
With the Crop Tool active, choose a preset such as 1 : 1 or 16 : 9 from the options-bar dropdown. For a custom ratio, choose Fixed Ratio and enter the proportions in W and H. For a portrait-oriented 4:5 crop, use W = 4 and H = 5, finish editing the fields, then adjust the crop boundary and confirm.

Crop to Exact Pixel Dimensions
Choose Fixed Size and enter the required pixel dimensions in W and H. For a 1024 × 1024-pixel image, enter 1024 in both fields, finish editing the values, and position the crop. Confirm it, then open Image > Image Size to check the resulting dimensions before export.
Fixed Size can combine cropping with scaling when the framed source area differs from the requested output size. It should not be treated as a guarantee that the retained pixels remain unresampled. Leave New DPI blank for a routine screen image unless you have a specific print-resolution requirement.

For more control, crop to the required ratio first, then resize the image in Photopea as a separate step. This lets you settle the composition before deciding how much to reduce or enlarge the result. If you need an exact rectangle of existing pixels without scaling, use the fixed-size selection method in the next section.
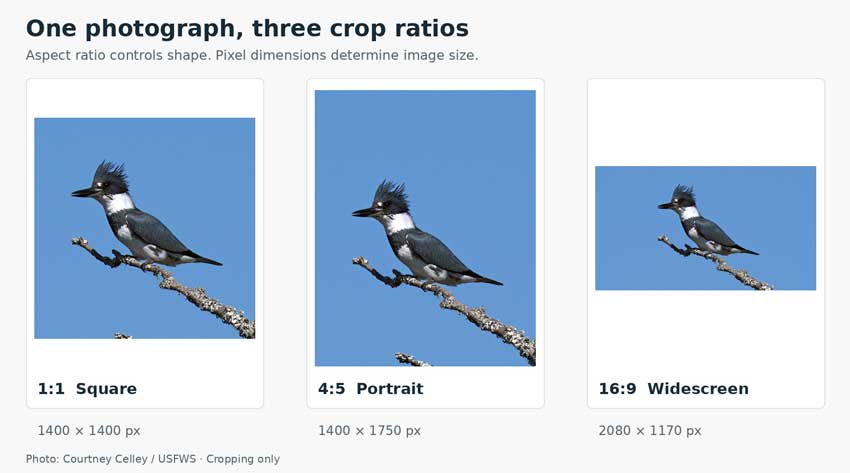
Image > Canvas Size changes the canvas boundaries without scaling the image content. Image > Image Size changes image dimensions and can resample the content. Use Canvas Size when the border dimensions and anchor position are what matter; use the Crop Tool when you want to frame the subject visually.
How to Crop to a Selection in Photopea
If you already know which rectangle you want to keep, use Rectangle Select (M) and then Image > Crop:
- Select Rectangle Select from the toolbar. Use Replace mode and set Feather to 0 px for a hard rectangular selection.
- Draw over the area you want to retain. For a specific source-pixel area, choose Fixed Size in this selection tool’s options and enter its width and height before positioning the selection.
- Choose Image > Crop to trim the document to the selection’s bounds.
This is a canvas crop, so it affects the visible frame of the whole document. It does not isolate the selected layer or remove a subject’s background. Image > Crop is unavailable when there is no active selection; selecting a layer in the Layers panel is not the same as making a pixel selection.
How to Crop a Single Layer in Photopea
In a collage or layered design, the ordinary Crop Tool changes the frame around every layer. To make one image smaller within the layout, mask the unwanted part of that layer while leaving the canvas unchanged.
Select the Layer and Define the Area to Keep
Click the target image’s thumbnail in the Layers panel. Choose Rectangle Select, use Replace mode with Feather set to 0 px, and draw a selection around the portion that should remain visible. Make sure you are selecting the intended photo layer, especially when several images overlap.
Add a Layer Mask
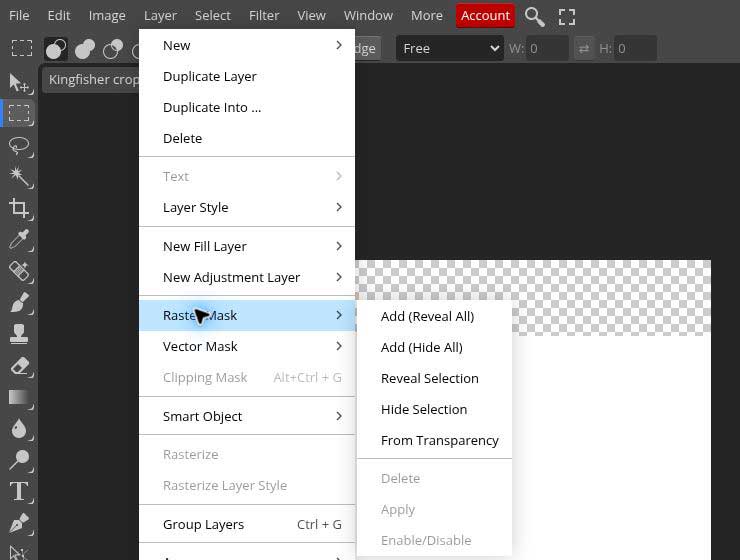
Choose Layer > Raster Mask > Reveal Selection. Photopea adds a mask beside the layer thumbnail and hides the layer content outside your selection. The canvas dimensions and the other layers remain unchanged.
Adjust the Mask Later
Click the mask thumbnail when you want to change the visible area. White in the mask reveals the layer, black hides it, and gray produces partial transparency. Painting on the image thumbnail edits the photograph instead, so check which thumbnail is active before using the Brush Tool.
Save the document as a PSD to keep the mask editable. If the layer already has a raster mask, edit that existing mask rather than adding another one to the same layer.
How to Crop an Image into a Circle in Photopea
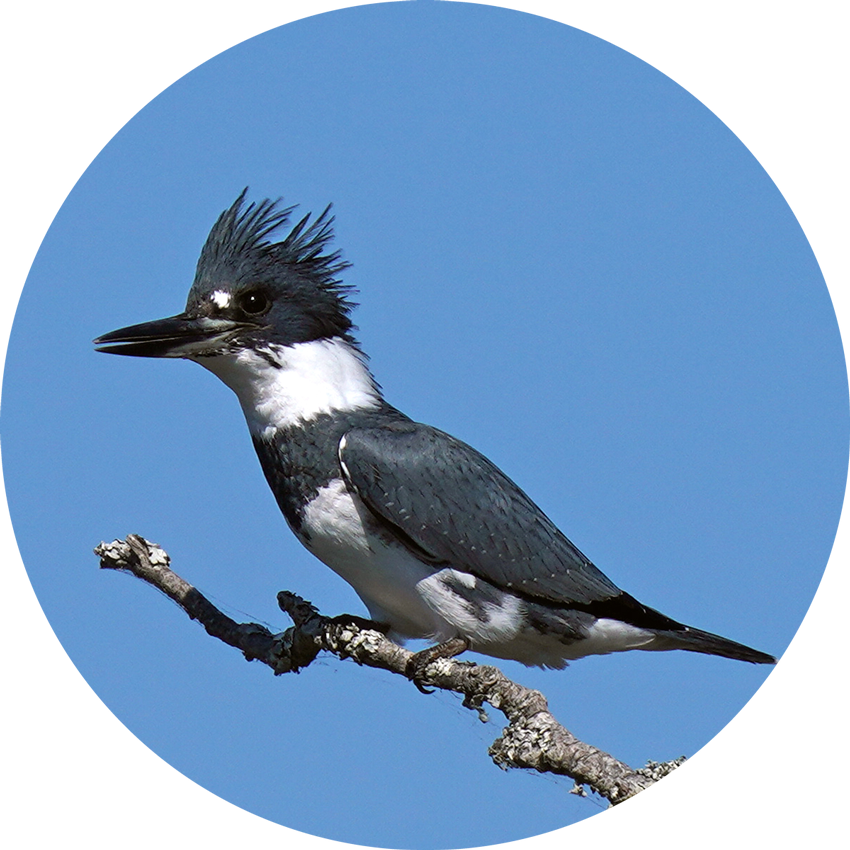
A circular image is a rectangular file with transparent pixels outside a circular visible area. The Crop Tool alone cannot create those transparent corners; use Ellipse Select and a raster mask.
Create a Circular Selection
For a tightly framed result, first make a square canvas with the 1:1 crop method above. Right-click the Rectangle Select tool to open its group, then choose Ellipse Select. Select the 1 : 1 preset, set Feather to 0 px, and leave Anti-alias enabled for a smooth edge.
Draw the circular selection across the square canvas, keeping the subject inside it. The 1:1 constraint prevents an accidental oval. If you miss the position slightly, use Replace mode and drag inside the selection to reposition it.

Mask the Area Outside the Circle
Select the image layer and choose Layer > Raster Mask > Reveal Selection. Hide any separate background layer or unmasked duplicate underneath it. You should see Photopea’s transparency checkerboard outside the circle.
The original photographic background remains visible inside the circle. If you want only the person, product, or animal on a transparent background, follow the separate background removal workflow in Photopea.
Export with a Transparent Background
Choose File > Export as > PNG and save the image. JPG does not support transparency, so it cannot preserve the transparent corners. A viewer may display those corners against white or another background even when the PNG’s transparency is intact.
Photopea Cropping Tips
Why Can’t I Freely Resize the Crop Box?
Check the Crop Tool’s constraint dropdown. Fixed Ratio keeps the width and height proportional, while Fixed Size uses specified output dimensions. Switch to Free for unrestricted framing. Also finish editing any active numeric field before trying to drag the boundary.
Why Does Cropping Affect Every Layer?
The Crop Tool changes the document’s canvas, even when only one layer is selected. Undo the crop through Edit > Step Backward, then use the selection-and-mask method above to hide part of one layer. Selecting a different layer does not change the Crop Tool’s scope.
Why Does My Cropped Image Look Blurry?
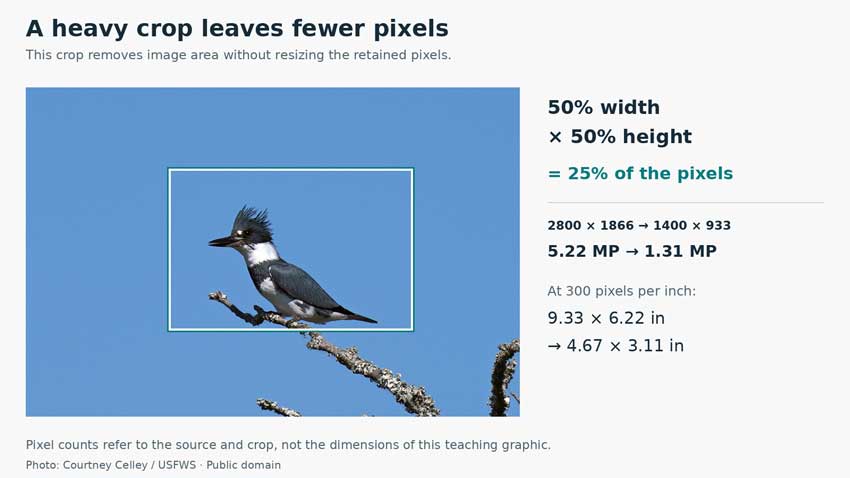
A straight, axis-aligned crop without resizing does not blur the pixels that remain. It reduces the number of pixels available for the final image. Softness becomes more apparent when that smaller result is enlarged to fill the same screen area or print size. Rotation and resampling are separate operations that can also change pixel values.
In the example below, the 2800 × 1866-pixel photograph is cropped to 1400 × 933 pixels. Keeping half the width and half the height leaves one quarter of the pixels: about 1.31 megapixels instead of 5.22. At 300 pixels per inch, the crop measures roughly 4.67 × 3.11 inches without upscaling. Changing a DPI value alone does not create additional image detail.
First check the exported file’s dimensions and compression, and inspect the image at 100% zoom. If it already meets the delivery requirements, additional enlargement may be unnecessary. If it needs a larger output, start with the highest-quality source available rather than repeatedly saving and enlarging a compressed JPEG.
For a heavily cropped photograph that needs further enlargement, Aiarty Image Enhancer offers a separate desktop workflow for AI upscaling, denoising, and detail enhancement, with processing performed locally. Export a high-quality crop from Photopea, import it into the enhancer, select a model suited to photographs, and preview a modest enlargement such as 2× before committing to a larger output. Noise reduction can help when enlarging a high-ISO crop, while enhancement strength controls let you moderate the treatment of fine texture.
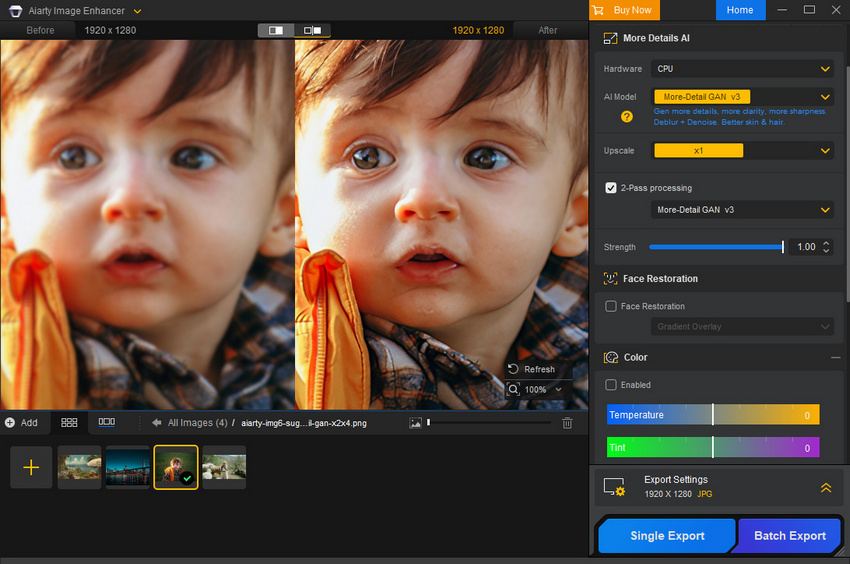
Compare eyes, feathers, hair, and edge transitions with the source, watching for halos or invented texture. AI enhancement estimates detail within the retained image; it cannot recover the excluded frame or guarantee an exact reconstruction of what the camera recorded. Keep the unprocessed crop, particularly for documentary or archival work.
For print delivery, calculate the pixel dimensions from the intended physical size and resolution before enhancing. This guide to enlarging a photo for printing explains how to plan that output.
FAQs
What Is the Crop Shortcut in Photopea?
Press C to select the Crop Tool when the editor has focus and you are not typing into a text field. You can also choose the tool directly from the left toolbar.
Can I Crop in Photopea Without Deleting the Original Pixels?
For a canvas crop, leave Delete Cropped Pixels unchecked and retain an editable PSD. For a single layer, use a raster mask to hide unwanted areas while preserving the image data. Keep the original photo as well; resampling or later destructive edits can change the retained content.
What Is the Difference Between Cropping and Resizing?
Cropping changes the framing by removing image area from view. Resizing changes the image’s dimensions and may resample its pixels. Photopea’s Fixed Size crop can combine both operations, so check the output dimensions rather than assuming every crop preserves the original sampling.
Can I Undo a Crop After Saving the Image?
If the editing session is still open and the action remains in History, you can step backward. A PSD may also retain off-canvas pixels or masks that allow further adjustment. A reopened JPG or PNG contains only the exported image, so it cannot reveal areas that were excluded from that export; you need the original or an editable working file.
You May Also Like


This post was written by Brenda Peng who is a seasoned editor at Digiarty Software who loves turning ordinary photos into extraordinary works of art. With AI assistance for brainstorming and drafting, the post is reviewed for accuracy by our expert Abby Poole for her expertise in this field.
