


To remove a background in Photopea, open your image, select its layer, and choose Select > Remove BG. Check the result, then use File > Export As > PNG to save an image with transparency. If the automatic cutout leaves a shadow, misses a gap, or clips part of the subject, use Magic Cut or a manual selection to finish the job.
The right method depends on the photograph. A mug against a plain backdrop needs a different approach from loose hair against foliage, and a soft contact shadow is a separate editing decision from the object itself. This guide covers four ways to remove a background in Photopea, followed by edge refinement and export settings. The screenshots show the live English-language editor, using a product photograph to illustrate selection and export steps.
Which Photopea Background Removal Method Should You Use
Start with the quickest method that suits the image, then inspect the areas it is most likely to misread. For a product, check handles, holes, shadows, and pale edges. For a portrait, check hair, the space around the shoulders, and any background visible between strands.
Refine Edge is a finishing step rather than a substitute for identifying the subject. You can combine it with a selection made by another tool. Keep an untouched copy of the image in your document so you can return to the source if a later adjustment removes useful detail.
Also see: 9 Best Photopea Alternatives: Free and Paid Options
Method 1 Remove the Background With Remove BG
Remove BG is the fastest place to start because it does not require drawing a selection. Open the photograph with File > Open, then select the layer containing the subject in the Layers panel. In a document with several layers, confirm that you have selected the photograph rather than a text layer, an empty layer, or an existing background replacement.
- Choose Select > Remove BG.
- Inspect the outline and any spaces inside the subject. Zoom in where the foreground meets the background.
- If the result is usable, hide any visible background layers and export a PNG. If it needs correction, adjust the mask or use one of the methods below.
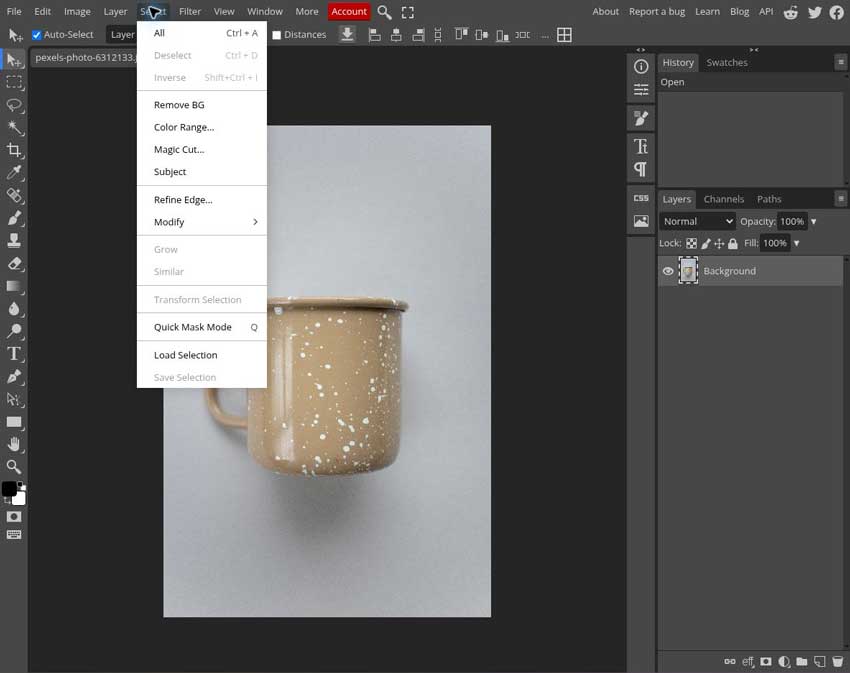
An automatic result is worth checking even when it looks convincing at a small zoom level. In the mug example below, the first pass retained part of the gray background and its shadow. That is a useful illustration of why a visible subject does not necessarily mean the background is fully removed: areas close in color to the object can remain connected to the cutout.
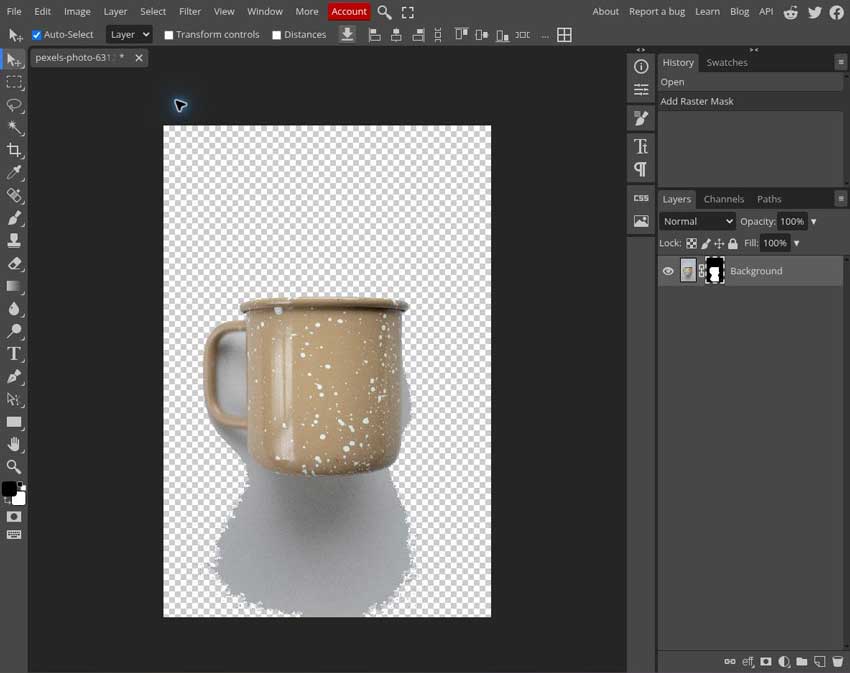
If the layer has a raster mask, click the mask thumbnail, then paint with the Brush tool: black hides pixels, white restores them, and gray produces partial visibility. Work on a small area before committing to a long stroke, especially near a pale object on a pale backdrop. If Photopea displays a prompt to run Remove BG again for a better result, follow the current on-screen instructions; access to the AI-assisted pass may involve an advertisement or a credit prompt.
Method 2 Remove a Complex Background With Magic Cut
Magic Cut lets you tell Photopea which areas belong to the subject and which belong to the background. Its split view is particularly useful when an automatic pass leaves an obvious patch behind: the source and your guidance appear on the left, while the right pane shows the current cutout. Choose Select > Magic Cut to open it.
Use the green Foreground brush to mark areas you want to keep and the red Background brush to mark areas you want to remove. A few clear strokes inside those regions are a better starting point than tracing every contour. The gray Erase brush removes your guidance strokes; it is not the uncertain-edge brush used in Refine Edge.
- Review the initial preview before adding marks. Photopea may already have identified much of the subject.
- Add green strokes inside any missing foreground areas.
- Add red strokes inside unwanted background areas, including openings such as a mug handle or the space between an arm and a body.
- Adjust Border while watching the preview. A value of 0 gives a hard boundary; a wider border allows a softer transition where the image requires one.
- Choose an output mode and click OK. New Layer creates a separate cutout; hide the original layer to view the transparent result.
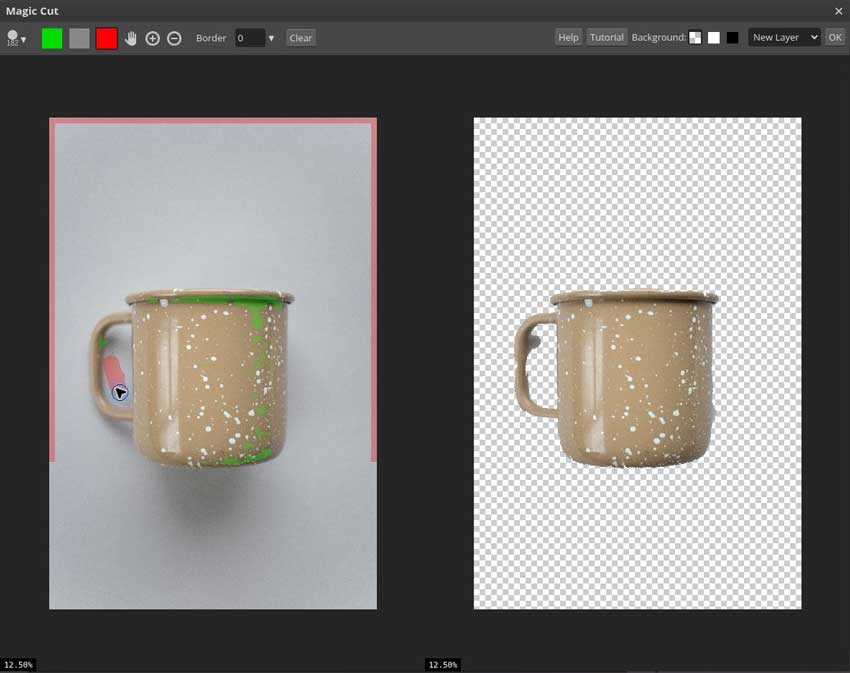
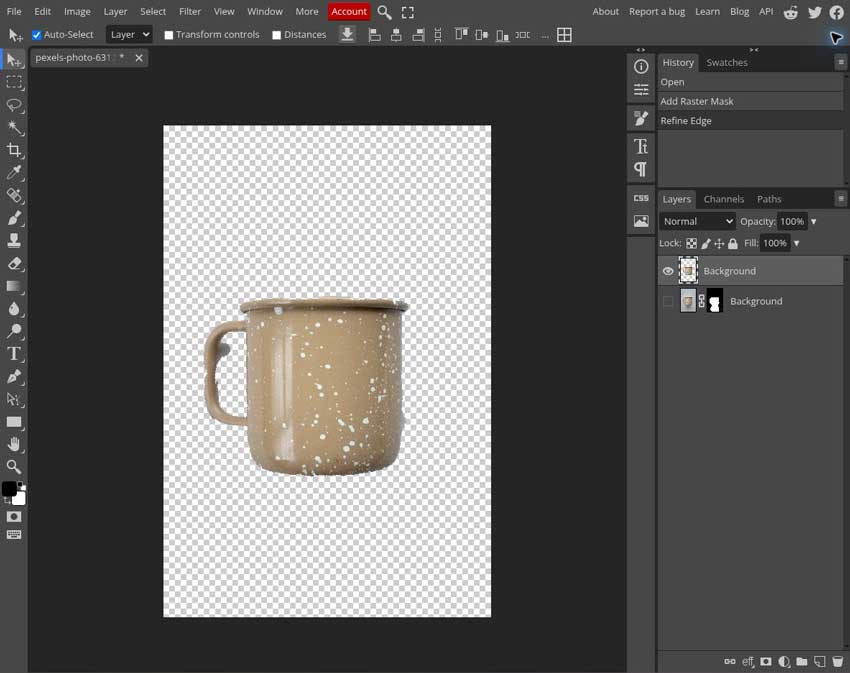
The mug needs its handle opening removed as well as the surrounding backdrop. Treating that opening as background produces a more useful result than accepting the outer silhouette alone. Whether to retain the shadow beneath the mug depends on the destination: a catalog cutout and an image intended for a realistic composite may need different treatments.
Method 3 Remove a White or Solid Background With the Magic Wand
The Magic Wand selects pixels by color, which makes it useful when you want to make a white background transparent or remove another relatively uniform background. It is less reliable when the backdrop contains a strong gradient or when the subject shares that color. The mug photograph has both a pale surface and a soft shadow, so a single click selects only part of its background.
Select the Magic Wand (W) in the toolbar and click the background. Tolerance controls how far the selected colors can differ from the pixel you clicked; increase it cautiously if the selection is too narrow. Keep Contiguous enabled to select connected areas, or disable it when you deliberately want similar colors selected throughout the image. The latter can also select pale details inside the subject.
- Click an area of background and inspect the selection boundary.
- Hold Shift and click additional background regions to add them, including separate openings inside the object.
- Once the background is selected, choose Select > Inverse so the subject becomes the selection.
- Choose Layer > Raster Mask > Reveal Selection, or use the Add Raster Mask control with the subject selected.
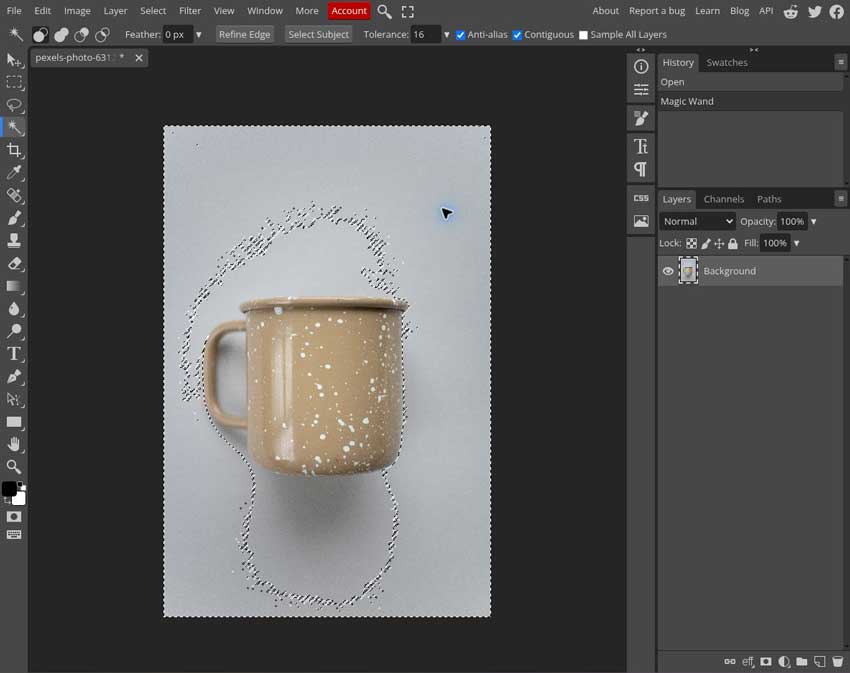
A mask leaves the original image pixels available for correction. If you prefer to delete the selected background, you can use Edit > Clear, but duplicate the image layer first. A Smart Object must be rasterized before direct pixel deletion; the mask workflow avoids needing to erase the source pixels. When a tolerance adjustment starts selecting the object itself, switch to another method instead of repeatedly expanding the color range.
Method 4 Use the Pen Tool for Precise Product Cutouts
The Pen tool is useful for removing backgrounds from product photos when the object has a definite outline and you need to decide exactly where that outline sits. Bottles, packaging, furniture, and other firm-edged products often benefit from a path. It takes longer than automatic removal, but the path gives you direct control over corners and curves; it is a poor choice for tracing hundreds of fine hairs.
Select the Pen (P) and set its mode to Path in the top toolbar. Click to create a corner anchor, or click and drag to create an anchor with curve handles. Use a small number of well-placed anchors and adjust the curve to the object rather than placing a point at every few pixels.
- Zoom in and trace the outside edge of the subject.
- Click the first anchor to close the path.
- Use the Selection control in the top toolbar to turn the path into a pixel selection.
- Add a raster mask that reveals the selected subject.
- Remove background inside any enclosed openings as a separate selection, then inspect the complete outline.
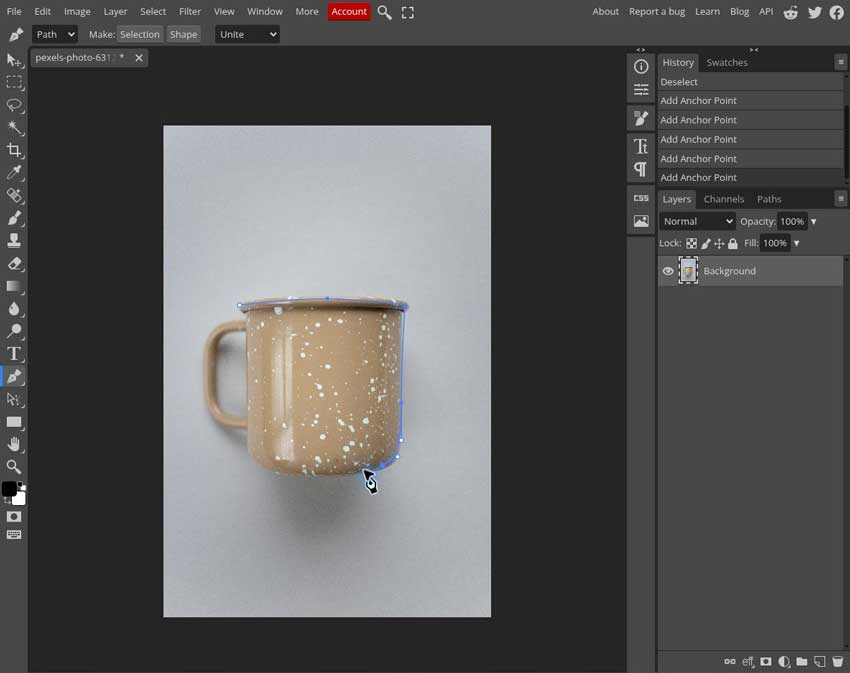
The boundary should follow the object's edge rather than the outer edge of its shadow. At a rounded corner, dragging the handles helps the path follow the curve without a visible kink. After masking, view the result at its intended display size as well as at a close zoom: an edge that seems smooth while enlarged can still look unnaturally sharp in a smaller composition.
Refine Hair and Fur Without Making the Edge Too Hard
Hair needs a different treatment because an edge pixel can contain both foreground and background. Begin with a rough subject selection, then choose Select > Refine Edge. In this tool, white identifies definite foreground, black identifies definite background, and gray identifies the uncertain region that Photopea must calculate.
Keep the uncertain region around the transition, including wisps and gaps between strands, rather than painting the whole head gray. Review the preview while adjusting the region and border. A broad soft edge can make solid areas look translucent, while an overly narrow hard edge can remove the fine detail you are trying to preserve.

For difficult hair, consider New Layer as the output. Photopea's Refine Edge calculates both transparency and foreground color; a selection or raster-mask output preserves the transparency information but not all of that calculated color information. After applying the result, inspect it over temporary light and dark backgrounds. A pale fringe on dark color, or a dark fringe on light color, can reveal contamination that was difficult to see against the original backdrop. Increasing mask feathering alone does not correct an unwanted fringe color.
Fix Common Photopea Background Removal Problems
When Aiarty Image Matting Fits a Larger Workflow
Photopea is useful when a cutout is one part of a layered design. If background removal becomes a recurring task across a folder of portraits or product photographs, a dedicated matting application is worth evaluating. Aiarty Image Matting is a desktop application for Windows and macOS that performs image matting locally and supports batch background removal. Its role here is to prepare the cutouts, which you can then bring into Photopea for composition.
Aiarty's current guide lists four models. AlphaStandard V2 targets softer and semi-transparent detail, while AlphaEdge V2 favors sharper edges with less transparency. EdgeClear V2 targets detailed, opaque subjects, and SolidMat V2 emphasizes solid outlines. Start with representative images from the batch and compare the edges before applying one model to the whole folder. The application also provides Brush, Eraser, Dodge, and Burn tools, plus Mask Curve adjustments, for refining the mask after processing.
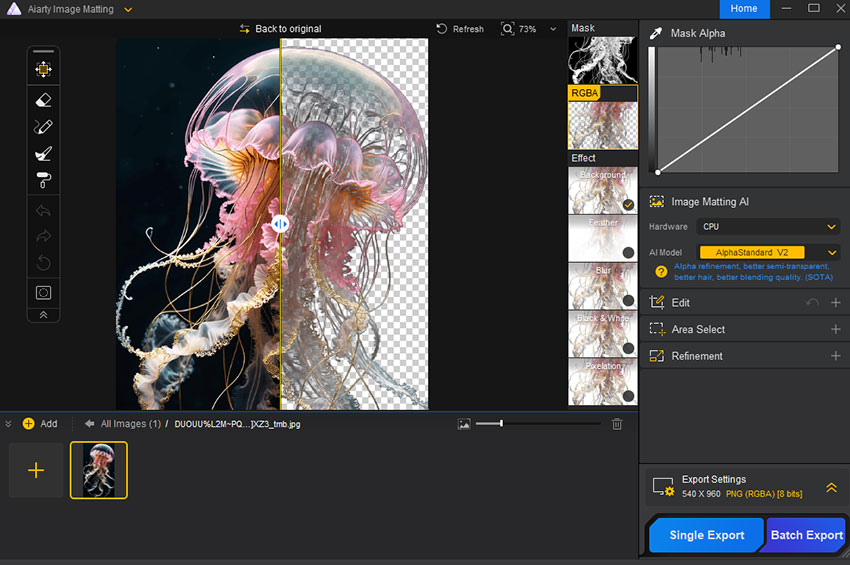
A practical workflow is to import the images, select a suitable model, run matting, review the difficult edges, and export the foreground image as a transparent PNG. Aiarty lists support for batches of up to 3,000 images. When returning to Photopea, use the image export containing transparency rather than a mask-only export, then place it above the replacement background. The trial exports a single image with a watermark and disables batch export, according to the official quick-start guide. Check those limits with your intended output in mind before committing to a production workflow.

This post was written by Brenda Peng who is a seasoned editor at Digiarty Software who loves turning ordinary photos into extraordinary works of art. With AI assistance for brainstorming and drafting, the post is reviewed for accuracy by our expert Abby Poole for her expertise in this field.
