How to Remove Product Background for Captivating E-commerce Visuals in 2025
Want to remove product background like a pro for stunning online visuals? A distracting background in product photos can truly make or break a sale. Clean, professional product photos with backgrounds removed are essential for success in e-commerce, marketing, and social media. Whether you need a crisp white background or a transparent cutout, learning how to remove product backgrounds is a game-changer. This guide will walk you through effective, step-by-step methods to create eye-catching product photos that boost your conversions.
![]() Removing Product Background Used to be Hard
Removing Product Background Used to be Hard
- You get messy or uneven edges, especially on detailed parts of the product or where the photo is a little blurry.
- Sometimes there's a weird glowing outline or the cutout just looks choppy.
- Beginners may waste a ton of time doing repetitive manual work instead of focusing on more important things.
- Many online tools don't allow you to remove backgrounds from lots of photos at once.
💡 Now, you can easily remove product backgrounds with AI precision.
Aiarty Image Matting offers a revolutionary solution for removing backgrounds from product photos. Leveraging advanced AI, it precisely isolates your products, delivering clean, professional cutouts in seconds. Experience effortless bulk background removal and unlock stunning product visuals with unparalleled ease and speed.
How to Remove Product Backgrounds for Stunning Photos
Creating visually appealing product photos is essential for online success, and a clean background is key. Whether you're aiming for a pristine white backdrop or a transparent cutout, mastering product background removal is crucial. Below, I'll explore several effective methods, ranging from user-friendly AI tools to manual techniques, to help you achieve professional-looking product photos efficiently.
How I test:
- To ensure the accuracy and effectiveness of each background removal method discussed in this post, I conducted thorough testing and practical application under the same conditions.
- My PC's specs: Windows 10, i7-13700K CPU, 32GB RAM, AMD Radeon RX 7600 Graphics.
- The test image: a photo of a perfume product.
- I spent hours testing every tool listed here, the 4 methods were cited by most editors.
#1. Remove Product Background with Aiarty Image Matting
Aiarty Image Matting utilizes cutting-edge AI to automatically and precisely remove backgrounds from product photos. Its intuitive interface and powerful algorithms make achieving professional-quality matte accessible to users of all skill levels. This method is ideal for those seeking speed, accuracy, and exceptional results without complex manual editing.
Killer Features List:
- 1-Click to remove and replace backgrounds for Amazon, eBay, Shopify, TikTok listings.
- SOTA-class alpha matting for precise matte, even complex edges, lace, translucent parts.
- Efficiently batch process over 3000 images, ideal for large e-commerce projects.
- Upscale images 2x to showcase product details and improve buyer confidence.
- Process images locally, keeping your product data safe.
Free Download Aiarty Image Matting to Make Product Background Transparent Now!
Steps to Remove Product Background with Aiarty Image Matting
Step 1. Import Your Product Image
Simply launch Aiarty Image Matting and drag your product photo directly into the program window. Alternatively, click the Import button to browse and select your image file.
Step 2. Automatically Remove Background
Choose an AI model based on the product type. In my case, I choose Alpha EdgeV2 since it works best with images with semi-transparent and transparent edge. You can check the official guide to quick understand the differences of each model. Hit the Start button to initiate the automatic background removal.
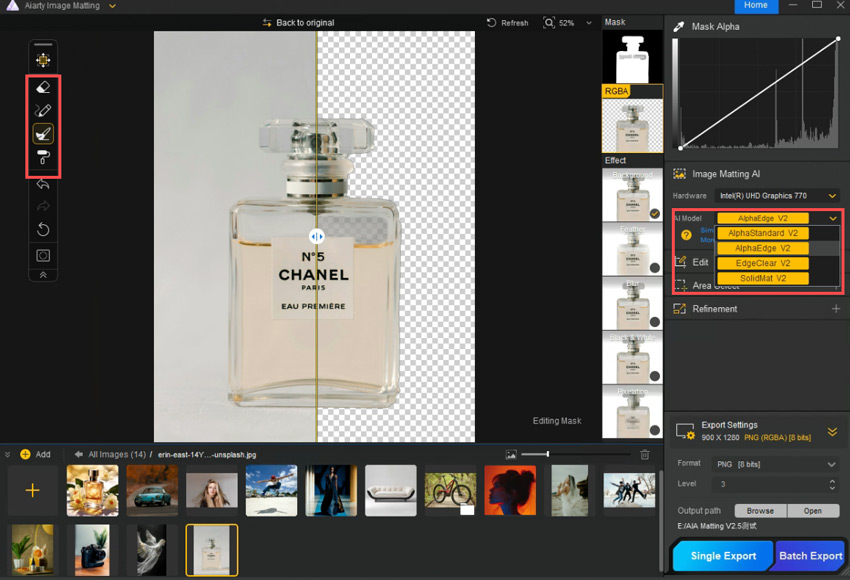
For even finer control over the background removal, especially around complex product shapes, use the refinement tools.
- The Mask Alpha curve lets you adjust transparency based on mask darkness – use the Lift Curve to soften edges and the Lower Curve to sharpen them.
- For manual fixes, the Eraser removes unwanted parts, the Brush restores product areas, and Dodge and Burn tools help blend edges seamlessly with the new background if needed.
Step 3. Export as Transparent PNG(s)
Expand Export Settings. Select PNG as the format; this keeps your background transparent. Adjust the image quality. Choose your export folder. Then, click Single Export for one image, or Batch Export for multiple product photos
#2. Remove Product Background Using Remove.bg Online
Remove.bg is a dedicated online background removal tool favored by many e-commerce sellers, as frequently mentioned in Amazon seller communities, primarily for its speed and ease of use directly in a web browser. It leverages AI for automated background removal, making it very accessible. While Remove.bg can be effective for quick tasks, especially for simple product photos, it's important to be aware of its limitations.
The "free" version is often perceived as fully free, but it provides only preview quality results and limits output resolution significantly. Also, the preview window is small, making it difficult to fully assess the final cutout quality before downloading, and full HD downloads require purchasing credits, making it ultimately a paid service for professional use.
Steps to Remove Product Background Online for Free
Step 1. Open your web browser and navigate to www.remove.bg. You'll see a clean interface with a prominent area to upload your product image.
Step 2. Click the Upload Image button or drag and drop your product photo directly onto the Remove.bg webpage. The website will begin processing your image automatically.
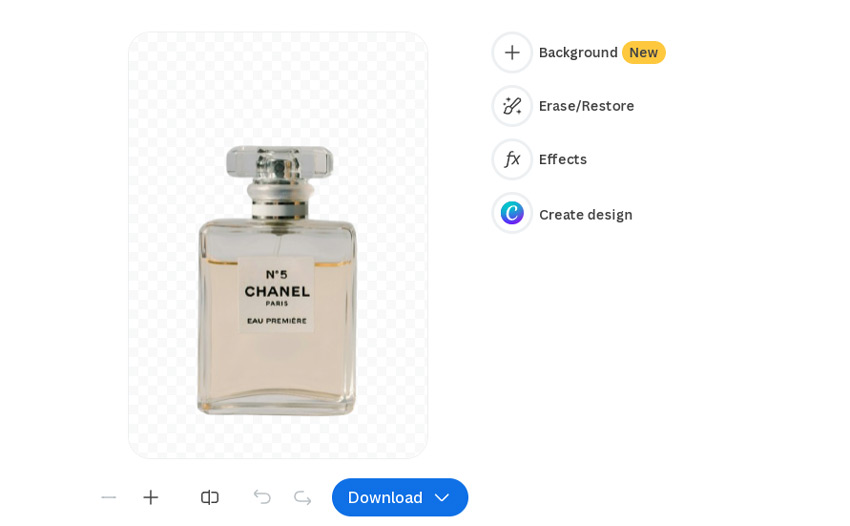
Step 3. Remove.bg quickly displays a preview of your product image with the background removed.
Note:
The preview is shown in a relatively small window. This limited preview size can make it challenging to thoroughly inspect the quality of the cutout, especially for fine details, before downloading.
Step 4. Click the Download button to get the processed image for free, but be aware this is a low-resolution, preview quality version.
For high-resolution, print-ready images, you'll need to click Download HD. This option will prompt you to purchase credits or sign up for a subscription, as full HD downloads on Remove.bg are a paid service.
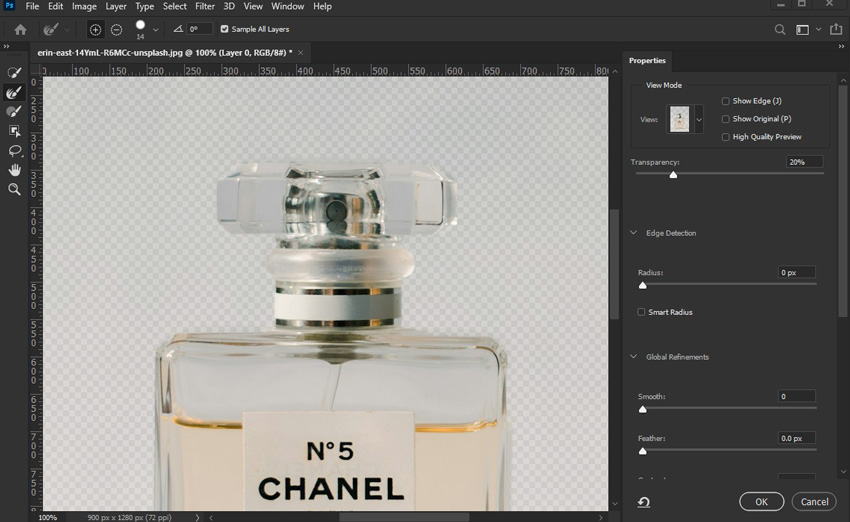
#3. Remove Product Background in Adobe Photoshop
Adobe Photoshop is known as the top software for professional image editing. It has strong tools to remove backgrounds and gives you lots of creative control for great results. Many pros use it for important product photos. But even Photoshop can have trouble with see-through, partly see-through, or textured items like lace. Getting perfect background removal on these can take a lot of skill and time, even in Photoshop. Also, Photoshop is not easy to learn quickly, and it costs money every month to use. So, while Photoshop is very powerful and often needed for top-level pro work, for simple product photos or if you need to be fast and don't have tricky see-through items, other methods might be quicker, easier, and cheaper.
Step 1. Launch Adobe Photoshop. Go to File > Open to load your image.
Step 2. Photoshop offers various selection tools, and the Subject Selection Tool is a good starting point for product background removal. Click that from the toolbar to begin roughly selecting your product.
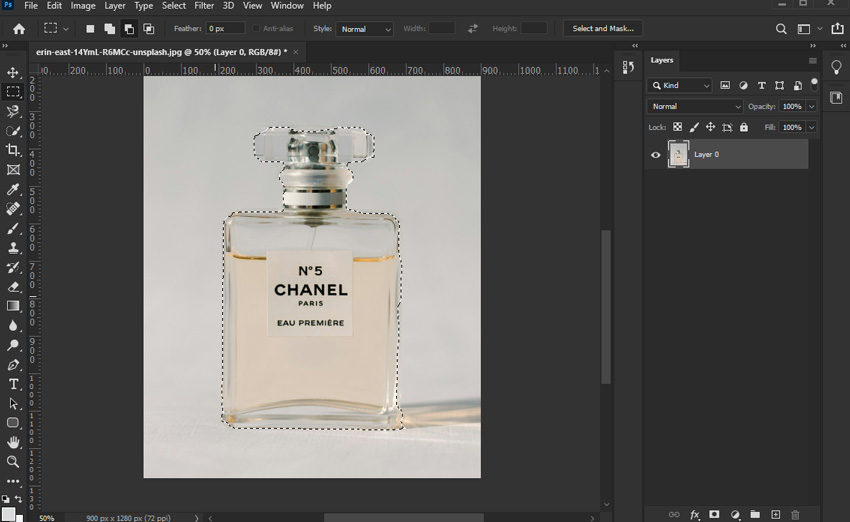
Step 3. Use the Refine Edge Brush Tool meticulously around your product's edges. Experiment extensively with the Smooth, Feather, Contrast, and Shift Edge sliders.
Note:
Achieving perfect selections in Photoshop is often an iterative process of refining and adjusting.
Step 4. Click the Add Layer Mask icon in the Layers panel to apply a mask based on your refined selection, effectively hiding the background.
Step 5. Remove blemishes, adjust lighting, and perform advanced edit by using Clone Stamp, Healing Brush, and more editing tools located in the toolbar section.
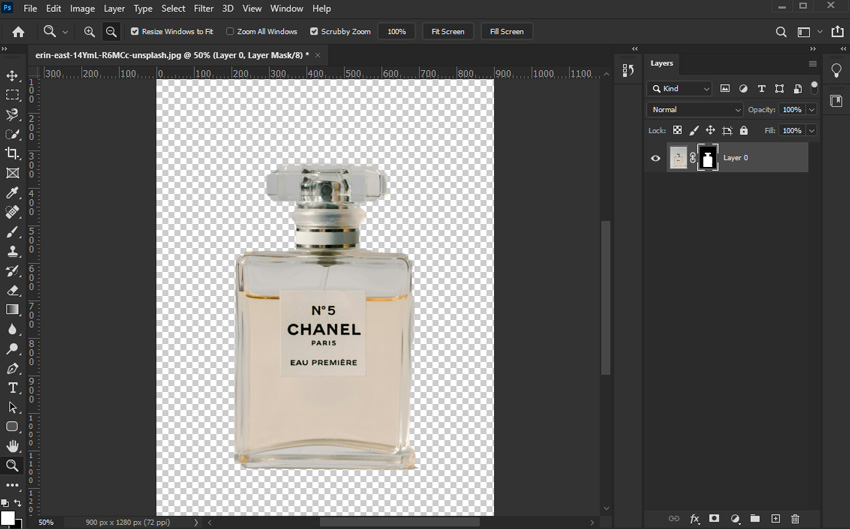
Step 6. Click File > Save As, and choose PNG format. Saving as PNG is crucial for using your product cutouts effectively on websites and in other digital media where transparency is needed.
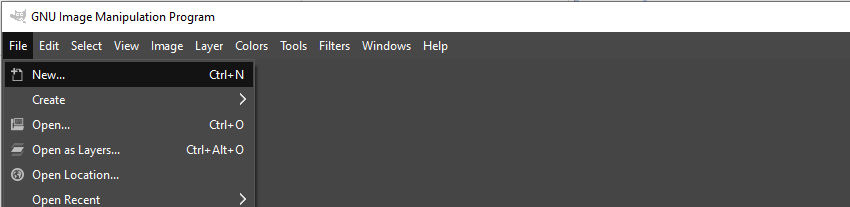
#4. Remove Product Background in GIMP
Looking for a free way to remove backgrounds from product photos? GIMP is a free image editor that can be used for this. It offers tools for removing backgrounds from product images. It includes selection and masking features that are helpful for this task. GIMP is a free option for photo editing, including background removal. Like any tool, GIMP has its limits. It can be more challenging to use effectively for products with very fine details, complex shapes, or transparency. For these more difficult photos, achieving a perfect background removal in GIMP may require extra effort.
Step 1. Launch GIMP on your computer and open your product image. Go to File in the top menu, then select Open and choose your image file.
Step 2. In the GIMP toolbox, find and select the Fuzzy Select Tool. It is usually represented by an icon resembling a magic wand.
Step 3. Using the Fuzzy Select Tool, click on an area of the background you want to remove. GIMP will select contiguous areas of similar color.
Note:
You may need to click multiple times in different background areas, especially if the background is not uniformly colored. Adjust the Threshold setting in the Tool Options to control the sensitivity of the selection.
Step 4. Once you have selected the background, go to Select in the top menu and choose Invert. This will reverse the selection, so that your product is now selected instead of the background.
Step 5. In the Layers panel, right-click on your image layer. In the context menu, select "Add Layer Mask. In the Layer Mask Options dialog that appears, choose Selection and click Add. This will create a layer mask based on your selection, effectively removing the background and revealing your product on a transparent backdrop.
Step 6. To save your image with background transparency, go to File in the top menu and select Export As. In the Export Image dialog, expand the Select File Type option at the bottom and choose PNG image. That's all for removing product background in GIMP.

Test Results of 4 Product Background Removal Methods
After trying out all four methods, let's look at the real results and see which tool does the best job. To really put them to the test, I didn't just remove the backgrounds – I also tried placing the transparent product photo onto a completely different background. Why? Because often, removing the background is just the first step. You want to put your product on a new background that looks great! So, how well the transparent image blends with a new background is super important.
Here's what I found:
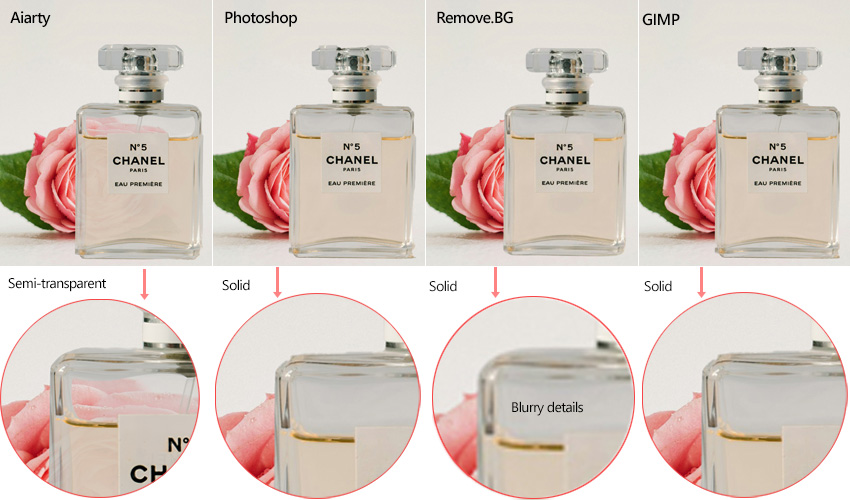
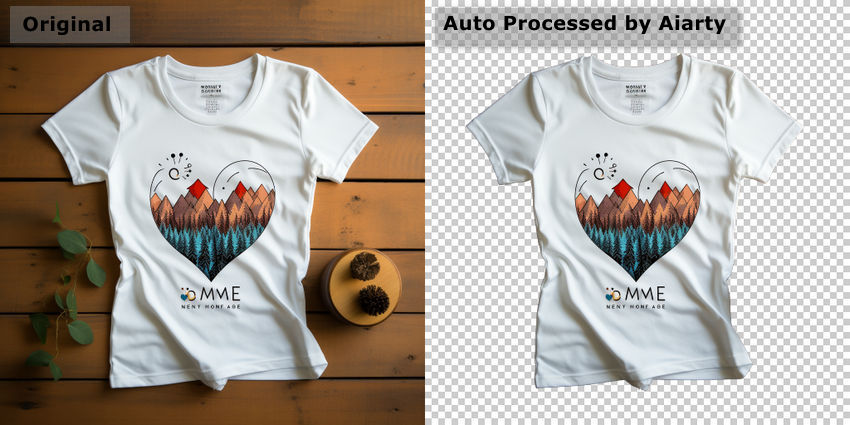
- Aiarty Image Matting (The Clear Winner): Wow! Aiarty was the only one that truly kept the semi-transparent parts of the product looking real, without needing tons of manual tweaking. When I put the product on a new background, it blended in so naturally and seamlessly – it looked fantastic!
- Remove.bg: Unfortunately, the image from Remove.bg came out a bit blurry overall. And it lost all the details in the semi-transparent areas. So, while it did remove the background, when I tried to blend it with a new background, it just didn't look natural at all.
- Photoshop: Even though Photoshop is supposed to be the pro tool, and I spent time trying to learn it, the result was actually less impressive than I hoped. The edges of the product looked kind of weird and too sharp, or rigid. Because of this, when I blended it with a new background, it just looked…off. Now, I'm not a Photoshop expert, so maybe a really skilled designer could get better results.
- GIMP: It was very similar to Photoshop in my tests. It took me more time to figure out the software, and in the end, it didn't give me a super precise background removal. Like with Remove.bg, I lost details in the semi-transparent parts and the edges weren't perfect.
If meticulous detail is paramount in your passport photo editing, Aiarty Image Matting's advanced AI algorithms provide the most accurate and reliable background removal.
Ready to make your product transparent? Give Aiarty a try and see the difference for yourself!
 FAQ
FAQ
One frequent mistake is rushing the selection process, leading to jagged edges or missing parts of your product. Another common pitfall is not paying attention to fine details like hair, fur, or translucent edges, which can result in a halo effect or unnatural look.
Furthermore, over-editing or aggressive use of refinement tools can sometimes make the product look artificial or lose its natural texture. Always aim for precise selections, carefully refine edges especially on complex areas, and use a subtle touch with refinement tools to maintain a realistic and professional product cutout.
To efficiently remove backgrounds from numerous product photos, utilize batch processing features if your chosen software offers them. Aiarty Image Matting, for example, includes a dedicated batch mode where you can import a folder of product images and apply background removal settings to all of them simultaneously, saving significant time.
For Photoshop or GIMP, you can explore using Actions or Scripts to automate background removal steps across a batch of images, though this may require a slightly more technical setup. Online background removers often have limitations on batch processing in free versions, so for large volumes, dedicated software with batch capabilities is generally the most effective solution.
You May Also Like
This post was written by Brenda Peng who is a seasoned editor at Digiarty Software who loves turning ordinary photos into extraordinary works of art. With AI assistance for brainstorming and drafting, the post is reviewed for accuracy by our expert Abby Poole for her expertise in this field.