


Photopea makes it easy to resize images directly in your browser without installing desktop software. Whether you need to reduce an image for a website, enlarge a photo, or set exact pixel dimensions for a design project, you can do it in just a few steps.
To resize an image in Photopea, open your image, go to Image > Image Size, enter your desired width and height, and apply the changes. This guide walks you through the process, explains how to maintain the original aspect ratio, and shows you how to export the resized image without unnecessarily compromising quality.
How to Resize an Image in Photopea Step by Step
Photopea lets you change an image's pixel dimensions through the Image Size dialog. The process is straightforward, but a few settings are worth checking before you apply the changes, especially if you want to preserve the original proportions or prepare an image for printing.
Step 1. Open Your Image in Photopea
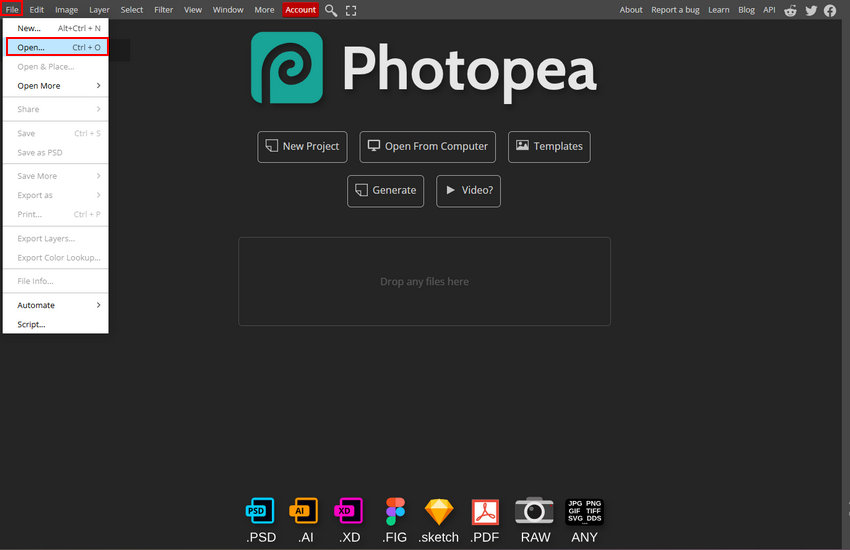
Go to Photopea in your browser and select File > Open from the top menu. Choose the image you want to resize from your computer.
Photopea supports common image formats such as JPG and PNG, so you can usually open your image directly without converting it first. Once the image appears on the canvas, you're ready to adjust its dimensions.
Step 2. Open the Image Size Dialog
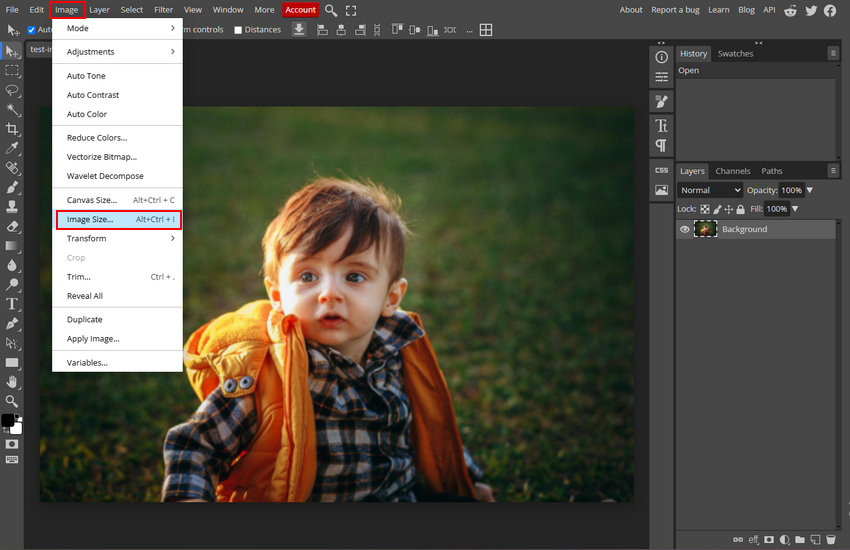
With your image open, select Image > Image Size. A dialog box will appear with settings for the image's width, height, resolution, and resampling.
Here's what the main options mean:
- Width and Height: Set the dimensions of your image. For digital images, pixels are usually the most useful unit.
- Chain icon: Locks or unlocks the relationship between width and height, depending on its current state.
- DPI: Controls the relationship between pixel dimensions and physical print size.
- Resample: Determines whether Photopea changes the number of pixels when resizing the image.
For most everyday resizing tasks, you'll mainly need to adjust Width and Height, keep the proportions locked, and leave Resample enabled.
Step 3. Enter Your Desired Image Dimensions
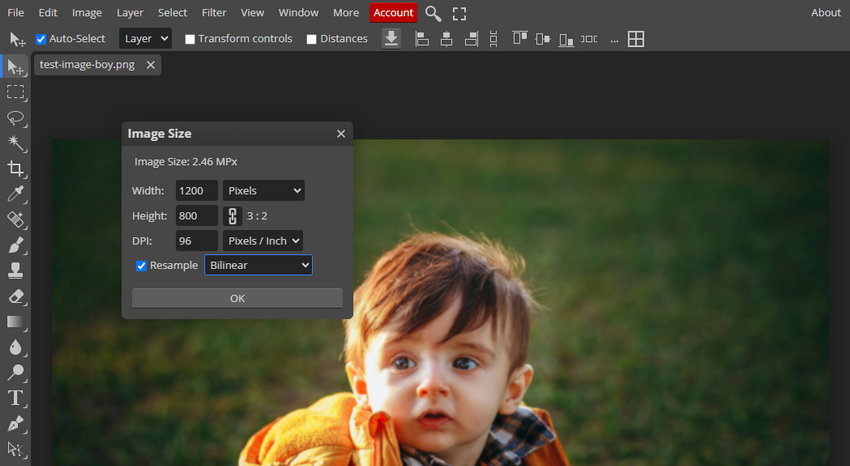
Before changing the values, decide how large the image needs to be. For example, you might want to reduce a large photo for a website or resize a graphic to fit a design layout.
1. Keep the aspect ratio locked.
Look for the chain icon beside the Width and Height fields. Make sure it is in the locked state. When the proportions are linked, changing one dimension automatically adjusts the other, helping prevent the image from looking stretched or squashed.
2. Enter the target dimensions.
Suppose your original image measures 2400 × 1600 pixels and you want to reduce it to half its original width and height. Enter 1200 in the Width field. With the aspect ratio locked, the Height should update automatically to 800 pixels.
If you need an exact width and height that don't match the original aspect ratio, don't force both values while the proportions are locked. Instead, consider cropping the image to the required shape.
3. Should you change the DPI?
For images intended for websites, social media, or on-screen use, you generally don't need to change the DPI value. The pixel dimensions determine how much image data is available for display; the DPI value alone doesn't make a digital image sharper.
For printing, DPI (more precisely, pixels per inch or PPI in this context) matters because it helps determine the physical print size. For example, a 2400 × 1600-pixel image printed at 300 PPI measures approximately 8 × 5.33 inches. If a print shop specifies a particular physical size and resolution, adjust the dimensions and resolution to meet those requirements.
4. Should Resample be enabled?
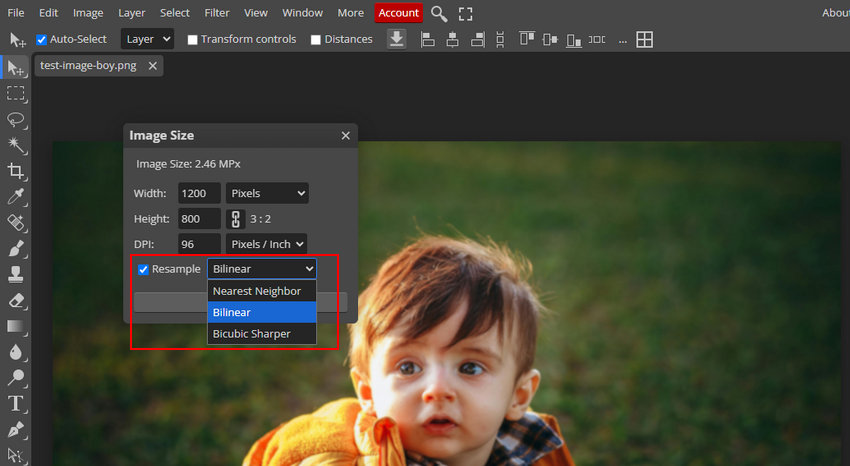
For normal image resizing, keep Resample enabled. This allows Photopea to add or remove pixels when you change the image's dimensions.
When reducing an image, resampling recalculates the pixels to fit the smaller size. When enlarging it, new pixels must be generated, so the result may look softer or less detailed than the original.
If Photopea offers a resampling-method dropdown, use a bicubic method for general photographs when available. Nearest Neighbor is more appropriate for pixel art or other graphics where preserving hard pixel edges is important.
For example, to reduce a 2400 × 1600-pixel photo to 1200 × 800 pixels, keep the aspect ratio locked, leave Resample enabled, enter the new width, and check that the height updates to 800 pixels.
Step 4. Apply the Changes and Check the Result
Once you've entered the new dimensions and checked the settings, click OK to apply the changes.
Inspect the resized image on the canvas. Check whether the subject still looks natural, edges remain clear, and important details are preserved. If you enlarged the image significantly, look closely for softness, pixelation, or other visible artifacts.
If the result isn't what you expected, press Ctrl + Z on Windows or Cmd + Z on Mac to undo the change. You can then reopen Image Size and try a different dimension or resampling method.
Keep in mind that resizing an image changes its dimensions, not necessarily its underlying quality. Reducing an image often produces good results, while enlarging a small or low-resolution image can make existing quality issues more noticeable.
Step 5. Export the Resized Image
When you're satisfied with the result, go to File > Export As and choose the format you need. Photopea supports exporting to common formats such as JPG and PNG.
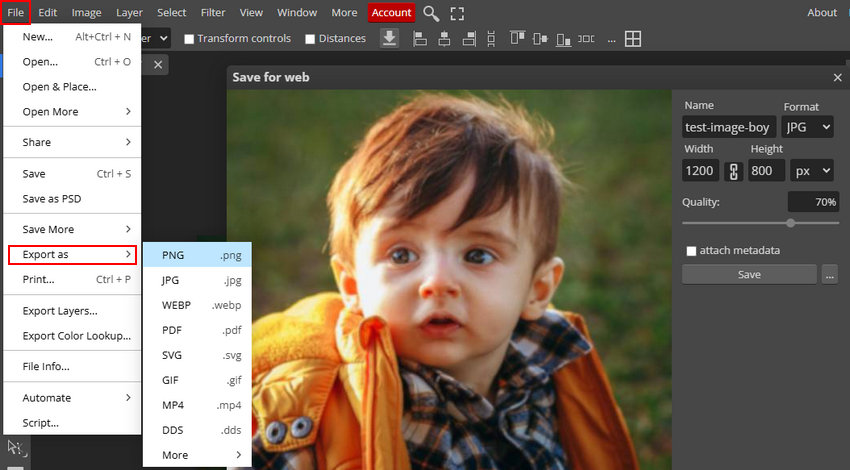
Choose the format according to how you plan to use the image:
- JPG: A good choice for photographs and web images where a smaller file size is important. Check the quality setting in the export dialog.
- PNG: Suitable for graphics, text, and images that need transparency.
- PSD: Use File > Save as PSD if you want to preserve the editable project, including supported layers and other editing information.
For JPG exports, higher quality settings generally produce larger files, while stronger compression can introduce visible artifacts. PNG is useful when transparency matters, but it doesn't guarantee a smaller file than JPG.
Click the save or export button in the dialog and choose where to save the file. If the image will be uploaded to a website or shared online, check the exported file's pixel dimensions and file size before using it.
Tip: Keep a copy of the original image or save an editable PSD before making substantial changes. This gives you a way to return to the original if you need a different size later.
Photopea Image Resizing Problems and How to Fix Them
Resizing an image in Photopea is straightforward, but the result may not always look the way you expect. Blurry details, distorted proportions, and unexpectedly large file sizes are common issues. Here's how to identify the cause and fix each problem.
Why Does My Image Look Blurry After Resizing?
An image may look blurry after resizing for several reasons. The most common is enlarging a low-resolution image beyond the level of detail it can support. For example, increasing a 600 × 400-pixel image to 2400 × 1600 pixels creates a much larger image, but it doesn't restore the missing details. Photopea has to generate additional pixels, which can make edges and textures look soft.
Repeated resizing can also affect image quality, particularly when working with JPEG files. Each time a JPEG is saved with lossy compression, some image information may be discarded.
To get better results:
- Avoid excessive enlargement. Start with the highest-resolution version of the original image available.
- Resize from the original file. If you need several output sizes, create each version from the original rather than repeatedly resizing an already resized copy.
- Choose an appropriate resampling method. For ordinary photographs, a bicubic method is a reasonable starting point when available. Different methods may produce different results depending on the image.
- Use AI image enhancement when necessary. If the original is too small or lacks clear detail, an AI upscaling tool such as Aiarty Image Enhancer can help enlarge the image and reconstruct plausible details. Results depend on the source image, and generated details may not perfectly match the original scene.
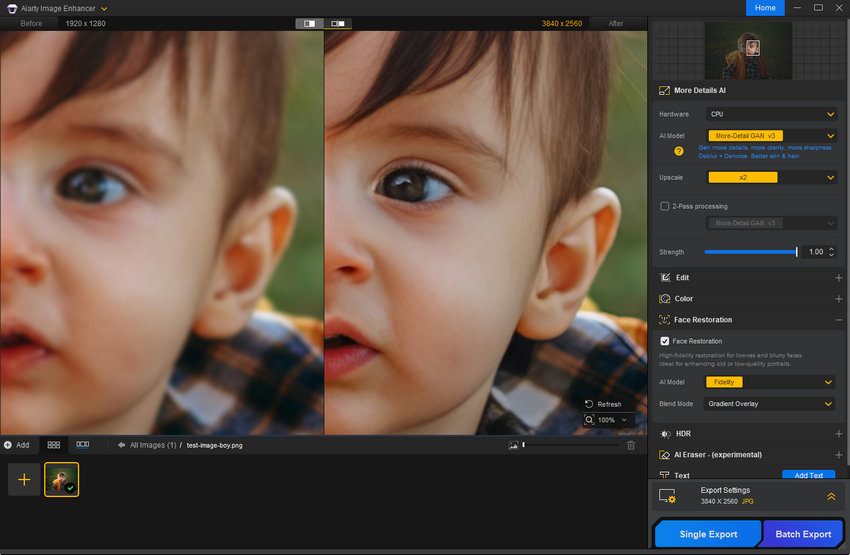
If you only need to reduce an image's dimensions, conventional resizing in Photopea is usually sufficient. AI enhancement is more relevant when you need a larger image that also looks clearer.
Why Does My Image Look Stretched or Distorted?
If a person's face looks too narrow, a circular object becomes oval, or other elements appear unnaturally stretched, the width and height may have been changed independently.
This usually happens when the aspect ratio is unlocked in the Image Size dialog. For example, changing an image from 2400 × 1600 pixels to 1200 × 1200 pixels without cropping forces a landscape image into a square shape, distorting its contents.
To fix this:
- Open the original image and select Image > Image Size.
- Check the chain icon beside the Width and Height fields.
- Lock the aspect ratio so changing one dimension automatically adjusts the other.
- Enter the desired width or height and apply the changes.
If you need a specific shape, such as a square thumbnail or a vertical social media image, use the Crop Tool instead of forcing the image into different proportions. Cropping removes parts of the image while preserving the proportions of the remaining content.
Why Is My Exported Image File Too Large?
An image's file size depends on several factors, including its pixel dimensions, format, image content, and compression settings. A high-resolution photograph exported as a JPEG at maximum quality, for example, may be much larger than a smaller, compressed version of the same image.
If the exported file is too large for a website, email attachment, or upload limit, try these adjustments:
- Reduce the pixel dimensions. If the image will only be displayed at a small size, you may not need to keep its full original resolution.
- Choose the right format. JPEG is often suitable for photographs, while PNG is useful for graphics that require transparency or crisp edges.
- Adjust JPEG quality. In Photopea's Export As dialog, try a moderately lower quality setting and inspect the preview before saving. Avoid excessive compression if fine details matter.
- Check the exported file. Confirm its dimensions and file size after saving, rather than relying only on the appearance of the image in the editor.
For example, if a 3000-pixel-wide photograph is only needed at 1200 pixels wide for a webpage, reducing its dimensions before exporting can substantially reduce the file size. The exact savings will depend on the image and export settings.
The goal is to find a balance between image quality, dimensions, and file size. For web use, start with the dimensions the layout actually requires, then adjust the format and compression settings to meet any file-size limits.
 Frequently Asked Questions
Open your image in Photopea and go to Image > Image Size. Make sure the chain icon beside the Width and Height fields is locked, then enter your desired width or height. Photopea will adjust the other dimension proportionally. If you need a different aspect ratio, use the Crop Tool instead of changing the proportions manually.
Yes. Go to Image > Image Size, select pixels as the unit, and enter your target width and height. If the required dimensions have a different aspect ratio from the original, you may need to crop the image first to avoid distortion. When preparing images for websites or social media, check the platform's recommended dimensions before exporting.
It depends on how you resize it. Reducing an image's dimensions usually preserves acceptable visual quality, although fine details may be lost. Enlarging an image can make it look blurry or pixelated because additional pixels must be generated. Repeated resizing and saving in a lossy format such as JPEG can also affect quality. For better results, start with the original image and avoid unnecessary resizing.
Image Size changes the dimensions of the image by scaling its content, while Canvas Size changes the boundaries of the working area without proportionally scaling the existing content. Use Image Size when you need to enlarge or reduce an entire image. Use Canvas Size when you want to add space around an image or trim the visible canvas area without scaling the original content.
Photopea can enlarge an image by increasing its pixel dimensions, but conventional resizing cannot recover details that were never present in the original. A low-resolution image may therefore look softer after enlargement. If you need to upscale an image while improving its apparent detail, an AI image enhancer such as Aiarty Image Enhancer can help reconstruct plausible details and reduce noise. Results vary depending on the source image, and no method can guarantee perfectly lossless enlargement.
You May Also Like


This post was written by Brenda Peng who is a seasoned editor at Digiarty Software who loves turning ordinary photos into extraordinary works of art. With AI assistance for brainstorming and drafting, the post is reviewed for accuracy by our expert Abby Poole for her expertise in this field.
