


Best AI Video Sharpeners for Blurry Videos (2026 Tested & Ranked)



How to Sharpen a Blurry Video (Quick Answer)
To sharpen a blurry video, the most effective method is to use an AI video sharpener like Aiarty Video Enhancer that can reconstruct missing details instead of simply increasing contrast or edges.
- Use an AI video enhancer to reconstruct missing details
- Choose the right AI model (low-light, detail, balanced) and upscale the resolution if needed (2× or 4×)
- Let it apply the video sharpener apply deblur and denoise
- Export with optimized settings
You know that feeling when you’re watching an old vacation video or grainy VHS footage, and everything looks just… soft? Not in a dreamy, nostalgic way—but in a frustrating, can’t-see-the-details kind of way. I’ve been there, especially when trying to breathe new life into wedding clips from the early 2000s or trying to prep gameplay videos for YouTube. The blur kills the vibe.
That’s where video sharpeners come in. Whether you're restoring old family footage, enhancing low-resolution clips for social media, or simply trying to make a professional tutorial videos, good video sharpening software can make the video sharper and clearer. In this guide, we’ll break down the most talked-about tools people are actually using today—no fluff, just results.
Quick Answer: Best Video Sharpener in 2026
We spent days testing leading tools, evaluating their performance across key criteria, and below are our picks:
Effortlessly fix blur, noise, blockiness, and pixelated artifacts with just one click. Transform your footage into sharp, detailed 4K resolution while preserving natural details and textures. Sharpen every frame without leaving footage looking overly processed or artificial.
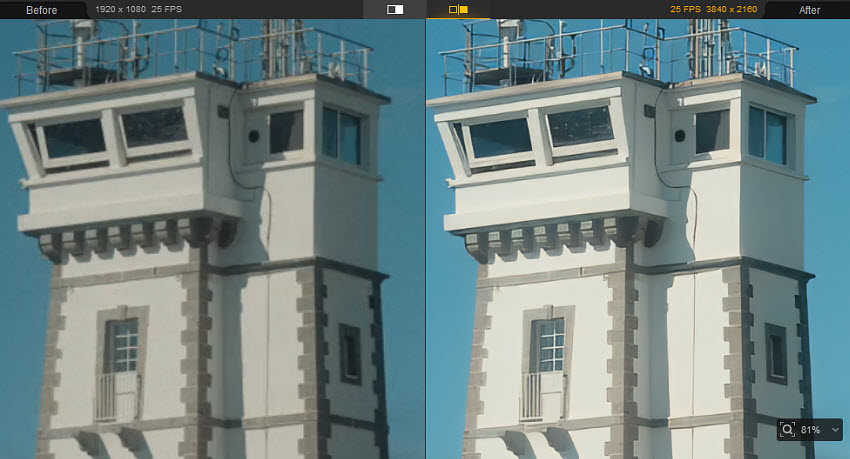
Topaz Video AI is a powerful video sharpener designed to recover fine details and improve video sharpness using advanced AI models. It is best for professionals who need the highest-quality video sharpening results for film, cinematic projects, or restoration work.
CapCut is a free and fast video sharpener tool that helps sharpen videos for TikTok, YouTube Shorts, and social media. It provides quick video sharpening and basic enhancement features, making it ideal for lightweight and casual editing.
Other picks on the list:
- Premiere Pro - Best for sharpening videos with precision control.
- UniFab Video Upscaler AI - Best for automated AI sharpening old videos and animations effortlessly.
- AVClabs Video AI - Best for overall video sharpening and enhancement, especially for videos with faces.
- Flixier - Best for online, cloud-based video sharpening.
- Vidio - Best for quickly sharpening short videos.
- YouCam Video Editor - Best for online, cloud-based video sharpening.
To ensure a fair comparison of each video sharpener, we tested all tools under the same conditions using real-world footage. We evaluated how each tool performs in video sharpening across different types of video quality issues.
Test environment:
- GPU: AMD Radeon RX Vega 11
- Same export settings for all tools
- Same target resolution (2× or 4× upscale when available)
- Same source: 640x360 MP4 video
1. Aiarty Video Enhancer
Aiarty Video Enhancer is powered by state-of-the-art generative AI techniques to sharpen videos up to 4K resolution, restoring crisp edges, natural details, and accurate color. It can also convert SDR footage to HDR, enhancing vibrancy and dynamic range. Whether you’re restoring old family videos, enhancing low-res clips, or fixing blurry smartphone footage, Aiarty improves both clarity and color realism in just one click.
- AI video sharpening: Actively reconstructs edges, textures, and fine details without stretching pixels. Works at 1x, 2x, or 4x upscaling, improving clarity even when maintaining the original resolution.
- Sharpen different videos: Sharpens edges, make soft/out-of-focuse videos clear, denoise, and fix pixelation in a single workflow.
- Three specialized AI models: Trained on a massive library of real-world problematic videos for different video sharpening needs.
- Correct color: Restores natural colors and converts SDR videos to HDR, delivering more vivid, lifelike visuals.
- Fast & efficient: Utilizes up to 95% GPU usage, making AI sharpening up to 3x faster than comparable tools. Supports batch processing for multiple videos.
How to sharpen videos with AI in clicks?
Step 1. Import videos to the sharpener
Download the AI video sharpener and install it. Then open it and click the "+" icon to select the blurry video file you want to sharpen. You can also drag and drop all the videos into it to sharpen in a batch.
Step 2. Choose AI Super Resolution
In the top menu, go to AI Model and choose the model to sharpen the video based on the source.
- moDetail-HQ: The model excels in high-precision detail recovery and texture enhancement (hair, plants). Perfect for upscaling daylight outdoor scenes and portraits.
- Smooth-HQ: This model is designed for balanced denoising and deblurring. Ideal for upscaling videos in indoor or moderately imperfect scenes.
- superVideo: This model offers industry-leading noise reduction in extreme low-light. It can upscale very dark footage with high quality (night scenes).
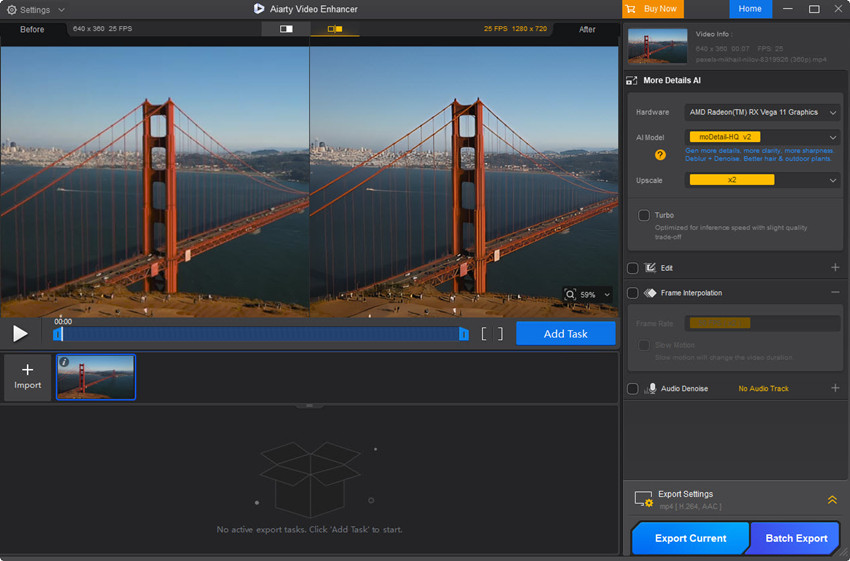
For general sharpening, I recommend the moDetail-HQ model.
Step 3. Set output resolution
You can upscale your video to 2x or 4x. Even if you keep the original resolution, you can choose 1X and video sharpening still applies. I chose 2x upscaling for my 640p video to make it 1080p, and it worked well.
Step 4. Start video sharpening
Check the preview window to see the difference. You can try different models and upscaling options to get the best result. Once satisfied, click Export Current or Batch Export, and wait for the AI to work its magic.
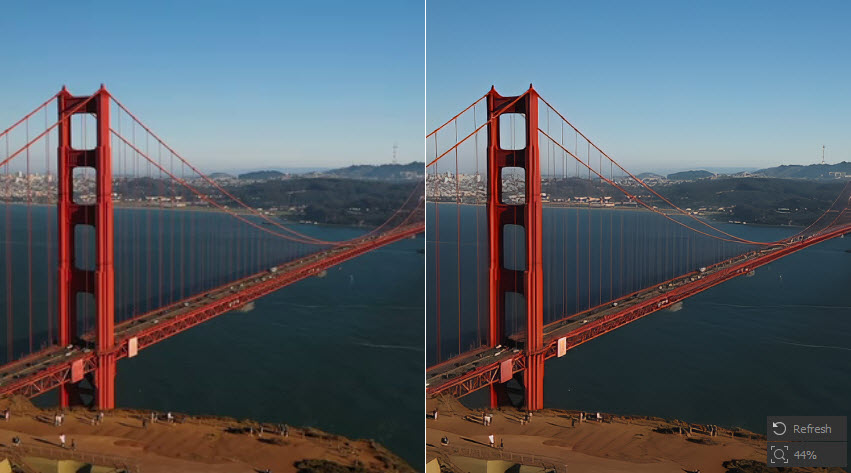
Test 1: Sharpen Old Low-re Pixelated Video
I recently grabbed a 3-minute 360p MP4 file that I'd shot in pretty low light. The original video was undeniably soft, especially on faces and those background details. After running it through the AI video sharpener, the output video looked genuinely sharp and natural. No weird artifacts, just a much clearer picture.
Here's a before-and-after comparison of the sharpened test video:
Test 2: Sharpen Noisy Blurry Video
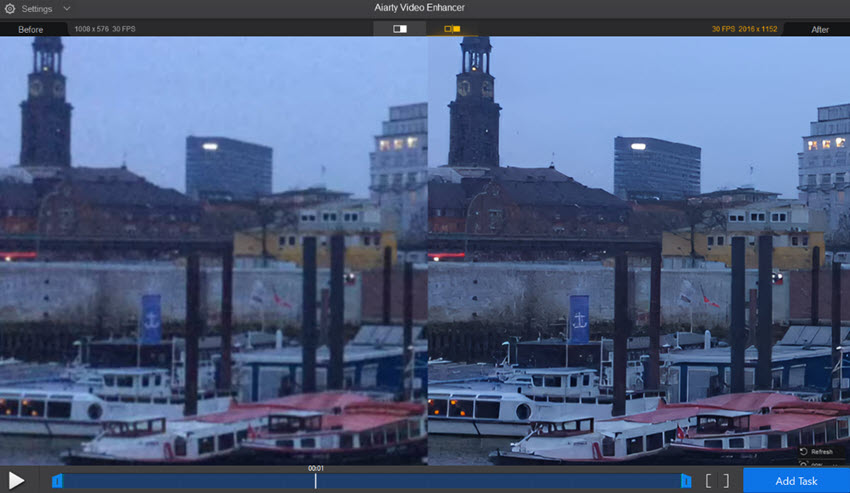
I then tested a more challenging noisy and blurry handheld video, recorded in a dim environment with visible grain and noise.
After processing it through Aiarty Video Enhancer using the AI video sharpener mode, the tool was able to significantly reduce noise while restoring edge clarity. The footage looked noticeably cleaner and sharp without noisy artifacts.
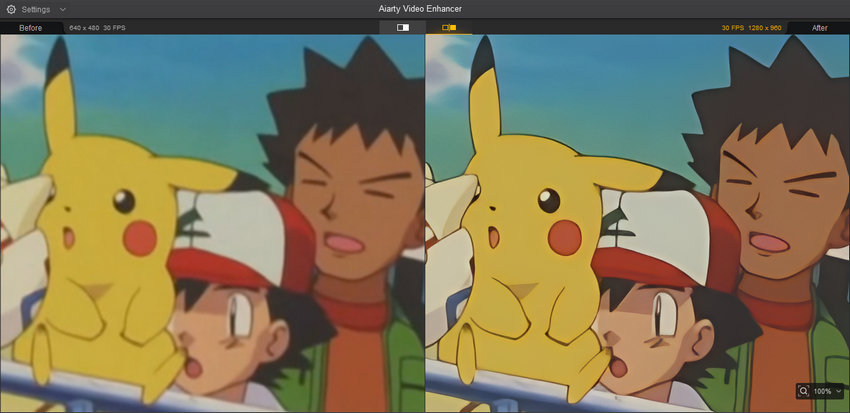
Test 3: Sharpen Blurry Anime Video
For the third test, I used a low-resolution blurry anime clip, which typically contains aliasing, soft edges, and compression artifacts.
Aiarty Video Enhancer shaperned the clip well by enhancing line sharpness and improving overall frame clarity while preserving the original anime style. The AI video sharpening was able to clean up jagged edges and restore more defined outlines without breaking the animation’s natural look.
Download Aiarty Video Enhancer to sharpen any blurry video now:
- The AI algorithm reconstructs lost details.
- Sharpen video details during video upscaling (e.g., from HD to 4K).
- AI unblur, denoise, remove pixilation, and other artifacts to make videos clearer.
- Fast high-efficiency AI models and 3x faster with Turbo mode.
- The video sharpening runs very fast on GPU, but slower when relying solely on the CPU.
- It doesn't offer an online version.
2. Topaz Video
When it comes to sharpening videos, I've been genuinely impressed with Topaz Video. It's not your typical "sharpen" filter that just increases contrast. There are various AI models trained on real-world footage to intelligently restore sharpness and enhance detail, such as Artemis, Rhea, and Theia. In addition to video sharpening, it contains various other tools to improve the video clarity.
Topaz Video seems to understand where the details should be sharpened and what should be left alone. This results in a more natural and refined look. For example, I had some slightly soft 1080p footage, and Topaz Video AI was able to add a noticeable crispness without introducing harsh artifacts or halos.
However, the video sharpening requires a powerful GPU, or be prepared to wait, especially if you're working with long videos or high resolutions. From my experience, this AI video sharpener work best with footage that is already reasonably good quality but needs a bit of a boost. If you're starting with very poor-quality footage (e.g., extremely low resolution, heavily compressed), the results may be less dramatic.
- Advanced AI to analyze videos and sharpen details with more natural sharpening quality.
- It supports increasing videos to 8K to make videos sharper.
- You can choose from different AI models and tweak the settings.
- It’s able to sharpen multiple videos at once.
- You’ll need a decent GPU to get smooth sharpening process.
- Slow even on my RTX 3070, a 2-minute 1080p video took ~8 minutes to sharpen and upscale to 4K.
- Available at $249.00 with one-year free updates, it’s too expensive for regular users.
How to Sharpen Videos in Topaz Video AI Step-by-Step
Step 1. Import your video
Open the AI video sharpener and import your blurry video in it.
Step 2. Apply AI sharpening model
On the right-hand panel, choose to upscale the video by 2x. Then in the Enhancement section, there are various AI models available, each designed for specific purposes. Choose an AI model based on the source video. For example:
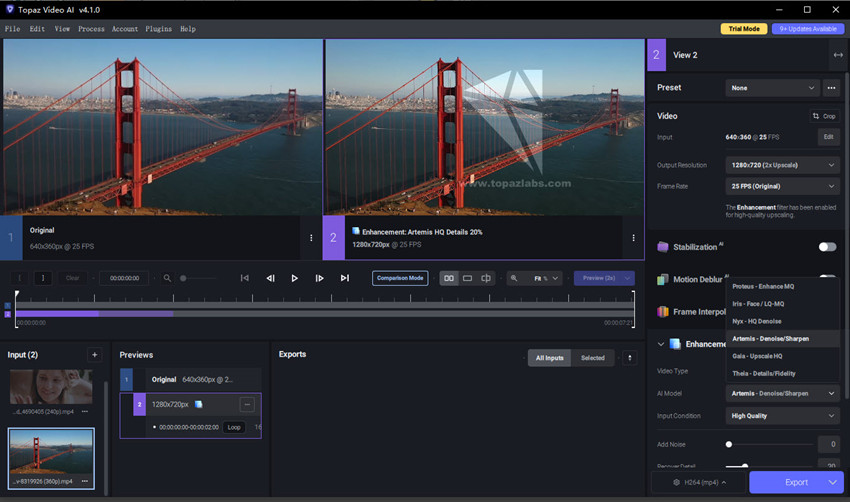
- Rhea is good for general sharpening with HQ footage.
- Theia is great when you need additional detail and sharpening in your footage.
- Artemis will deliver different levels of noise reduction and video sharpening.
Here I choose Artemis model. It also contains models to sharpen videos with motion blur and out of focus blur.
Step 3. Preview and export
Check the preview and try different models if needed. If you’re satisfied with the sharpened video quality, click Export to render the video.
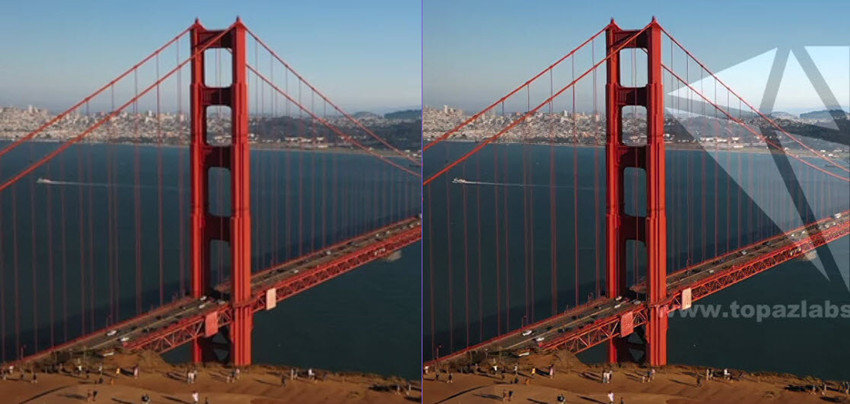
Here's a before-and-after comparison of the sharpened test video:
3. Premiere Pro
I've used Premiere Pro for everything from short social media videos to longer documentaries, and sharpening has been a crucial part of my workflow.
When I'm working with footage that's already decent quality but just needs a little extra "oomph," Premiere Pro's built-in video sharpeners are usually sufficient. The "Unsharp Mask" effect is my go-to. However, when I'm dealing with truly problematic footage – like old videos that are inherently soft or footage that's been degraded by compression – Premiere Pro's native tools sometimes fall short. That's where third-party plugins come in.
What I love most about sharpening videos in Premiere Pro is that I'm doing it as part of the full editing process, not just to make the video sharper. In addition to other components like color grading, effects, and graphics, this enables me to make sharpening decisions depending on how the video will appear in the final edit.
Features for video sharpening:
- Unsharp Mask: The effect will sharpen the video without introducing excessive noise.
- Sharpen Effect: A simpler effect than Unsharp Mask for quick jobs.
- Lumetri Color Panel: Add contrast and clarity to improve the perceived sharpness.
- Adjustment Layers: Apply sharpening effects without touching the original clips.
- Third-party plugins: Plugins like Topaz Video AI, Neat Video, Magic Bullet, Smart Sharpen Pro, etc. can all help sharpen videos in Premiere Pro.
- Precision control over the video sharpening.
- It applies sharpening effects without modifying the original video.
- It sharpens blurry videos without too noticeable artifacts.
- Work with 3rd-party AI video sharpeners.
- It requires time to master and test for the best sharpening results.
- It needs a powerful configuration for smooth video sharpening.
- No built-in AI video sharpeners for one-click sharpening.
- It’s expensive.
How to Sharpen Videos in Premiere Pro Step-by-Step
Step 1. Import blurry videos to Premiere Pro
Import the blurry or out of focus you want to sharpen in Premiere Pro. Then drag the clip onto the timeline.
Step 2. Apply the "Unsharp Mask" effect
Next, head over to the "Effects" panel and find the Unsharp Mask effect. Then drag the sharpening effect onto the blurry video in the timeline.
Step 3. Adjust the "Unsharp Mask" settings
Now, go to the "Effect Controls" panel and you will see several settings to tweak:

- Amount: Controls the sharpening intensity. Start with a low value (around 20-50) and gradually increase it. Do not go too high, or you'll get halos and artifacts.
- Radius: Determines areas around each edge affected. A smaller radius (around 1-2) sharpens fine details, while a larger radius (around 3-5) sharpens larger areas. Also start with a small radius.
- Threshold: Controls the contrast level for sharpening. A lower threshold harpens more of the image, while a higher threshold sharpens only high-contrast areas. I often increase it slightly to minimize noise in flat areas.
Step 4. Preview and export
Play the video to check if it sharpens the video as you like. You can go back to adjust the settings until it delivers the desired sharpness and quality. You can also apply other quality improving effects if needed, such as denoise.
Once you're satisfied with the sharpening, click File > Export > Media to export the sharpened video.
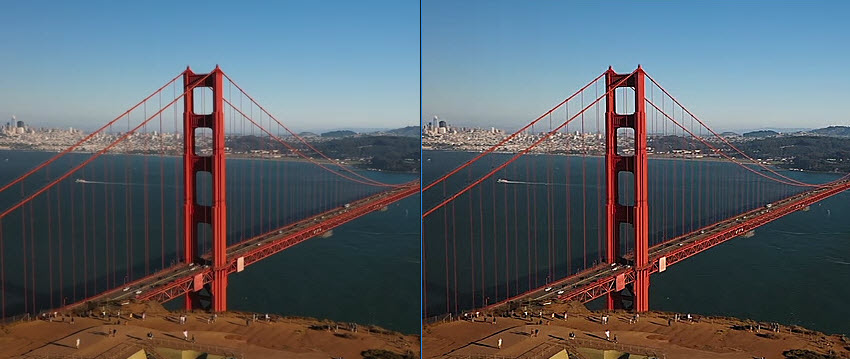
Here's a before-and-after comparison of the sharpened test video:
4. UniFab Video Upscaler AI
UniFab Video Upscaler AI is not a standalone video sharpener, it’s a video upscaler that will also fix blur, noise, motion artifacts, etc. to restore the clarity. It's not like those old-school methods where you just crank up the sharpness and get a bunch of ugly artifacts. This software actually uses AI to intelligently sharpen videos as it upscales them.
What I mean is, when I take some of my older, lower-resolution videos and use UniFab to bring them up to, say, 1080p or even 4K, it doesn't just stretch the pixels. It analyzes the video and does a pretty darn good job of removing motion blur and those annoying out-of-focus blurriness issues. It's like it's actually enhancing the clarity and detail.
Related reading: how to unblur a video to clear quality
And it's got a couple of cool modes to sharpen different videos:
- Universal Model: This is the one I use most of the time. It's great for all sorts of videos – my old home movies, some low-res stuff I downloaded ages ago, even those vlogs I shot that were a bit blurry. It just generally makes everything clearer, restores details, and boosts the colors.
- Animation Model: I tried this on some anime I had, and it really does make a difference. It sharpens the lines, brings out the details, and keeps those vibrant colors looking, well, vibrant!
- It AI algorithm upscales and sharpens videos with natural quality.
- It’s able to retain and enhance details in the original videos.
- It’s integrates in an all-in-one AI video toolkit.
- It runs fast with decent GPU.
- The sharpness doesn't quite match that of some competitors, such as Premiere Pro.
- There is no option to adjust the video sharpening.
- It requires a fairly powerful computer with a dedicated GPU to run smoothly.
How to Sharpen a Video in UniFab Video Upscaler AI?
Step 1. Download the UniFab toolkit and install it. Then open it and choose UniFab Video Upscaler AI from the main interface.
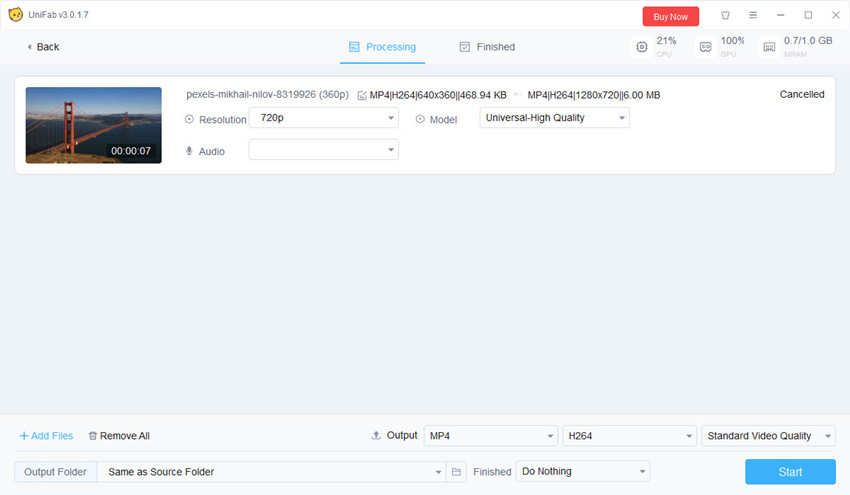
Step 2. Click Add Video to import the video you’d like to sharpen. Once imported, choose the resolution (e.g., 2x upscale, 4x upscale) you want. Then in the Model dropdown menu, choose Universal-High Quality unless the source video is an anime.
Step 3. You can click the small preview button to check the sharpened video quality. If you’re OK with it, go back to the interface and click Start.
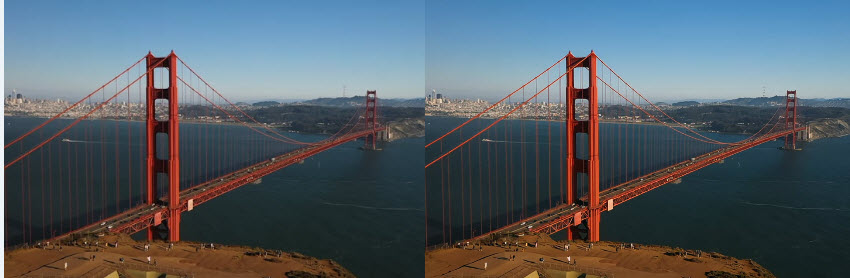
Here's a before-and-after comparison of the sharpened test video:
5. AVClabs Video AI
AVCLabs Video Enhancer AI is another AI-driven tool that's been making waves in the video enhancement space. Like others, it aims to improve video quality, and video sharpening is one of its key functions. When upscaling lower-resolution videos (like 720p to 1080p or 1080p to 4K), AVCLabs generally does a decent job of increasing sharpness. It users several AI algorithms, such as GAN and CNN to sharpen edges and bring out details, making the upscaled video look clearer.
If you're looking for a no-fuss, effective way to sharpen blurry or soft videos, AVCLabs Video Enhancer AI is one of the best out there—especially for beginners and casual editors. It’s not as “deep” as Topaz in terms of AI model customization, but in terms of results, I’d rate them side by side for most real-world use cases.
- The AI upscaling can effectively improve edge clarity and details.
- 6 AI models to better handle different videos
- The built-In denoising feature can sharpen videos without making the noise worse.
- The Face Enhancement is very useful to sharpen portraits and interviews.
- There is no real-time preview to check the changes live.
- There is limited manual control on the video sharpening process.
- AI sharpening still requires a solid graphics card (NVIDIA preferred).
How to Sharpen Blurry Videos in AVCLabs?
Step 1. Download and open AVCLabs Video Enhancer AI. The installation may take quite a long time to download the AI models.
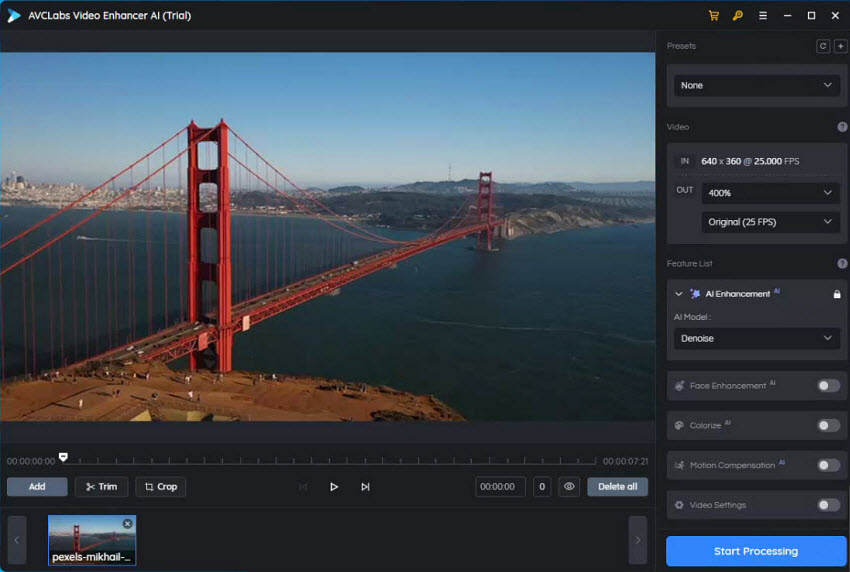
Step 2. Open the AI video sharpener and click Browse to import the blurry video to sharpen.
Step 3. Select a desired output resolution. For the best quality, I usually start with 2x upscaling. Next in the AI Enhancement section, choose an AI model based on your video. Here I choose Standard.
Step 4. There is no preview option. So after the settings, click Start Processing. During the processing, you can see the difference between the original and sharpened video. You can cancel the process and make any change.
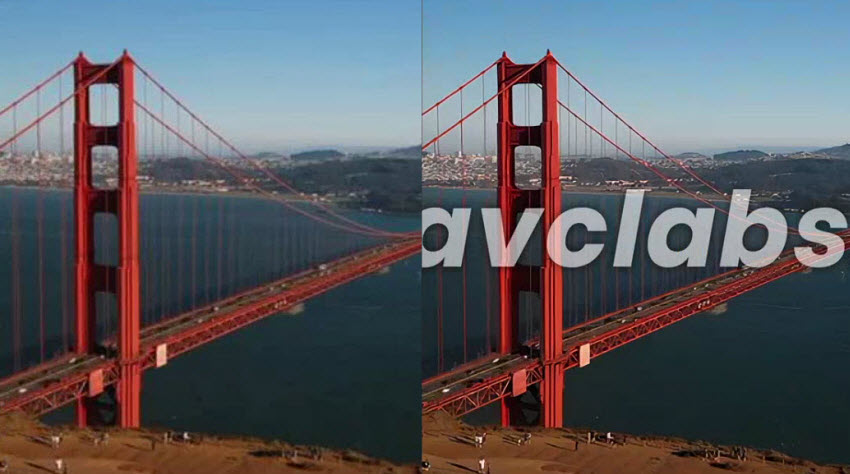
Here's a before-and-after comparison of the sharpened test video:
6. CapCut
I didn’t expect CapCut Desktop to become one of my go-to tools for sharpening video. I used to think of CapCut as a TikTok editing app for quick cuts and stickers. But after spending hours editing short-form content on my PC, I have to say CapCut can be a good video sharpener if you're looking for a fast, intuitive, and free solution.
It contains a sharpen filter as well as an AI video upscaler, which according to CapCut, uses AI to upscale and sharpen. If you’re dealing with soft footage, say, a phone video that looks muddy after uploading, or an old 1080p screen recording you want to crisp up, CapCut's video sharpening solutions will work. This can be a quick way to improve overall quality, but it doesn't always give you precise control over just the sharpening and lacks AI depth like Topaz.
Hot search: how to use CapCut Video Upscaler to sharpen videos
- Totally free video sharpener, no watermarks or hidden fees.
- The "Sharpen" filter can works instantly.
- It provides real-time sharpen preview.
- It sharpens video much faster than than AI-heavy tools like Topaz.
- It’s an all-in-one editor.
- It’s not AI video sharpener so the results my look not as natural as that of Topaz.
- There is not option to adjust the sharpening.
How to Sharpen Videos Free with CapCut?
Step 1. Download, install, and open CapCut on your computer. Then import the video into it.
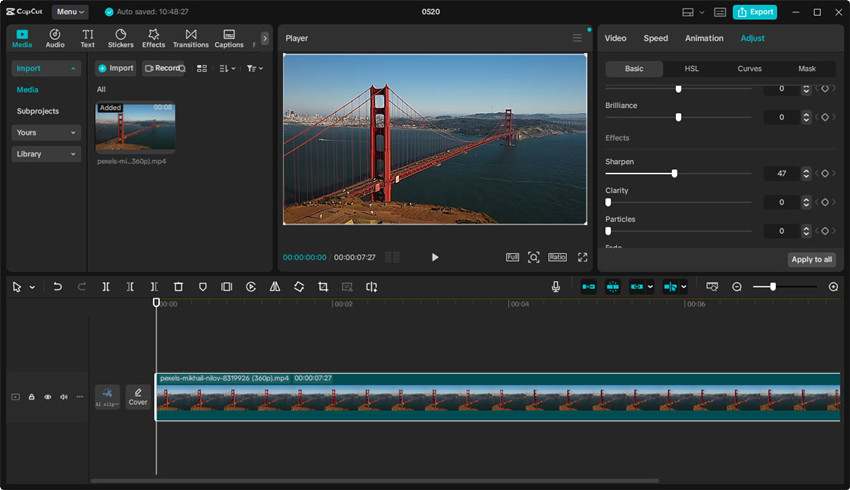
Step 2. Drag the video clip to the timeline. On the right-hand panel, click on Adjustment and choose the Sharpen effect. Drag the slider to control the amount of sharpening. Preview the video until you are satisfied with the sharpened quality.
Step 3. Click Export button and in the output settings, if you choose to upscale the video to a higher resolution, CapCut will apply some sharpening automatically as part of that process.
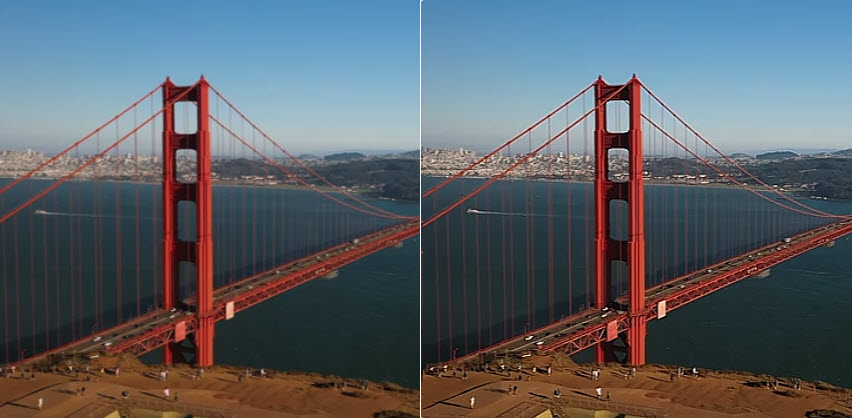
Here's a before-and-after comparison of the sharpened test video:
7. Flixier
When it comes to sharpening, Flixier does an adequate job for basic needs. Flixier is one of the most popular tools to sharpen video online for free. It offers a straightforward video sharpening solution for those who need to create videos quickly and easily. I've used it to add a bit of crispness to slightly soft footage, and it can definitely make a noticeable improvement. The sharpening filter is easy to apply, and it can help to make videos look a bit more polished.
However, in my testing, this online video sharpener goes too far away sometimes. When you use it to sharpen very blurry or low-resolution footage, it may end up with an over-sharpened or artificial-looking video. And unfortunately, it’s a one-click workflow and there is no option to adjust the sharpening density.
- The online video sharpener is free & simple.
- It’s very fast to sharpen a video online.
- Flixier isn't just a sharpener; it's a full-fledged video editor.
- You can’t adjust or control the sharpening process.
- The video sharpening is not powered by AI.
How to Sharpen Videos Online Free in Flixier
Step 1. Open the Flixier site and click the Choose Video button on the page. Then choose and upload your blurry or low-quality video to it.
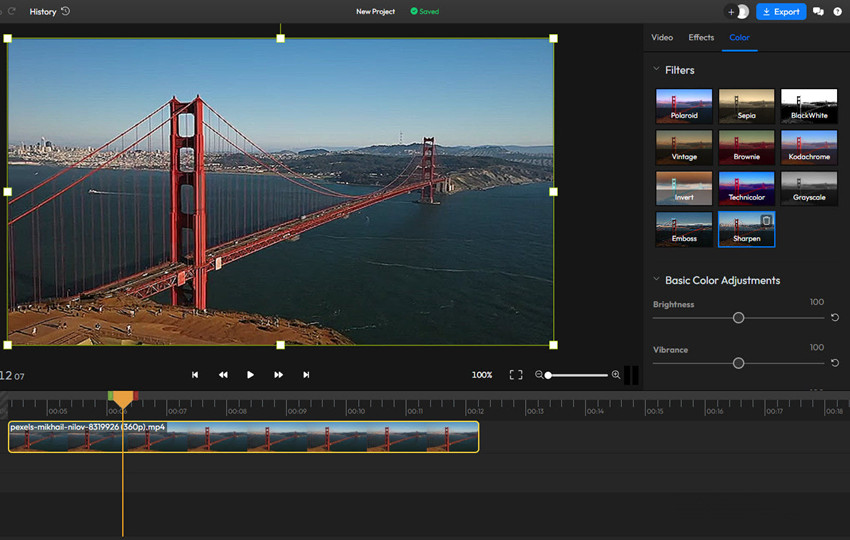
Step 2. Once the source video is uploaded, drag it to the timeline. On the right-hand panel, click the Color tab. In the Filters, find and click Sharpen.
Step 3. It will then sharpen the video quality. You can also adjust the brightness, vibrance, contrast, saturation, etc. to improve the quality.
Step 4. Then click the Export button on the top to save the sharpened video to your local computer.
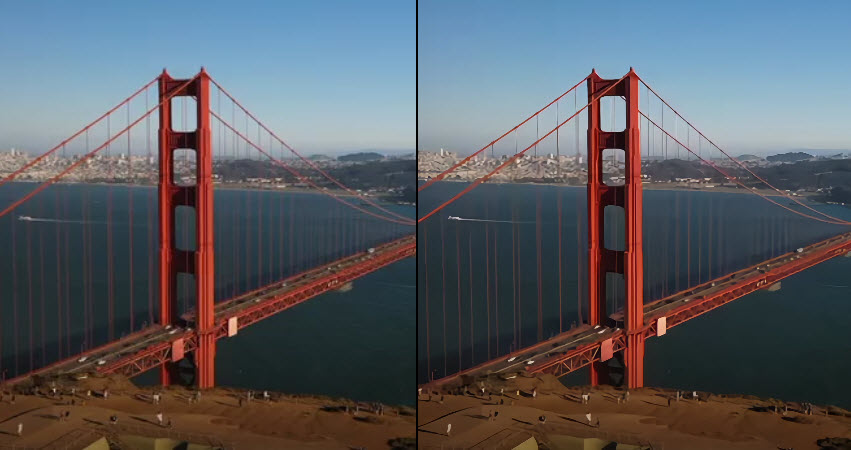
Here's a before-and-after comparison of the sharpened test video:
8. Davinci Resolve
DaVinci Resolve is an industry-standard video editing and color grading software widely used in professional filmmaking and post-production. While it is not a dedicated AI video sharpener, it provides extremely precise manual video sharpening tools that allow editors to enhance clarity at a frame-level.
Unlike one-click AI video sharpeners, DaVinci Resolve focuses on controlled video sharpening workflows, giving users full flexibility over how sharpness is applied. Editors can isolate specific blurry regions using Power Windows, adjust midtone detail, and fine-tune contrast to improve perceived sharpness without introducing artifacts.
In addition, DaVinci Resolve includes advanced processing features such as AI Super Scale (upscaling engine), which intelligently enlarges low-resolution footage while preserving edges and reducing noise. This makes it especially useful for restoring older or compressed video content in professional pipelines.
- Advanced manual video sharpening controls.
- Industry-standard editing and color grading tool.
- High-quality output for professional workflows.
- There is a free version available.
- The node-based editing workspace can be highly intimidating for beginners.
- To use the video sharpener smoothly without crashing, you need a high-end local GPU (NVIDIA RTX or Apple Silicon Mac).
How to Sharpen Videos Online Free in Davinci Resolve
Step 1. Launch DaVinci Resolve, import your blurry clip into the Media Pool, and drag it onto your timeline track.
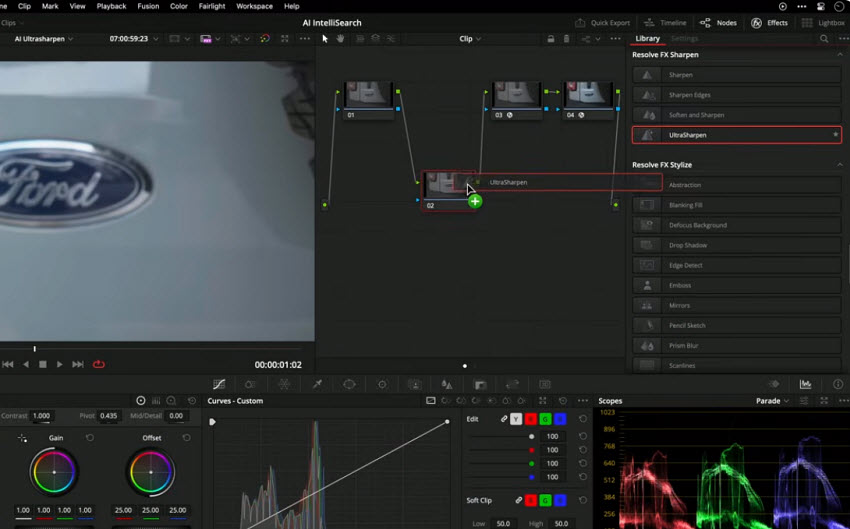
Step 2. Go to the Inspector panel on the right side under Video -> Super Scale. Change the setting from Auto to 2x Enhanced or 4x Enhanced to activate AI detail reconstruction.
Step 3. Switch to the Color workspace tab at the bottom. Create a new serial node, navigate to the Blur/Sharpen icon (triangle shape), and pull the Radius slider downward to dial in crisp edge definition.
Then navigate to the Deliver tab, choose your preferred codec format (like H.264, H.265, or AV1), and click Render All to output the clean, sharpened footage.
9. Video2x
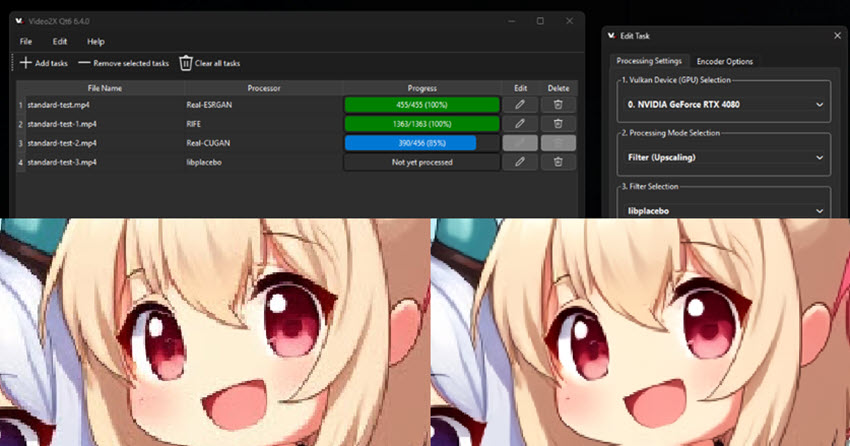
Video2X is a powerful open-source video sharpener and upscaling framework designed for users who want full control over AI-based video enhancement. Unlike commercial tools, Video2X does not rely on a single model—it acts as a wrapper that integrates multiple AI engines to perform frame-by-frame video sharpening and upscaling.
It commonly uses Real-ESRGAN for real-world footage enhancement and Real-CUGAN for anime/video cartoon sharpening, making it highly flexible across different content types. This allows users to significantly improve video clarity, reduce blur, and upscale resolution without paying for proprietary software.
Because it processes videos frame-by-frame using local AI models, Video2X is often considered one of the most customizable AI video sharpening solutions, especially for hobbyists, researchers, and technical users who want maximum control over the pipeline.
However, its power comes with complexity, as setup and configuration require technical knowledge.
- It's a completely free and open-source video sharpener.
- It works well for anime and animated video sharpening.
- It supports multiple AI upscaling engines.
- It offers high customization for advanced users.
- There is no real-time preview so you cannot see a live "before/after" split-screen.
- Its setup process is quite complicated.
- Long render times and massive VRAM consumption.
10. YouCam Video Editor
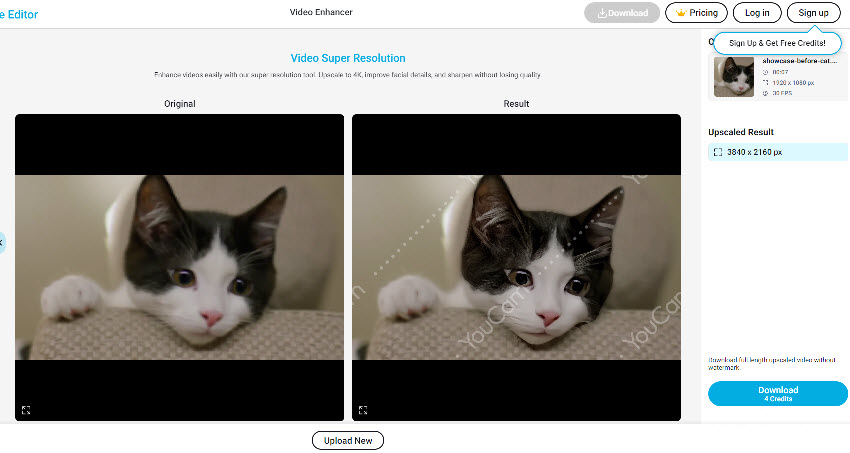
YouCam Video Editor is a versatile video editing app and software that works as a powerful video sharpener for iPhone, Android, and desktop users. In addition to traditional editing tools, it features AI-powered super resolution that can upscale videos to 4K, improve facial details, and sharpen footage without losing quality.
With mobile and desktop versions available, YouCam is suitable for creators who want to enhance video clarity on the go or on a full computer setup.
As a video sharpener, it focuses on enhancing edges, textures, and faces while keeping results natural and balanced.
- A good video sharpener for iPhone & Android to sharpen videos directly on smartphones.
- Upscales videos while preserving visual quality.
- Enhances edges and details without heavy artifacts.
- Includes trimming, filters, transitions, subtitles, and music.
- AI upscaling and watermark-free exports are part of premium plans.
- Extremely low-quality footage still has visible limitations.
- Less manual control on the output.
Final Thoughts: Which Video Sharpener Is Right for You?
If you're choosing a video sharpener, Aiarty Video Enhancer is the best option for most users due to its fast and easy AI workflow, while Topaz Video AI is ideal for professionals seeking maximum detail recovery. The table below compares these video sharpeners across key factors like quality, speed, and ease of use.
The best video sharpener really depends on your needs. If you're a content creator needing crisp YouTube footage fast, CapCut or Premiere Pro does the trick with minimal hassle. But if you're restoring old home videos or want next-level clarity, Topaz Video AI or AVCLabs is absolutely worth the deeper dive.
Many users on Google also ask: “Will sharpening fix a blurry video?”, and the honest answer is: only to a degree. Sharpening can't magically recover lost focus, but it can dramatically enhance details and make your footage pop again.
So whether you're reviving VHS tapes, fixing smartphone clips, or polishing professional edits, a good video sharpener can make your footage look way more watchable, sometimes even stunning. Just don’t crank it to 100 and expect miracles.
 FAQs about Video Sharpener
1. How to sharpen video quality for free?
You can use free AI video sharpeners or video editing apps that offer basic sharpening features, such as Upscayl, CapCut, seedvr2, or online enhancers. These tools let you improve video clarity with limited resolution or watermarks at no cost.
2. How can I sharpen a blurry video?
You can sharpen a blurry video by using AI-powered video enhancers or editing software with sharpen and clarity tools. Upload your video, apply the sharpening feature, adjust the strength if needed, and export the improved version.
3. Can AI sharpen video?
Yes. AI can sharpen videos by analyzing frames, detecting edges, and reconstructing details. Modern AI video sharpeners can reduce blur, improve textures, and even upscale resolution while keeping the video natural.
4. What is the best AI video sharpener?
Some of the best tools include Aiarty Video Enhancer, Topaz Video AI, and AVCLabs Video Enhancer AI, depending on your needs and hardware.
5. Can I sharpen a video without increasing resolution?
Yes. AI models can enhance clarity at the original resolution, although upscaling often provides better results.
6. Why does my video look worse after sharpening?
This usually happens when using traditional sharpening filters, which amplify noise and artifacts. AI-based tools avoid this issue by reconstructing details instead of over-enhancing edges.
You May Also Like


This post was written by Brenda Peng who is a seasoned editor at Digiarty Software who loves turning ordinary photos into extraordinary works of art. With AI assistance for brainstorming and drafting, the post is reviewed for accuracy by our expert Abby Poole for her expertise in this field.
