Have you ever finished recording what should’ve been a great podcast or video, only to discover a wall of background hiss, buzzing appliances, or annoying static underneath your voice? It’s one of the most common frustrations for creators, and it can instantly ruin the listening experience.
The good news: you can clean up audio in Audacity, even if you're a complete beginner. Whether you're dealing with room noise, low-level hum, mouth clicks, or long silent gaps, Audacity gives you several tools to fix the most common issues, as long as you know which feature to use for which type of noise.
💡 Key Takeaways:
In this guide, you'll learn how to clean up audio in Audacity using its core tools:
- Noise Reduction for constant background hiss
- Noise Gate for removing low-volume unwanted audio
- Truncate Silence for cleaning long silent parts
- EQ for repairing muddy, distorted, or harsh sound
And because Audacity has limits, especially with complex or non-constant noise, we’ll also introduce Aiarty Video Enhancer’s Audio Denoise, an AI-powered one-click solution for users who want faster, cleaner, and more accurate results.

Why Use Audacity to Clean Up Audio (and the Noise Types It Can Fix)
Audacity is one of the most popular free tools for anyone learning how to clean up audio. It gives users powerful manual control over noise reduction, EQ, gating, and detailed waveform editing, making it a solid option for podcasters, YouTubers, and beginners who want hands-on control.
However, Audacity also requires time, technical understanding, and trial-and-error adjustments. Cleaning difficult or inconsistent background noise can be challenging, and results depend heavily on the user’s skill. For this reason, many creators combine Audacity with modern AI tools for fast, automated cleanup when manual tuning becomes inefficient.
Common Types of Audio Noise
Before diving into how to clean audio in Audacity, it’s helpful to understand the types of noise you might be dealing with. The infographic above illustrates how continuous noises have different frequency profiles (or "colors"). Understanding these can help you identify what you are hearing:
- High-Frequency Hiss (White Noise): Often audible as microphone hiss or preamp static. This aligns with the White Noise, where energy is equal across all audible frequencies, similar to "Television Static."
- Low-Frequency Hum & Rumble (Pink/Brown Noise): Deep, rumbly sounds like AC power hum, electrical interference, or traffic. These relate to Pink Noise (like "Wind") and the even deeper Brown Noise (like "Rumbling Thunder"), where low frequencies dominate. >> More for removing wind noise from video
- Mid-Range Ambiance (Green Noise): General background tones that aren't overly harsh or deep. Green Noise, which amplifies mid-range frequencies (like a "Waterfall"), is a good example of this type of consistent environmental sound.
- Room Tone, Echo, or Reverb: The "sound of silence" in a specific space, which often contains elements of pink or green noise depending on the room's acoustics.
- Transient Clicks & Pops: Sharp, sudden sounds like keyboard and mouse clicking. (Note: These are impulsive noises, unlike the continuous noise colors shown in the chart).
- Noise Floor in Silences: The low-level continuous noise audible during long gaps between speech.

Audacity offers specific tools to handle these issues. Each method works best for certain noise types, which is why choosing the right tool is the key to achieving clean, professional audio.
How to Clean Audio in Audacity (Step-by-Step)
Below are the four most effective ways to clean up audio in Audacity with detailed steps.
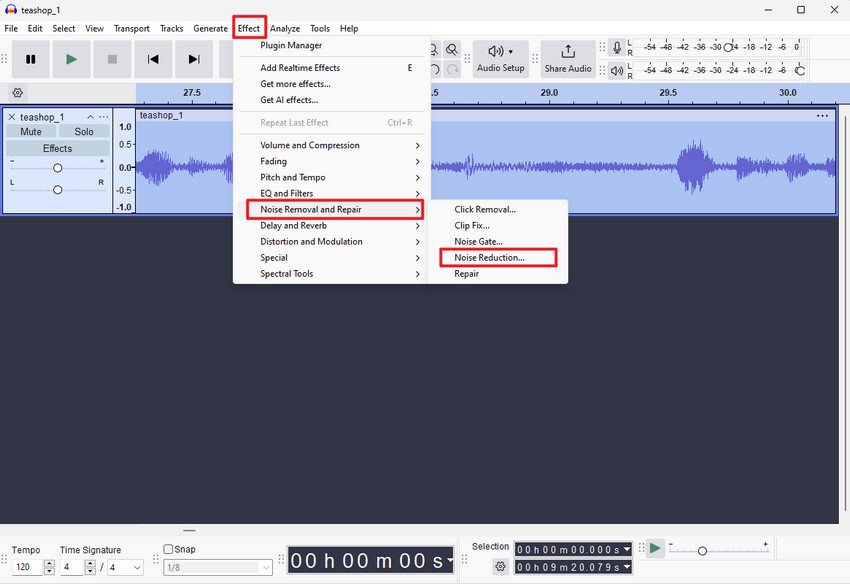
1. Noise Reduction: Remove Background Noise (Hiss, Hum) in Audacity
Noise Reduction is the most commonly used method when learning how to clean up audio in Audacity. It works especially well for steady, continuous white noise, such as microphone hiss, fan noise, soft static, or low-level electrical hum. The tool analyzes a “noise profile,” then removes that pattern throughout the entire track without affecting the louder parts of your recording.
Step-by-Step: How to Use Noise Reduction in Audacity
Step 1. Find a section of your audio where only background noise is present (no speech or intentional sound).
Step 2. Select this noise-only segment.
Step 3. Go to Effect → Noise Reduction → Get Noise Profile.
Step 4. Press Ctrl + A to select the entire audio track.
Step 5. Go back to Effect → Noise Reduction. Start with these recommended settings:
- Noise Reduction: 6–12 dB
- Sensitivity: 4–6
- Frequency Smoothing: 1–3 bands
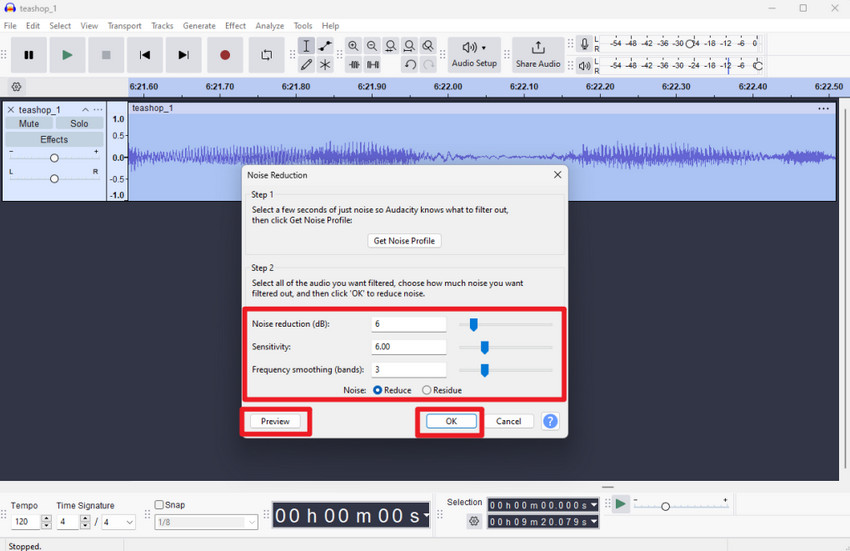
Step 6. Click Preview to hear the effect before applying.
Step 7. Adjust settings as needed, then press OK to apply the cleanup.
Tips for Better Results
- Instead of one heavy noise reduction pass, apply two or three lighter passes for a more natural result.
- If your voice starts to sound metallic, robotic, or underwater, reduce the Noise Reduction value or increase Frequency Smoothing slightly.
- Always capture the cleanest possible noise profile. This directly affects the final quality.
2. Noise Gate: Remove Noise Between Speech in Audacity
A Noise Gate is ideal for cleaning up the quiet gaps between spoken phrases. Instead of removing noise continuously like Noise Reduction, a gate simply mutes or reduces audio that falls below a user-defined volume threshold. This makes it very effective for handling room tone, faint chair movements, keyboard clicks, or light breathing during pauses without affecting your actual speech.
Also see: Best noise reduction software (real-time and post-processing)
Step-by-Step: How to Use Noise Gate in Audacity
Step 1. Highlight the entire audio track you want to clean.
Step 2. Go to Effect → Noise Gate.

Step 3. Adjust the main settings:
- Gate Threshold: –40 dB to –30 dB (determines what gets muted)
- Attack/Decay: 50–100 ms (controls how smoothly the gate opens/closes)
- Hold Time: 100–200 ms (keeps the gate open briefly after speech ends)
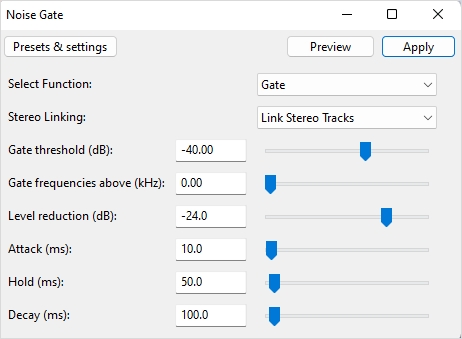
Step 4. Click Preview and make sure your speech isn’t being cut off or sounding choppy.
Step 5. Press OK to apply the effect.
Tips for Better Results
- If parts of your speech are getting clipped, lower the threshold slightly so the gate opens more easily.
- This method works especially well for eliminating breathing sounds, keyboard taps, mouse clicks, subtle shuffling, or HVAC noise during silent gaps.
- Combine Noise Gate after Noise Reduction for cleaner overall audio.
3. Truncate Silence: Remove Long Pauses in Audacity
Truncate Silence is a useful tool for making your audio more engaging by shortening or removing long periods of silence between speech. This is especially helpful for podcasts, interviews, or videos where long pauses can make the content feel slow or uneven.
Instead of manually cutting silent sections, Truncate Silence automates the process while maintaining natural pacing, helping your audience stay focused on the content.
Step-by-Step: How to Use Truncate Silence in Audacity
Step 1. Select the full track you want to edit.
Step 2. Go to Effect → Truncate Silence.
Step 3. Adjust the recommended settings:
- Detect Silence Below: −35 dB (audio quieter than this is considered silence)
- Duration: 0.5 sec (minimum length of silence to truncate)
- Truncate To: 0.1–0.3 sec (how much the silent section will be shortened)
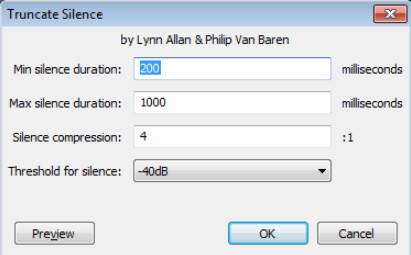
Step 4. Click Preview and check the pacing of your audio. Adjust settings if necessary.
Step 5. Press OK to apply the effect.
Tips for Better Results
- Don’t set “Truncate To” too short; otherwise, the audio may feel rushed or unnatural.
- Combine this effect with Noise Reduction or Noise Gate to clean both the sound and timing simultaneously.
- Preview in context with the entire track to ensure flow remains smooth.
4. EQ (Equalization) for Fixing Distortion & Enhancing Clarity
Equalization (EQ) is essential for improving the tonal balance of your audio. It allows you to enhance voice clarity, reduce muddiness, and repair minor distortions, making your audio sound more professional and polished.
EQ works by adjusting the balance of different frequency ranges, so subtle adjustments often produce the most natural results.
Step-by-Step: How to Use EQ in Audacity
Step 1. Select the entire track you want to enhance.
Step 2. Go to Effect → Filter Curve EQ.
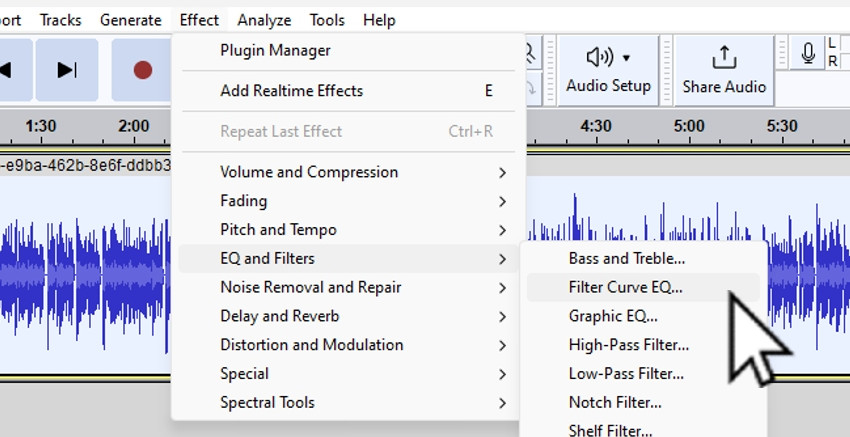
Step 3. Apply basic vocal enhancement:
- High-pass filter (80–120 Hz): removes low-end rumble and background hum.
- Boost 3–5 kHz: improves speech clarity and intelligibility.
- Cut 200–300 Hz: reduces muddiness or boxy tones.
Step 4. Click Preview and adjust until the voice sounds natural and clear.
Step 5. Press OK to apply the EQ.
Tips for Better Results
- Make subtle changes—dramatic boosts or cuts can sound unnatural.
- Apply EQ after Noise Reduction and Noise Gate to ensure clarity without amplifying residual noise.
- Experiment with small adjustments to suit different voices and recording environments.
In short, Audacity is a powerful tool for users who want hands-on control over every aspect of their audio. It’s perfect for hobbyist podcasters, budget-conscious creators, and anyone comfortable experimenting with manual settings. You can achieve excellent results with Noise Reduction, Noise Gate, Truncate Silence, and EQ, but only if you have the time and patience to fine-tune each effect.
However, Audacity has its limitations. It can struggle with complex environmental noise, echo, or reverb, and it isn’t ideal for fast batch processing or beginners seeking instant results. For creators who want a faster, more automated approach to noise removal without sacrificing quality, AI-powered tools like Aiarty Video Enhancer’s Audio Denoise offer a convenient and professional alternative.
Aiarty Video Enhancer: A Smarter Alternative to Clean Audio in One-Click
Aiarty Video Enhancer’s Audio Denoise leverages advanced AI algorithms to automatically identify and remove unwanted noise without any complicated settings or manual noise profile extraction. This makes it a powerful solution for creators who want high-quality audio with minimal effort.
Key Benefits of Aiarty Audio Denoise
- One-click automatic noise removal: instantly cleans your audio without trial-and-error.
- Handles complex and changing noise: works even with fluctuating background sounds.
- Preserves natural voice tone: keeps speech clear and lifelike.
- Perfect for YouTubers, podcasters, teachers, and beginners: anyone who wants professional audio without manual editing.
- Faster and more consistent than manual editing: saves hours compared to traditional tools.
How to Clean Up Audio in Aiarty Video Enhancer
Step 1. Download and install Aiarty Video Enhancer. Then open it, drag and drop to import your video(s) with annoying audio noise.
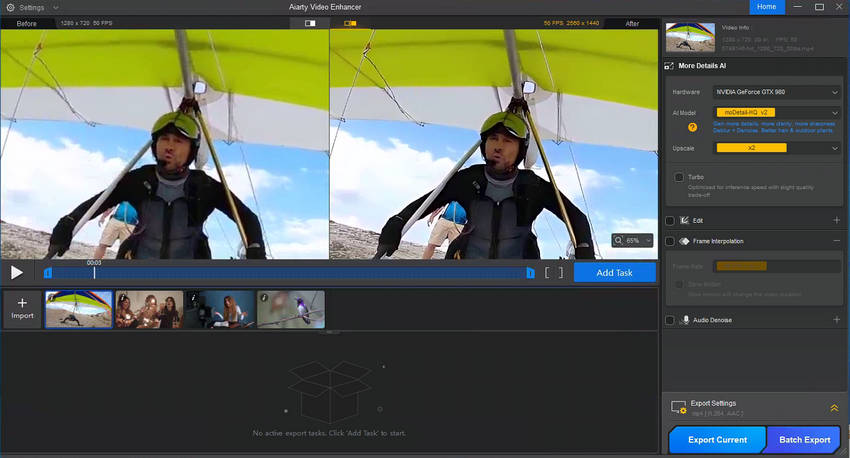
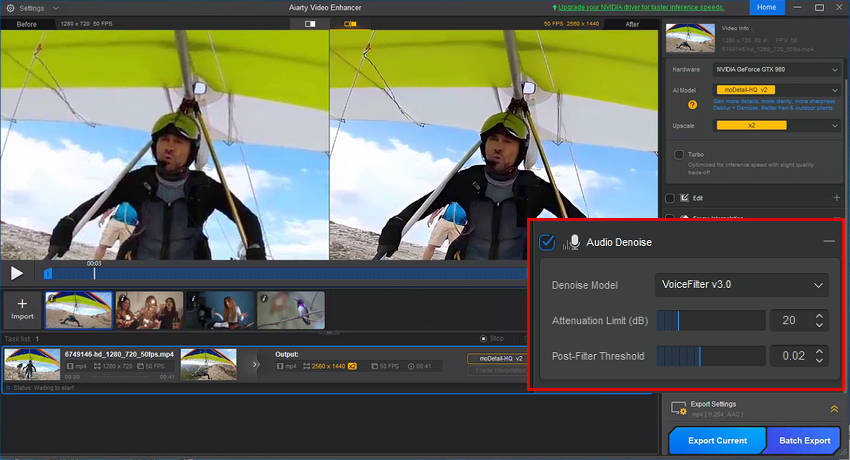
Step 2. Enable Audio Denoise. Then fine-tune your audio by adjusting the following settings:
- AI model: Use VoiceFilter V3.0 to maintain voice clarity while effectively reducing wind noise.
- Noise Attenuation Limit (dB): For moderate to strong wind, try 18–24 dB to noticeably reduce rumbling and whooshing sounds. If the wind is light, use 6–12 dB to avoid making the audio sound unnatural.
- Post-Filter Threshold: When dealing with moderate wind noise or residual hum after attenuation, a higher threshold (0.03–0.05) can help. For lighter wind or to preserve more natural ambience, a lower threshold (0.01–0.02) is sufficient.
Step 3. Click Export Current to save the new video with audio noise cleaned.
Beyond Audio Noise Removal: Aiarty Video Enhancer is more than just an AI noise removal tool. It’s a complete video quality enhancer. Every video you export can enjoy a noticeable upgrade: it will remove noise and blur, restore lost details, and even enhance your resolution.
You stay in control: simply select the AI model (moreDetail HQ v2, Smooth HQ v2, superVideo vHQ) and upscale factor (1x, 2x, 4x, 1080p, 2K, 4K) that best match your creative vision, and get a polished, professional-looking video every time.
Conclusion
If you value full manual control over every aspect of your audio, detailed fine-tuning, and hands-on editing, Audacity remains an excellent choice. It’s ideal for hobbyists, podcasters, and creators who enjoy experimenting with effects like Noise Reduction, Noise Gate, Truncate Silence, and EQ.
If your priority is speed, convenience, and achieving professional clarity with minimal effort, Aiarty Audio Denoise is the better option. Its AI-driven processing handles complex and changing noise automatically while preserving natural voice quality.
For most creators, the best approach is a hybrid workflow: perform initial edits and noise reduction manually in Audacity, then use Aiarty for a one-click cleanup and final polish. This combination maximizes control, efficiency, and audio quality, ensuring your content sounds its absolute best.
Download Aiarty Video Enhancer to Clean Up Audio Noise in Your Video Instantly!
 FAQs
FAQs
This happens when the Noise Reduction settings are too aggressive. High Noise Reduction or Sensitivity can remove important frequencies in your voice, making it sound metallic or robotic. To fix this, reduce the Noise Reduction dB and/or apply multiple gentle passes instead of one heavy pass.
Use the EQ (Filter Curve EQ) in Audacity. Apply a high-pass filter to remove low-end rumble, slightly boost 3–5 kHz for voice clarity, and reduce 200–300 Hz to minimize muddiness. Preview carefully to maintain natural voice tone.
No, Audacity requires manual steps: you need to select a noise profile and adjust the Noise Reduction settings. For one-click AI noise removal, tools likeAiarty Video Enhancer are recommended.
Audacity has limited ability to remove echo or reverb. While you can try using Noise Reduction and EQ to reduce some reverb, persistent room echo is difficult to eliminate manually. AI tools like Aiarty Video Enhancer's Audio Denoise often handle echo removal more effectively.
Use a combination of EQ to adjust problematic frequency ranges and Noise Reduction for background hiss. Avoid overprocessing, as excessive Noise Reduction can worsen distortion. In some cases, AI-powered denoising with Aiarty Video Enhancer provides a cleaner, more natural result.
Yes! Many creators benefit from a hybrid workflow: start with Audacity for manual fine-tuning, trimming silence, and basic EQ, then finish with Aiarty Audio Denoise for fast, one-click noise removal and professional clarity. This approach combines control, efficiency, and high-quality results.
The quickest method is using Aiarty Video Enhancer’s Audio Denoise. Import your audio or video, let the AI automatically remove noise, and export. For additional control, you can first apply light edits in Audacity, then let Aiarty finalize the cleanup for polished results ready for social media.
You May Also Like
This post was written by Brenda Peng who is a seasoned editor at Digiarty Software who loves turning ordinary photos into extraordinary works of art. With AI assistance for brainstorming and drafting, the post is reviewed for accuracy by our expert Abby Poole for her expertise in this field.