Nothing ruins a great video or podcast like a constant hissing sound in the background. This persistent static, hiss, keyboard clicks, or even background dog barks, known as white noise, can make your content sound unprofessional and distract your audience. If you are seeking for how to remove white noise from audio, you've come to the right place.
In this post, we will walk you through how to remove white noise using different tools. Just follow the step-by-step tutorial to remove unwanted white noise and achieve clean, high-quality audio.
What Is White Noise?
White noise is a type of random, static-like sound that contains all audible frequencies at equal intensity. It's often heard as a continuous hiss in the background of recordings. The most common causes of white noise in audio are:
- Microphone Self-Noise: The subtle electronic hiss produced by the microphone's internal components.
- Ambient Noise: The faint, constant sound of a room, such as an air conditioner, computer fans, or a refrigerator.
- Electronic Interference: Hissing or static caused by poor-quality cables, ground loops, or other electrical issues.
While not as jarring as a sudden buzz or a pop, white noise is a consistent irritant that can be difficult to remove without the right tools.
Remove White Noise using Aiarty Video Enhancer in Clicks
White noise can be a constant headache for anyone working with audio. That persistent hiss, static, or low hum can easily ruin an otherwise great video or podcast. While getting a clean recording from the start is ideal, it’s not always possible. Fortunately, tools like Aiarty Video Enhancer can help you remove white noise from audio with impressive results.
Aiarty Video Enhancer is an AI-powered tool that uses advanced algorithms to detect and remove a wide range of background audio noises, including white noise, hiss, hum, keyboard typing, wind ghost, and even dog barking. This makes it a perfect solution for improving audio clarity and producing professional-sounding content.
What sets Aiarty apart is that it’s not just an audio white noise remover—it’s a comprehensive video enhancer. It simultaneously removes white noise while improving overall video quality. This includes upscaling video to 4K, restoring lost details, removing visual noise and grain, and unblurring videos. This all-in-one capability makes it a fantastic choice for anyone who wants both audio and visual improvements in a single, streamlined process.
Key Features for Removing White Noise from Audio:
- AI White Noise Removal: Its advanced AI algorithm can remove white noise from audio while preserving the clarity and richness of voices and music.
- Remove All Noise: From constant hiss to hum, wind, traffic, and other distracting background sounds, it delivers cleaner audio in every project.
- All-in-One Video & Audio Enhancement: In addition to white noise removal, it will also upscale video, restore details, denoise, deblur, remove artifacts from videos.
- Batch & Fast Processing: Femove white noise from audio in multiple videos at once, with processing speeds up to 3x faster in turbo mode.
How to Remove White Noise in Aiarty Video Enhancer?
Step 1. Import Your Video
First, download and install Aiarty Video Enhancer. Once it’s running, simply drag and drop your video file(s) that suffer from unwanted white noise directly into the application.
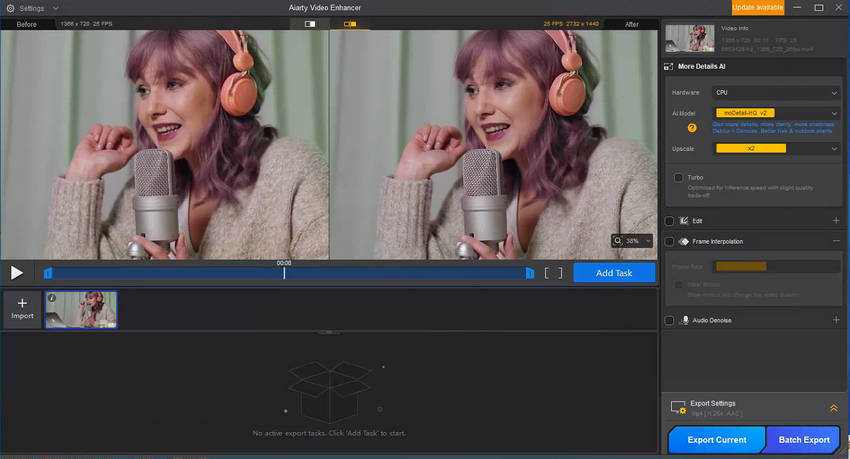
Step 2. Activate and Refine Audio Denoise
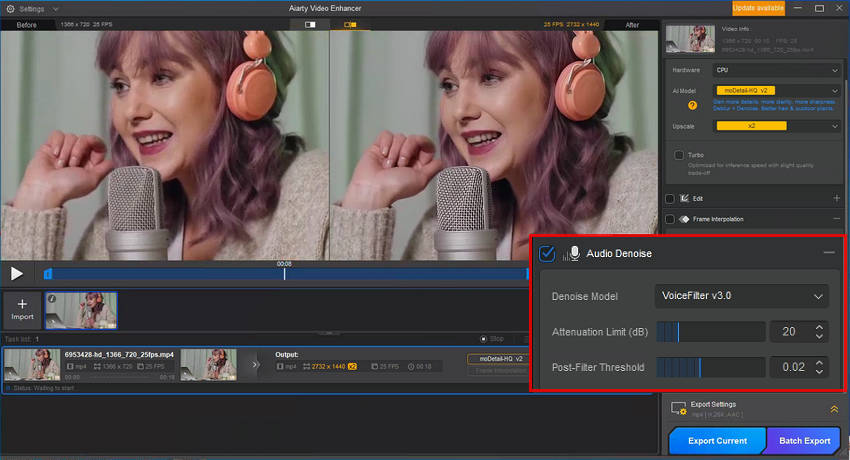
Check the box next to Audio Denoise to enable this powerful feature. Now, you can fine-tune the settings for optimal white noise reduction:
- AI Model: For the best white noise reduction results and speech clarity, choose VoiceFliter V3.0.
- Noise Attenuation Limit (dB):
- Post-Filter Threshold:
For significant white noise, begin by setting this between 18-24 dB. This level helps substantially reduce pronounced reverberation; If the white noise is more subtle, aim for a lower range of 6-12 dB to ensure your audio sounds natural, not over-processed.
With moderate white noise or if a slight hiss persists, a higher threshold (0.03-0.05) can be beneficial for a cleaner sound; For lighter white noise or when you want to retain more of the natural room ambiance, a lower threshold (0.01-0.02) should be sufficient.
Step 3. Export the Clean Video
Once your settings are dialed in, simply click Export Current to save your single video, or choose Batch Export if you're processing multiple files. Your newly saved video will feature clear, hiss-free audio.
Aiarty Video Enhancer is more than just a tool to remove white noise from audio—it’s a comprehensive solution designed to elevate your entire video's quality. Every video you process with it will see a remarkable transformation: it will clear away visual noise and blur, meticulously restore missing details, and dramatically improve resolution.
Of course, any video is at your disposal. Just select the appropriate AI model (such as moreDetail HQ v2, Smooth HQ v2, or superVideo vHQ) and your desired upscale factor (like 1x, 2x, 4x, 1080p, 2K, or 4K) to achieve the stunning results you envision.

2. Remove White Noise with Audacity (Free but Manual)
Audacity is a free, open-source audio editor that’s been a go-to for audio professionals and hobbyists for years. While it requires a bit of a learning curve, its powerful features make it an excellent choice for cleaning up audio, and the price is unbeatable.
How to Remove White Noise with Audacity?
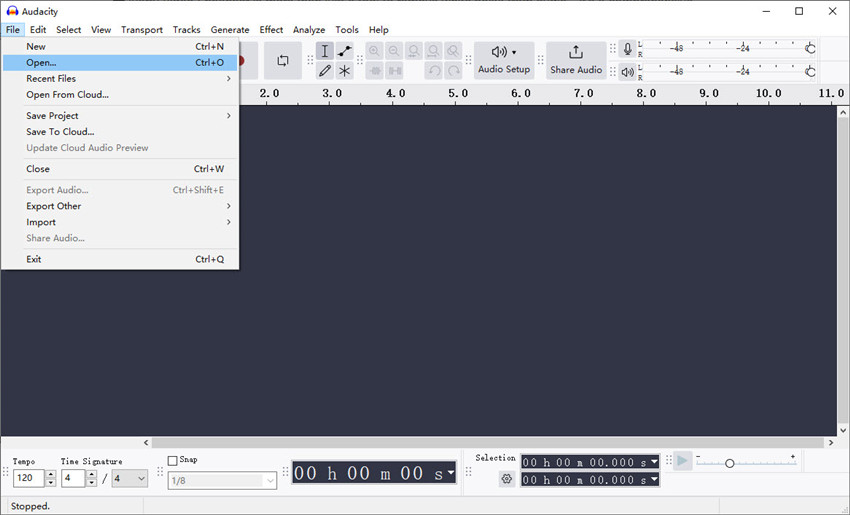
Step 1. Import the Audio File
Download and install Audacity. Once the white noise remover is open, navigate to the top menu bar, select File > Import, and choose the audio file you want to clean.
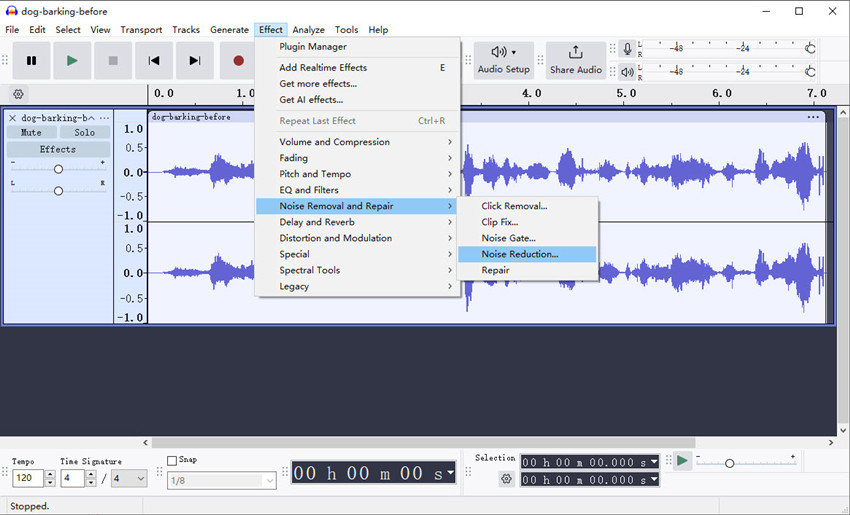
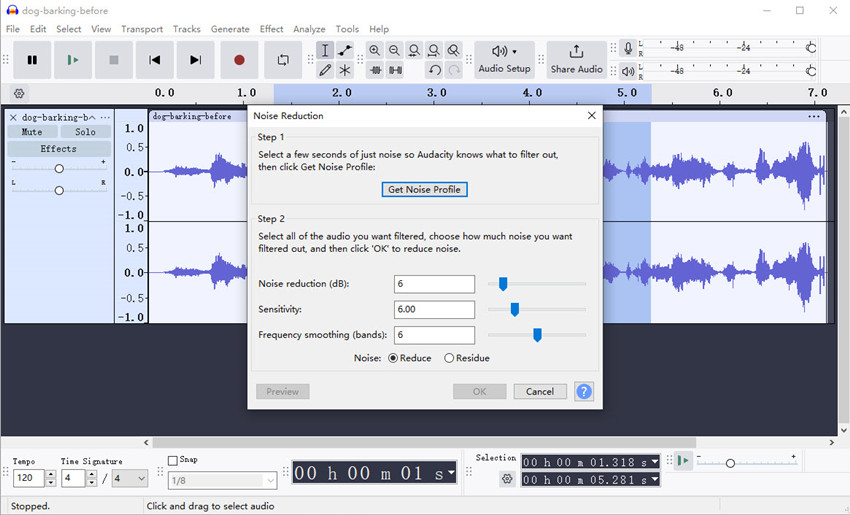
Step 2. Create a Noise Profile
Next, you need to highlight a section of your audio that contains only the white noise (no voices or instruments). Go to Effect > Noise Removal and Repair > Noise Reduction. Then click and drag over the waveform to choose it.
With that section highlighted, go to the Effect menu at the top, choose Noise Removal and Repair and select Noise Reduction. In the Noise Reduction window, click Get Noise Profile. This action tells Audacity to analyze the selected sound sample and create a digital "fingerprint" of the noise you want to eliminate. The window will then automatically close.
Step 3. Remove White Noise from Audio
Now that Audacity understands your specific white noise, it's time to apply the white noise reduction to your entire audio. Select the full audio track by double-clicking on the waveform, then go back to back to Effect > Noise Removal and Repair > Noise Reduction. In the Noise Reduction window, you'll need to adjust the following key parameters to effectively remove the white noise from your audio file:
- Noise Reduction (dB): This slider determines how much of the noise you want to remove. Start with a lower value (around 12 dB) and increase if needed. Be careful not to set it too high, as it can make your audio sound robotic or distorted.
- Sensitivity: This affects how precisely the algorithm targets the noise
- Frequency Smoothing (bands): This helps to reduce artifacts.
Step 4. Export the Audio
Click on Preview to listen and check if the background white noise is sufficiently reduced. Once you’re happy with the sound, click OK. Audacity will then apply the white noise removal across your entire track. Then go to File > Export and choose your desired file format, such as MP3 or WAV.
Also see: Best software to remove white noise (real-time and post-processing)
3. Remove White Noise from Audio Using Adobe Audition
If you’re looking for a professional-grade solution to remove white noise from audiowith minimal audio distortion, Adobe Audition is one of the most powerful tools available. It can effectively remove stubborn background white noise like air conditioning, static, or microphone hum. Users can use it together with DeReverb and Spectral Frequency Display for precision.
Due to its advanced noise reduction algorithms, spectral editing, and real-time preview, Audition is a go-to choice for podcasters, video creators, and audio engineers. While the software requires a subscription and has a steep learning curve, its robust capabilities make it an industry standard.
Howto Remove White Noise in Adobe Audition?
Step 1. Import your audio file
Open Adobe Audition and drag your audio file into the timeline. It also supports removing white noise from video files.
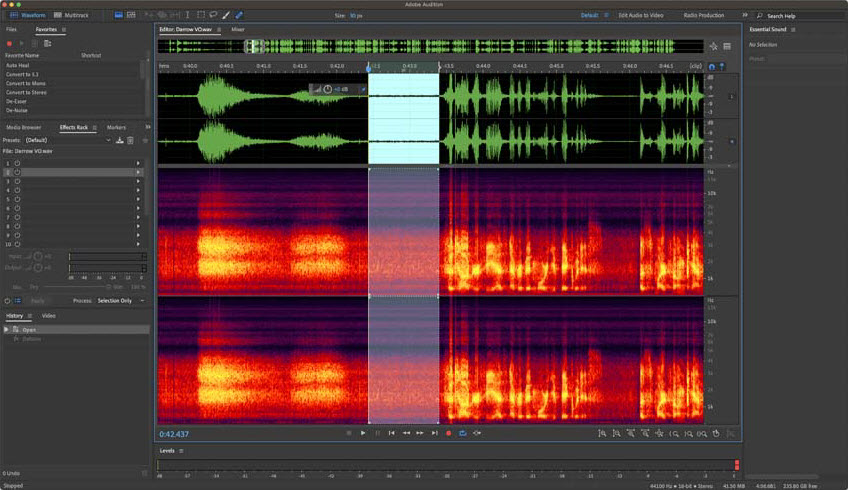
Step 2. Highlight a section of white noise
Find a part of your recording where only the noise (like hiss, hum, or static) is present, without voice or music. Then use your cursor to highlight that section.
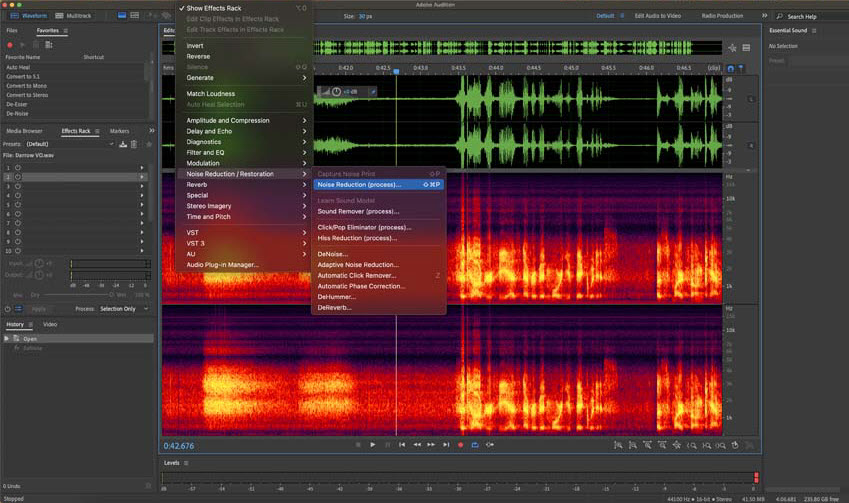
Step 3. Capture Noise Print
Go to the top menu and click: Effects > Noise Reduction/Restoration > Noise Reduction (Process). In the Noise Reduction window that appears, click the Capture Noise Print (Shift+P). This step tells Audition what kind of white noise you want to remove.
Step 4. Apply Noise Reduction Effect
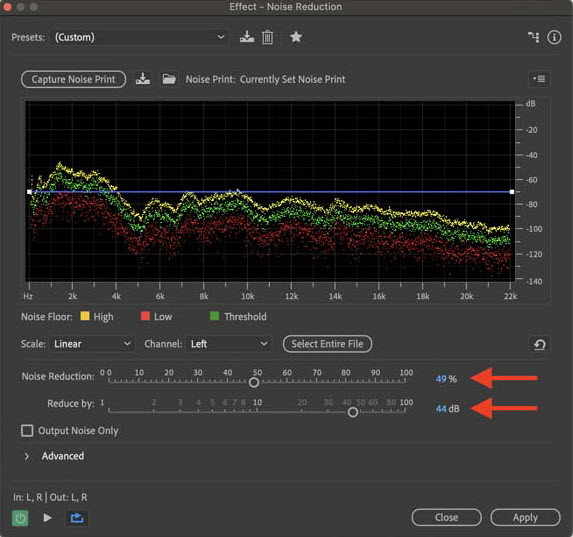
Now, select the entire audio clip (Ctrl+A) that you need to clean. Go back to Effects > Noise Reduction/Restoration > Noise Reduction (process). A window will pop up with adjustable sliders.
Adjust the Noise Reduction Settings for white noise removal:
- Noise Reduction (%) – Controls how much of the noise is removed. Start around 60-70%.
- Reduce By (dB) – Determines how much the noise level is reduced. Around 20-30 dB is usually safe.
- Use the Preview button to hear the difference in real time.
Step 5. Start white noise removal
Once satisfied with the balance (noise reduced without hurting voice quality), click Apply. Finally, export your cleaned audio as MP3, WAV, or directly into your video project.
4. Remove White Noise from Audio Online
Online tools are a great option if you need a quick fix without downloading any software. Some popular white noise removal tools are available such as Media.io, Tape It, Audio Cleaner AI, Veed, Online Audio Noise Reduction, Kapwing, and more.
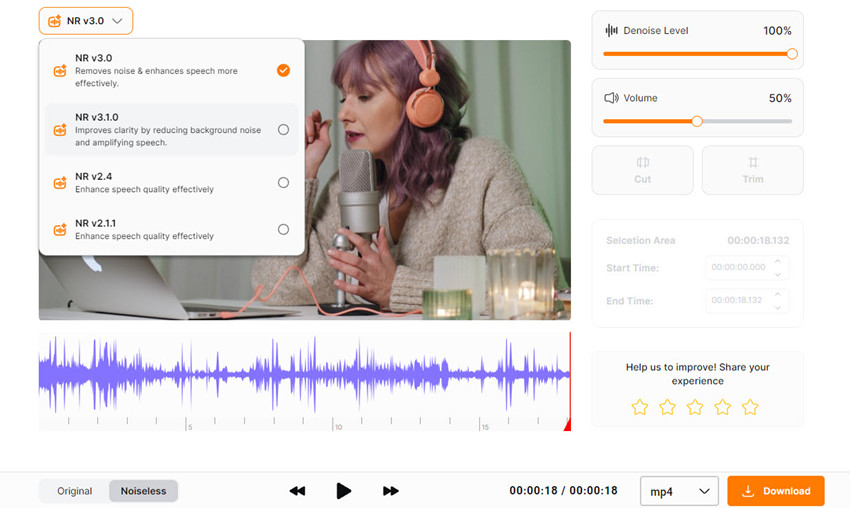
Among the white noise removers online, Noise Reducer is a powerful background noise removal tool that uses AI to remove white noise from audio and video, including traffic, wind, and static. It's simple, intuitive, and works directly in your web browser.
How to Remove White Noise with Noise Reducer?
Step 1. Go to the Noise Reducer website and click Upload File. You can use it to remove white noise from both audio and video files.
Step 2. Once your video is uploaded, there are a few settings to adjust. First, adjust the noise level and volume. It offers 4 AI models and it will choose the best model by default.
Step 3. Play the Noiseless version to check the white noise removed audio. If it's OK for you, click Download to save the file on your local computer.
Comparison Table: Which Is the Best Echo Remover?
You don't have to live with a staticky, unprofessional sound. As this guide has shown, there are multiple effective ways to remove white noise from audio, whether you're a professional or a complete beginner.
- Choose an AI-powered solution like Aiarty Video Enhancer for a fast, one-click white noise removal that also enhances your video.
- Opt for Audacity if you need a free, powerful tool and don't mind a bit of a learning curve.
- Use Adobe Audition for professional-grade control and seamless integration into your video workflow.
No matter the method you choose, the right tools and a few simple steps can transform your audio from noisy to pristine. Start your journey to cleaner sound today and say goodbye to that unwanted hiss for good.
What Causes White Noise in Audio?
Understanding the source of the problem is the first step to finding the right solution for white noise removal. While the hissing sound is often simply called "white noise," it can originate from various sources. Knowing the cause can help you not only fix the current issue but also prevent it in the future.
- Microphone Self-Noise: Every microphone generates a small amount of internal electronic noise. This "self-noise" is more noticeable on lower-quality microphones or in a very quiet recording environment.
- Electronic Hum & Hiss: This is one of the most common causes of white noise in audio. It often comes from electrical interference (e.g., from power cables, fluorescent lights, or your computer's fan). A poorly shielded cable or a grounded outlet can introduce a steady hum.
- Poor Gain Staging: If your microphone's input gain is set too low and you have to boost the volume significantly in post-production, you'll also amplify any inherent background noise, leading to that audible hiss.
- Interference from Wi-Fi or Bluetooth: Wireless signals can sometimes interfere with your audio cables, causing subtle buzzing or static that acts as a form of white noise.
Best Practices: Prevention is Key!
The most effective way to handle white noise from audio is to stop it from getting into your recording in the first place. A great white noise remover is a last resort, not a first-line defense. Here are some actionable tips for cleaner recordings:
- Optimize Your Recording Environment: Record in a quiet space away from noisy appliances like refrigerators, air conditioners, or buzzing lights. Using acoustic foam panels can also help reduce echo and external noise.
- Position Your Microphone Correctly: Get your microphone as close to the sound source (e.g., your mouth) as possible. This improves the signal-to-noise ratio, meaning your voice is much louder than the background noise.
- Check Your Cables: Use high-quality, shielded cables to prevent electrical interference. Make sure all connections are secure and that you are not running audio cables parallel to power cables.
- Set Your Gain Levels Correctly: Adjust your microphone's gain so that the input signal is strong without "clipping" (distorting). A good rule of thumb is to aim for a level of around -12 dB on your recording meter.
 FAQs
FAQs
You can clear white noise from recorded audio using AI-powered tools like Aiarty Video Enhancer, which automatically detects and removes unwanted background noise while keeping voices clear. Alternatively, free software like Audacity allows you to capture a noise profile and apply noise reduction, though it requires a bit more manual setup.
In the above post, we have detailed the steps to reduce white noise in audio using Audition. In fact, in Adobe Audition, there are 2 ways for white noise removal: Noise Reduction (process) or Adaptive Noise Reduction effect.
On iPhone, you can use apps like Voice Memo’s built-in Enhance Recording feature, or third-party apps such as GarageBand, Krisp, which let you remove white noise from audio with one tap. These mobile-friendly options are quick and convenient for casual use.
In Adobe Premiere Pro, apply the DeNoise effect from the Essential Sound panel. You can adjust the Amount slider to balance noise reduction and clarity. For more precise control, combining DeNoise with EQ adjustments often gives the best results.
You May Also Like
This post was written by Brenda Peng who is a seasoned editor at Digiarty Software who loves turning ordinary photos into extraordinary works of art. With AI assistance for brainstorming and drafting, the post is reviewed for accuracy by our expert Abby Poole for her expertise in this field.