How to Use Stable Diffusion: Guide and Overview
Updated on
Welcome to the definitive guide to Stable Diffusion. If you are exploring AI image generation, chances are you've encountered the name Stable Diffusion. It's a tool that allows you to create digital art, realistic photos, and illustrations from text prompts or image references.
This page is designed for breadth, giving you a complete overview of what's possible. For every topic, you'll find links to our in-depth articles, allowing you to dive deeper whenever a concept sparks your interest.
Free Resources:
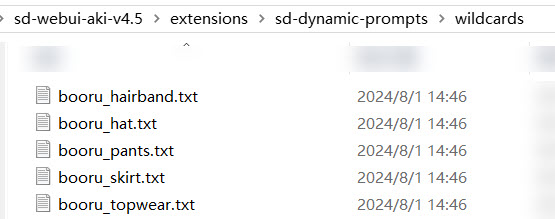
To make prompting easier, we've prepared a collection of wildcard text files (.txt) you can reuse in Stable Diffusion. They cover common categories like clothing (dress, skirt, pants, top wear), character elements (hairstyles, ears, horns, tails, wings), and everyday accessories (eyewear, handwear, headwear, masks).
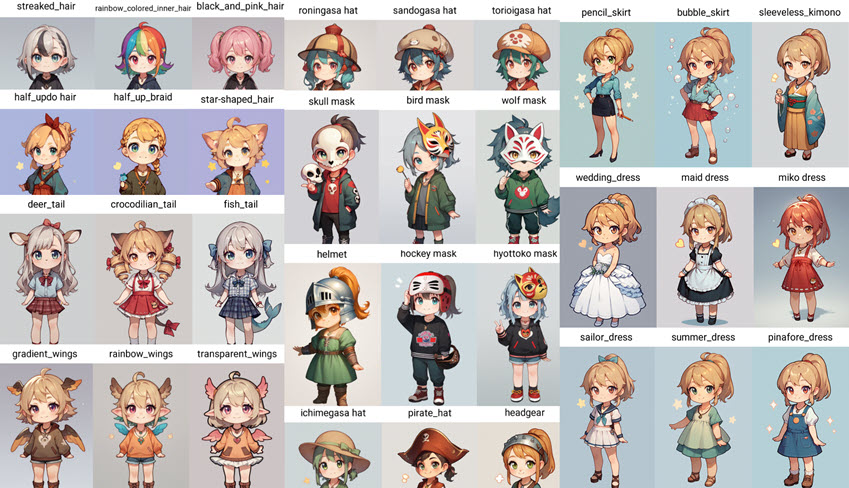
You can download the wildcard files from Google Drive: stable-diffusion-resources. For instance, if you want to iterate the hat styles, use the hat booru tags and dynamic prompts.
Prompts:
score_9,score_8_up,score_7_up,1girl, solo, wearing witch_hat, necklace, light smile, cute, tiny, (chibi:1.1), standing, ponytail, looking at viewer, grey_background, wide_shot
Tip: The masks wildcard is especially fun to experiment with. It adds a lot of variation to prompts and produces great results when used with the Pony Diffusion model.
1. A Quick Glance at Stable Diffusion
In technical terms, Stable Diffusion is an open-source, deep learning, text-to-image model. In practice it's a powerful AI that can generate unique images based on prompts.
Why Choose Stable Diffusion? Unlike many AI art generators, Stable Diffusion is open-source. This is its key distinction. It means anyone can download, use, and modify the software on their own computer. This provides a degree of freedom and control that most closed-source, proprietary models cannot offer.
Is Stable Diffusion Free? Yes, the software itself is free to download and use. Your only cost is the hardware to run it on. While some online services charge for access, running it locally on your own PC is completely free.
2. Getting Started: Your First Generation
You have two main paths to start creating: using a convenient online service or installing it locally for maximum power.
The Quickest Start: Online Generators
The fastest way to generate your first image is to use an online service. These platforms handle all the technical overhead, such as installation and hardware requirements, letting you focus immediately on prompting. They are a good way to experiment with the basics.
For Power Users: Local Installation
For maximum control and flexibility, a local installation is the standard approach for serious users. This gives you unlimited image generation, complete privacy since nothing leaves your machine, and access to a large ecosystem of custom models and extensions that are not available on most online platforms.
Check Your Hardware: Before you start, you need to know if your computer is up to the task. We've broken down the general system requirements for your reference. Early versions of Stable Diffusion is mostly optimized for Nvidia cards. If your machine is equipped with AMD card, you can read about how to install Stable Diffusion with AMD GPU.
You can use CPU as a last resort, though the program can freeze upon AI image generation and upscaling. It works for 512px images, but struggles with 768px or higher resolutions.
Install the Software: Once you are ready to go, our step-by-step tutorial will walk you through the entire process in our guide on how to set up Stable Diffusion.
Choose Your Interface (UI): A good User Interface makes all the difference. We've reviewed the best Stable Diffusion Interfaces to help you pick the right one. AUTOMATIC1111 is a community favorite for beginners.
3. The Core Concepts: Mastering the Fundamentals
Once you're set up, you'll interact with Stable Diffusion using a few core techniques.
Text-to-Image (txt2img): This is the basic process. You provide a text prompt, and the AI generates an image from scratch based on that description.
Image-to-Image (img2img): This workflow uses an existing image as a starting point. You provide an initial image along with a text prompt, and the AI transforms the image according to your instructions.
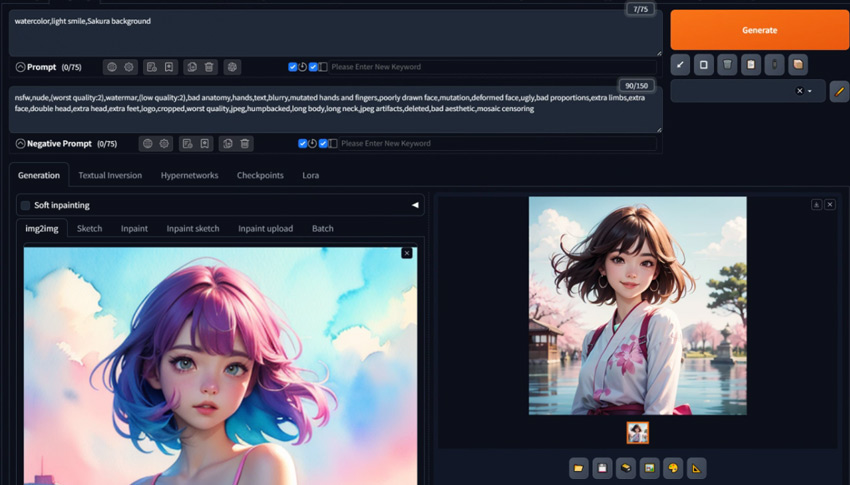
Inpainting: Need to fix a weird hand or add an object to an existing image? Inpainting allows you to "mask" a specific area and regenerate only that part.
Outpainting: If your generated image feels too cropped, outpainting lets you expand the canvas, and the AI will intelligently fill in the new space. See how it works here.
4. Prompting: How to Communicate with the AI
The quality of your final image is directly tied to the quality of your prompt, as well as parameter settings, model selections and more. A well-structured prompt is a good starting point.
To structure your prompts in a way that Stable Diffusion understands, you can try containing the following component, and then revise it according to the output image.
- Subject: What is the main focus? For instance: 1girl, a lion, a 3d blink box figure, etc.
- Medium: Is it a photograph, a painting, a sketch or other medium and techniques?
- Style: What is the artistic style? Art deco, futurism, pixel art, minimalism, etc.
- Details: Modifiers for composition, lighting, color, and image quality.
And don't forget Negative Prompts, which tell the AI what to avoid. Based on Reddit user discussions and Stable Diffusion forum threads, we tested and found some negative prompts working for different models. You can visit this guide to copy the negative prompts.
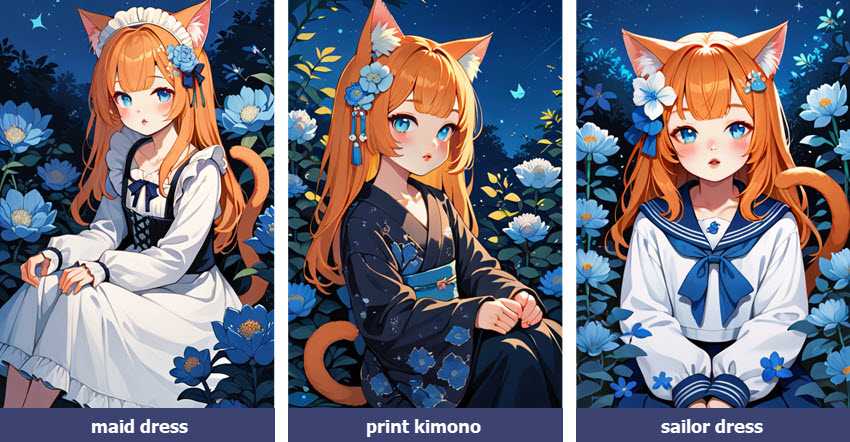
If you want to generate Stable Diffusion images in batch, but find it a hassle to vary part of the prompts, the easiest way is to use Dynamic Prompts to test variations. To illustrate, the wildcards used in dynamic prompts are files each covering a category, such as wildcards for hair styles, for clothing (as shown above), for character poses, etc. The dynamic prompts feature will automatic randomize these in your prompts.
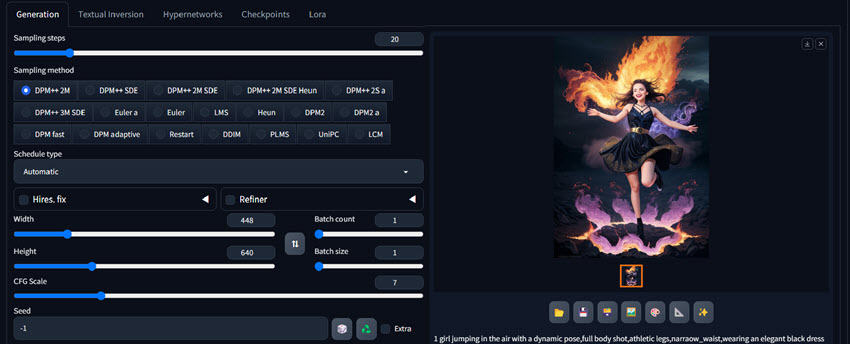
5. Decoding the Settings: A Guide to Key Parameters
Beyond the prompt, a few key sliders and settings will dramatically impact your results. Below are some of the parameters you shall see in Stable Diffusion.
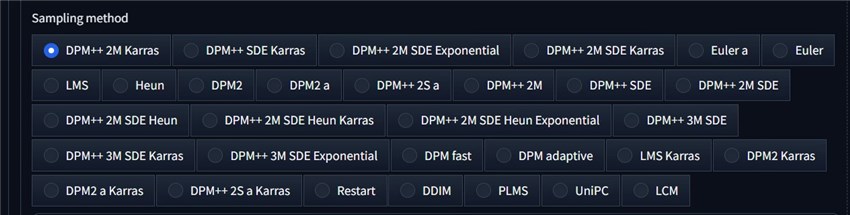
Sampling Method: This determines the process the AI uses to denoise the initial static into a final image. Different samplers offer different looks and speeds.
Sampling Steps: This is the number of iterations the sampler runs. More steps can mean more detail but will take longer.
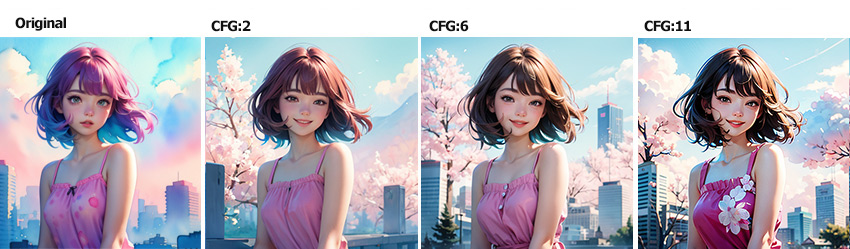
CFG Scale (Guidance Scale): This controls how closely the AI must adhere to your prompt. A low value gives the AI more creative freedom, while a high value forces it to follow your instructions strictly. To find an optimal value, explore our tests on the CFG Scale.
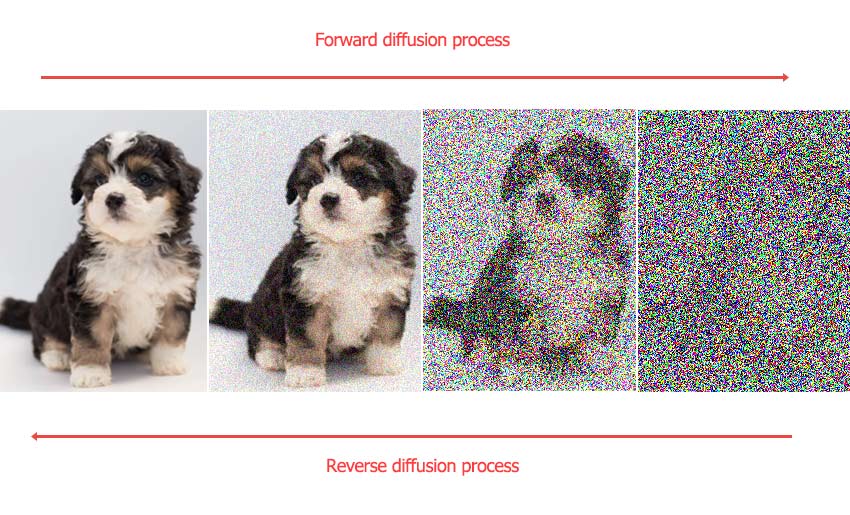
Seed: The seed in Stable Diffusion is a number that initializes the random generation process. The AI starts with a field of random noise and refines it into an image; the seed determines that initial noise pattern. Using the same prompt, settings, and seed will consistently produce the same image.
Denoising Strength: Used in Img2Img, this slider controls how much the AI will change the original image. A low value makes minor tweaks, while a high value can create something entirely new. We explain it all in Denoising Strength guide.
6. Customizing Your Stable Diffusion Experience
This is where Stable Diffusion truly shines. You can fundamentally change its output by swapping out core components and adding lightweight modifications.
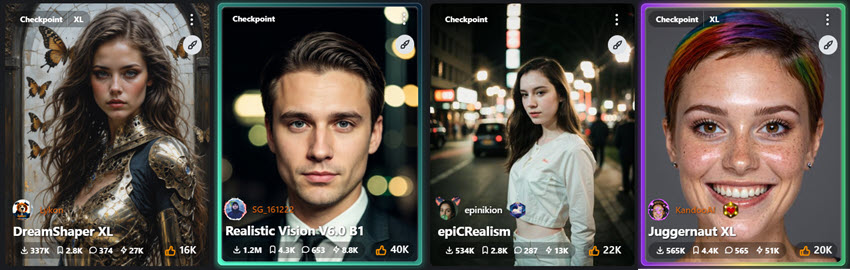
Checkpoint Models: These are large files that contain the core "knowledge" of the AI. By downloading and using different community-trained models, you can instantly switch from generating photorealistic portraits to creating anime art. To quickly get started, you can use one of these best Stable Diffusion models.
For anime fans, we have a curated list of the best anime models and a look into the Waifu Diffusion.
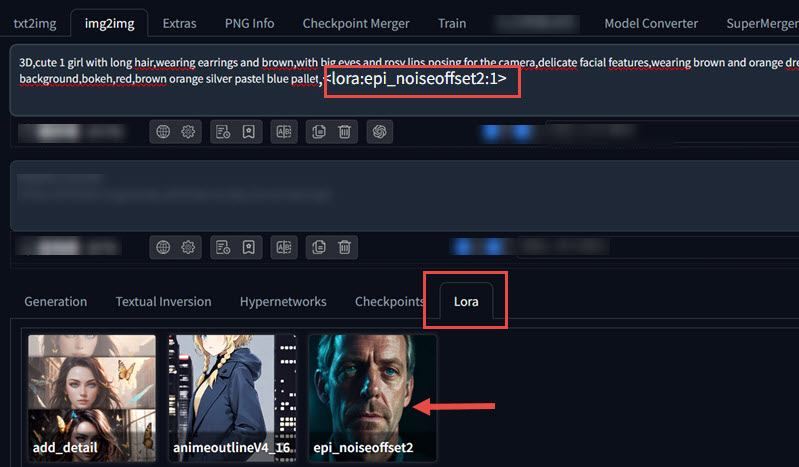
LoRA (Low-Rank Adaptation): These are small files that apply specific styles, characters, or concepts to your main checkpoint model. They are a lightweight and powerful way to customize your generations. Learn all about LoRA here.
VAE (Variational Autoencoder): A VAE is a small companion file to your model that helps decode the final image. A good VAE can fix washed-out colors and add fine details.
Textual Inversion: Similar to LoRAs, these are tiny files that teach the AI a new "word" or concept, perfect for embedding a specific object or style into your images.
Training Your Own: For the ultimate in personalization, you can train your own models. Whether you want to train a full Stable Diffusion model or engage in the more accessible process of LoRA training, the power is in your hands.
7. Pro-Level Workflows and Extensions
Beyond the basic workflows, Stable Diffusion’s functionality can be expanded with specialized tools and extensions. These provide more granular control over the final output.
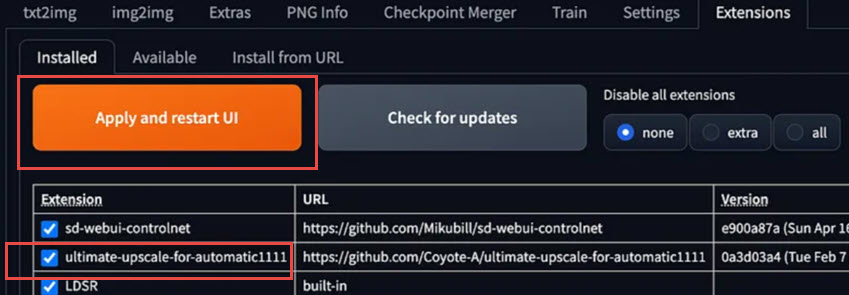
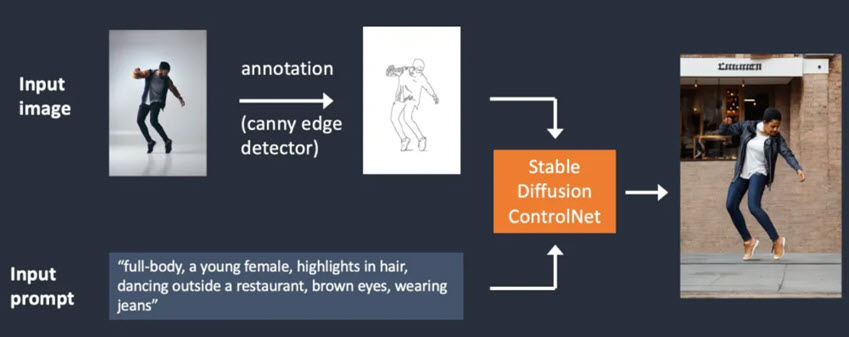
ControlNet is an extension that allows you to guide the composition of a generated image using a source image. For instance, you can provide a depth map, a canny edge map (a simple line drawing), or a human pose skeleton. The AI will then generate an image that adheres to the structure of your input. This is a standard tool for users who require precise control over the subject's pose and the layout of the scene.
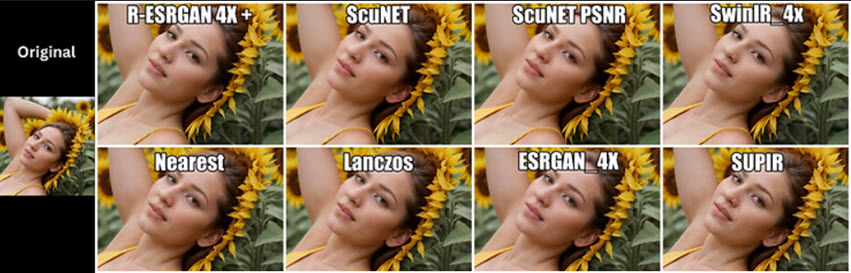
Refining and Upscaling: Your initial generations are often small. To create large, printable art, you'll need to upscale. The built-in Hires. Fix is a great start, and for even better results, you can use advanced tools like the LDSR upscaler.
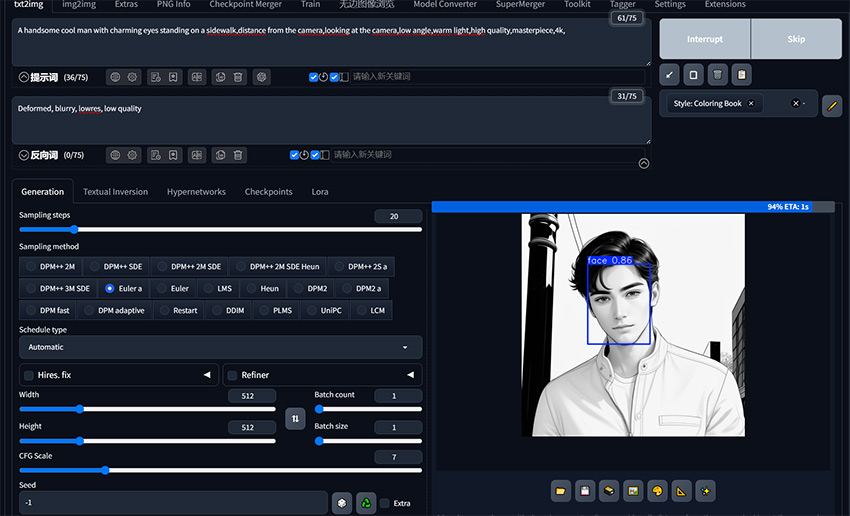
Fixing Faces and Details: AI can sometimes struggle with faces and hands. Fortunately, tools like ADetailer can automatically detect and fix faces and hands in your images.
Essential Extensions: The Stable Diffusion community has built an incredible number of extensions to add new functionality. Our overview of Stable Diffusion Extensions is a great place to start. Some popular examples include tools for advanced controls below.
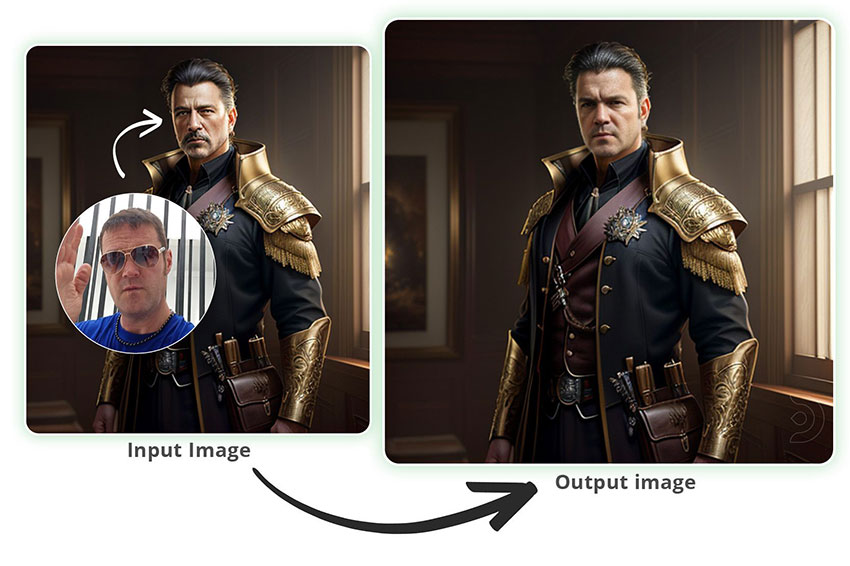
- Face Swapping with Reactor: Using an extension like Reactor to replace a face in a generated image with a source photo.
- Tiling: Creating seamless, repeatable patterns for textures or backgrounds.
- Background Removal Extension: Isolating the subject by automatically removing the background with Stable Diffusion from an existing image or newly generated pictures.
Combining Workflows
You can combine these tools for amazing results. For example, a Sketch-to-Image workflow might use a ControlNet Canny model to turn a line drawing into a full-color image, Style Transfer can be achieved by using an image in img2img with a low denoising strength.
You can also experiment with Img2Img and Inpainting for complex edits, such as such as modifying specific parts of an image, exploring how to create photorealistic people or learning about how to change and remove clothing.
8. Troubleshooting Common Problems
When using a local installation of Stable Diffusion, you may encounter several common technical errors. We gathered solutions that's working for most users, and tested the steps when we can replicate the error. Below are common issues and verified fixes.
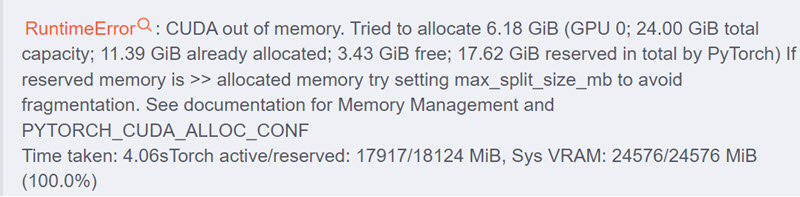
Out of Memory: This is the most frequent error, typically caused by insufficient VRAM for the requested image size or batch count. Learn how to fix CUDA out of memory errors and make your workflow more efficient.
Performance Issues: If things are running slow, it may be because the software is not correctly utilizing your GPU. You can also learn general tips on how to make Stable Diffusion faster.
Loading Errors: If a new model or extension fails to load, it is often due to incorrect file placement or dependencies. Here are some ways to troubleshoot the "model failed to load" issue.
Staying Current: New features and performance improvements are released regularly. Learn how to update Stable Diffusion to ensure you always have the latest and greatest tools.
If you're exploring the entire landscape, or prefer not to spending time fixing errors, don't miss our review of the best Stable Diffusion alternatives.
Final Words
You now have a complete map of the world of Stable Diffusion. You've seen how to get started, how to craft the perfect prompt, how to customize the AI to your exact needs, and how to use pro-level tools to achieve stunning results.
Practical application is key to mastering these techniques. Don't be afraid to try strange prompts, push sliders to their limits, and combine different techniques. Bookmark this guide as your central hub, and click through to the detailed articles whenever you're ready to master a new skill. Now go create something amazing.
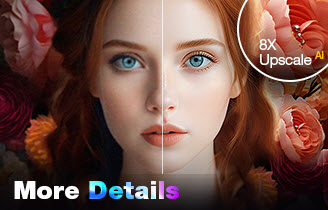
- Upscale, denoise, deblur, and restore details with AI inference
- Batch process 512px/1024px to 2K/4K/8K and higher resolutions
- Avoid the painterly, unnatural look in other image upscaling tools
- Trained to upscale AI generated art, photos, old, flawed images
You May Also Like
Rico Rodriguez is an experienced content writer with a deep-rooted interest in AI. He has been at the forefront of exploring generative AI tools like Stable Diffusion. His articles offer valuable insights into the world of AI, providing readers with practical tips and informative explanations.