


Photo restoration in Adobe Photoshop is one of the most sought‑after skills for photographers, designers, and anyone who wants to revive cherished memories. No matter you want to fix faded color, remove scratches, or bring a vintage portrait back to life, Photoshop offers powerful tools to get the job done. In this guide, you’ll learn what photo restoration in Photoshop is, how to use Photoshop to restore old photos, and step‑by‑step techniques you can use to achieve stunning results.
Want Faster Results? Try AI-Assisted Photo Restoration Before Photoshop
Manual photo restoration in Photoshop can be powerful but time-consuming, especially when working with scratched, faded, or low-resolution images.
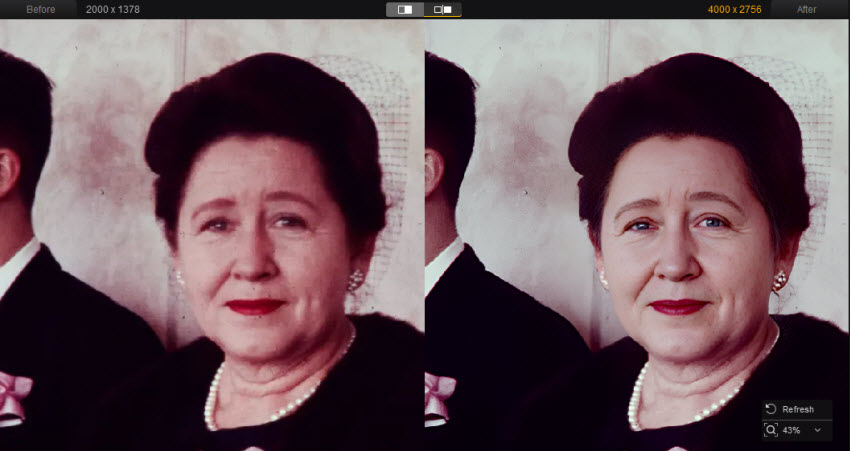
Aiarty Image Enhancer offers a faster alternative by using AI to restore clarity, enhance faces, remove bluriness, noise, pixelated artifacts, upscale old photos to HD/4K quality, and restore faded colors in just a few clicks. Restore old photos to new instantly!
What Is Photo Restoration?
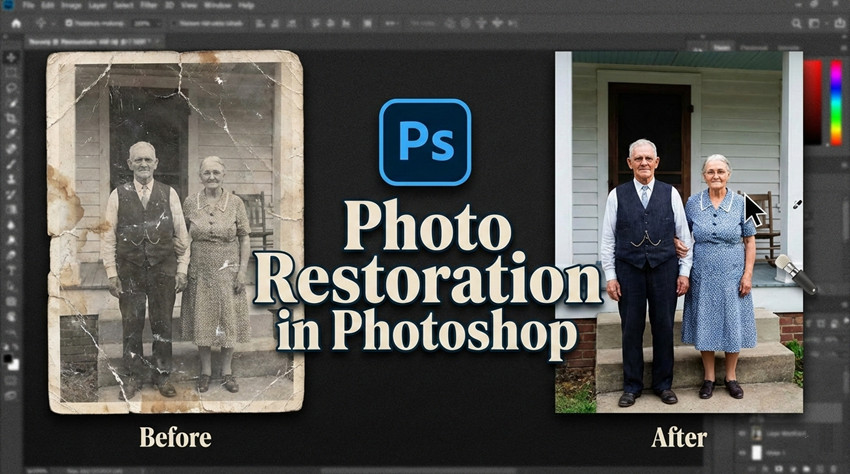
Photo restoration in Photoshop is the process of repairing old, damaged, faded, or imperfect photographs to make them look new again. This involves multiple tasks, including:
- Removing scratches, dust, and blemishes to clean the image
- Correcting faded colors and contrast to restore vibrancy
- Reconstructing missing details for a complete image
- Colorizing black and white photos to bring them to life
- Sharpening and enhancing overall clarity
Modern Photoshop tools combine traditional manual editing techniques with AI-powered filters, making it faster and easier to restore old photos in Photoshop.
Key Tools & Techniques for Old Photo Restoration in Photoshop
Below are the essential tools that you may use to restore old photos in Photoshop effectively. These tools make it possible to tackle scratches, faded colors, and missing details with precision and ease. Depending on the level of damage and your restoration goals, you can use one or multiple tools to fix old photos in Photoshop.
1. Photo Restoration Neural Filter
Adobe Photoshop’s Photo Restoration Neural Filter is a newer AI‑powered feature that automatically repairs and improves old images. It applies enhancements, reduces scratches, and restores clarity with minimal input. So it’s perfect for quick old photo fixes.
2. Spot Healing Brush & Healing Tools
To use Photoshop to fix old photos’ small imperfections like dust or tiny scratches, the Spot Healing Brush, Healing Brush, and Patch Tool are indispensable. They sample nearby pixels and intelligently blend them over damaged areas. You may need to use a small brush size and work slowly to preserve detail and natural texture.
3. Clone Stamp Tool
When damage is larger or more complex (like tears or missing areas), the Clone Stamp Tool gives you precise control by copying clean areas of the image onto the damaged parts. This tool is essential for advanced photo restoration in Photoshop with high accuracy.
4. Color Correction & Restoration
Many old photos suffer from fading and color shifts. Using Photoshop’s Colorize filter, as well as the adjustment layers, such as Levels, Curves, Hue/Saturation, and Auto Color, you can effectively fix old photos’ color in Photoshop.
5. Noise Reduction & Sharpening
After restoring form and color, reduce grain and improve clarity with noise reduction filters and Smart Sharpen, which sharpen image detail in Photoshop without introducing artifacts. These tools can help you restore old photos in Photoshop for clean, polished results
How to Restore Old Photos in Photoshop Step-by-Step Workflow
The following step-by-step workflow will guide you through the process of how to restore old photos in Photoshop using the above key tools.
Step 1. Import Your Old Photo
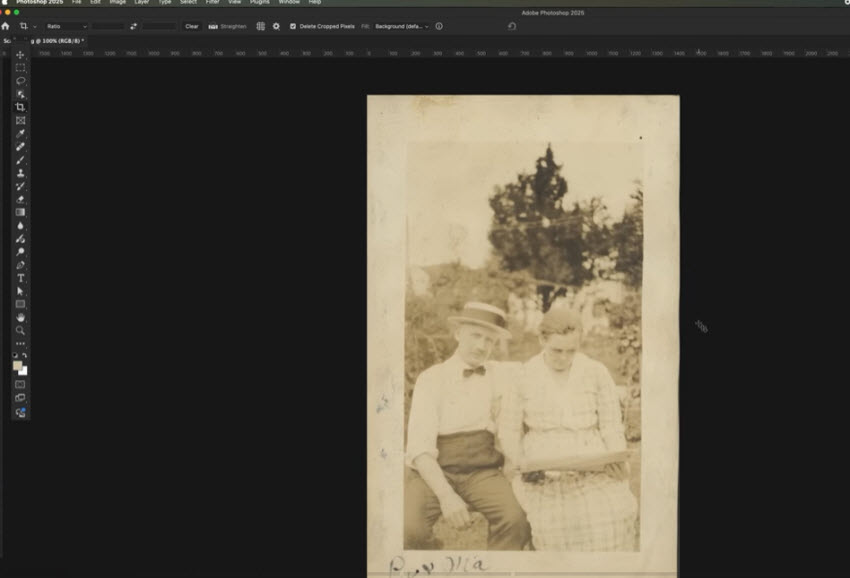
Open Photoshop, click File > Open to load in the old photo that you want to fix. Then duplicate the background layer, either by dragging it onto the New Layer button or by right-clicking and selecting “Duplicate Layer.” This way, all your edits will be made on the new “Working Layer,” while the original scan remains untouched.
For the best restoration results in Photoshop:
- Scan old photos at 300–600 DPI whenever possible.
- Use a higher-resolution scan if you plan to print the restored image.
- Avoid editing directly on the original layer because restoration often requires multiple adjustments.
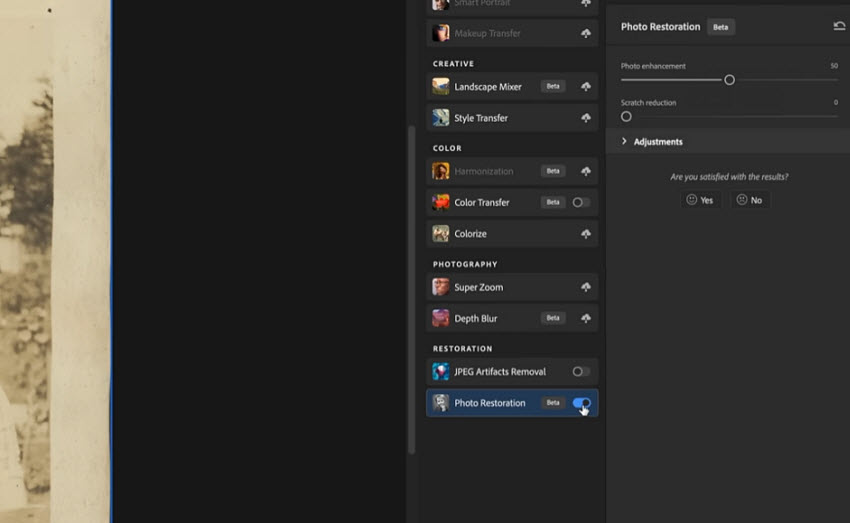
Step 2. Apply the Photo Restoration Neural Filter
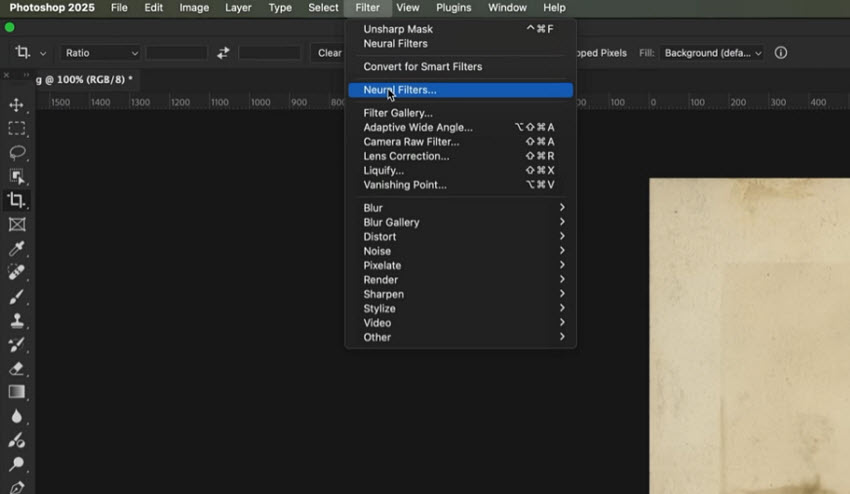
Next, select the duplicate layer and go to Filter > Neural Filters. From the AI filters’ panel, click Photo Restoration. Photoshop will then analyze the photo.
Enable the following photo restoration options:
** Photo Enhancement: Use this option to recover faded contrast and improve overall clarity. Start with a moderate strength and increase it gradually if the image still looks flat. Avoid pushing it too high because it may make skin texture look unnatural.
** Scratch Reduction: This helps remove dust marks, small scratches, and scanning artifacts. For heavily damaged photos, you're also suggested to increase Scratch Reduction gradually.and rreview at 100% zoom to make sure fine details are not removed.
** Enhance Face: For portrait photos, enable face enhancement carefully. Do not blindly crank the "Enhance Face" slider to 100%. While AI is great at recovering facial features on blurry vintage portraits, over-processing often creates a strange "plastic/painterly" hallucination that ruins the natural skin texture. Keep the slider between 40–50, and fix remaining micro-details manually later.
Step 3. Remove Small Imperfections
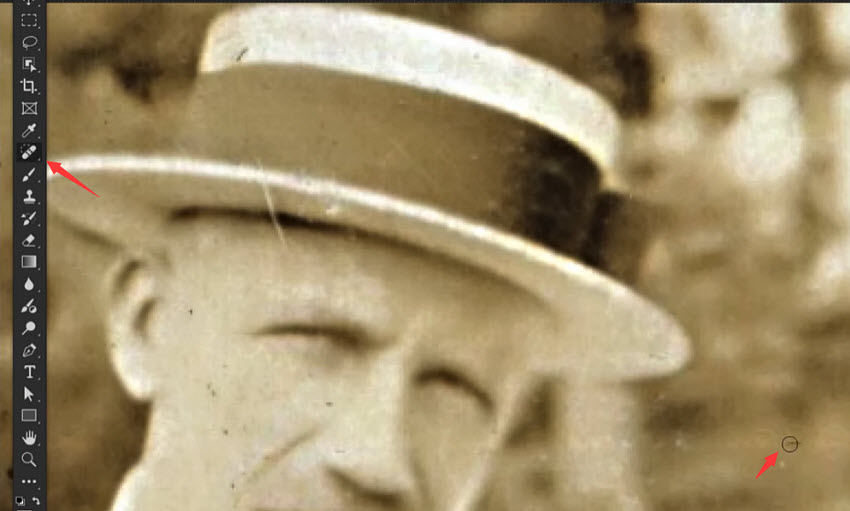
After applying the Neural Filter, manually clean remaining imperfections using Photoshop’s healing tools.
For photos with minor scratches, dust, or blemishes, create a new layer and choose the Spot Healing Brush Tool from the left menu bar. Then use the brush to select the spots that Photoshop’s Photo Restoration tool missed.
For larger tears or blemishes, the Patch Tool lets you select the damaged area and drag it over a clean part of the image to replace it seamlessly.
Note: Do not remove every imperfection. Some old photos contain natural film texture. Over-cleaning can make the restoration look artificial.
Step 4. Repair Larger Areas with the Clone Stamp
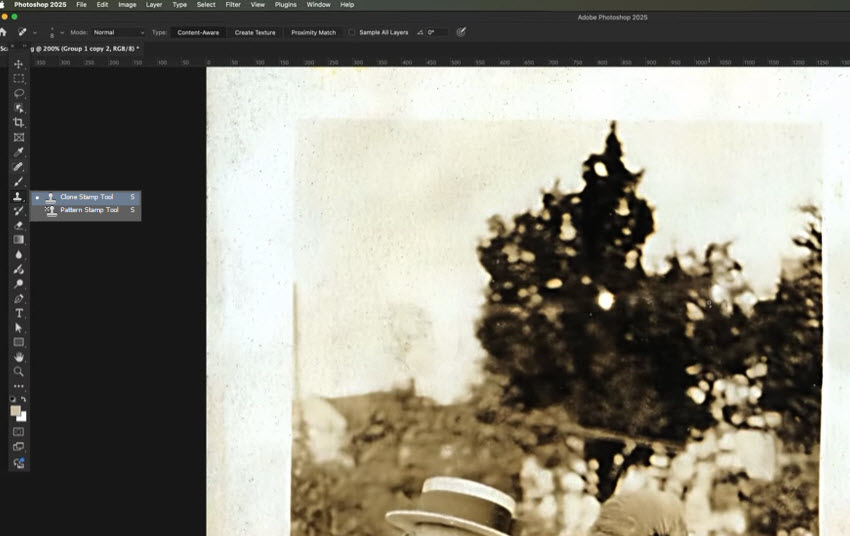
When dealing with larger damage or missing sections, the Clone Stamp Tool is essential. Choose a soft brush and adjust the opacity to around 70–90% for natural blending. Sample a clean area using Alt/Option and carefully paint over the damaged parts in small strokes. Work layer by layer and frequently toggle the visibility to compare your edits with the original.
Note: When repairing faces, avoid cloning directly from another facial area. Small differences in lighting or skin texture can make the result look unnatural. Instead, repair surrounding areas first, then refine facial details carefully.
Step 5. Noise Reduction and Sharpening
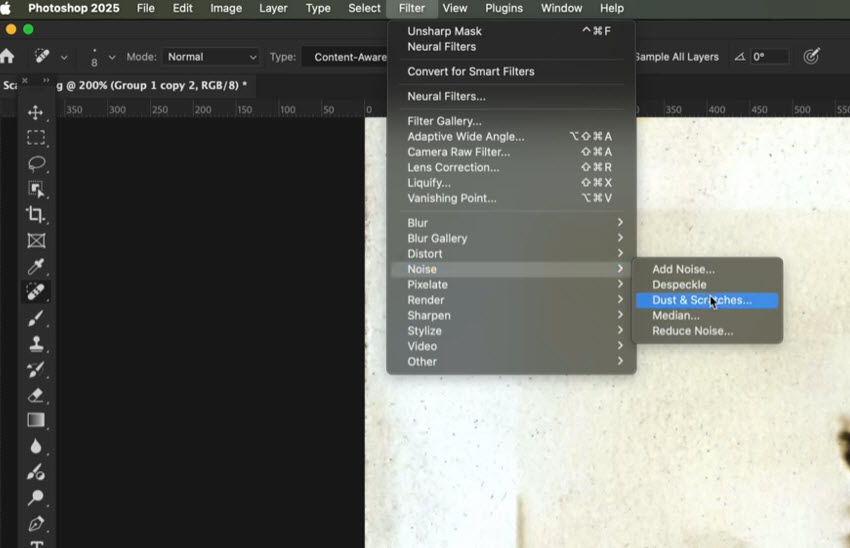
Next, duplicate your working layer to preserve a clean copy. Use Filter > Noise > Reduce Noise to remove grain without losing detail.
Avoid removing too much grain because aggressive noise reduction can make faces and textures look plastic. The best workflow for photo restoration is usually:
Remove damage → Reduce noise → Correct color → Sharpen details
Sharpening too early can make scratches and grain more visible.
Step 6. Colorize the Photo
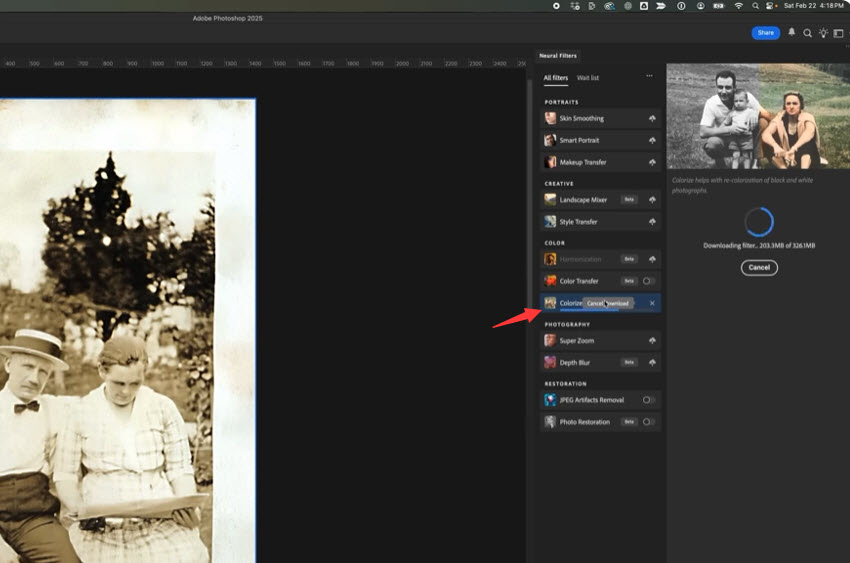
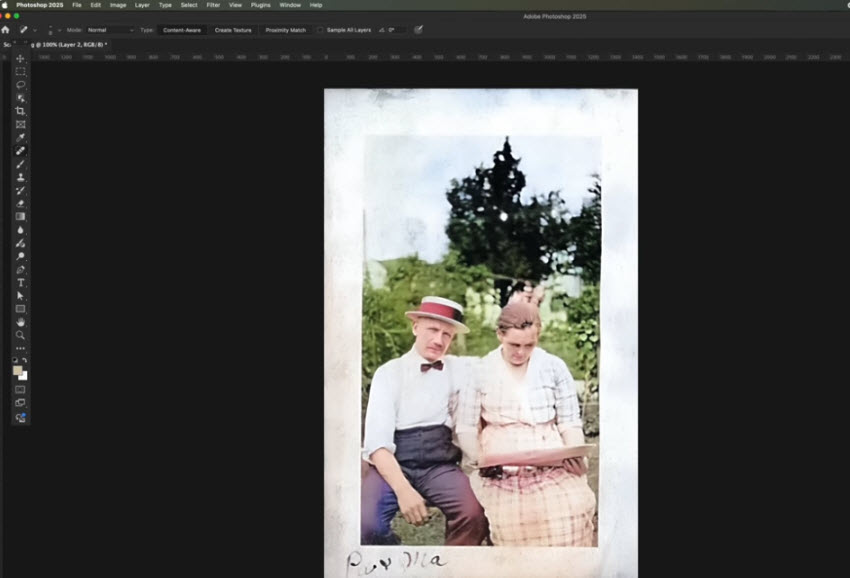
If you want to restore the color of a B&W old photo in Photoshop, also go to Filter > Neural Filters. From the AI filters’ panel, enable the Colorize filter and tweak the adjustments if necessary. Photoshop will then automatically restore the faded color to a polished lifelike result.
AI colorization creates a realistic starting point, but historical accuracy is not guaranteed. For important family photos, manually adjust skin tones and clothing colors when possible.
Step 7. Final Touches and Export
Once finished photo restoration in Photoshop, review the restored image at different zoom levels.
Then click File > Export to save the restored photo in the format you need. You can flatten the image if desired, or save it as a layered PSD for future edits. Export your restored photo in high-quality formats like TIFF, PNG, or JPG.
Tips: if you also want to increase the resolutions of old photos, you can upscale low-res photos in Photoshop.
Pro Tips for Better Photo Restoration in Photoshop
- Work non-destructively: Always use layers and masks for your edits rather than applying changes directly to the background. This allows you to adjust or undo specific corrections at any time, which is essential when learning how to restore old photos in Photoshop.
- Use a graphics tablet: For precise work with the Spot Healing Brush, Clone Stamp, or painting on masks, a tablet gives much better control than a mouse. This is especially helpful when tackling fine details or delicate textures in photo restoration Photoshop projects.
- Break major edits into multiple adjustment layers: Instead of making large corrections on a single layer, create several smaller adjustment layers for Levels, Curves, Hue/Saturation, or Color Balance. This keeps your workflow flexible and allows you to fine-tune each aspect of the image individually, giving professional-level results when you restore old photos in Photoshop.
- 3rd-party Plugins: In addition to Photoshop's built-in filters and tools, you can also try third-party plugins to enhance the old photos. For example, you can use Topaz Photo/Gagipixel with Photoshop, and other plugins.
Here is a video tutorial that shows how to restore an old photo in Photoshop below:
Restore Old Photos Without Spending Hours in Photoshop
If you love the idea of photo restoration in Photoshop but dread spending hours on tedious manual edits, AI-powered tools can be a game-changer.
Aiarty Image Enhancer is a smart AI tool designed to enhance and restore old or low-quality photos instantly. Unlike traditional editing, it uses advanced AI algorithms to automatically repair scratches, improve sharpness, and correct colors, saving hours of manual work in Photoshop.
- Automatic Face Restoration: Fixes scratches, dust, and faded facial details instantly.
- High-Resolution Enhancement: Upscales low-resolution photo scans to HD/4K/higher resolutions while preserving fine details.
- Sharpen and Artifacts Removal: Removes blurriness, noise, grain, compressed blocks, etc. from old photos.
- Color Correction: Restores natural and accurate colors for vintage photos.
How to Restore Old Photos in Photoshop Alternative Instantly?
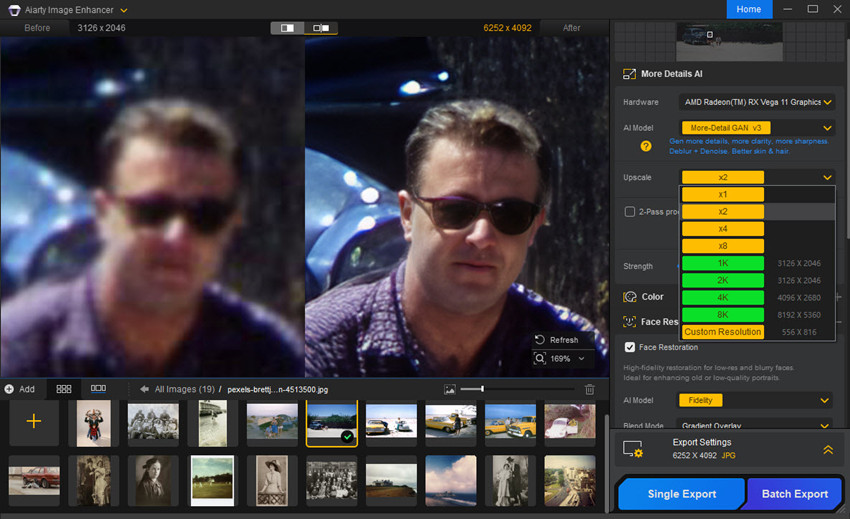
Step 1. Import your old or scanned photo into it. Then choose an AI enhancement model that best matches your image type.
Step 2. Next, choose if you need to upscale the old photo to higher resolution by 2x, 4x, etc. If you simply want to restore the quality of old photos, just choose x1.
Step 3. If your photo contains people, enable Face Restoration to automatically improve facial clarity, skin texture, and natural details.
Step 4. Enable and fine-tune color enhancement to correct faded tones and improve overall color balance. Once processed, just export the restored photo to your local drive, significantly reducing the time needed to fix old photos in Photoshop.
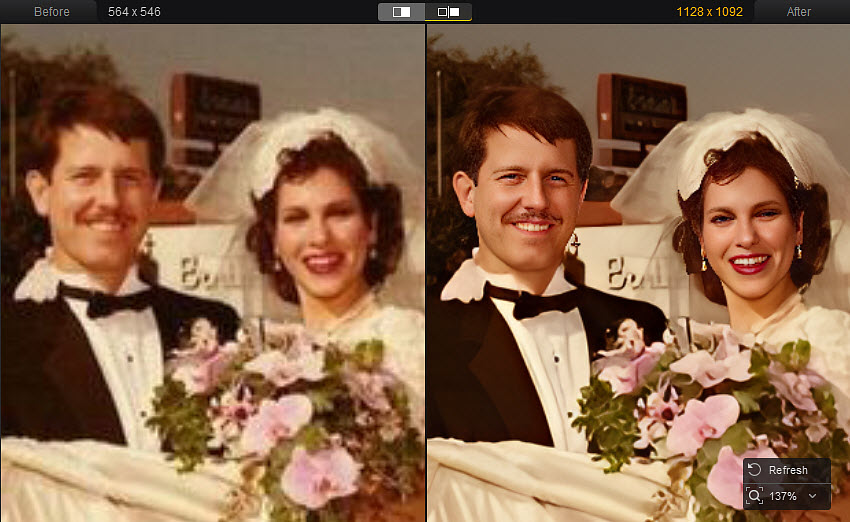
Compared to Photoshop photo restoration workflow, Aiarty Image Enhancer is much easier and faster.
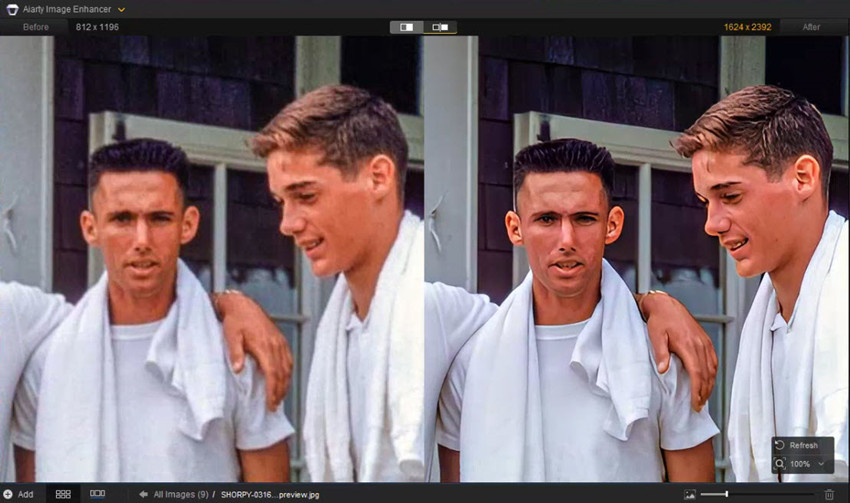
Photoshop remains a powerful choice for restoring old photos because it provides precise control over every editing step. However, manual restoration can become time-consuming when dealing with large numbers of photos or common issues like blur, noise, and low resolution.
AI photo restoration tools can automate many enhancement tasks and help speed up the restoration process. The best choice depends on how much control you need and how much time you want to spend editing.
Here Craig demonstrates a step-by-step test of Aiarty Image Enhancer on restoring old family photos. You can get a sense of how Aiarty fits into an old photo restoration workflow compared with traditional editing tools like Photoshop.
Conclusion
Photo restoration in Photoshop remains one of the most powerful ways to repair and revive old, damaged photos, offering full control over every detail, from scratch removal to color correction and final sharpening. However, as this guide shows, the process can be time-consuming, especially for heavily damaged or low-resolution images. By combining traditional photo restoration Photoshop techniques with AI-assisted tools like Aiarty Image Enhancer, you can significantly speed up your workflow while maintaining high-quality results. Whether you prefer full manual control or a faster AI-first approach, the right tools and workflow make it easier than ever to restore old photos and preserve precious memories.
You May Also Like


This post was written by Brenda Peng who is a seasoned editor at Digiarty Software who loves turning ordinary photos into extraordinary works of art. With AI assistance for brainstorming and drafting, the post is reviewed for accuracy by our expert Abby Poole for her expertise in this field.
