


Jagged or rough edges can make an image look unfinished, especially after removing a background, enlarging a photo, or combining multiple elements in Photoshop. Common issues like pixelated outlines, white halos, uneven selections, and blurry edges can affect the overall quality of portraits, product images, logos, and AI-generated artwork.
Photoshop provides several tools to smooth and clean up edges, including Select and Mask, Refine Edge Brush, Feather, and sharpening adjustments. However, manually refining complex edges, such as hair, fur, transparent objects, or detailed product shapes can be time-consuming.
In this guide, you’ll learn how to smooth edges in Photoshop, fix jagged edges, and clean up rough cutouts using practical methods. We’ll also explore how AI-powered tools like Aiarty Image Matting can simplify edge refinement and improve resolution and restore details when the original image quality is limited.
Why Do Edges Look Rough or Jagged in Photoshop?
Before smoothing edges in Photoshop, it helps to understand why they look uneven. Jagged edges usually come from low-resolution images, poor selections, complex subjects, or incorrect sharpening.
1. Low-Resolution Images
When you enlarge a small image, Photoshop has to stretch limited pixels to fill a larger area. This can create stair-step edges, pixelation, blurry outlines, and missing fine details, especially around curved shapes and diagonal lines.
2. Poor Background Removal
Rough selections or inaccurate masks can leave unwanted pixels, white halos, and uneven outlines around objects after removing a background. This is especially common with product photos, portraits, and images with complex edges. >> How to Make an Accurate Clipping Mask in Photoshop
3. Complex Subjects
Fine details like hair, fur, leaves, and transparent objects are difficult to select perfectly in Photoshop. Without careful edge refinement, these areas may look messy, unnatural, or lose important details.
4. Incorrect Sharpening
Sharpening can make edges appear clearer by increasing contrast between pixels, but it does not actually smooth rough edges or remove jagged pixels. Over-sharpening may even create harsh outlines and unnatural results.
How to Smooth Edges in Photoshop (5 Methods)
Photoshop offers several ways to smooth rough or jagged edges, depending on the type of image you are editing. For cutouts and background removal, Select and Mask is usually the most effective option. For simple shapes or small imperfections, tools like Feather, Blur, and Anti-Aliasing can also help create cleaner transitions.
Below are five practical methods to smooth edges in Photoshop.
Method 1: Smooth Edges with Select and Mask (Best for Cutouts)
Best for: Product photos, Portraits, Background removal, Complex selections
The Select and Mask workspace is one of the most useful Photoshop features for refining rough edges. It allows you to adjust selection boundaries, remove unwanted borders, and create smoother transitions around objects.
Step 1: Create a selection and open Select and Mask
Open your image in Photoshop and use the Object Selection Tool, Quick Selection Tool, or another selection tool to select the subject. Once the selection is created, click Select and Mask from the options bar to enter the edge refinement workspace.
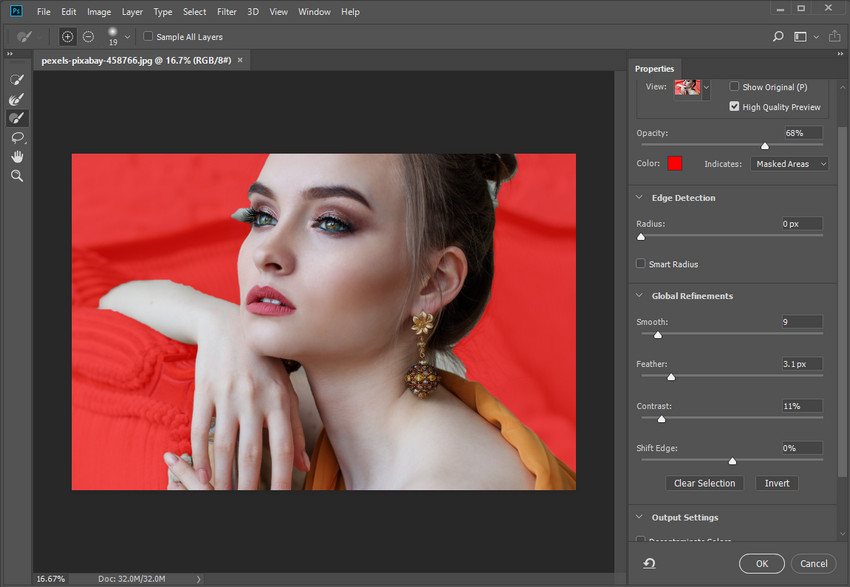
Step 2: Adjust Smooth, Feather, and Shift Edge
In the Global Refinements section, adjust the Smooth slider to reduce jagged edges and uneven selection lines. Use Feather to create softer transitions, and adjust Shift Edge to remove unwanted borders or halos around the subject.
Step 3: Refine details and export the result
For images with complex edges, use the Refine Edge Brush Tool to improve areas like hair, fur, or transparent objects. When finished, choose Output To > New Layer with Layer Mask to keep your edits flexible and non-destructive.
Method 2: Refine Hair and Complex Edges with Refine Edge Brush
Best for: Hair, fur, leaves, transparent objects, and other detailed edges.
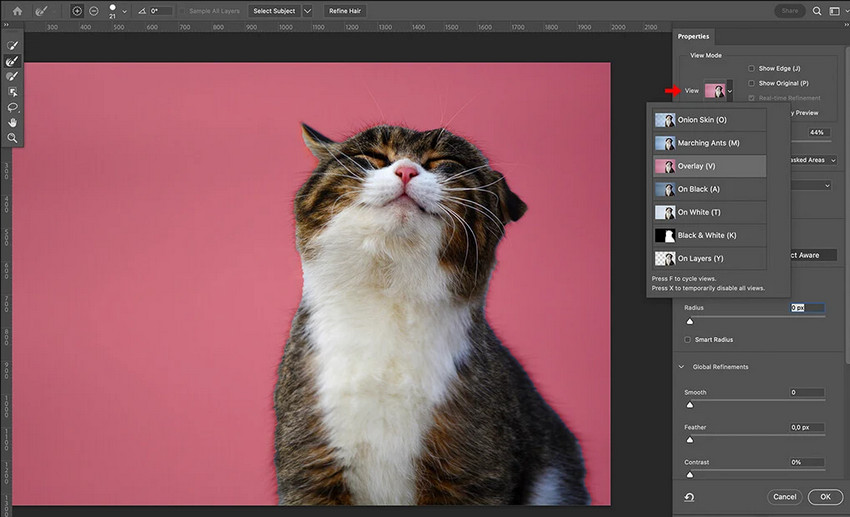
Some edges are difficult to smooth because they contain many fine details. Hair strands, fur, and transparent areas often become messy after a basic selection. In these cases, the Refine Edge Brush Tool in Photoshop can help recover details while creating a more natural transition.
- Open your selection in Select and Mask.
- Choose the Refine Edge Brush Tool.
- Paint over areas with complicated edges.
- Photoshop analyzes the area and adjusts the selection.
Avoid trying to make every edge perfectly smooth. For natural images, keeping realistic textures and fine details is often more important than creating an overly clean edge.
Method 3: Use Feather, Blur, and Manual Cleanup Tools
Best for: Simple objects, graphic elements, and small edge corrections.
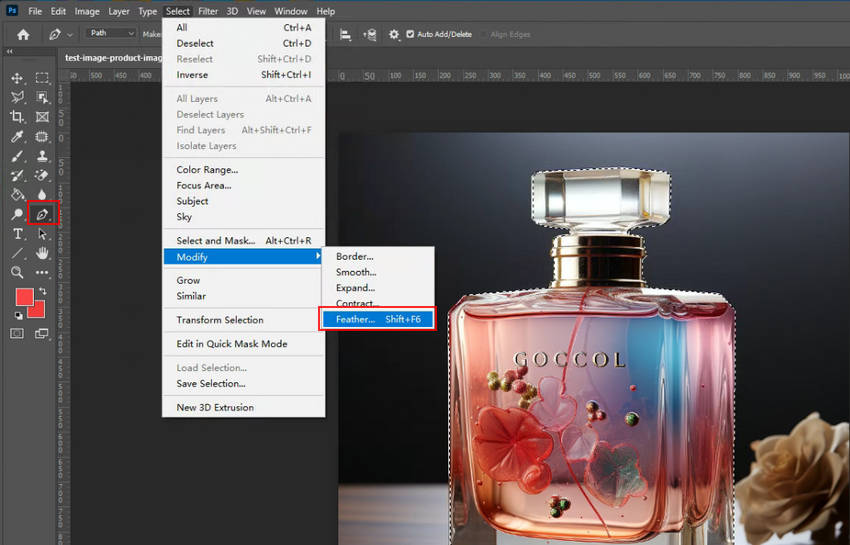
For images with simple shapes or minor edge problems, Photoshop’s built-in softening tools can quickly improve the result. The Feather option creates a smoother transition between selected areas, while the Blur Tool and Smudge Tool allow you to manually fix small imperfections.
To use Feather, create a selection and go to Select → Modify → Feather, then adjust the Feather Radius based on how soft you want the transition to be. A small value is usually enough for blending objects into a new background without making the edge look blurry. Detailed Guide to Feather Edges in Photoshop >>
For small rough areas, you can use the Blur Tool to soften harsh pixels or the Smudge Tool to blend uneven transitions. However, these manual tools are better suited for small adjustments because excessive editing may reduce image details.
Method 4: Enable Anti-Aliasing for Cleaner Edges
Best for: Logos, text, shapes, and graphic elements.
Anti-aliasing helps create smoother edges by reducing the visible stair-step effect between pixels. It is especially useful when creating selections with tools such as the Lasso Tool, Magic Wand Tool, and Marquee Tools.
To enable it, select a selection tool and turn on the Anti-Alias option in the top options bar before creating your selection. Photoshop will automatically blend edge pixels with surrounding areas, making curves and diagonal lines appear smoother.
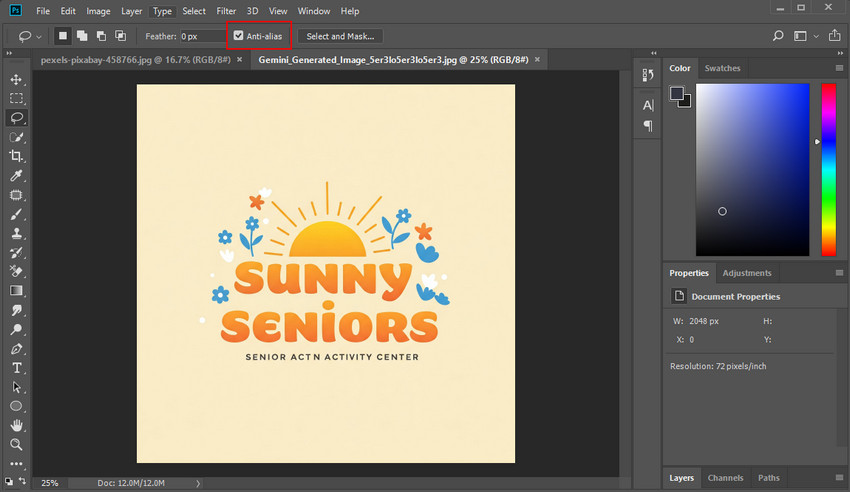
Keep in mind that Anti-Aliasing works best when creating new selections. It cannot fully repair heavily pixelated edges from low-resolution images.
Method 5: Sharpen Edges Carefully with Smart Sharpen
Best for: Soft-looking edges and slightly blurry images.
Sometimes users search for how to sharpen edges in Photoshop because their images look unclear rather than jagged. Sharpening and smoothing solve different problems: smoothing reduces rough transitions, while sharpening increases edge contrast to make details appear clearer.
To sharpen edges, select your image layer and go to Filter → Sharpen → Smart Sharpen. Adjust settings such as Amount, Radius, and Reduce Noise until the image looks clearer while keeping a natural appearance.
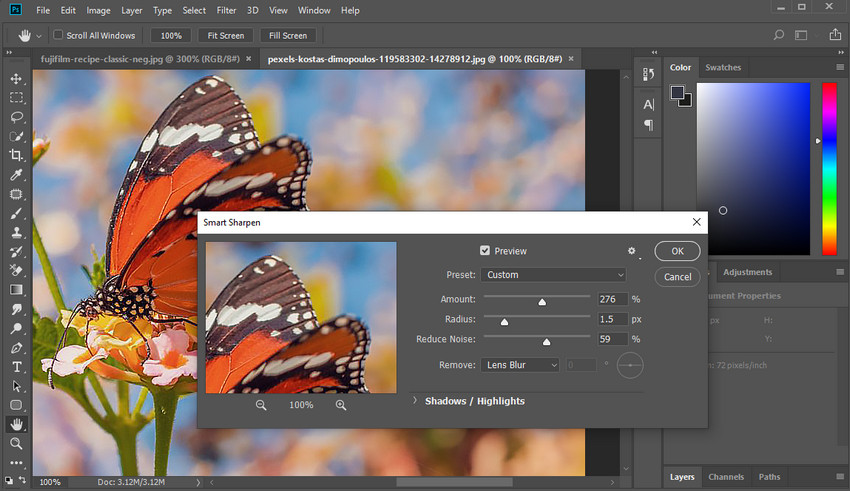
Avoid applying too much sharpening, as it can create harsh outlines, bright halos, and unnatural-looking edges. For the best results, fix rough edges first, then apply sharpening only when necessary.
How to Clean Up Edges in Photoshop After Removing Background
After removing a background in Photoshop, you may still notice rough edges, white halos, or missing details around the subject. These problems are especially common in product photos, portraits, and images with complex outlines.
Remove White Halos Around Objects
White halos usually appear when leftover background pixels remain around the subject. You can fix them by opening the selection in Select and Mask and adjusting Shift Edge to slightly contract the selection. For small areas, a Layer Mask can help manually clean up unwanted pixels.
Refine Hair and Complex Details
Hair, fur, and transparent objects often require extra attention because simple selections may create unnatural edges. Use the Refine Edge Brush Tool in Select and Mask to preserve fine details while improving the transition between the subject and background.
Fix Pixelated Edges
If the original image is low resolution, Photoshop can smooth the selection but cannot fully restore missing details. In these cases, improving image quality after edge cleanup can help create a more natural result.
For users who frequently remove backgrounds, Aiarty Image Matting offers an AI-powered way to create cleaner cutouts with refined edges. It helps preserve details like hair, fur, and transparent areas while reducing the time spent on manual edge adjustments.
A Faster Way to Smooth Edges: Use AI-Powered Edge Refinement
While Photoshop provides powerful tools for cleaning up edges, manually refining selections can become time-consuming when working with complex subjects or large numbers of images. This is especially true for ecommerce sellers, photographers, and designers who need to process multiple product photos or portraits regularly.
Why Use AI for Edge Refinement?
Photoshop gives you precise control over every detail, but achieving clean edges often requires multiple adjustments, especially for hair and fur, transparent objects, detailed product shapes, and images with complicated backgrounds
Instead of manually adjusting every edge, AI-powered matting tools can automatically detect the subject and create cleaner cutouts while preserving important details.
Use Aiarty Image Matting for Cleaner Cutout Edges
Aiarty Image Matting uses AI-powered matting technology to automatically detect subjects and refine edges, helping create cleaner cutouts with less manual adjustment. It is especially useful for challenging areas such as hair, fur, glass, and other detailed materials where traditional selection tools often require extra effort.
- Aiarty uses AI-powered matting technology to accurately separate subjects from backgrounds, helping create clean cutouts with fewer rough edges, unwanted pixels, and unnatural outlines.
- It preserves fine details such as hair, fur, glass, and other complex edges, reducing the need for time-consuming manual cleanup.
- When needed, you can further adjust edge softness with feathering to achieve smoother blending between the subject and the new background.
- With one-click and batch processing, Aiarty helps users create consistent cutouts faster while supporting image enhancement up to 10K resolution and private offline processing.
Free download Aiarty Image Matting to create clean cutouts with smoother edges.
Step 1. Launch Aiarty Image Matting and import your images by dragging and dropping them into the workspace. You can add multiple images at once for batch background removal.
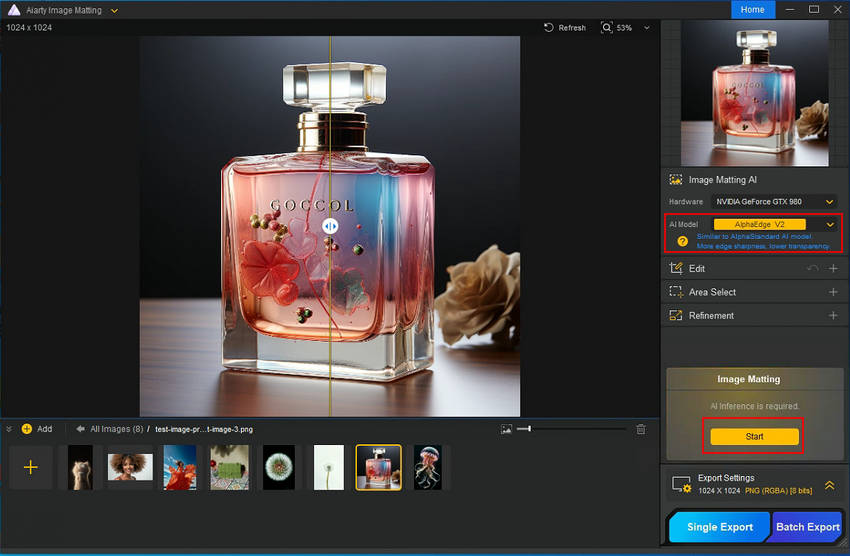
Step 2. Select an AI model that matches your image type, then click the Start button to automatically remove the background and create a clean cutout.
Step 3. To further smooth the cutout edges, enable the Feather option under Effect. Adjust the Width and Strength sliders to control the softness and blending of the edges. For multiple images, enable Apply to Batch Export to apply the same settings to all files.
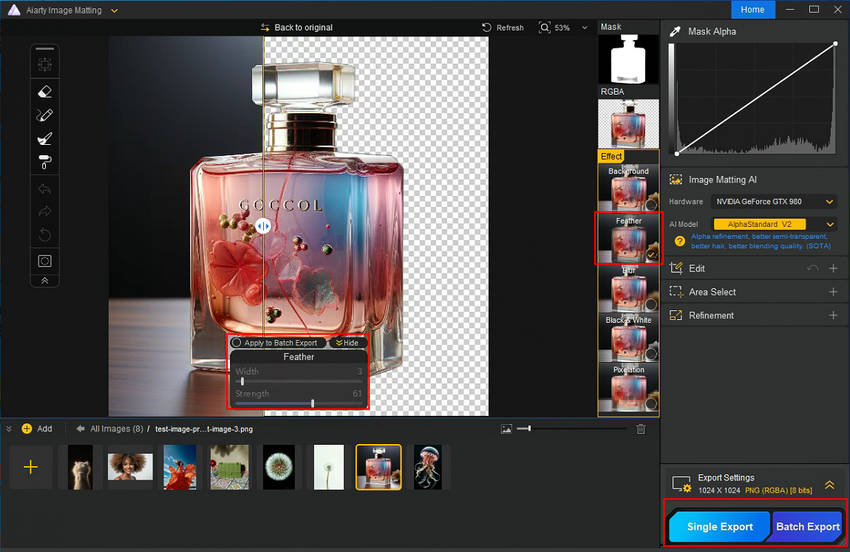
Step 4. When the result looks good, click Single Export or Batch Export to save your smooth-edged cutouts individually or process multiple images at once.
When enlarging a low-resolution photo, you may notice pixelated edges, stair-step outlines, or blurry details because the original image lacks enough pixels.
If you need to remove the background after enlargement, you can first use Aiarty Image Matting to enhance and enlarge the image by 2X (up to 10K resolution), then remove the background again to achieve cleaner cutouts with smoother edges.
For users who only want to upscale images or fix quality issues caused by enlargement, Aiarty Image Enhancer is a better choice. It supports 2X, 4X, and 8X upscaling up to 32K resolution, while also reducing noise, fixing blur, and restoring natural details without an artificial AI look.
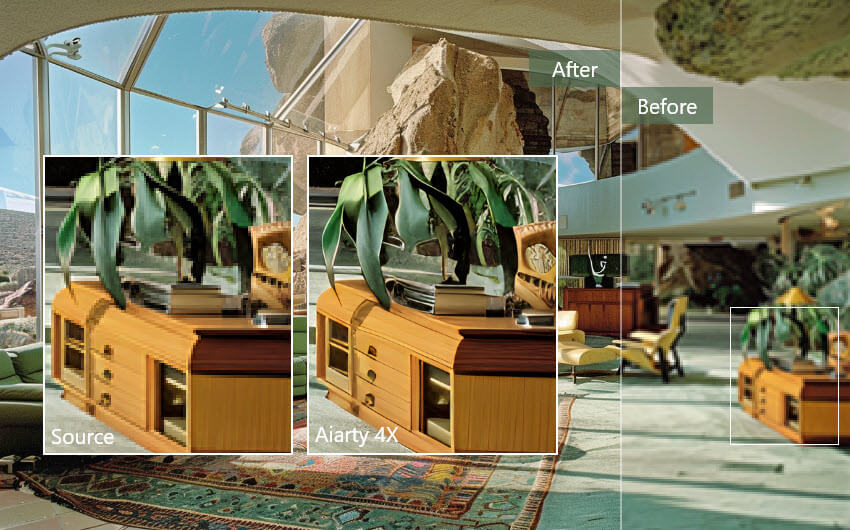
Fix pixelated edges and enhance image quality with AI. Try Aiarty Image Enhancer for sharper, more natural results.
Recommended Workflow: Combine AI Matting with Photoshop Editing
Photoshop provides precise control over edge adjustments, but refining every detail manually can be time-consuming, especially for images with hair, fur, transparent objects, or when processing multiple files. A more efficient approach is to use AI for the initial cutout and Photoshop for final creative adjustments.
Start with Aiarty Image Matting to automatically remove the background and create a cleaner cutout with smoother edges. Its AI-powered matting technology helps preserve fine details and reduce rough edges, minimizing the need for repeated manual cleanup.
After exporting the cutout, you can continue editing in Photoshop to adjust colors, or fine-tune the final composition. This workflow combines the speed of AI-powered edge refinement with the flexibility of Photoshop editing.
Final Thoughts
Smooth edges can make a significant difference in the quality of cutouts, product images, and creative designs. While Photoshop tools like Select and Mask, Refine Edge Brush, and Feather provide detailed control, complex edge cleanup can still require considerable time and effort.
Aiarty Image Matting offers a faster way to remove backgrounds, reduce rough edges, and create natural-looking cutouts while preserving details such as hair, fur, and transparent areas.
Ready to create cleaner cutouts with less manual editing? Try Aiarty Image Matting and simplify your edge refinement workflow.
 FAQs
FAQs
1. How do I smooth jagged edges in Photoshop?
You can smooth jagged edges in Photoshop by using Select and Mask and adjusting settings like Smooth, Feather, and Shift Edge. These tools help refine selections, soften transitions, and remove unwanted edge pixels.
2. What is the easiest way to smooth edges in Photoshop?
The easiest way to smooth edges in Photoshop is to use the Select and Mask workspace. It provides quick adjustments for smoothing rough outlines, reducing halos, and refining cutout edges without manually editing every pixel.
3. How do I clean up rough edges in Photoshop?
To clean up rough edges in Photoshop, use Select and Mask, the Refine Edge Brush Tool, and Layer Masks to refine selections and preserve details. For complex images with hair, fur, or transparent objects, AI-powered tools like Aiarty Image Matting can help create cleaner cutouts faster.
4. Can Photoshop automatically smooth edges?
Photoshop provides automatic edge refinement features through tools like Select and Mask, but complex edges still often require manual adjustments. For faster background removal and smoother cutouts, AI matting tools can help reduce the amount of manual cleanup.
5. Does sharpening make edges smoother?
No. Sharpening and smoothing solve different problems. Sharpening increases edge contrast to make details appear clearer, while smoothing reduces rough transitions and jagged outlines. Over-sharpening may even create harsh edges or unwanted halos.
You May Also Like


This post was written by Brenda Peng who is a seasoned editor at Digiarty Software who loves turning ordinary photos into extraordinary works of art. With AI assistance for brainstorming and drafting, the post is reviewed for accuracy by our expert Abby Poole for her expertise in this field.
