


Film grain may seem like a thing of the past, but it remains a popular technique among photographers, designers, and digital artists who want to recreate the natural texture of analog photography.
Whether you are editing portraits, creating a vintage film look, or adding a more organic feel to digitally enhanced images, Photoshop offers several ways to apply grain effects with different levels of control.
In this guide, you'll learn how to add grain in Photoshop using four practical methods, from quick Camera Raw adjustments to more advanced techniques for creating realistic film grain.

Why Add Grain to Photos?
Film grain is not just a way to recreate the look of old film cameras. When used intentionally, it can change how an image feels, adding texture, depth, and a more natural appearance. This is why many photographers and digital artists still use grain in modern photo editing workflows.
Make Digital Images Feel More Natural
Modern cameras, smartphones, and AI editing tools can produce extremely clean images, but sometimes that level of perfection can make photos feel overly smooth or artificial. Adding subtle grain introduces organic texture and helps restore a more photographic look, especially after heavy noise reduction, retouching, or AI enhancement.
Create a Classic Film Photography Look
Film grain is one of the key elements behind the aesthetic of analog photography. A carefully adjusted grain effect can help recreate the mood of classic 35mm film, including the soft texture and nostalgic character associated with film stocks such as Kodak and Fujifilm.
Add Texture and Visual Depth
A completely smooth image can sometimes appear flat, especially in portraits, cinematic edits, or digital artwork. Grain adds subtle variation across the image, creating a richer texture and helping different elements blend together more naturally.
Reduce the Appearance of Imperfections
Grain can also be a useful finishing tool. It can help hide minor editing flaws, reduce the visibility of color banding in smooth gradients, and make retouched or composited areas blend better with the rest of the image.
However, the key is moderation. Too much grain can make an image look noisy and reduce clarity. The goal is not to make a photo look damaged, but to add just enough texture to enhance its overall character.
Pro Tip: Enhance Image Quality Before Adding Grain
Adding grain works best when you start with a clean, detailed image. Applying a grain effect to a low-resolution photo, heavily compressed image, or one with unwanted digital noise can make the result look messy rather than cinematic.
Before adding film grain, it is worth improving the image foundation first. Make sure your photo has:
- Sufficient resolution for the intended output size
- Clean details without distracting digital noise
- Minimal JPEG compression artifacts
- Natural textures that can blend well with the added grain
For older, blurry, or low-resolution images, an AI image enhancement tool can help restore details and create a cleaner base before you apply creative effects in Photoshop. For example, Aiarty Image Enhancer can improve image clarity, reduce unwanted noise, and upscale images while preserving natural details, making them better suited for further editing.
A typical workflow is:
- Enhance and prepare the image quality first.
- Open the improved image in Photoshop.
- Apply film grain as a finishing effect.
- Fine-tune the grain amount, size, and opacity based on your style.
This approach gives you more control over the final look. Instead of using grain to hide image problems, you can use it as a creative tool to add texture and character.
How to Add Grain in Photoshop: 3 Effective Methods
Photoshop offers several ways to create a film grain effect, from quick one-click adjustments to more advanced workflows with precise control. The best method depends on the look you want to achieve and how much flexibility you need during editing.
Below are three practical ways to add realistic grain in Photoshop.
Method 1: Add Grain with Camera Raw Filter (The Quickest Method)
The Camera Raw Filter is one of the easiest ways to add grain in Photoshop. It works similarly to Lightroom’s grain controls and is ideal for photographers who want a natural film-like texture without creating multiple layers.
Step 1: Open the Camera Raw Filter
Open your image in Photoshop, then go to:
Filter > Camera Raw Filter
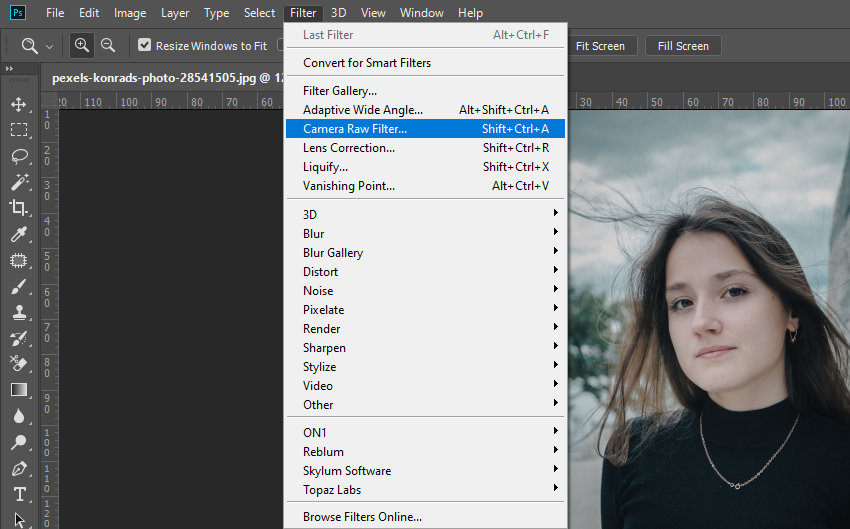
In the Camera Raw window, open the Effects panel.
Under the Grain section, you will find three controls:
- Amount
- Size
- Roughness
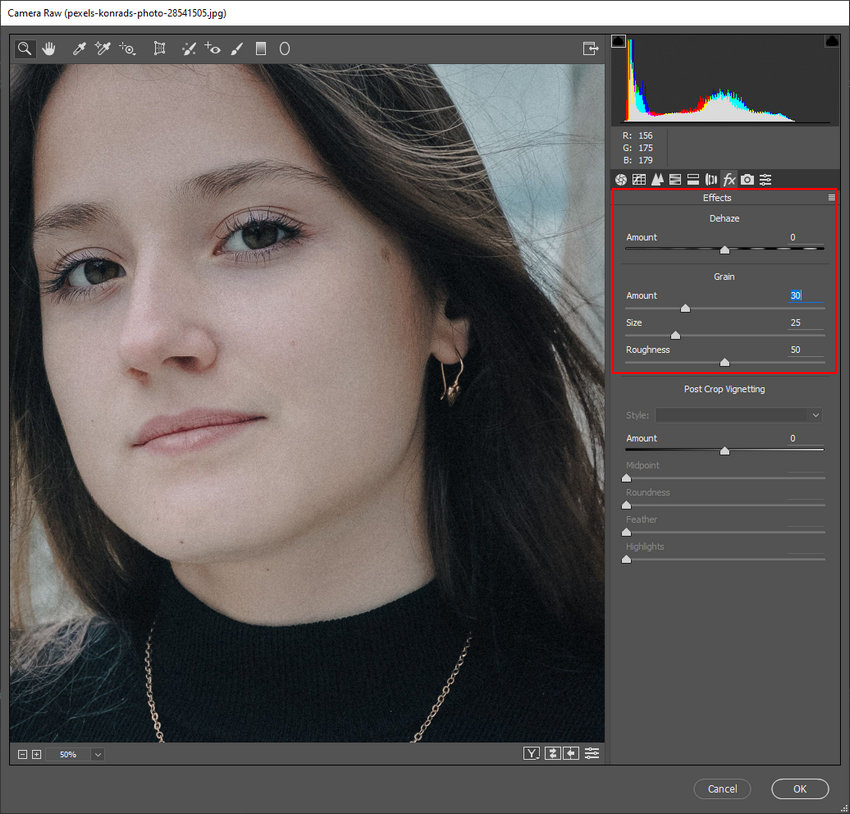
Step 2: Adjust Grain Settings
There is no universal grain setting that works for every image, but these ranges are a good starting point:
| Setting | Recommended Range | Effect |
|---|---|---|
| Amount | 15-40 | Controls the overall strength of grain |
| Size | 20-30 | Controls how large the grain particles appear |
| Roughness | 40-60 | Controls the irregularity and texture of grain |
For a subtle film look:
- Amount: 20
- Size: 25
- Roughness: 50
For a stronger vintage film effect:
- Amount: 35-40
- Size: 30
- Roughness: 60
Step 3: Fine-Tune the Result
Keep in mind that grain looks different depending on image resolution. A setting that looks natural on a 24MP photo may appear too strong on a small web image.
If the effect is too noticeable:
- Reduce Amount
- Lower the layer opacity after applying the filter
- Apply grain after resizing your image to the final output size
Why Use Camera Raw Grain?
Pros:
- Fast and beginner-friendly
- Natural-looking film texture
- Easy to adjust later when used as a Smart Filter
Best for:
- Portrait photography
- Social media images
- Quick film-style edits
Method 2: Create Custom Film Grain with Add Noise (Most Flexible)
Using Photoshop’s Add Noise filter gives you more control over the grain effect. This method is popular among photographers because it is fully adjustable and does not permanently affect the original image.
Step 1: Create a New Layer
In the Layers panel:
- Click Create New Layer
- Rename it Film Grain
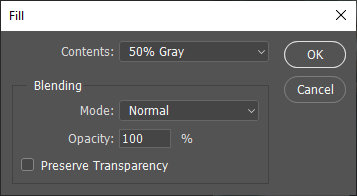
- Fill the layer with 50% gray
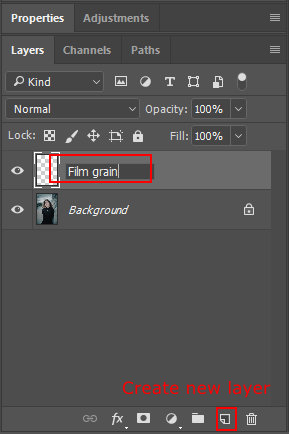
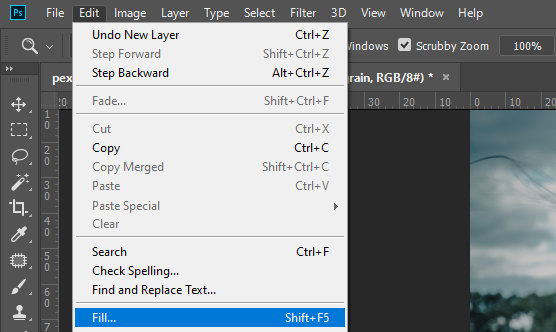
To fill the layer:
Edit > Fill > Contents: 50% Gray
Step 2: Change the Blend Mode
With the new gray layer selected, change the blend mode to:
- Overlay for a stronger grain effect
- Soft Light for a more subtle result
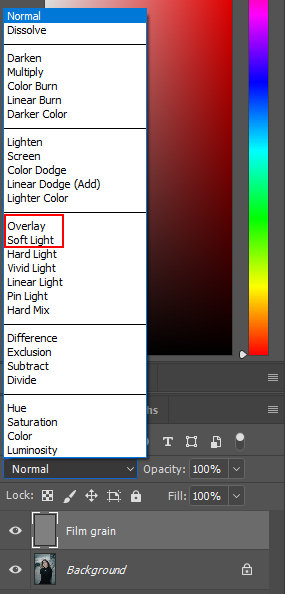
The gray layer will become invisible while allowing the grain texture to affect the image underneath.
Step 3: Add Noise
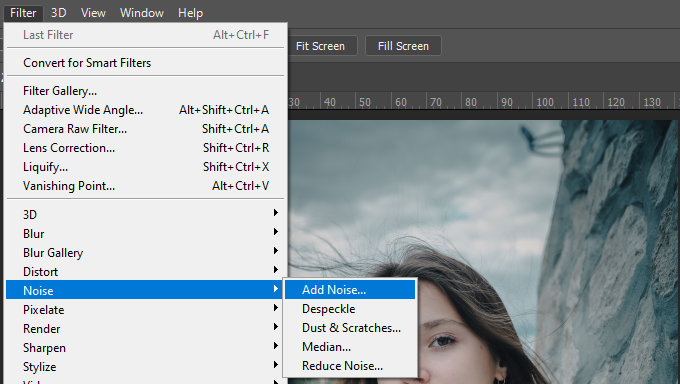
Go to:
Filter > Noise > Add Noise
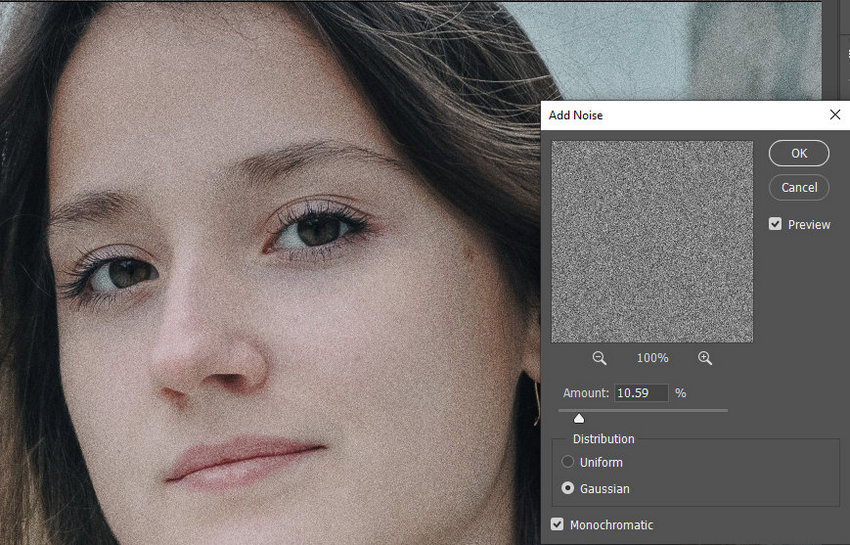
Recommended settings:
Setting |
Recommended Value |
Amount |
2%-8% |
Distribution |
Gaussian |
Monochromatic |
Checked |
Why Choose Monochromatic?
Real film grain does not usually appear as random red, green, and blue dots. Checking Monochromatic creates a more natural black-and-white grain texture and avoids unwanted color noise.
Step 4: Adjust Grain Strength
After applying noise:
- Reduce layer opacity for a softer effect
- Duplicate the grain layer for a stronger film look
- Add a layer mask if you want grain only in certain areas
A typical opacity range:
- Subtle texture: 10%-30%
- Visible film look: 30%-50%
Why Use the Add Noise Method?
Pros:
- Completely non-destructive
- More control over intensity
- Easy to customize for different images
Best for:
- Professional photo editing
- Cinematic looks
- Images requiring selective grain adjustments
Method 3: Add Realistic Film Grain Using a Grain Overlay
If you want a more authentic film look, you can use a film grain overlay instead of creating grain from scratch in Photoshop.
A film grain overlay is a texture file that contains real or simulated film grain patterns. You simply place it on top of your photo and blend it with the original image. Compared with Photoshop's built-in noise effect, grain overlays usually look more organic because the texture comes from scanned film or carefully created grain patterns.
Where Can You Get Film Grain Overlays?
You can find film grain overlays from:
- Free texture libraries
- Photography resource websites
- Premium film emulation packs
When choosing a grain overlay, look for:
- High-resolution files
- Black-and-white grain textures
- Different grain sizes (fine, medium, or coarse)
Avoid low-quality overlays with obvious repeating patterns, as they can make the effect look artificial.
How to Add a Film Grain Overlay in Photoshop
Step 1: Import the Grain Texture
Open your photo in Photoshop.
Then go to:
File > Place Embedded
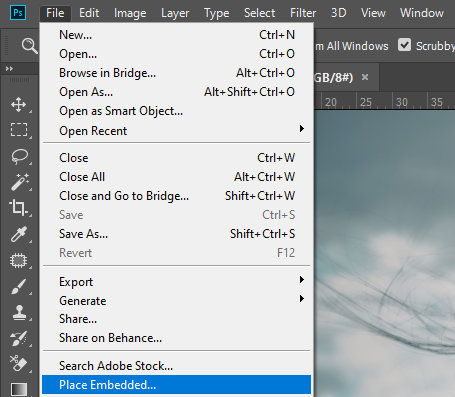
Select your film grain texture file and click Place.
Photoshop will add the grain texture as a new layer above your image.
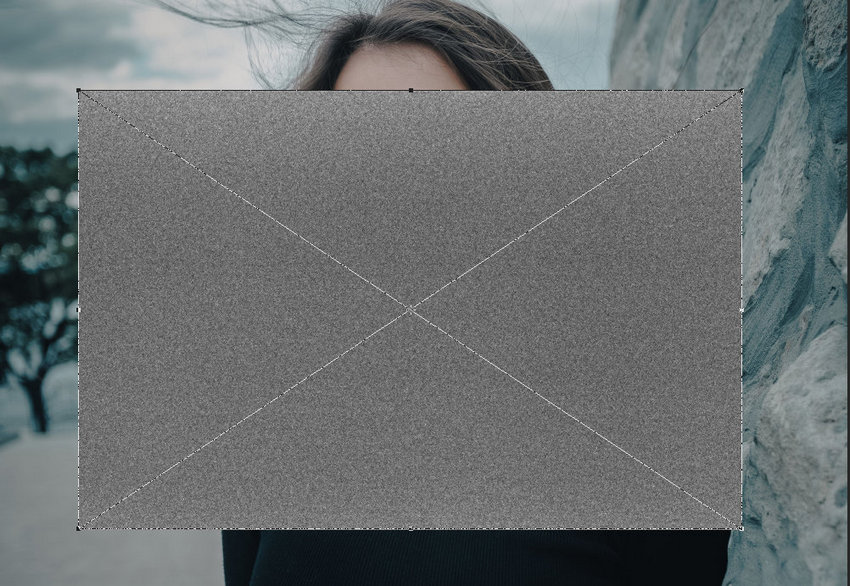
Step 2: Resize the Overlay
If the grain texture does not cover the entire image:
- Use Ctrl + T (Windows) or Command + T (Mac) to transform the layer.
- Resize it until it covers the whole photo.
Press Enter to confirm.
Step 3: Change the Blend Mode
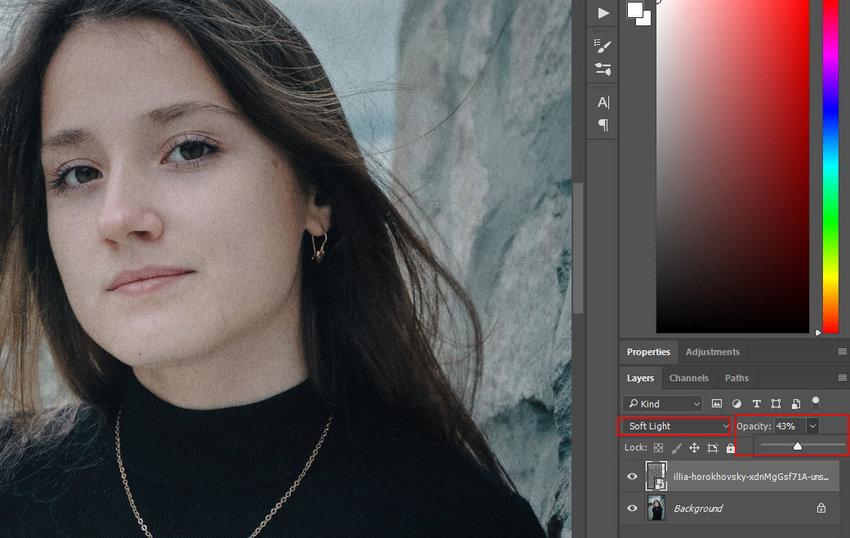
With the grain layer selected, change the blending mode in the Layers panel.
Common choices:
- Soft Light: Creates a subtle, natural film texture
- Overlay: Makes the grain more visible and contrasty
- Multiply: Works well for darker vintage effects
For most photos, start with Soft Light.
Step 4: Adjust the Grain Strength
Lower the layer opacity until the grain looks natural.
Typical settings:
- Subtle film texture: 20%-40% opacity
- Strong vintage effect: 40%-60% opacity
You can also use Levels or Curves on the grain layer to adjust the contrast of the texture.
Why Use Film Grain Overlays?
Pros:
- More natural than random digital noise
- Creates a true analog film feel
- Offers unique grain patterns
Best for:
- Film photography effects
- Cinematic edits
- Vintage-style portraits
 FAQs
FAQs
There is no single grain setting that works for every image. The right amount depends on your photo style, resolution, and the look you want to create.
As a general starting point:
- Subtle texture: Use a low grain amount for portraits, product photos, and clean digital images.
- Classic film look: Increase the grain slightly for street photography, travel photos, and vintage-style edits.
- Strong cinematic effect: Use heavier grain for creative projects or when you want a noticeable analog feel.
For Photoshop's Add Noise filter, many users start with around 2%-8% Amount with Gaussian distribution and Monochromatic enabled. For Camera Raw's Grain effect, an Amount of around 20-40 is a good starting range, then adjust based on the image.
The key is that grain should support the image, not become the main subject. If viewers notice the grain before the photo itself, it is probably too strong.
In most cases, add grain after sharpening.
Sharpening enhances edges and fine details, while grain is a finishing texture. If you add grain before sharpening, the sharpening process may also enhance the grain particles, making the image look harsher and noisier.
A typical editing workflow is:
- Correct exposure and colors.
- Remove unwanted noise and improve image quality.
- Apply sharpening.
- Add film grain as the final creative effect.
- Resize and export the image.
Adding grain at the end also allows you to better judge how it looks at the final output size.
Although they may look similar, film grain and digital noise are created in different ways.
| Film Grain | Digital Noise | |
|---|---|---|
| Source | Chemical texture from photographic film | Electronic interference from camera sensors |
| Appearance | Organic, irregular texture | Random colored or luminance speckles |
| Purpose | Added intentionally for style | Usually an unwanted image problem |
| Effect | Adds character and depth | Can reduce image quality |
Film grain is often used as a creative effect, while digital noise is usually something photographers try to reduce.
This is why simply increasing ISO or adding random noise in Photoshop does not always create a convincing film look. Realistic grain usually requires controlling the size, contrast, and distribution of the texture.
If your image already contains heavy digital noise, adding more grain will usually make it look worse. The first step is to clean up the unwanted noise and create a better-quality base image.
Common problems include:
- Color speckles in dark areas
- JPEG compression artifacts
- Blocky textures
- Excessive high-ISO noise
- Over-sharpened details
A better workflow is:
- Reduce unwanted digital noise using noise reduction tools.
- Restore details if the image is blurry or low-resolution.
- Add a controlled film grain effect in Photoshop.
For old photos, low-resolution images, or heavily compressed images, an AI image enhancement tool such as Aiarty Image Enhancer can help improve clarity and recover details before applying creative effects.
The goal is to separate unwanted noise from intentional grain: remove the problems first, then add grain as a finishing touch.
You May Also Like


This post was written by Brenda Peng who is a seasoned editor at Digiarty Software who loves turning ordinary photos into extraordinary works of art. With AI assistance for brainstorming and drafting, the post is reviewed for accuracy by our expert Abby Poole for her expertise in this field.
