When you're shooting in low light or using a high ISO setting, noise can easily creep into your images. Those grainy or speckled areas that take away from the overall quality. Fortunately, Adobe Photoshop offers several tools to help reduce noise and restore clarity to your photos.
In this guide, we’ll walk you through five effective methods for denoising in Photoshop: Generative Fill, the classic Reduce Noise filter, the powerful Camera Raw Filter, a more advanced technique using individual color channels, and AI Denoise.
💡 Trying to denoise an image in Photoshop?
- You'll often need to adjust multiple sliders and settings manually.
- Choosing the right filter (Reduce Noise, Camera Raw, or Channels) depends on your image type and noise level.
- It can take time and experimentation to get results without losing important details.
- For beginners, the process may feel overwhelming or too technical.
Prefer a quicker, easier way to denoise your photos?
Aiarty Image Enhancer is an AI-powered tool that automatically removes noise and enhances image clarity with just one click. No manual adjustments or Photoshop experience needed. Simply upload your image and let the AI handle the rest.
Try Aiarty Image Enhancer to denoise photos effortlessly and get high-quality results in seconds:

Method 1: Use Generative Fill to Denoise (AI-Powered and Selective)
Photoshop’s Generative Fill tool can do more than remove objects. It can also intelligently reduce noise in specific areas of an image. This method is great when you want to clean up localized grain while preserving key textures.
Notes:
- Generative Fill is available in Photoshop 2024 (version 25.0) and newer versions with Adobe Firefly support. It requires an internet connection and consumes generative credits, included with Adobe Creative Cloud subscriptions.
- This method works best for local noise removal, especially in areas with noticeable grain or artifacts.
- For global denoising, use Reduce Noise or Camera Raw Filter instead for more efficient results.
Step 1: Open your photo in Photoshop.
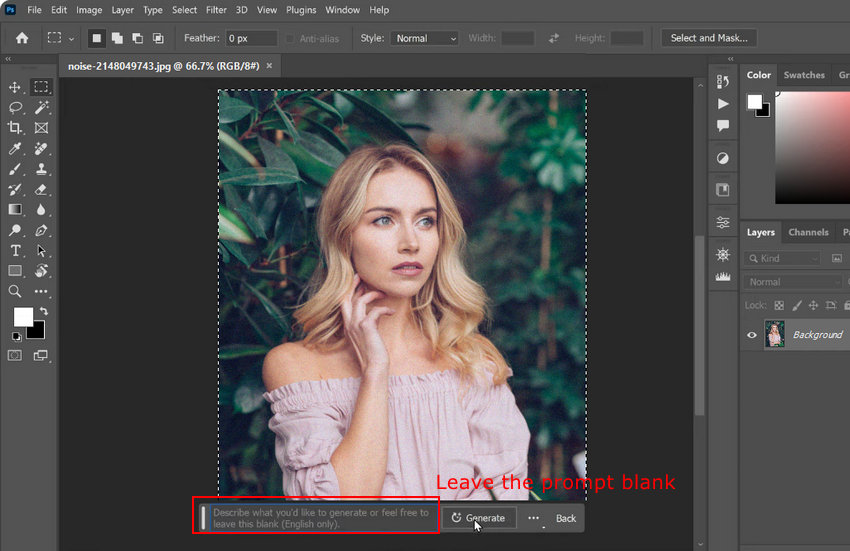
Step 2: Use the Lasso Tool or Marquee Tool to select noisy areas of the image. Avoid selecting parts where you want to keep the texture, such as skin pores or intentional grain.
Step 3: Go to the top menu and choose Edit > Generative Fill. When the prompt appears, leave it blank. This tells Photoshop to analyze and clean the selection without adding new content.
Step 4: Adjust the fill settings as needed. Photoshop combines inpainting (replacing pixels inside the selection) and outpainting (blending into nearby areas) to clean up the noise smoothly. Use a lower strength for subtle noise and a higher strength for heavier grain.
Step 5: Review the result and reapply Generative Fill to smaller areas if needed. You can also undo or fine-tune the effect until you’re satisfied.
Step 6: To preserve important textures, consider applying Generative Fill with a Layer Mask so you can denoise selectively without affecting the entire image.
Method 2: Use the Reduce Noise Filter (Simple and Quick)
The Reduce Noise filter is one of the easiest ways to remove noise from a photo in Photoshop. It’s especially useful when your image has visible grain from shooting in low light or at high ISO.
Step 1: Open your photo in Photoshop.
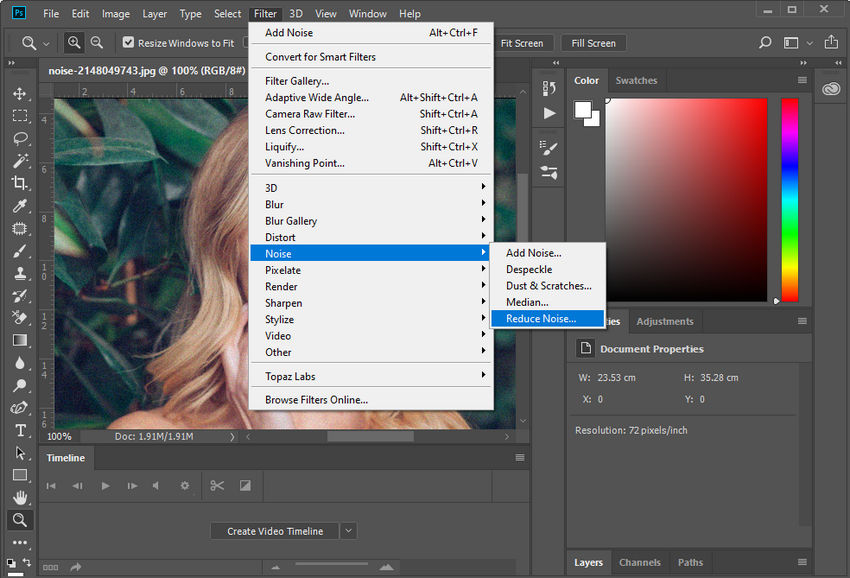
Step 2: Go to the top menu and choose Filter > Noise > Reduce Noise.
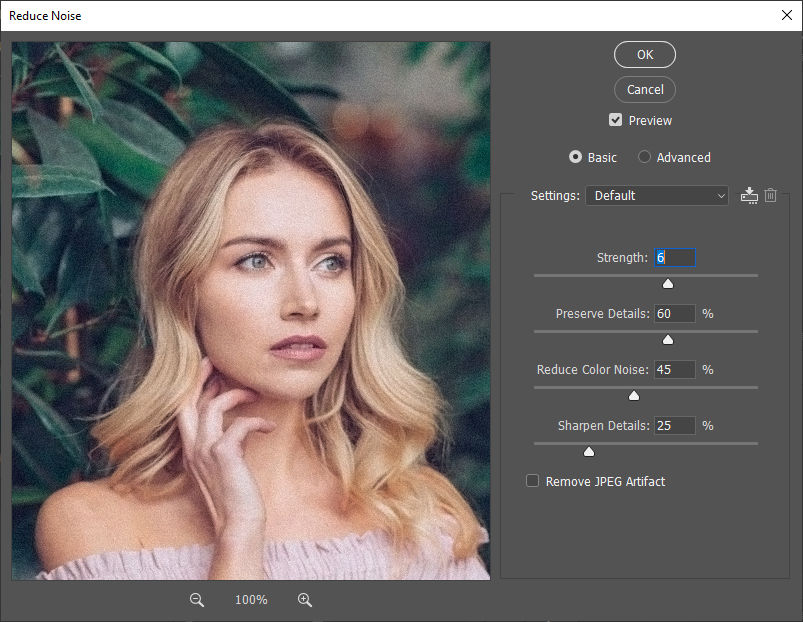
Step 3: In the Reduce Noise dialog box, you’ll see four main sliders. Here’s what each one does and how you might set them:
- Strength (try 5–8 for a start): Controls how much noise is reduced. A higher value removes more noise but may blur details.
- Preserve Details (start with 25%–50%): Keeps edges and texture sharp. Increase this if the image looks too soft.
- Reduce Color Noise (30%–70% usually works well): Gets rid of random color dots — common in shadows or low light.
- Sharpen Details (0%–20% is safe): Adds some sharpness back after denoising. Use carefully to avoid introducing halos.
Step 4: If your image is a JPEG and shows compression artifacts (blocky patches or smudges), check the box labeled Remove JPEG Artifact.
Many beginners find that getting the perfect balance between smoothness and detail takes a bit of trial and error. A good idea is to zoom in to 100% as you adjust the sliders — this makes it much easier to see what’s actually changing.
This method works well for mild to moderate noise. If you're dealing with heavy noise or want more precise control, try the next method using the Camera Raw Filter.
Method 3: Denoise with Camera Raw Filter (More Control and Better Results)
If you want a bit more control over the denoising process — especially for RAW or high-res images — the Camera Raw Filter is a great option. It offers more advanced tools and tends to preserve detail better than the basic Reduce Noise filter.
Step 1: Open your image in Photoshop.
Step 2: Go to Filter > Camera Raw Filter from the top menu.

Step 3: In the Camera Raw interface, click the Detail panel (the icon that looks like two triangles).
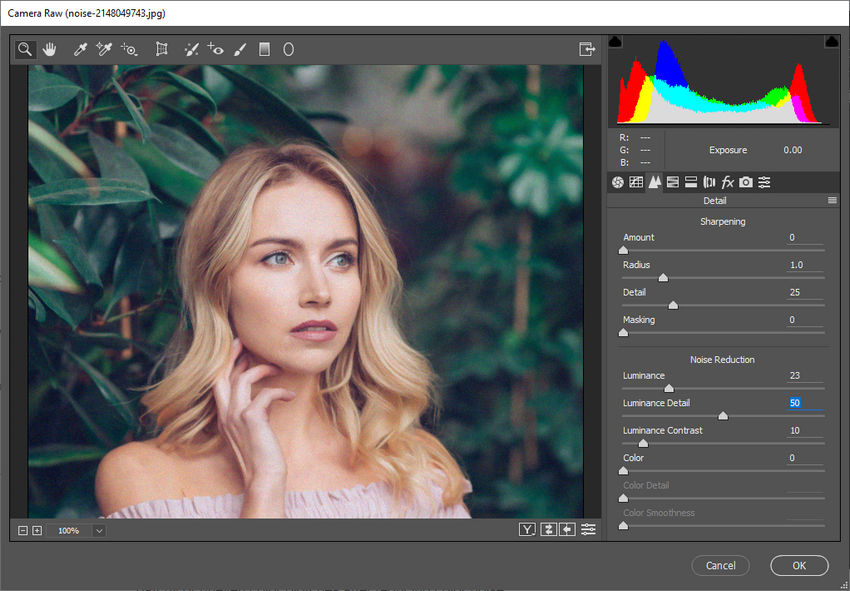
Step 4: Under the “Noise Reduction” section, you'll find these sliders:
- Luminance (start with 20–40): Controls grainy noise in brightness. The higher the value, the smoother the image — but too much can blur it.
- Luminance Detail (set around 50–70): Helps protect textures and fine details. Raising this too much can bring some noise back.
- Luminance Contrast (10–30 is usually safe): Adds contrast back to midtones after smoothing.
- Color (usually leave at 25): Reduces color noise, like green or purple splotches.
- Color Detail (50 is the default): You can leave it as is unless you see blotchy color patches.
- Color Smoothness (default is 50): Controls how evenly color noise is blended. Increase it slightly if you notice patchy or uneven color blotches after reducing color noise.
Step 5: Zoom in to 100% and adjust the sliders slowly while watching your image. Every photo is different, so it helps to experiment and compare before and after.
The Camera Raw Filter is especially good for photos with heavy noise or where you want more subtle results. It gives you finer control, and the results often look more natural than using the basic Reduce Noise filter.
Method 4: Use the Channel Method (For Targeted Noise Reduction)
This method takes a different approach. Instead of applying a global noise reduction, you inspect each RGB channel individually and fix the noisy one. It’s especially useful when most of the noise is coming from just one color channel, which often happens in low-light shots or underexposed areas.
Step 1: Open your image in Photoshop.
Step 2: Go to the Channels panel. If you don’t see it, go to Window > Channels.
Step 3: Click through the Red, Green, and Blue channels one by one. Look closely at each one to see which has the most visible noise. Usually, the Blue channel is the noisiest.
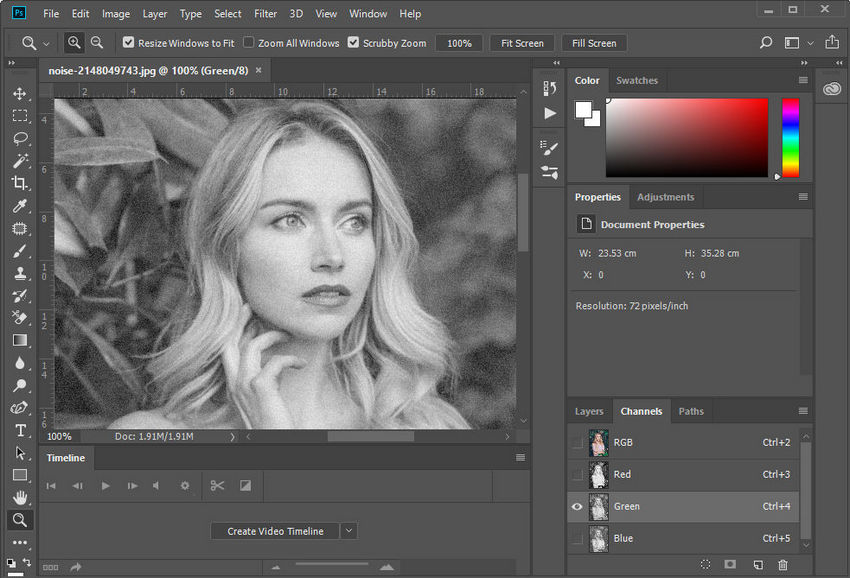
Step 4: Once you've found the noisy channel, select it by clicking on it. Only that channel will be visible now (you'll see a grayscale version of the image).
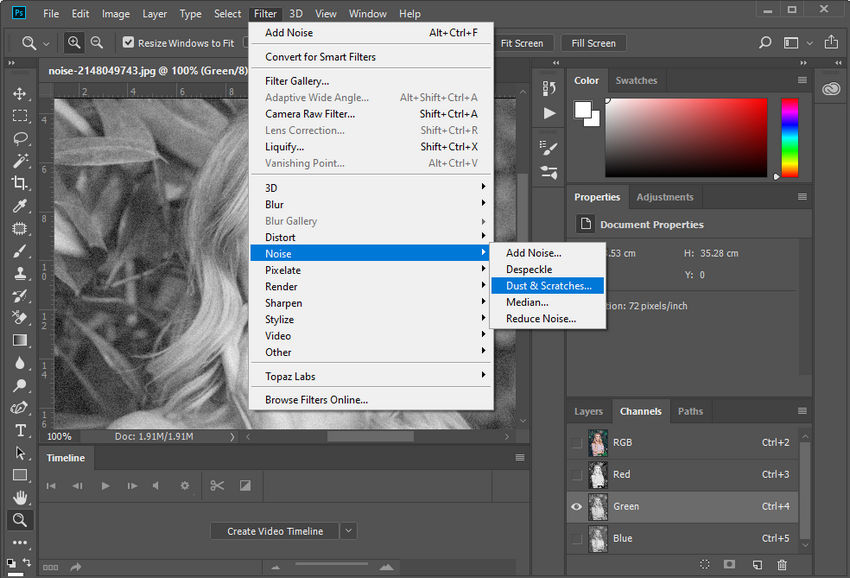
Step 5: Go to Filter > Noise > Dust & Scratches.
- Set Radius around 1–3 pixels to smooth the grain without destroying too much detail.
- Keep Threshold low at first (like 0–10) to avoid wiping out real textures.
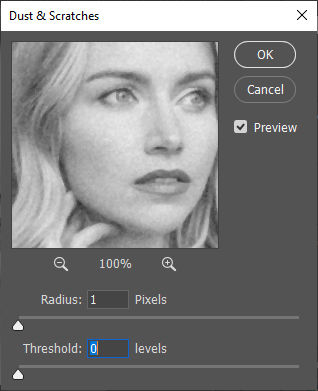
Step 6: Adjust the settings carefully while zoomed in. The goal is to reduce visible specks or harsh noise patterns without making the channel look overly soft.
Step 7: After you're done, click back on the RGB composite channel to see the full-color image again.
This method gives you precise control and works well when one channel is much noisier than the others. It's not ideal for large-scale noise reduction, but it's a handy trick when global filters aren't doing the job.
Method 5: Use AI Denoise (One-Click Professional Plugin)
If you find Photoshop's built-in filters a bit lacking, you can leverage the power of the AI Denoise plugin (part of the Topaz partner ecosystem). Unlike traditional algorithms that simply blur pixels, this AI-driven Photoshop plugin analyzes your image to distinguish between fine detail and grain, offering a one-click solution that consistently outperforms the standard "Reduce Noise" filter.
Step 1: Create a Backup Layer
Open your image in Photoshop. Before applying any effects, press Ctrl + J (Windows) or Command + J (Mac) to duplicate your background layer. This ensures you’re working non-destructively and allows you to toggle the effect on and off later to see the difference.
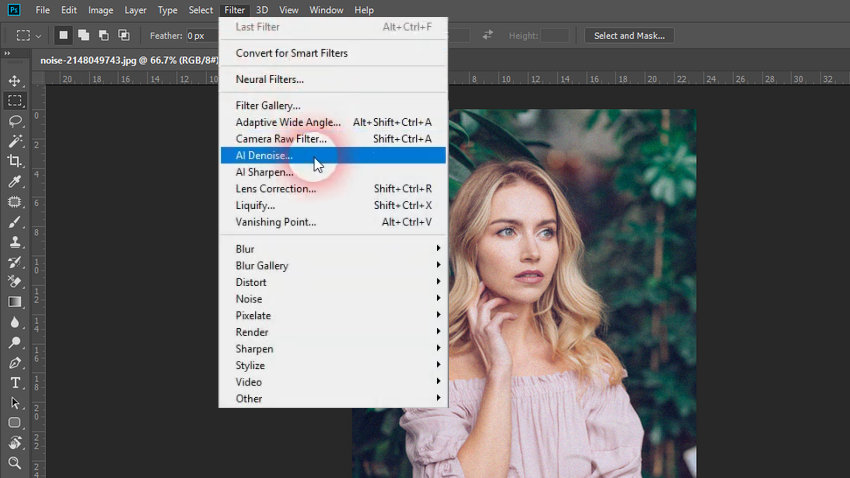
Step 2: Launch the AI Denoise Filter
With your new layer selected, navigate to the top menu and select Filter > AI Denoise. If this is your first time using it, a dialogue box may appear noting that it is a partner program; simply confirm the message to proceed.
Step 3: Let the AI Work Its Magic
The beauty of this method is its simplicity. Once the plugin initializes, it automatically evaluates the noise levels in your photo. It is essentially a one-click process. The AI will take a few seconds to process the image, intelligently scrubbing away grain while attempting to preserve edges.
Step 4: Review the Results
Zoom in on problematic areas, such as shadows or flat-colored surfaces (like the sky or water), where noise is most prominent. While the AI is highly effective at removing grain, keep an eye out to ensure it hasn't washed out too much texture. If you're happy with the clean look, apply the changes to return to the Photoshop workspace.
The AI Denoise plugin is significantly more sophisticated than the legacy "Reduce Noise" filter. It’s particularly useful for photographers who want professional-grade results without spending twenty minutes fiddling with manual sliders.
Pro Tip: While Topaz plugins are fantastic additions to Photoshop, they do require a separate installation. If you prefer a standalone desktop solution that offers similar (or even more advanced) AI capability for noise removal and upscaling, Aiarty Image Enhancer is a top-tier alternative worth exploring.
Want a Simpler Way to Denoise Photo?
If you find Photoshop's denoising tools a bit too complex or you’re new to all those sliders and channels, Aiarty Image Enhancer can be a great companion tool. It’s not meant to replace Photoshop, but rather to give you an easier, AI-assisted option when you just want fast, clean results.
Powered by advanced AI models, Aiarty automatically detects and reduces noise in your photos. No manual tuning required. It’s especially helpful for beginners, or anyone who wants to save time.
Why try Aiarty:
- Automatically removes both luminance and color noise with AI precision
- Supports one-click denoising and upscaling. Enhance and enlarge in one go
- Beginner-friendly, no Photoshop experience needed
- Batch processing support for high-efficiency workflows
- Desktop software. It runs smoothly, no internet required
Aiarty Image Enhancer works especially well for portraits, night shots, old photo restoration, and any situation where you want to enhance image clarity with minimal effort.
How to Use Aiarty Image Enhancer
Using Aiarty is super straightforward. No complex settings, no steep learning curve.
Step 1: Download and install Aiarty Image Enhancer on your PC or Mac.
Step 2: Launch the software and click the "+" button to import your noisy image. You can add one or multiple images at once.
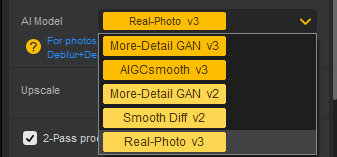
Step 3: Choose the AI model based on the type of image you’re working with.
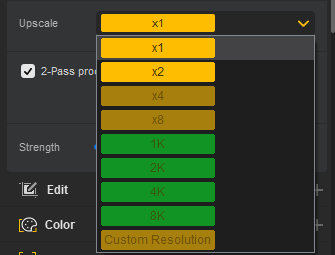
Step 4: Select a upscaling option.
If you choose ×1, Aiarty will focus only on denoising and enhancement without enlarging your photo.
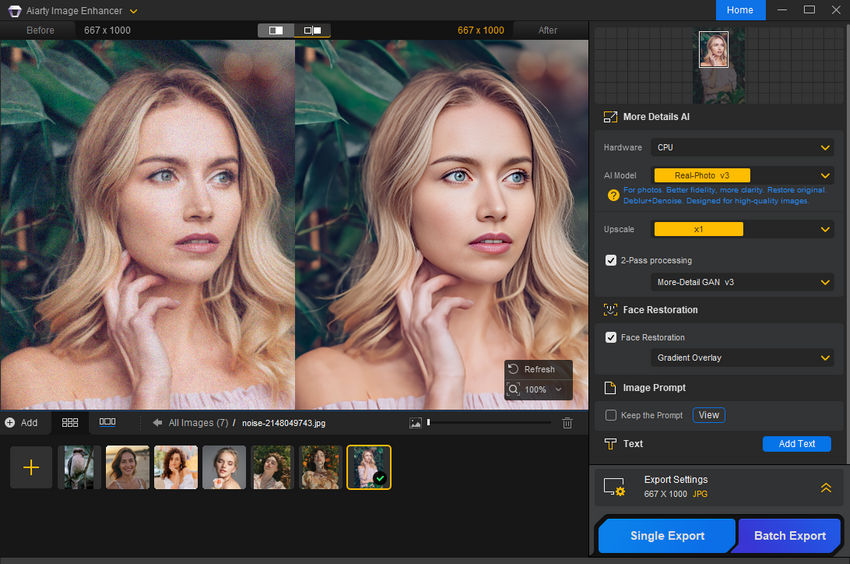
Step 5: Preview the result.
Check if the noise is removed and the image looks cleaner. If you’re not satisfied, you can easily swap AI models, adjust your upscale settings, or toggle on Face Restoration and Color to achieve the perfect look.
Step 6: Click Single Export or Batch Export to save your enhanced image(s).
As you can see, it’s extremely easy to use. No manual parameter adjustments required.
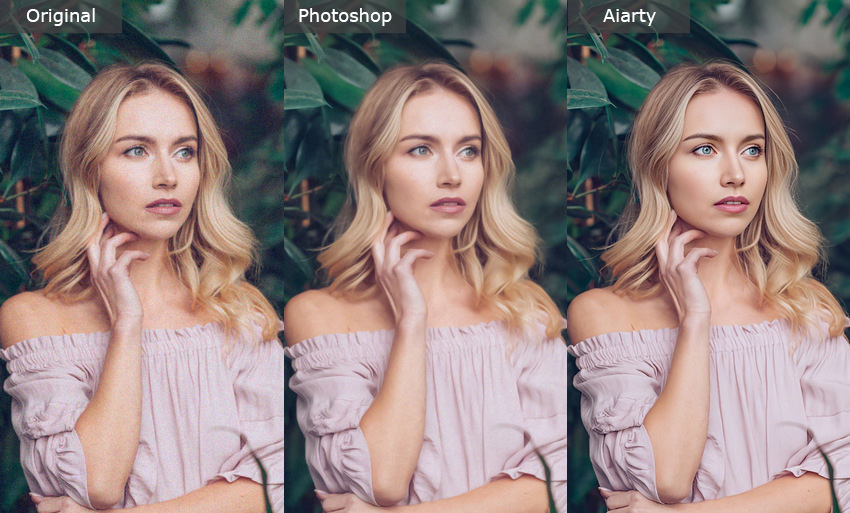
And when it comes to results? You’ve seen them - clean, crisp, and on par with what Photoshop can deliver, without the hassle.
See It in Action
Sometimes, seeing the transformation in real-time is better than any explanation. Watch this quick demonstration video to see how Aiarty Image Enhancer handles extreme noise, restores facial details, and upscales images with just a few clicks.
You May Also Like
This post was written by Brenda Peng who is a seasoned editor at Digiarty Software who loves turning ordinary photos into extraordinary works of art. With AI assistance for brainstorming and drafting, the post is reviewed for accuracy by our expert Abby Poole for her expertise in this field.