


Stretching an image in Photoshop can mean different tasks, including upscaling, upsizing, downsizing, or expanding the picture. For some users, it's for a composition project, where you need to stretch the image on one layer and change the layout; for other users, they may simply need to scale a photo; for designers, there are occasions when you need to stretch the image background to make it fit the required UI space, such as making a banner wider.
Different scenarios involve quite different steps. In this guide, we cover all the scenarios for beginners and hobbyists to learn how to stretch an image in Photoshop.
If your initial goal is to batch upscale images with better quality, you don't necessarily need to stick with Photoshop.
Method 1: Stretch an Image with the Free Transform Tool
By stretching, if you mean to change the dimension of the image, such as from 500px to 700px, follow this method. If you need to stretch the image and filling in the canvas or background, such as extending the image from vertical to landscape, go to method 2 below with content-aware scale.
As Photoshop adopts the layer-based mechanism, when stretching an image in Photoshop, make sure you have selected the layer that contains the target image.
For experienced users, simply press Ctrl+T on Windows to use the transform tool on that image (or Cmd+T on Mac).
For beginners, let's start from creating the projects to the resizing and export workflows.
Step 1. Add your image into Photoshop.
You can right click on the image > Open with > Photoshop, the project will be created with a resolution that fits your source image.
Alternatively, you can launch Photoshop > Create a project, and then drag and drop your image into this project. Though you need to input the resolution of this project in the beginning.
Step 2. Select the layer containing your image.
If you added multiple layers after creating the Photoshop project, click on the layer with the image you want to stretch or resize.
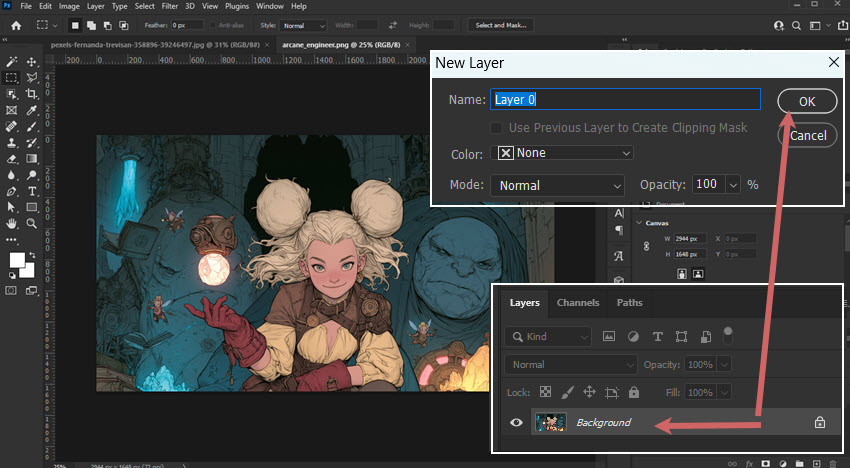
If you only import one image to Photoshop, it will be set as the background by default, and that background is locked. Double-click on the thumbnail of the background layer to unlock it, which will turn the background layer to a regular layer.
Otherwise, you cannot edit the image or using the transform tool.
Step 3. Use the transform tool to resize or stretch the image.
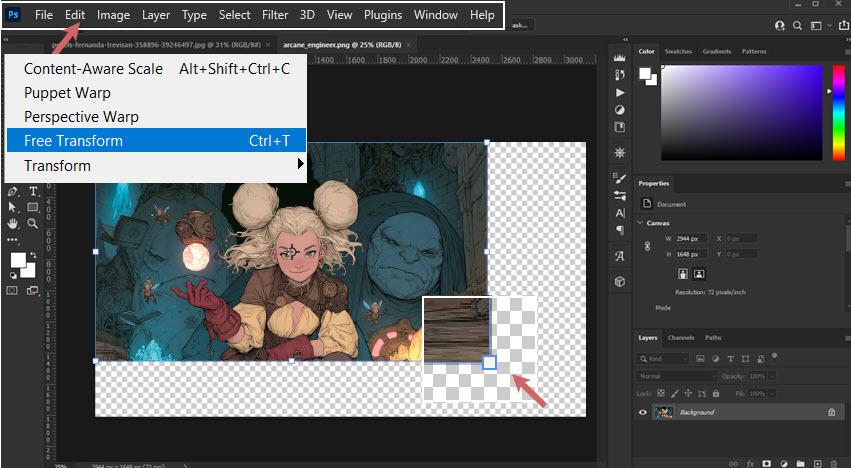
Select the layer and click on the image, press Ctrl+T on Windows (or Cmd+T on Mac).
Using the shortcut will help you enhance the workflow in editing, though you can also call out this feature from menu: Edit > Free Transform.
Step 4. Keep or change aspect ratio when stretching the image.
Depending on whether you want to keep the image proportions while resizing, you can use different shortcuts:
- To keep the aspect ratio: Press Shift and drag a corner handle of the image.
- To stretch the image freely: Drag the handles to resize the image to any size and aspect ratio.
- To intentionally distort the image: Press Alt and drag a corner handle. This allows you to distort the image beyond its original rectangular proportions.
Note:
1. I went wrong with some steps, how do I revert to a previous state?
Hit Alt+Ctrl + Z to undo a step, or press Shift+Ctrl+Z to redo a step if you undo too far.
Sometimes the shortcut key may be complicating with other apps on your computer, in that case, you can also call out the History panel from menu: Window > History. Then undo to a certain step in the history.
2. What will be the output resolution of the image? Is it the resized image (either smaller than the canvas or larger than the canvas)?
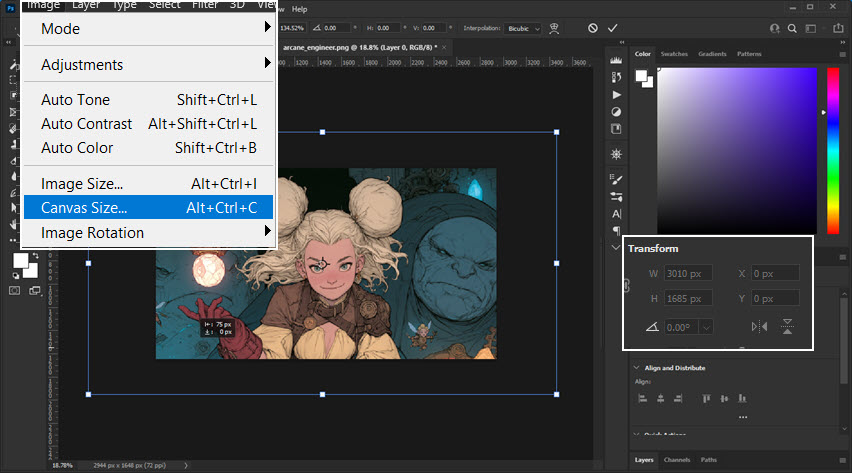
The output image size will be the size of your canvas, you can check it from menu: Image > Canvas Size (Alt+Ctrl+C). If you stretch the photo to a larger size that extends beyond the canvas, you need to also change the canvas size before exporting the image.
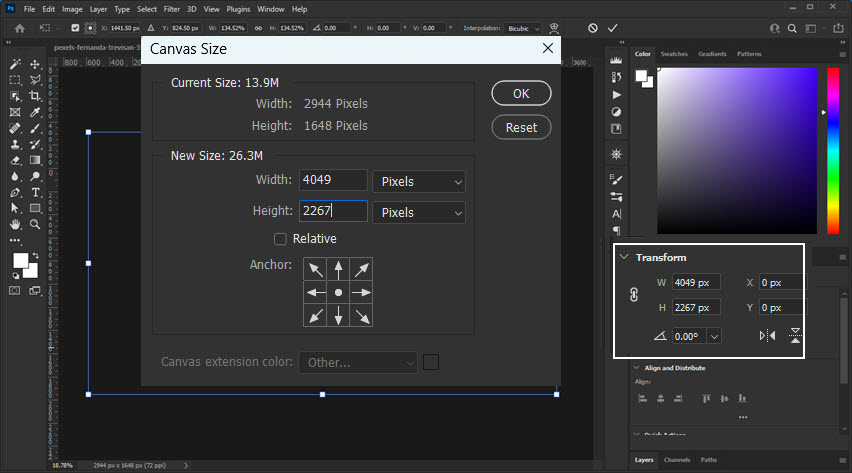
Or initially, when creating this Photoshop project, you can input the needed resolution (which is larger than the source photo), import the photo, and press Ctrl+T to transform and stretch the image.
Shortcuts:
Alt+Ctrl+C: Canvas Size
Alt+Ctrl+I: Image Size
3. What's the difference of Canvas Size vs Image Size in Photoshop menu?
The Image Size refers to the resolution of the final output image, therefore, changing the width and height of Image Size will alter the canvas and the images from different layers on it.
The Canvas Size refers to the document boundaries. When you enlarge the Canvas size, the image content itself is not scaled. For instance, you may notice extra canvas space added to the image when changing the Canvas Size from 500x300 to 1000x600.
Method 2. Stretch an Image with the Image Size Settings
Photoshop adopts a layer-based editing and composition mechanism. The above method using the Transform tool works nicely for scenarios where you are compositing multiple images on the canvas. What if you simply want to resize a single image or change the size of the final merged output?
The traditional way is to use the Image Size dialog box in Photoshop, and it works well when you're not dealing with extreme upscaling. For instance, if you want to upscale images by 4X, 8X, or even higher, the output image may appear pixelated, blurry, or lack detail, as traditional methods only use mathematical interpolation and lack the capabilities of generative upscale in Photoshop.
For 1.5X, 2X, and other relatively small scaling factors, follow the steps below to stretch the image in Photoshop.
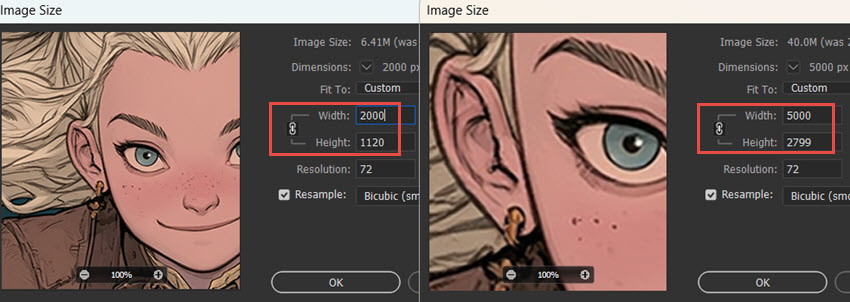
Step 1. Assuming you have followed the steps in method 1 to import the image in Photoshop, click on the layer with your target image.
Step 2. Go to menu: Image > Image Size.
Step 3. Input the target resolution of the image.
By default, the aspect ratio is locked. You can click on that chain icon to unlock it.
You can change the measuring of the image size by pixels, by inches, etc.
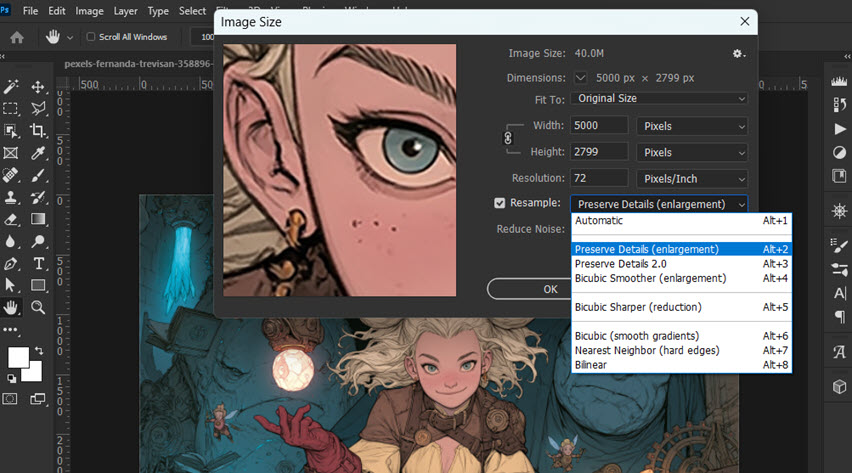
For the resampling methods, leave it to auto or choose from the following based on your specific scenarios.
- Preserve Details (Enlargement): Designed for enlarging images while preserving edges and fine details. A good choice for moderate upscaling.
- Preserve Details 2.0: An improved enlargement algorithm that generally does a better job of preserving details, especially for photos.
- Bicubic Smoother (Enlargement): Produces smoother results when enlarging, but may look softer than Preserve Details.
- Bicubic Sharper (Reduction): Optimized for reducing image size while maintaining sharpness.
- Bicubic (Smoother Gradients): Useful when you want smooth transitions, such as in images with gradual tones.
- Nearest Neighbor (Hard Edges): Preserves hard edges without smoothing, making it more suitable for pixel art, screenshots, or images with sharp, block-like edges.
- Bilinear: A relatively simple interpolation method that produces softer results. It's generally not the first choice when image quality is important.
If you specifically needs the larger scaling factors while enhancing image quality, use Super Resolution in Photoshop.
Method 3: Stretch an Image with Content-Aware Scale
In some scenarios, the composition doesn't quite fit the space you need. Maybe you need extra room on one side for text, a wider banner, or a different layout.
Instead of simply stretching the entire image, you can use Content-Aware Scale in Photoshop to expand suitable parts of the background while keeping the main subject relatively intact.
Follow the steps below to "stretch an image" and extending the background with content-aware scale.
Step 1. Assuming you are familiar with creating a project and importing images demonstrated in methods above, now select the target layer.
Step 2. Extend the canvas with the crop tool.
Select the Crop tool, hold the Alt key and drag the cropping frame.
Make the cropping frame larger than the canvas or the image. Click the apply icon (on the options bar under the menu) or press enter.
You should now have an empty or transparent area beside the original photograph.
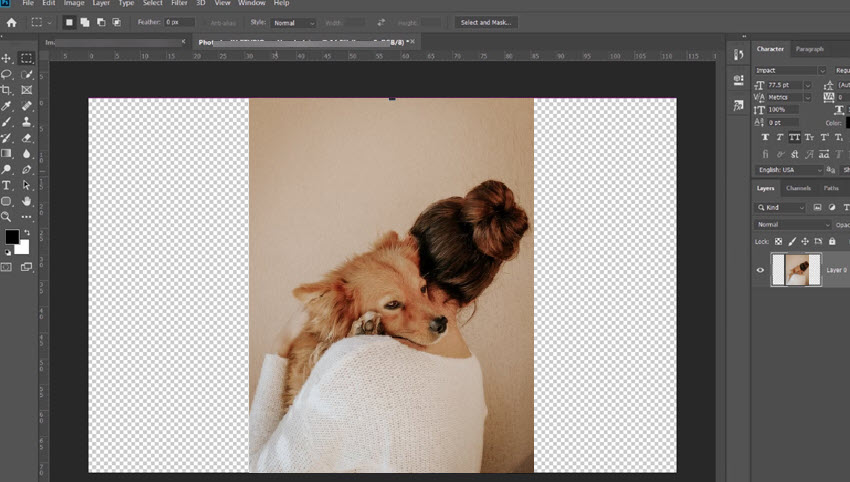
Step 3. Use Content Aware scale.
With the selection remains active, go to menu: Edit > Content Aware Scale to fill the transparent area.
If you're working with a relatively uniform wall, sky, or other simple background, Photoshop can often extend it smoothly.
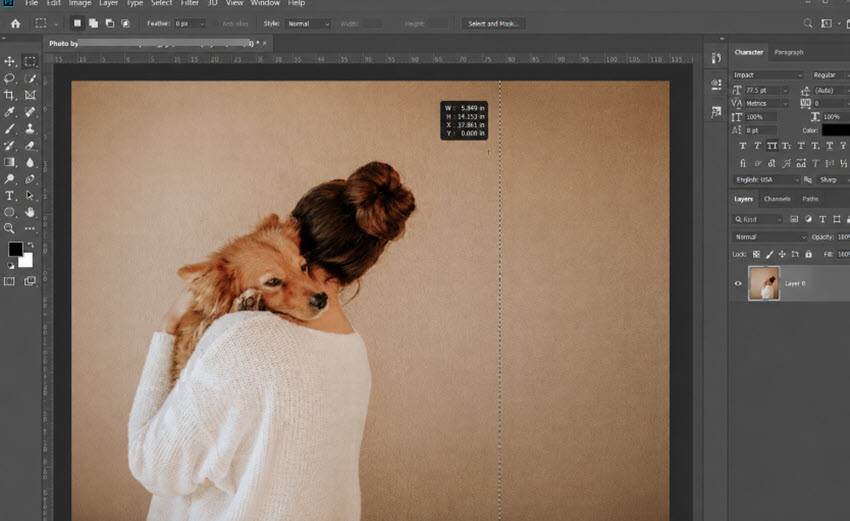
Note:
- If the option is grayed out, make sure you have selected the layer with your target image.
- For the options bar under Photoshop menu, make sure the protect option is set at "none" when using Content-Aware Scall Fill.
- Press Ctrl/Cmd+D to deselect the selection.
Modern Photoshop Gives You More Control
While Photoshop CS users may prefer to rely on the traditional image resizing or Transform tool, users with a Creative Cloud subscription can enjoy more AI tools and Firefly features. If you also have a Topaz Studio subscription, you can use Topaz with Photoshop.
For users who prefer standalone software without a subscription, or want to avoid being confined to the Adobe ecosystem and paying for overlapping tools, here is a list of the best image upscalers worth trying with AI inference.
You May Also Like


This post was written by Brenda Peng who is a seasoned editor at Digiarty Software who loves turning ordinary photos into extraordinary works of art. With AI assistance for brainstorming and drafting, the post is reviewed for accuracy by our expert Abby Poole for her expertise in this field.
