Ever increased Canva's Sharpness slider only to end up with a photo that looks grainy instead of clearer? That's because image blur isn't always caused by a lack of sharpness. A soft image, a low-resolution photo, and an out-of-focus subject all require different fixes.
The good news is that Canva offers multiple ways to improve image clarity—not just the Sharpness slider. Depending on the problem, AI Upscaling or Auto Focus may deliver noticeably better results.
In this guide, we'll walk through all three methods, explain when each one works best, and show what to do when Canva can't recover the detail you're looking for.
Method 1: Sharpen an Image with Canva's Sharpness Slider
The fastest way to sharpen an image in Canva is through the built-in Sharpness adjustment. This tool increases contrast along edges and fine details, making photos appear crisper and more defined. For slightly soft images, the improvement can be noticeable within seconds.
How to Use Canva's Sharpness Tool
- Upload your image to Canva.
- Select the image on the canvas.
- Click Edit Photo.
- Open Adjust.
- Locate the Sharpness slider.
- Gradually increase the value until the image looks clearer.
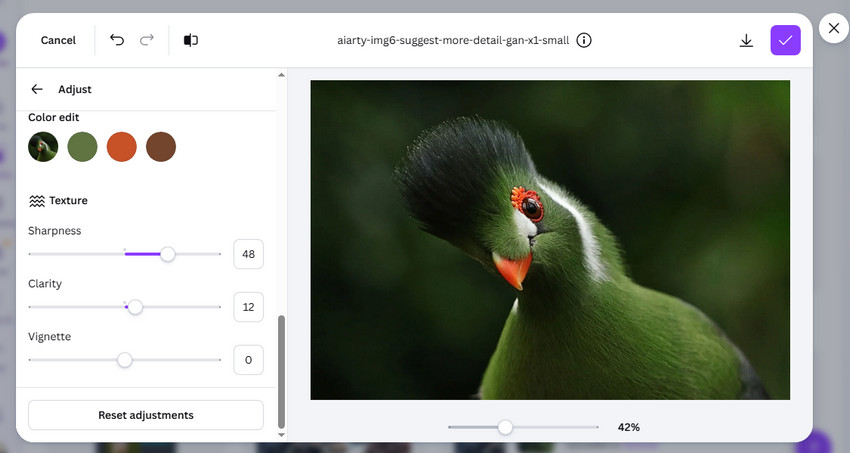
Rather than pushing the slider to its maximum value, increase sharpness gradually while monitoring the image at full size. Excessive sharpening often creates unwanted grain, halos around edges, and artificial-looking textures.
When the Sharpness Slider Works Best
The Sharpness adjustment works well when a photo is already reasonably clear but needs a little extra definition. It is particularly useful for product photos, social media graphics, portraits with slightly soft edges, or images that have been mildly compressed.
What the Sharpness Tool Cannot Do
One common misconception is that sharpening can restore missing detail. In reality, Canva's Sharpness slider only enhances existing edge contrast. It cannot recreate information that no longer exists in the image.
If a photo is low resolution, heavily compressed, out of focus, or enlarged beyond its original size, sharpening alone may make the image look harsher without actually improving detail.
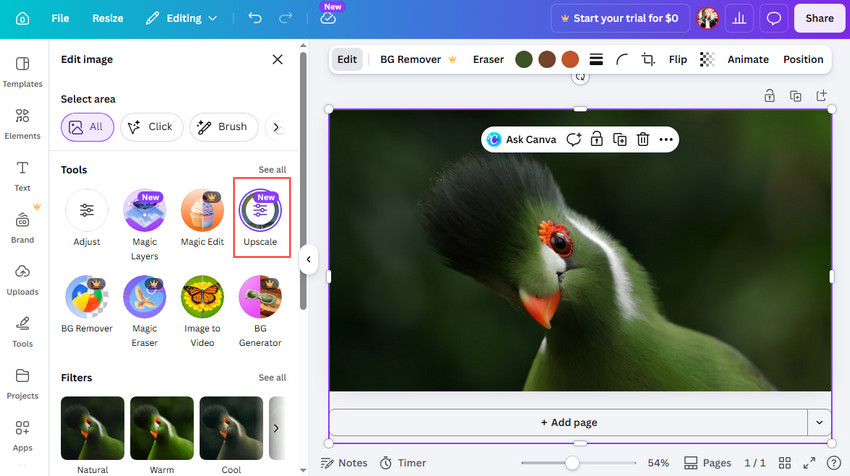
Method 2: Sharpen an Image with Canva's AI Upscale Tool
If your image is small, pixelated, or lacks detail because of low resolution, Canva AI upscaling may produce better results than traditional sharpening. Unlike the Sharpness slider, Canva's Upscale tool attempts to increase image resolution while improving perceived detail.
Canva's AI Upscale tool is designed to improve image clarity and perceived resolution with minimal effort. Available through Magic Studio, it uses AI to enhance photos for social media, presentations, print graphics, and other creative projects, helping images appear sharper and more polished without requiring manual editing.
How to Use Canva's Upscale to Sharpen Images
- Upload your image to Canva. Open Canva, import your photo, and select it on the canvas.
- Use Canva's AI Upscale tool. Click Edit, choose Upscale from Magic Studio, and let Canva automatically enhance image clarity and resolution.
- Export the upscaled image. Review the result, make optional edits, and download the enhanced image in PNG or your preferred format.
Beyond Canva's native AI Upscale tool, users can also find third-party image enhancement apps such as Photo Upscaler from Artyde and AI Photo Enhancer from Imgkits. These tools can help sharpen images, enlarge low-resolution photos, and improve overall clarity without leaving Canva.
However, app availability changes over time—some previously available options, including A1D.AI's Image Upscaler, have quietly disappeared from the Canva Apps Marketplace. More importantly, image quality can vary considerably between different AI models, with some producing cleaner detail while others may introduce artifacts, oversharpening, or an artificial look.
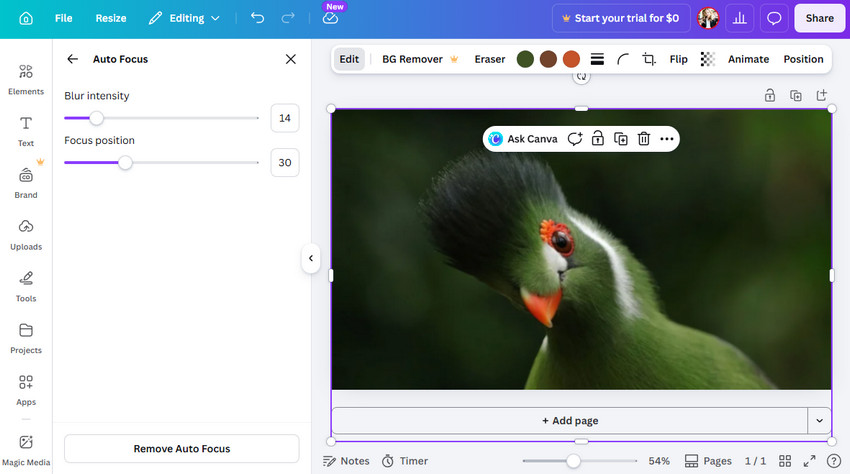
Method 3: Sharpen a Subject with Canva Auto Focus
Sometimes the goal isn't to sharpen the entire image. Instead, you may want the main subject to stand out more clearly. This is where Canva's Auto Focus feature can help. Auto Focus uses AI to identify the primary subject in a photo and visually separate it from the background. By emphasizing the subject and reducing background distractions, the image often appears sharper and more professional.
How to Use Auto Focus in Canva
- Select the photo you want to edit in Canva.
- Click Edit from the editor toolbar.
- Go to Tools, then click See all.
- Choose Auto Focus from the available options.
- Adjust the Blur intensity slider to control background blur strength.
- Use the Focus position slider to decide what remains sharp in the image.
Auto Focus is especially useful for portrait photography, pet photos, product photography, social media content and thumbnail creation. Although it can improve visual emphasis, it does not restore missing image detail. If the subject itself is blurry, low resolution, or affected by motion blur, Auto Focus cannot reconstruct the lost information.
Why Your Image Still Looks Blurry After Sharpening
Many users try multiple Canva tools and still end up with an image that doesn't look truly sharp. This usually happens because the problem isn't a lack of sharpness. Instead, the image may be suffering from one of several common quality issues.
Check detailed reasons and fixes to blurry Canva downloads issues>>
1. The Original Image Is Too Small
A low-resolution image contains limited visual information. Once enlarged, there simply aren't enough pixels available to maintain clarity.
2. Compression Removed Fine Detail
Images downloaded from social media platforms, messaging apps, or websites often lose texture and detail because of compression. >> How to Fix Overly Compressed Images
3. Motion Blur or Focus Errors
If the camera moved during capture or the subject was out of focus, important detail may never have been recorded in the first place.
4. Sharpening Cannot Recreate Missing Pixels
This is the most important limitation to understand. Sharpening enhances existing detail. It does not generate new detail. If the image lacks information, you'll need an AI enhancement tool designed to rebuild texture and improve image structure rather than simply increasing edge contrast.
When Canva Sharpening Isn't Enough
Canva is excellent for design workflows and quick edits, but there are situations where sharpening and basic enhancement tools reach their limits.
This is particularly true for:
- Old photos
- Compressed social media images
- Wildlife photography
- Smartphone photos taken in low light
- Images that need significant enlargement
In these cases, dedicated AI image sharpening software often delivers noticeably better results because it combines multiple processes into a single workflow. Rather than applying sharpening alone, advanced AI models can upscale resolution, reduce noise, improve texture, and recover visual detail simultaneously.
Improve Blurry Photos with Aiarty Image Enhancer
When an image remains soft after sharpening in Canva, the issue is often missing detail rather than insufficient sharpness. Aiarty Image Enhancer is designed specifically for these situations.
Instead of simply boosting edge contrast, it uses AI models trained to analyze textures, patterns, and image structures to recover detail, reduce noise, upscale low-resolution images, and generate cleaner, more natural-looking results.
Why Aiarty Produces Better Results
- Upscale images while preserving natural textures and fine details.
- Reduce noise, compression artifacts, and low-light grain.
- Recover detail in low-resolution or heavily compressed photos.
- Process multiple images at once with batch enhancement.
- Adjust enhancement strength to avoid an overly processed AI look.
- Enhance photos locally without uploading them to the cloud.
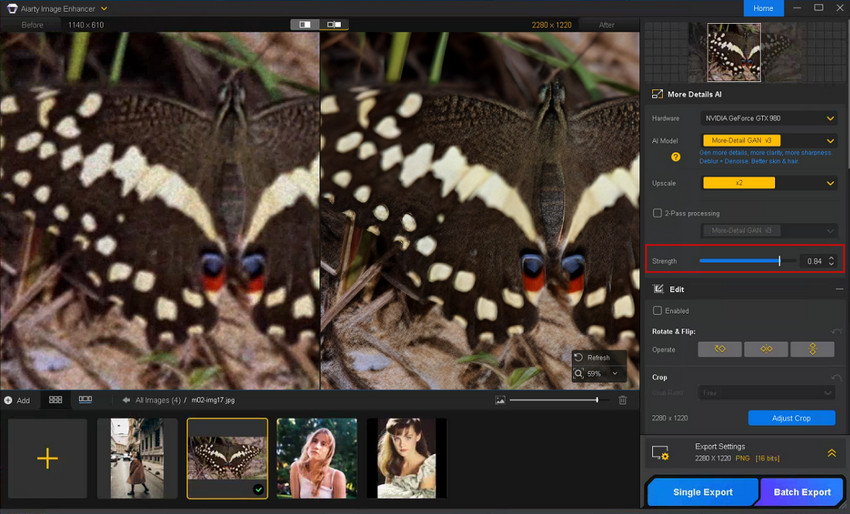
One particularly useful feature is the Strength control, which allows you to fine-tune enhancement intensity. This helps prevent the overly processed, plastic, or waxy appearance often associated with aggressive AI enhancement.
How to Enhance and Sharpen Images with Aiarty Image Enhancer
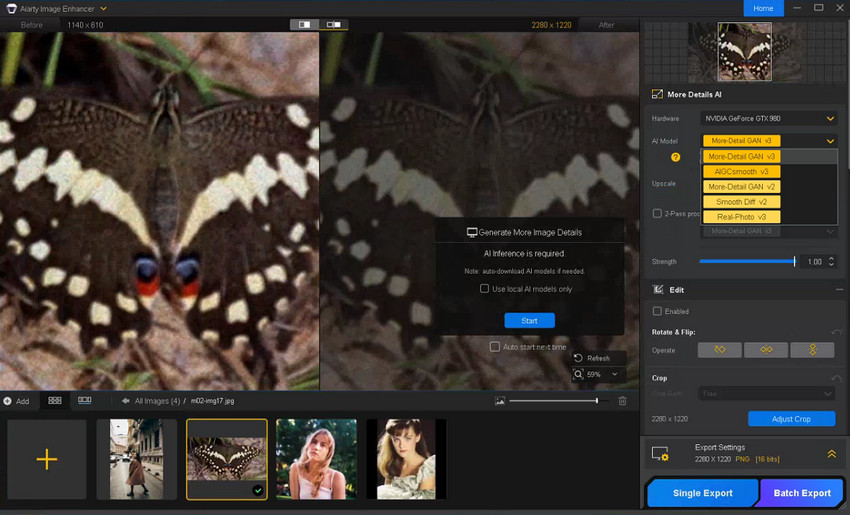
Step 1. Import your image. Open Aiarty Image Enhancer and add the photo you want to sharpen or improve. The software supports formats such as JPG, PNG, and common RAW files. If you haven't installed it on your computer, feel free to download it below on your PC or Mac.
Step 2. Select an AI model. Choose the AI model that best matches your image type. For example, More-Detail GAN v3 works well for recovering fine textures and enhancing image clarity.
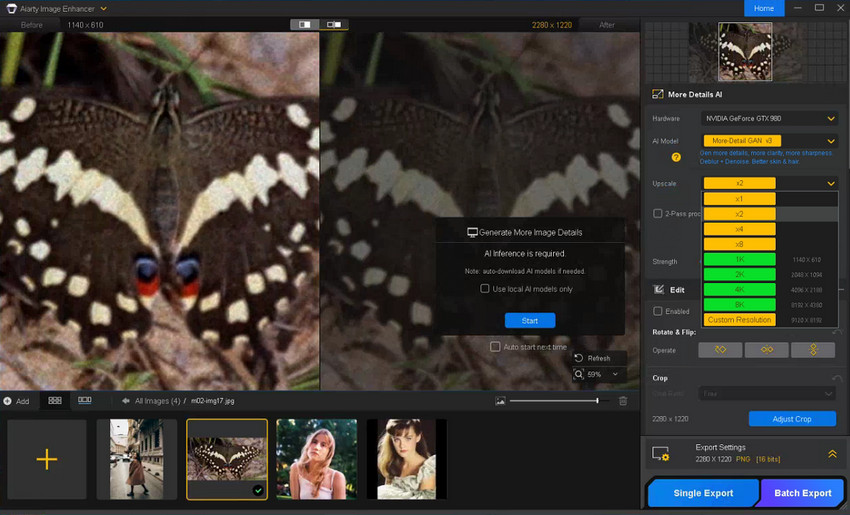
Step 3. Choose an upscale ratio. Select an upscale factor or target resolution if you want to enlarge the image while improving overall sharpness and detail.
Step 4. Preview and fine-tune the result. Fine-tune the Strength slider or try a different AI model to achieve the right balance between detail recovery and a natural-looking result.
Step 5. Export the enhanced image. Export the image in your preferred format and resolution.

For heavily compressed images, wildlife photography, scanned photos, and low-resolution social media images, the difference is often far more noticeable than sharpening alone.
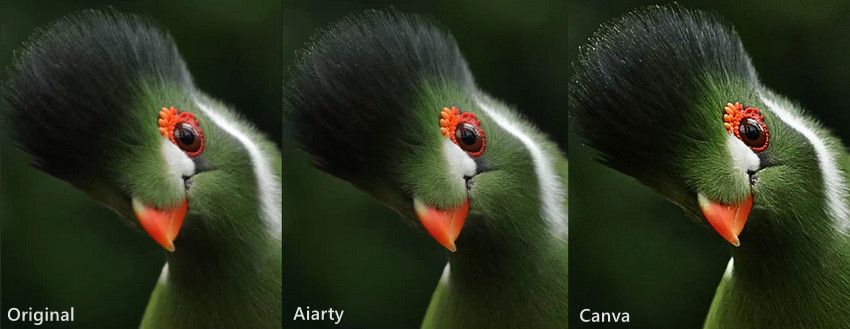
Test 1: Sharpen a wildlife photo of a bird.
The original photo was slightly soft, with a less-defined eye and muted feather details. After enhancement with Aiarty Image Enhancer, the bird's eye became noticeably sharper, while feather textures appeared clearer and more natural without obvious AI artifacts or signs of overprocessing.
Canva's Sharpness adjustment also improved clarity, but introduced visible sharpening artifacts, including hard edges, white halos, and small white speckles around high-contrast areas. While both results looked sharper than the original, Aiarty delivered a cleaner and more natural-looking enhancement.
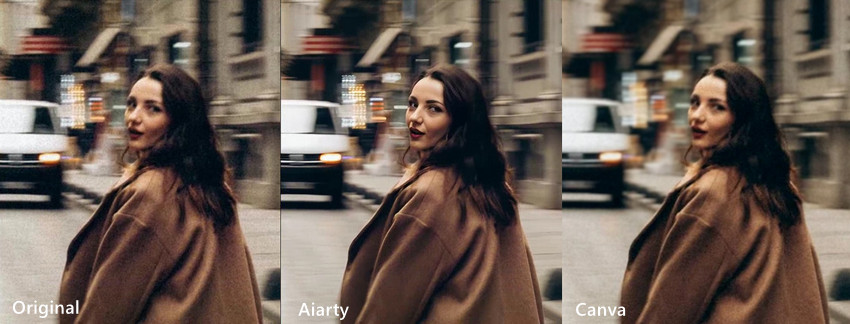
Test 2: Sharpen a blurry street portrait.
The original street portrait was slightly out of focus, with soft facial features and visible low-light noise affecting eyes, skin, and hair details.
After enhancement with Aiarty Image Enhancer, facial structure became clearer and more natural, with improved sharpness and texture recovery without a plastic or overprocessed look. Canva's Auto Focus offered only minor improvement, while its AI Upscale mainly increased image size but had limited impact on restoring actual facial detail, resulting in only subtle overall enhancement.
Conclusion
If you simply need to add a little extra crispness to a photo, Canva's Sharpness slider remains the quickest solution. For low-resolution images, Canva's AI enhancement features can often provide better results.
However, when you're working with heavily compressed photos, old images, wildlife shots, or pictures that need significant enlargement, sharpening alone usually isn't enough. In those situations, dedicated AI enhancement tools such as Aiarty Image Enhancer can recover more detail while maintaining a cleaner and more natural appearance.
 FAQs
FAQs
Yes. Canva offers several tools to improve image clarity, including the Sharpness slider, AI Upscale, and Auto Focus. For slightly soft photos, increasing the Sharpness setting is often enough. If the image is low resolution or blurry, AI Upscale usually produces better results.
To improve image quality in Canva, select your photo and use tools such as AI Upscale, Sharpness, Contrast, Brightness, and Color Adjustments. Starting with the highest-quality source image will generally produce the best results. For heavily compressed or low-resolution photos, a dedicated AI image enhancer may be more effective.
The best method depends on the cause of the blur. For slightly soft images, try the Sharpness slider. For low-resolution images, use Canva's AI Upscale feature. If you want to emphasize a subject, Auto Focus can help draw attention to the sharpest area of the photo. However, severely blurry or out-of-focus images may require advanced AI enhancement tools to recover missing detail.
You can improve an image's quality by using Canva's AI Upscale tool, which enhances clarity and resolution automatically. After upscaling, download the image in a high-quality format such as PNG. Keep in mind that Canva can enhance image quality, but it cannot always recreate detail that is missing from a very low-resolution source image.
Over-sharpening increases edge contrast and often amplifies image noise, compression artifacts, and texture imperfections. Instead of creating new detail, sharpening enhances existing pixels, which can make low-quality images appear grainy or unnatural. If your photo lacks resolution or fine detail, AI upscaling may produce a cleaner result than sharpening alone.
Many older Canva tutorials mention the A1D.AI Image Upscaler app, but it is no longer available in Canva's Apps Marketplace. Canva has gradually shifted toward its own built-in AI enhancement tools, including the AI Upscale feature in Magic Studio. While some third-party upscaling apps remain available, their availability and functionality may change over time as Canva updates its app ecosystem.
You May Also Like
This post was written by Brenda Peng who is a seasoned editor at Digiarty Software who loves turning ordinary photos into extraordinary works of art. With AI assistance for brainstorming and drafting, the post is reviewed for accuracy by our expert Abby Poole for her expertise in this field.