Content-Aware Fill is one of Photoshop’s most useful retouching tools for removing unwanted elements and repairing images. Instead of manually cloning or painting over an area, Photoshop analyzes the surrounding pixels and automatically fills the selected region with matching content. The feature works especially well on simple backgrounds such as sky, grass, walls, sand, water, or other areas with relatively consistent textures. In more complex scenes, however, you may still need to refine the result with additional retouching tools.
In this guide, you’ll learn what Content-Aware Fill is, when to use it, how to remove objects and extend backgrounds, what the main settings mean, and how to fix common problems when the tool doesn’t work as expected.
What Is Content-Aware Fill in Photoshop?
Content-Aware Fill is a Photoshop feature that replaces a selected area by sampling nearby pixels and blending them into the image. Rather than filling an area with a solid color or copied texture, Photoshop analyzes the surrounding content and attempts to create a natural-looking replacement.
For example, if you remove a person from a beach photo, Photoshop may use nearby sand, water, and sky to fill the empty space. Likewise, removing power lines from a clear sky or cleaning dust spots from scanned photos are common tasks for Content-Aware Fill.

The tool performs best when the surrounding background is relatively uniform. Areas such as sky, grass, roads, walls, sand, and water are usually easy for Photoshop to reconstruct. More detailed subjects—including faces, hair, buildings, text, logos, or repeating patterns—are often more challenging and may require additional manual editing. It’s also important to understand the difference between Content-Aware Fill and Generative Fill. Content-Aware Fill relies primarily on existing image pixels, while Generative Fill uses AI to create entirely new content. If your goal is realistic photo cleanup that stays close to the original image, Content-Aware Fill is often the better option.
When Should You Use Content-Aware Fill?
Content-Aware Fill is ideal when you want to remove or repair something while preserving the original appearance of the photo.
Typical use cases include:
- Removing people, wires, signs, dust spots, or small distractions
- Filling empty areas after cropping or straightening an image
- Extending simple backgrounds
- Repairing damaged, old, or scanned photographs
The tool is particularly effective when the object occupies only a small portion of the image and there is enough surrounding background for Photoshop to sample.
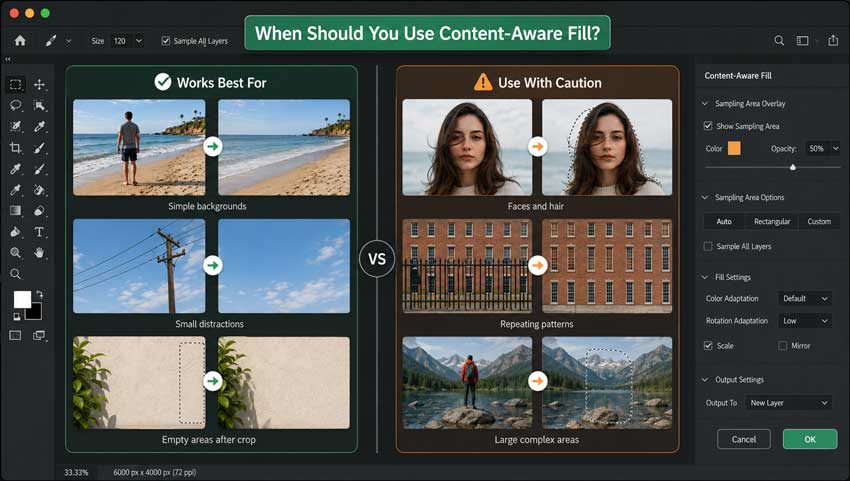
However, Content-Aware Fill may struggle in situations involving:
- Buildings and architectural details
- Repeating patterns such as bricks, tiles, or fences
- Text, logos, and graphic elements
- Large objects that cover most of the original background
For portrait editing, it’s usually best to use Content-Aware Fill only for minor distractions. Reconstructing facial features, hands, hair, or clothing details often requires more precise tools such as Clone Stamp, Healing Brush, Patch Tool, or Generative Fill.
How to Use Content-Aware Fill in Photoshop
Although Content-Aware Fill can seem like a one-click solution, the quality of the result depends heavily on your selection and sampling area. A careful setup usually produces much more natural edits.
Content-Aware Fill Settings Explained
Understanding the main settings can help you achieve more consistent results.
- Sampling Area Overlay: Displays the source pixels Photoshop will use.
- Sampling Brush Tool: Allows you to add or remove source areas.
- Color Adaptation: Adjusts color and brightness to match surrounding areas.
- Rotation Adaptation: Helps align textures with changing directions.
- Scale: Resizes sampled details to fit the target area.
- Mirror: Mirrors textures when appropriate.
- Output Settings: Determines where Photoshop places the final result.
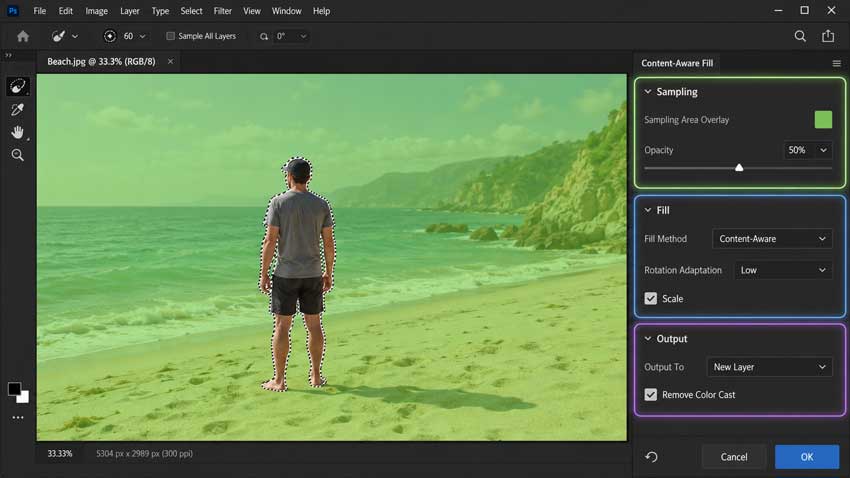
For most editing workflows, Output to New Layer is the recommended option because it preserves editing flexibility.
Step 1. Duplicate the Layer
Open your image in Photoshop and duplicate the original layer before making any changes.
- Windows: Ctrl + J
- Mac: Command + J
Working on a duplicate layer keeps your workflow non-destructive. If the result doesn’t look right, you can easily compare versions, mask unwanted areas, or start over without affecting the original image.
Step 2. Select the Area
Use a selection tool to highlight the object or area you want to remove. Common options include:
- Object Selection Tool for people and clearly defined objects
- Lasso Tool for manual selections
- Quick Selection Tool for subjects with obvious edges
- Magic Wand Tool for simple color-based selections
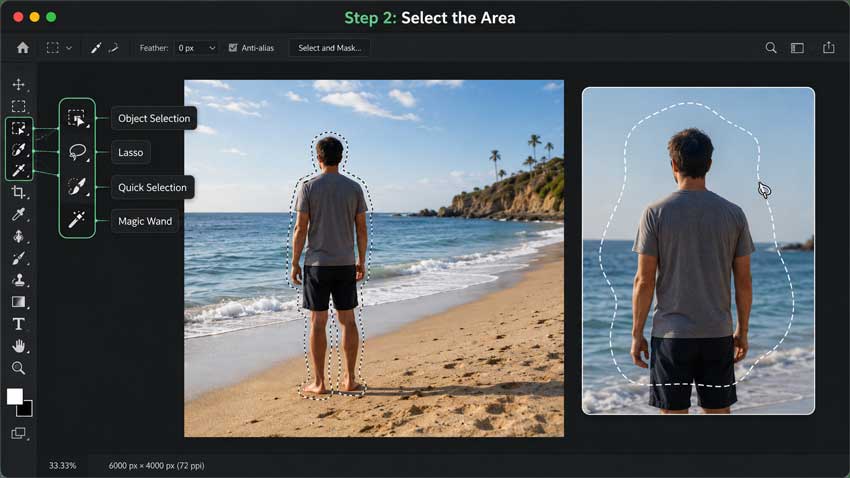
Avoid selecting too tightly around the object. Expanding the selection slightly often helps prevent visible halos, leftover edges, or shadows from remaining after the fill is applied.
Step 3. Open Content-Aware Fill
Once your selection is active, go to: Edit > Content-Aware Fill. Photoshop will open the dedicated Content-Aware Fill workspace. Here, you’ll see both the sampling area and a live preview, allowing you to evaluate the result before applying it.
Step 4. Adjust the Sampling Area
The green overlay indicates which parts of the image Photoshop is using as source material. This step is extremely important because poor sampling often leads to poor results. Use the Sampling Brush Tool to remove unwanted source areas. For example:
- When removing a person from a beach scene, sample only nearby sand and sky.
- When repairing grass, sample surrounding grass rather than nearby objects or shadows.
- When extending a wall, avoid sampling people, signs, or unrelated textures.
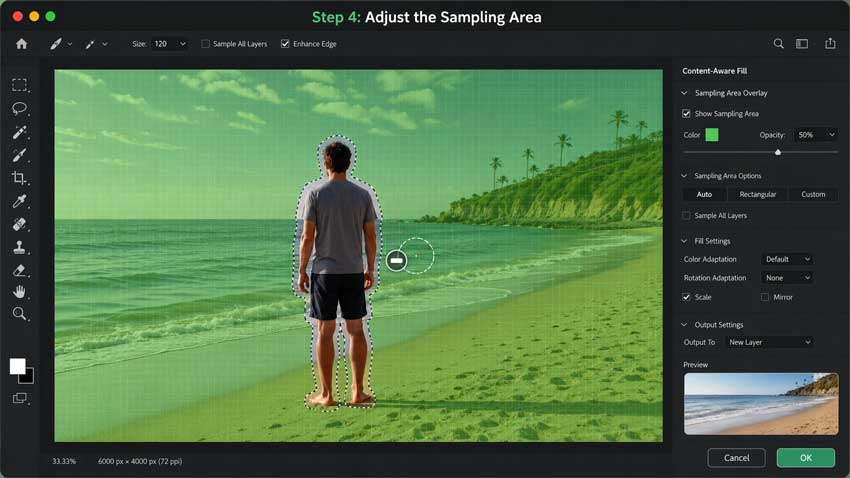
A clean and relevant sampling area usually produces much more realistic fills.
Step 5. Adjust Fill Settings
The Content-Aware Fill workspace includes several settings that help Photoshop adapt the sampled pixels.
The main options include:
- Color Adaptation: Matches color and lighting variations.
- Rotation Adaptation: Helps align curved or angled textures.
- Scale: Resizes sampled textures when necessary.
- Mirror: Useful for symmetrical or reflective areas.
For many images, the default settings work perfectly well. However, experimenting with these options can improve results in more complex scenes.
Step 6. Output to a New Layer
Whenever possible, choose: Output to New Layer. This keeps the original image untouched and gives you greater flexibility for additional adjustments. You can later use masks, opacity changes, or further retouching without permanently altering the source image.
Step 7. Clean Up the Result
After applying the fill, zoom in and inspect the edited area carefully. Even successful fills may contain repeated textures, blurry patches, or minor artifacts.
Useful cleanup tools include:
- Healing Brush for blending textures and tones
- Clone Stamp for precise texture replacement
- Patch Tool for larger corrections and smoothing transitions
In many professional workflows, Content-Aware Fill serves as the starting point, while manual retouching creates the final polished result.
How to Remove Objects with Content-Aware Fill
Removing unwanted objects is one of the most common uses for Content-Aware Fill. A typical workflow looks like this:
- Duplicate the image layer.
- Select the object along with any visible shadow or reflection.
- Open Edit > Content-Aware Fill.
- Refine the sampling area.
- Output the result to a new layer.
- Clean up any remaining artifacts.
For larger subjects, avoid removing everything in a single pass. Instead, work in smaller sections. Removing a person, shadow, and surrounding area separately often produces more natural results because Photoshop has more relevant pixels to sample from. Simple backgrounds such as sky, grass, sand, or walls usually produce excellent results with minimal effort.
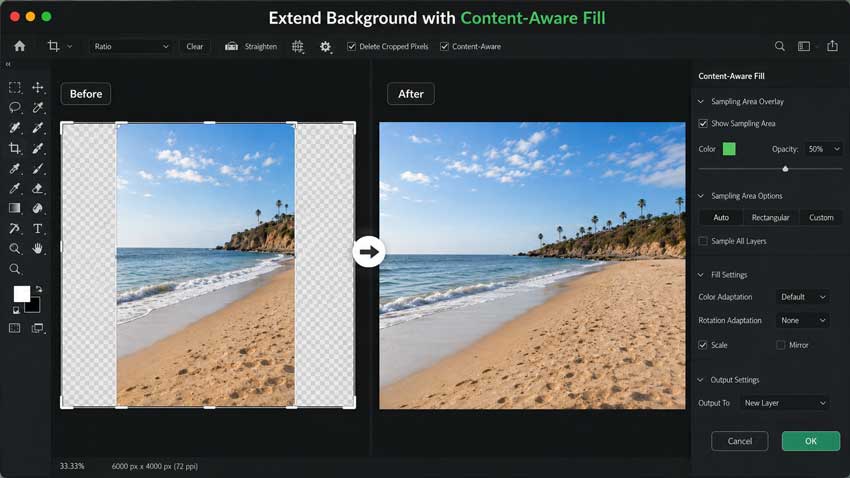
How to Extend a Background with Content-Aware Fill
Content-Aware Fill can also generate additional background space when you need a larger canvas. To extend a background:
- Use the Crop Tool to expand the canvas.
- Select the newly created empty area.
- Open Edit > Content-Aware Fill.
- Adjust the sampling area if necessary.
- Apply the fill.
This technique works especially well with simple backgrounds such as sky, water, grass, walls, sand, or studio backdrops. You can also enable Content-Aware Crop while straightening photos. Photoshop will automatically attempt to fill blank corners created during the crop process. For larger extensions, manually using Content-Aware Fill generally provides more control and better results.
Content-Aware Fill vs Generative Fill vs Remove Tool
Photoshop now offers several cleanup tools, each designed for different situations.
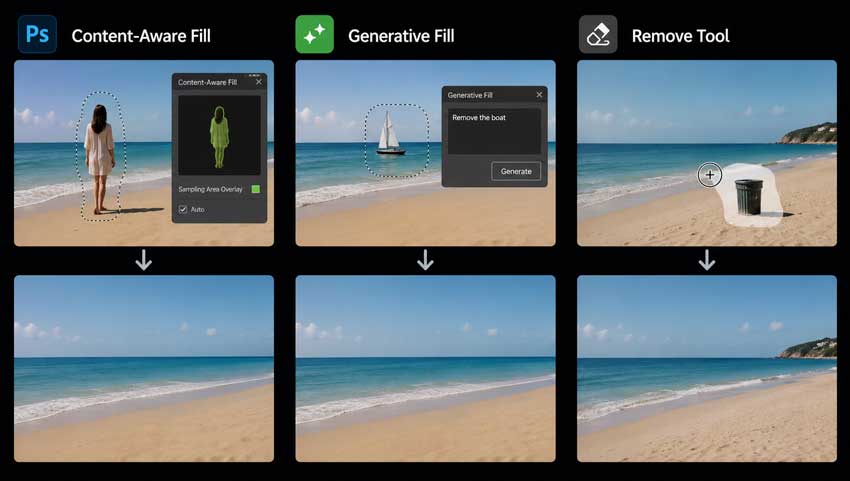
In general:
- Use Remove Tool for quick fixes and small distractions.
- Use Content-Aware Fill when you need more control over the source area.
- Use Generative Fill for large missing areas or creative edits.
- Use Clone Stamp and Healing Brush for detailed finishing work.
Many editors combine several of these tools within the same project.
Content-Aware Fill Not Working? Common Problems and Fixes
Why Is Content-Aware Fill Greyed Out in Photoshop?
If Content-Aware Fill is greyed out in Photoshop, the issue is usually related to the selection or the active layer. Photoshop requires both an active selection and a compatible pixel layer before the feature becomes available.
Common reasons why Content-Aware Fill is unavailable include:
- No active selection has been made.
- The wrong layer is selected in the Layers panel.
- The selected layer is locked or is not a raster image layer.
- A Smart Object, text layer, shape layer, or adjustment layer is active.
To fix the problem, make sure you create a selection first and work on a normal pixel layer. If necessary, duplicate or rasterize the layer before using Content-Aware Fill.
How to Fix “Not Enough Source Pixels” in Photoshop
The “Could not fill because there are not enough source pixels” error appears when Photoshop does not have enough surrounding image data to generate a realistic fill.
You can usually fix this Content-Aware Fill error by trying the following:
- Work on the original image layer instead of an empty or transparent layer.
- Remove objects in smaller sections rather than selecting a very large area.
- Expand the sampling area to include more usable background pixels.
- Avoid selecting extremely large empty regions all at once.
In many cases, breaking the edit into several smaller Content-Aware Fill operations produces much better results.
Why Does Content-Aware Fill Look Blurry or Repetitive?
If Content-Aware Fill looks blurry, soft, or repetitive, Photoshop is often sampling insufficient or unsuitable image data.
This usually happens when:
- The selected area is too large.
- The image resolution is low or heavily compressed.
- Photoshop samples the wrong texture or background area.
- The sampling area is too limited.
To improve Content-Aware Fill results:
- Work in smaller sections instead of one large fill.
- Refine the sampling area carefully.
- Exclude unsuitable source regions from the sampling overlay.
- Use Clone Stamp or Healing Brush for final retouching and cleanup.
Tips for Better Content-Aware Fill Results
Following a few best practices can significantly improve Content-Aware Fill results in Photoshop:
- Expand selections slightly beyond object edges to avoid halos.
- Include shadows and reflections when necessary.
- Carefully refine the sampling area before applying the fill.
- Use multiple smaller fills instead of one large selection.
- Inspect edits at 100% zoom before exporting the final image.
These simple techniques can help you achieve cleaner, more natural-looking object removal and background repairs.
Best Content-Aware Fill Alternatives
Content-Aware Fill offers excellent control, but some users prefer a faster and simpler workflow.
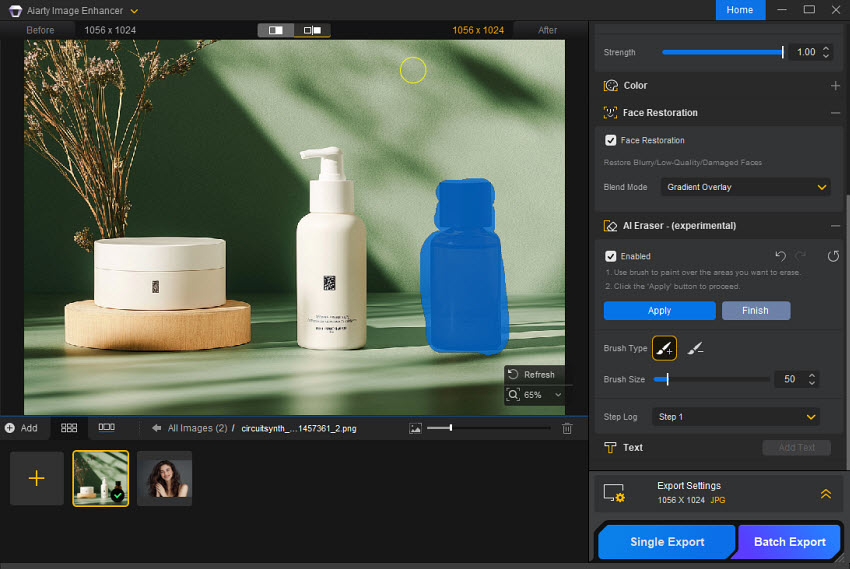
Aiarty Image Enhancer includes an AI Eraser tool designed for users who want a faster and more straightforward way to remove unwanted elements from photos. Unlike Photoshop’s Content-Aware Fill, which often requires an accurate selection, manual sampling area adjustment, and additional cleanup, Aiarty AI Eraser uses an AI-based workflow: you brush over the object you want to remove, and the software analyzes the surrounding image content to rebuild the background automatically. This makes it especially useful when you need quick object removal without spending time fine-tuning Photoshop settings. For example, it can help clean up common distractions such as:
- Tourists or passersby in travel photos
- Power lines, street signs, poles, or small background distractions
- Unwanted text, logos, marks, or watermarks in an image
- Minor portrait distractions, blemishes, or background clutter
The advantage of using an AI eraser is not only speed, but also simplicity. Photoshop gives experienced users more manual control, especially for complex retouching, but beginners may find the sampling area, layer settings, and cleanup process less intuitive. Aiarty AI Eraser offers a more direct approach for users who simply want to mark an unwanted area and let the software handle the background reconstruction.
Another benefit is that object removal is often only one part of the editing process. After removing a distraction, the edited area may still look slightly soft, compressed, or less detailed than the rest of the image, especially when working with low-resolution or heavily compressed photos. Since Aiarty Image Enhancer also focuses on image enhancement, it can further improve sharpness, clarity, texture, and overall image quality after the object has been removed.
For users who need precise manual retouching, Photoshop’s Content-Aware Fill is still a powerful option. But for quick cleanup, beginner-friendly object removal, and final image enhancement in one workflow, Aiarty Image Enhancer AI Eraser can be a practical alternative.
Conclusion
Content-Aware Fill is a powerful Photoshop feature for removing objects, extending backgrounds, and repairing photos. When used with accurate selections and a carefully refined sampling area, it can produce highly realistic results. For simple edits, the tool can often deliver excellent results in seconds. For more complex scenes, combining Content-Aware Fill with Clone Stamp, Healing Brush, Patch Tool, or Generative Fill usually produces the most natural outcome. If you prefer a faster workflow with less manual adjustment, AI-powered object removal tools can also be a practical alternative.
This post was written by Brenda Peng who is a seasoned editor at Digiarty Software who loves turning ordinary photos into extraordinary works of art. With AI assistance for brainstorming and drafting, the post is reviewed for accuracy by our expert Abby Poole for her expertise in this field.