


A tiny dark spot appearing in the sky of a landscape photo can be frustrating, especially when you know your lens is clean. If the same spots appear in multiple images at the same location, the problem is likely not your lens — it may be dust on your camera sensor.
The camera sensor is one of the most important components inside your DSLR or mirrorless camera. Since it directly captures light and converts it into digital images, keeping it clean is essential for maintaining image quality. However, cleaning a camera sensor requires care. The sensor surface is delicate, and using the wrong tools or techniques can cause damage.
This guide explains how to clean a camera sensor safely, including how to identify sensor dust, what tools to use, step-by-step cleaning instructions, and how to prevent future contamination.
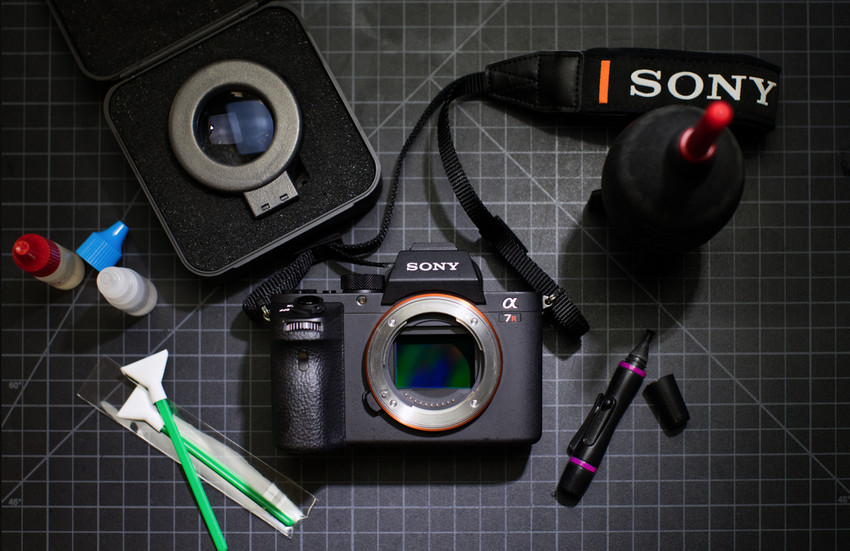
What Is a Camera Sensor and Why Does It Need Cleaning?
A camera sensor is the digital component inside a DSLR or mirrorless camera that captures light and records images. Because it is highly sensitive and exposed during lens changes, it can collect dust and debris over time.
Common situations that introduce sensor dust include:
- Frequent lens changes or outdoor shooting in dusty environments
- Traveling with your camera or storing it without proper protection
- Using your camera in humid or challenging conditions
Sensor dust is most noticeable in photos with large, clean areas such as blue skies, white backgrounds, product shots, and landscapes. It becomes especially visible when shooting at narrow apertures like f/11 or f/16, where dust particles appear as sharper spots or shadows.
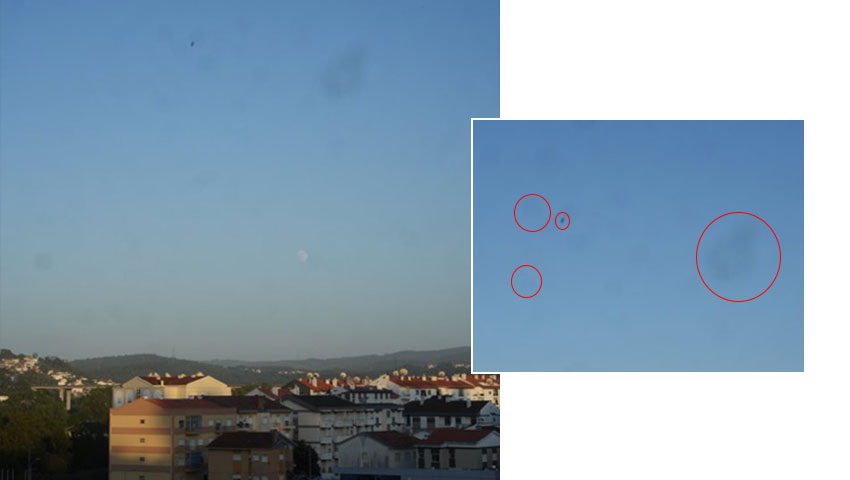
How to Tell If Your Camera Sensor Needs Cleaning
Before cleaning your sensor, make sure dust is the real cause of the problem. Blurry images or reduced image quality can also come from focus errors, camera shake, or lens issues.
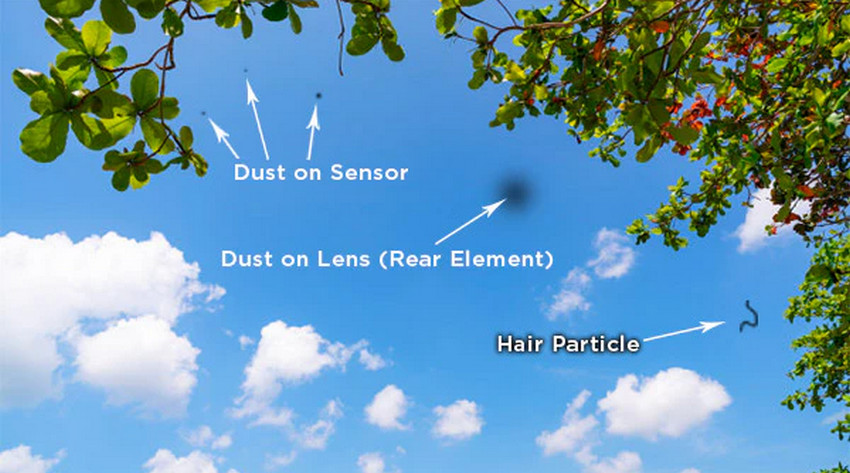
Here are three simple ways to check for sensor dust:
1. Look for Dark Spots in Your Photos
Small, dark spots appearing in your images are the most common sign of sensor dust. To check, photograph a bright, plain surface such as a white wall or clear sky using a narrow aperture (around f/16), then view the image at 100% zoom.
If the same spots appear across multiple photos, your sensor likely needs cleaning.
2. Check Whether Spots Stay in the Same Location
Sensor dust stays fixed, so spots will appear in the same position even when you change lenses or take different photos. In contrast, lens dirt usually affects overall sharpness or contrast rather than creating identical spots.
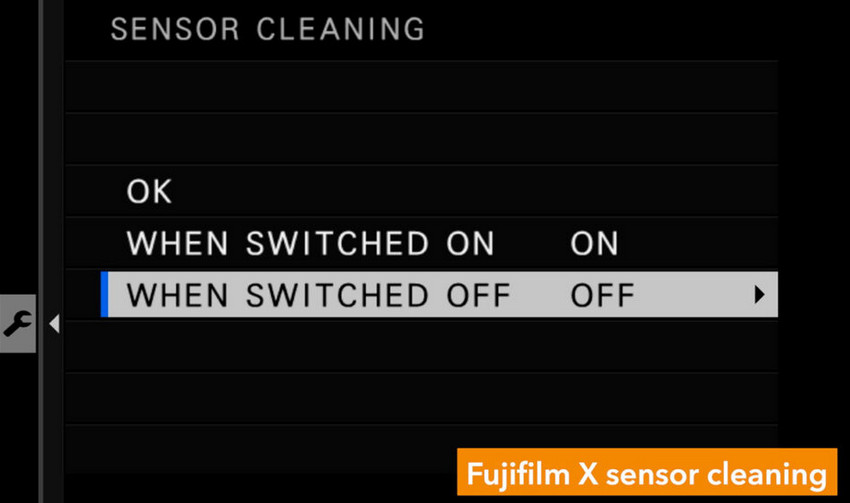
3. Try Your Camera’s Built-In Sensor Cleaning Function
Many DSLR and mirrorless cameras include automatic sensor cleaning, which uses vibrations to loosen and remove loose dust particles. However, it may not remove stubborn dirt, oil marks, or moisture residue, which may require manual cleaning.
How to Clean Camera Sensor: Step-by-Step Guide
If you decide to clean your sensor yourself, preparation is the most important step. Always work carefully and use tools specifically designed for sensor cleaning.
Step 1: Prepare the Right Camera Sensor Cleaning Tools
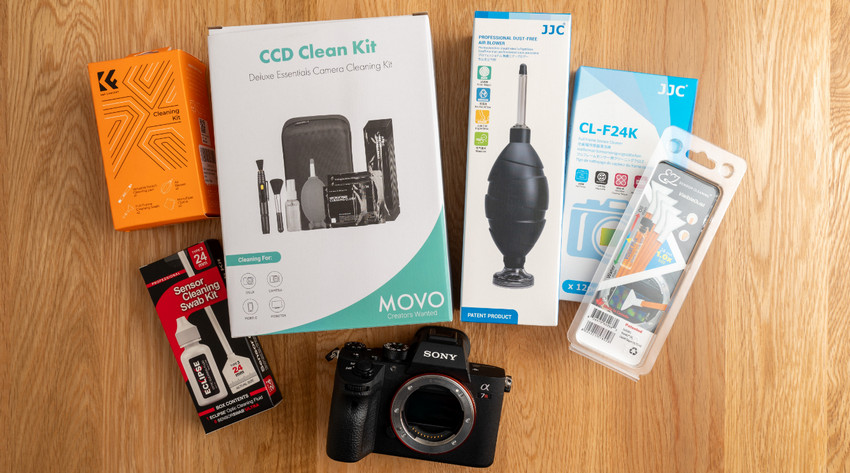
Before cleaning your sensor, prepare the proper tools to avoid damaging the delicate surface. You will typically need:
- Air blower: The safest first step for removing loose dust. Avoid compressed air, which may damage the sensor or leave residue.
- Sensor cleaning swabs: Choose a swab that matches your camera’s sensor size, such as full-frame, APS-C, or Micro Four Thirds.
- Sensor cleaning solution: Only use cleaning products specifically designed for camera sensors.
Optional tools like a sensor loupe, cleaning gloves, or a camera cleaning kit can make the process easier. Avoid using household items such as tissues, cotton buds, paper towels, or general cleaning sprays, as they may scratch the sensor coating or leave fibers behind.
Step 2: Fully Charge Your Camera Battery
Before manual sensor cleaning, make sure your battery is fully charged. During cleaning:
- DSLR cameras may require the mirror to stay lifted.
- Mirrorless cameras keep the shutter open.
If the camera loses power during cleaning, the mechanism could close unexpectedly and potentially damage the sensor or shutter.
Step 3: Use an Air Blower to Remove Loose Dust
Start with the least invasive method, and follow these steps:
- Turn off the camera.
- Remove the lens.
- Activate the camera's sensor cleaning mode if available.
- Hold the camera mount facing downward.
- Use the blower gently several times.
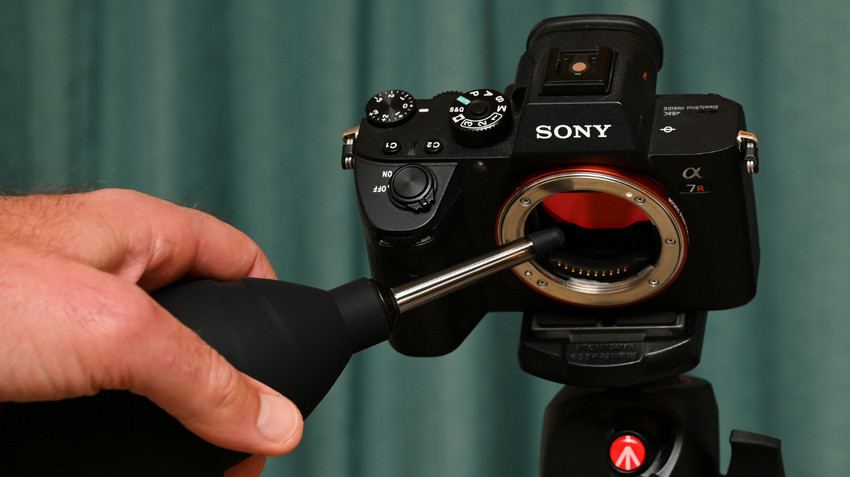
Keeping the camera facing downward helps dust particles fall away instead of landing back on the sensor. It's important to note that never touch the sensor with the blower tip.
Step 4: Use Sensor Cleaning Swabs for Stubborn Dust
If dust remains after using an air blower, you may need to use a sensor cleaning swab. This method requires more caution because the swab directly touches the sensor surface.
Follow these steps:
- Check that you have the correct swab size for your camera sensor.
- Add the recommended amount of sensor cleaning solution if required.
- Gently place the swab on one side of the sensor.
- Swipe across the sensor surface in one smooth motion.
- Use the other side of the swab or a new swab if another pass is needed.
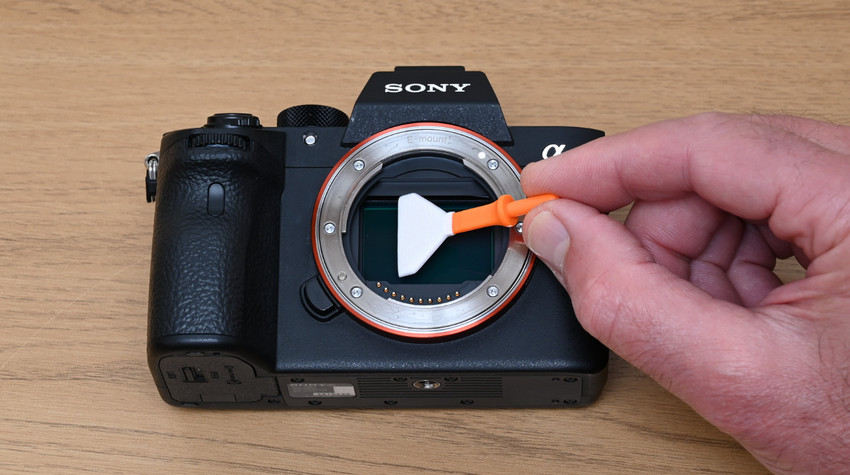
Avoid repeatedly rubbing the same area. Excessive pressure or repeated cleaning can increase the risk of damaging the sensor coating. After cleaning, take another test photo at a narrow aperture to confirm that the dust spots have disappeared.
Camera Sensor Cleaning Mistakes to Avoid
Knowing how to clean a camera sensor is important, but knowing what not to do is equally important. Many sensor problems happen because photographers use incorrect cleaning methods.
Mistake 1: Using Compressed Air
Compressed air cans may seem convenient, but they are not recommended for sensor cleaning. Potential problems include excessive air pressure, chemical residue from propellants, moving dust particles deeper into the camera, and a manual air blower is a much safer choice.
Mistake 2: Touching the Sensor Directly
The sensor surface is extremely delicate. Avoid touching it with fingers, clothing, or unapproved cleaning materials. Even small amounts of oil or moisture can create additional marks that are harder to remove.
Mistake 3: Cleaning the Sensor Too Frequently
While regular maintenance is important, unnecessary cleaning is not recommended. Every time you manually clean your sensor, there is a small risk of scratching the protective coating, leaving cleaning marks, and introducing new dust. Clean your sensor when there is a visible problem rather than following an overly aggressive schedule.
Mistake 4: Using Household Cleaning Products
Never use common household products like glass cleaner, alcohol wipes, paper towels, or cotton swabs on your camera sensor. These products are not designed for camera sensors and may cause permanent damage.
How to Prevent Camera Sensor Dust
Regular maintenance can reduce how often you need sensor cleaning.
1. Change Camera Lenses Carefully
Lens changes are the most common way dust enters a camera. When changing lenses:
- Turn the camera mount downward.
- Avoid changing lenses in windy or dusty environments.
- Keep the rear lens cap clean.
- Prepare the new lens before removing the old one.
Reducing the time your camera is open can minimize dust exposure.
2. Keep Your Camera Equipment Clean
Dust does not only come from the outside environment. Camera bags, lens caps, and accessories can also collect particles. Regularly clean camera body, lens mount, lens caps, and camera bag interior. A clean storage environment helps protect your sensor.
3. Use Automatic Sensor Cleaning
Most modern cameras include automatic sensor cleaning. Although it cannot replace manual cleaning, it is useful for removing loose dust before it becomes a bigger issue. Enable automatic cleaning when turning the camera on or off, changing lenses frequently, and returning from outdoor photography.
What If Your Photos Still Look Soft After Sensor Cleaning?
Cleaning your camera sensor can remove dust spots, but it cannot fix every image quality issue. Photos may still look soft or imperfect due to factors such as low light, high ISO noise, motion blur, camera shake, limited resolution, or image compression.
For example, a wedding photographer may clean the sensor before a shoot but still have to deal with noisy indoor photos, slightly soft details, or underexposed images. In these cases, post-processing can help improve the final results.
Improve Photos After Shooting with RAW Editing
RAW editing is a useful first step for refining photos because RAW files preserve more image data than JPEG files. Photographers can adjust exposure, white balance, colors, shadows, and highlights to improve the overall look.
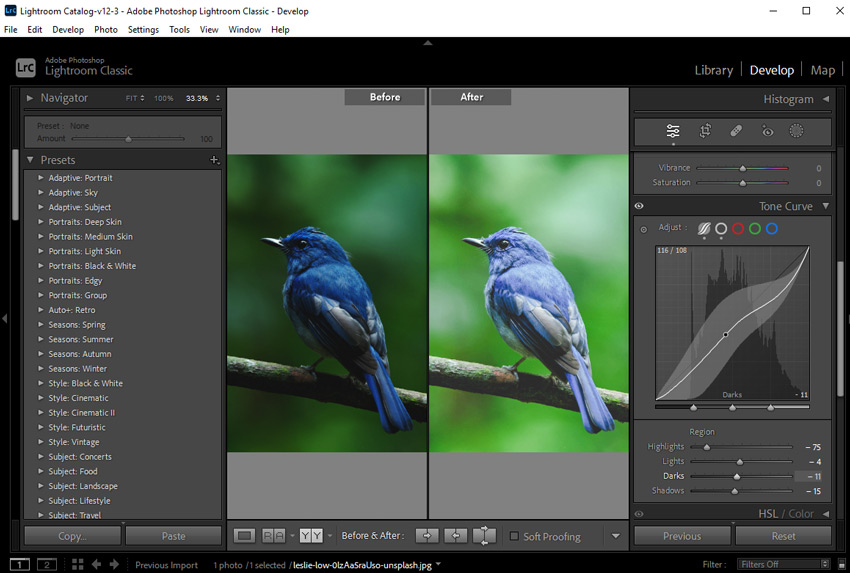
However, RAW editing works best when the original photo already contains enough detail. It cannot fully restore severely blurred or heavily damaged images.
Enhance Image Quality Beyond Sensor Cleaning with Aiarty Image Enhancer
When photos need more than basic adjustments, AI image enhancement can help improve details and overall image quality. Aiarty Image Enhancer uses AI-powered processing to help photographers enhance images after shooting.
With Aiarty Image Enhancer, you can:
- Upscale photos to higher resolutions for larger displays, detailed viewing, or high-quality prints
- Reduce image noise and improve overall clarity, especially for low-light or high-ISO photos
- Restore fine details and enhance sharpness in photos with soft or slightly blurry areas
- Enhance old photos, scanned images, and low-resolution files with improved details and visual quality
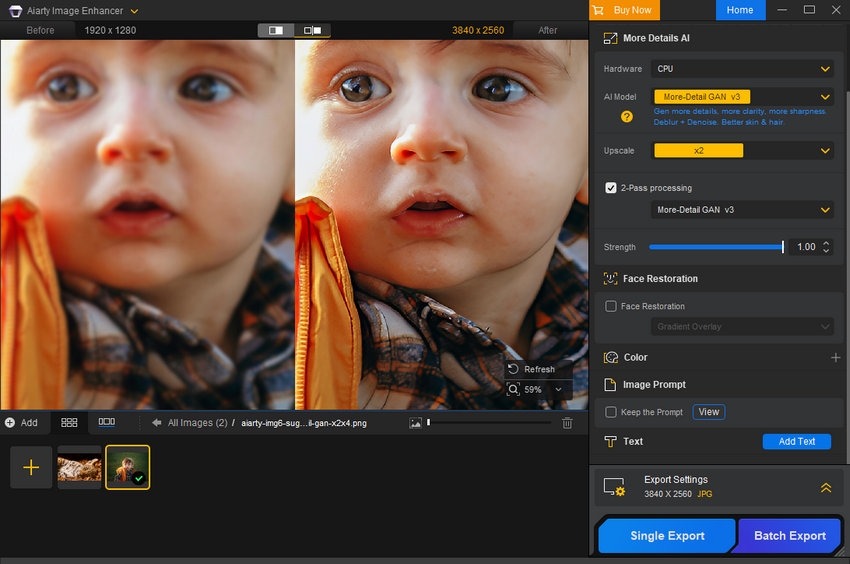
The difference between these tools is simple:
- Camera sensor cleaning removes physical dust that affects image capture.
- RAW editing helps adjust exposure, colors, and other image settings after shooting.
- AI image enhancement improves details, clarity, and overall image quality when photos need further refinement.
Together, they support a complete photography workflow, from keeping your camera in good condition to enhancing the final image.
Conclusion: Keep Your Sensor Clean and Your Photos Looking Their Best
A clean camera sensor is essential for maintaining image quality. By using the right tools and following safe cleaning steps, you can prevent dust spots and keep your DSLR or mirrorless camera ready for every shot.
Regular sensor maintenance, combined with effective post-processing tools, helps photographers get the best results from their images—from capture to final output.
 FAQs
FAQs
Yes. Many photographers clean their own sensors using proper tools such as air blowers and sensor cleaning swabs. However, if you are uncomfortable cleaning the sensor yourself or notice stubborn stains, professional cleaning may be a safer option.
Take a photo of a bright, plain surface using a narrow aperture such as f/16. If dark spots appear in the same position across multiple images, your camera sensor likely has dust that needs cleaning.
Yes. Sensor dust can create visible dark spots, especially in photos with large plain areas such as skies, walls, and studio backgrounds. However, it usually does not cause overall blur or reduce image sharpness.
No. Automatic sensor cleaning can remove loose dust particles, but it may not remove sticky dust, oil marks, or stubborn debris. Manual cleaning may be needed for these situations.
No. Sensor cleaning only removes dust spots and does not increase sharpness, resolution, or image detail. If photos still look soft after cleaning, the issue may come from focus, camera settings, lenses, or image processing. You can resort to this solution to enhance camera photo quality.
The cleaning frequency depends on your shooting habits and environment. Photographers who frequently change lenses or shoot outdoors may need more frequent cleaning, while others may only need occasional sensor maintenance.
You May Also Like


This post was written by Brenda Peng who is a seasoned editor at Digiarty Software who loves turning ordinary photos into extraordinary works of art. With AI assistance for brainstorming and drafting, the post is reviewed for accuracy by our expert Abby Poole for her expertise in this field.
