If you've ever resized an image in Photoshop, you've probably come across the Resample option in the Image Size dialog. It looks simple enough - a single checkbox - but it can have a significant impact on the quality of your image.
Many users assume that increasing image dimensions automatically adds detail. In reality, enlarging a photo is more complicated than simply making it bigger. Depending on whether Resample is enabled, Photoshop may create entirely new pixels, remove existing ones, or leave the original pixel data untouched. Understanding what happens behind the scenes is key to getting the results you want.
In this guide, we'll explain what Resample means in Photoshop, how it affects image resizing, when you should turn it on or off, and which resampling methods work best for different situations. We'll also look at the limitations of traditional resampling and how modern AI-powered upscaling tools can produce sharper, more detailed enlargements.
What Does Resample Mean in Photoshop?
In Photoshop, resampling refers to the process of changing the number of pixels in an image. When you resize an image with Resample enabled, Photoshop either adds new pixels or removes existing ones to match the dimensions you specify.
For example, imagine you have a photo that is 1000 × 1000 pixels. If you increase it to 2000 × 2000 pixels with Resample turned on, Photoshop must generate millions of additional pixels that weren't present in the original image. Conversely, if you reduce the image size, Photoshop removes pixels to create a smaller file.
When Resample is turned off, Photoshop cannot add or remove pixels. Instead, it only changes how those pixels are distributed. You can adjust the document's resolution or print dimensions, but the actual pixel count remains exactly the same.
This distinction is important because image quality is closely tied to pixel information. Whenever Photoshop has to invent new pixels during enlargement, it estimates what those pixels should look like based on surrounding data. While modern resampling algorithms can produce decent results, they cannot recover details that were never captured in the original image.
In short:
- Resample On: Photoshop adds or removes pixels.
- Resample Off: Pixel count stays unchanged.
- Upscaling with Resample: Creates new pixels through interpolation.
- Downscaling with Resample: Discards pixels to reduce image dimensions.
Understanding this difference is the foundation for choosing the right settings when resizing photos, preparing images for print, or enlarging low-resolution pictures.
Resample vs. Resize: What's the Difference?
Although the terms resize and resample are often used interchangeably, they don't mean the same thing in Photoshop.
Resizing simply means changing some aspect of an image's dimensions. Depending on your settings, this may involve changing the pixel count, the print size, the resolution, or a combination of these factors.
Resampling, on the other hand, specifically refers to adding or removing pixels from an image.
The easiest way to understand the difference is to look at what happens when the Resample option is turned on or off.
Resizing Without Resampling
When Resample is disabled, Photoshop keeps the original pixel count unchanged. If you increase the resolution value, the print dimensions become smaller. If you decrease the resolution, the print dimensions become larger. The image data itself remains untouched.
This approach is commonly used when preparing images for printing because it allows you to adjust print settings without affecting image quality.
Resizing With Resampling
When Resample is enabled, Photoshop can change the number of pixels in the image. Increasing the dimensions adds new pixels, while reducing the dimensions removes existing ones.
This is necessary when you need a file with specific pixel dimensions, such as enlarging a photo for a poster, creating a higher-resolution image for a project, or reducing an image for web use.
However, because Photoshop must estimate pixel values during enlargement, quality loss can occur, especially when scaling images significantly beyond their original size.
Resize vs. Resample at a Glance
In short, every resampling operation involves resizing, but not every resizing operation involves resampling. Knowing the difference helps you choose the right settings and avoid unnecessary quality loss when working with your images.
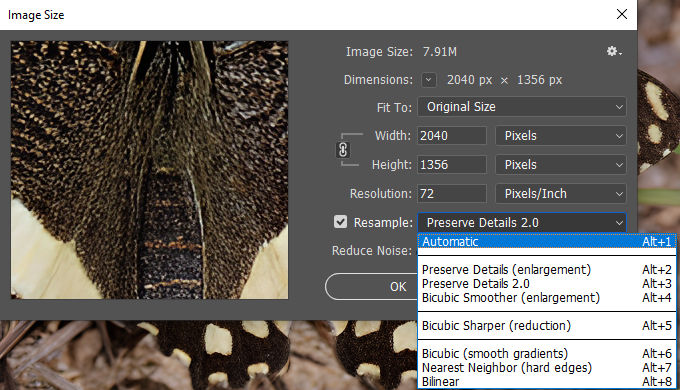
How to Use Resample in Photoshop
You can find the Resample option in Photoshop's Image Size dialog. This is where you control an image's dimensions, resolution, and pixel count.
Step 1. Open the Image Size Window
Open your image in Photoshop.
Go to Image > Image Size from the top menu bar.
The Image Size window displays the current width, height, resolution, and estimated file size of the image.
Step 2. Locate the Resample Option
Near the bottom of the Image Size window, you'll see a checkbox labeled Resample.
- With Resample enabled, Photoshop can add or remove pixels when you change image dimensions.
- With Resample disabled, the existing pixels stay untouched, and Photoshop only adjusts the relationship between resolution and print size.
Step 3. Enter Your Desired Dimensions
Choose the new width and height for your image.
If Resample is turned on, Photoshop will recalculate the pixel count to match the dimensions you enter.
For example:
Step 4. Choose a Resampling Method
When Resample is enabled, Photoshop lets you select a resampling algorithm from the drop-down menu.
Different methods are designed for different tasks. Some work better for enlargements, while others are intended for reducing image size.
We'll look at each option in the next section.
Step 5. Apply the Changes
Click OK to resize the image.
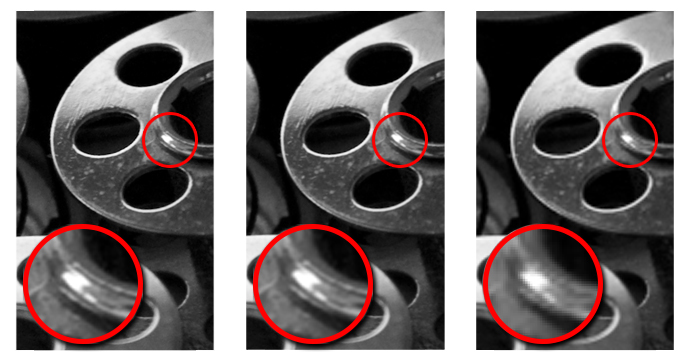
If you're enlarging a photo, zoom in and inspect areas with fine textures, edges, or small details. These areas often reveal the differences between resampling methods most clearly.
Photoshop Resampling Methods Explained
Once Resample is enabled, Photoshop lets you choose how new pixels are calculated. The method you select can affect edge sharpness, texture retention, gradients, and the overall appearance of the resized image.
Some options are designed for enlargements, others work better when reducing image size, and a few are mainly intended for specialized graphics.
Automatic
For most users, Automatic is the easiest choice.
Rather than using a fixed interpolation method, Photoshop analyzes whether you're enlarging or reducing the image and selects an appropriate resampling algorithm automatically.
If you don't have a specific reason to choose another method, Automatic usually produces reliable results.
Preserve Details 2.0
Preserve Details 2.0 is Photoshop's most advanced option for enlarging photographs.
It was developed specifically for upscaling and does a better job of maintaining edge definition and fine detail than older interpolation methods. A Reduce Noise slider is also available to help control artifacts that can appear during enlargement.
For photos containing faces, architecture, wildlife, or other detailed subjects, this is generally the first method worth trying. Adobe recommends it for image enlargement tasks.
Preserve Details (Enlargement)
This is the earlier version of Preserve Details 2.0.
While it was originally introduced to improve enlargement quality compared with traditional Bicubic methods, Adobe later replaced it with Preserve Details 2.0, which generally delivers cleaner results and better detail retention.
You may still encounter this option in some Photoshop installations or older tutorials.
Bicubic Smoother (Enlargement)
Before Preserve Details became available, Bicubic Smoother was the preferred choice for enlarging images.
It produces softer transitions and reduces the jagged edges that can appear when increasing image dimensions. The trade-off is that fine textures may look slightly softer than they do with Preserve Details 2.0.
For modest enlargements, the difference may be subtle. When scaling an image significantly, Preserve Details 2.0 usually holds detail better.
Bicubic Sharper (Reduction)
Bicubic Sharper was designed for the opposite task: making images smaller.
When a photo is reduced in size, details can sometimes appear softer. Bicubic Sharper applies additional sharpening during the resampling process to help maintain a crisp appearance.
It's a popular choice when preparing images for websites, social media, or email.
Bicubic (Smooth Gradients)
Standard Bicubic serves as a middle-ground option.
It uses more complex calculations than Bilinear or Nearest Neighbor and generally produces smoother tonal transitions. Adobe describes it as suitable for images with smooth gradients and general-purpose resizing.
If Bicubic Sharper looks too aggressive or Bicubic Smoother appears too soft, regular Bicubic can be a reasonable alternative.
Nearest Neighbor (Hard Edges)
Nearest Neighbor behaves very differently from the other methods.
Instead of blending neighboring pixels, it simply copies the value of the closest pixel. As a result, edges remain sharp and individual pixels stay visible.
This makes it a poor choice for most photographs but an excellent option for:
- Pixel art
- Retro game graphics
- Icons
- Screenshots with hard edges
When enlarging pixel art, Nearest Neighbor preserves the blocky appearance that would otherwise become blurred by other interpolation methods.
Bilinear
Bilinear is one of the oldest interpolation methods available in Photoshop.
It calculates new pixels by averaging nearby pixel values. The process is relatively simple and fast, but the results are often softer than those produced by Bicubic-based methods.
Today, Bilinear is rarely the best option unless compatibility or processing speed is a higher priority than image quality.
Does Photoshop Resample Reduce Image Quality?
Not necessarily.
Whether image quality changes depends largely on how the image is being resized and how much scaling is involved.
When Reducing Image Size
Making an image smaller usually has little visible impact on quality.
During downsampling, Photoshop removes pixels from the image. Although some image data is discarded, the remaining pixels are compressed into a smaller space, making any loss of detail difficult to notice under normal viewing conditions.
This is one reason why large photos can often be reduced significantly for websites, social media, or email while still looking sharp on screen.
When Enlarging an Image
The situation changes when an image is enlarged.
A low-resolution photo doesn't contain enough pixel information to fill a larger canvas. To create the additional pixels required, Photoshop analyzes neighboring pixels and estimates what the new ones should look like.
The process works reasonably well for modest enlargements. Increasing dimensions by 10% or 20% may produce little visible degradation, especially when the original image is already high quality.
Larger increases are more challenging.
As scaling increases, common issues may begin to appear:
- Softer edges
- Blurred textures
- Loss of fine detail
- Haloing around high-contrast edges
- Artificial-looking sharpening artifacts
The exact result depends on the image content. A simple graphic with clean shapes may upscale fairly well, while a detailed wildlife photo, portrait, or landscape often reveals the limitations more quickly.
Why Photoshop Can't Recover Missing Detail
Even the most advanced resampling method in Photoshop, Preserve Details 2.0, still relies on interpolation.
Interpolation creates new pixels by analyzing existing ones. It can make an image larger and help maintain a natural appearance, but it cannot recreate details that were never captured by the camera in the first place.
For example, if individual strands of hair, feathers, or distant textures are not visible in the original file, Photoshop has no reference data from which to rebuild them accurately.
This is where traditional resampling reaches its limit. The image may become larger, but it doesn't necessarily become more detailed.
Photoshop Resample vs. AI Image Upscaling
Traditional resampling and AI upscaling are often used for the same purpose - making an image larger - but they work in fundamentally different ways.
When Photoshop enlarges an image, it relies on interpolation. New pixels are generated by analyzing surrounding pixels and estimating what should appear between them. Methods such as Preserve Details 2.0 can produce cleaner enlargements than older algorithms, but the process is still based on information already present in the image.
AI upscaling takes a different approach.
Instead of relying solely on neighboring pixels, AI models are trained on large collections of images and patterns. During enlargement, they analyze the content of a photo and attempt to reconstruct details that would otherwise appear soft or indistinct after traditional resampling.
The difference becomes more noticeable as the scaling factor increases.
For example, enlarging a photo from 1000 pixels wide to 1200 pixels wide may produce similar results with either approach. Enlarging the same image to 4000 pixels wide is far more demanding. At that point, traditional interpolation often struggles to maintain texture and detail, while AI-based tools may be able to generate a cleaner, more detailed result.
Traditional Resampling vs. AI Upscaling
For small adjustments, Photoshop's built-in resampling tools are often sufficient. If the goal is to prepare a photo for a larger print, recover detail from a low-resolution image, or upscale older photos, AI-based enhancement tools like Aiarty Image Enhancer generally have a significant advantage.
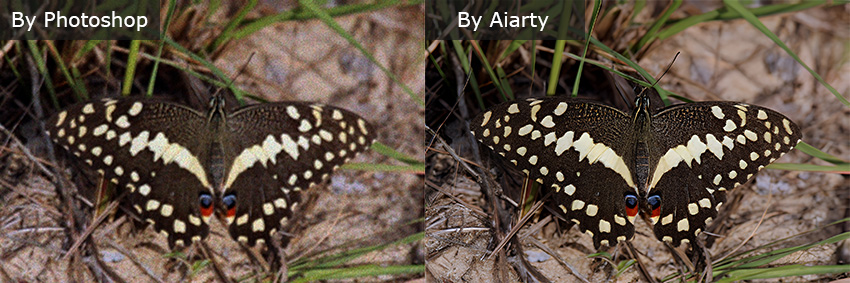
Rather than relying entirely on interpolation, AI models analyze image content and generate additional detail during the upscaling process. The goal isn't simply to increase pixel dimensions, but to produce an image that looks sharper and more natural at a larger size.
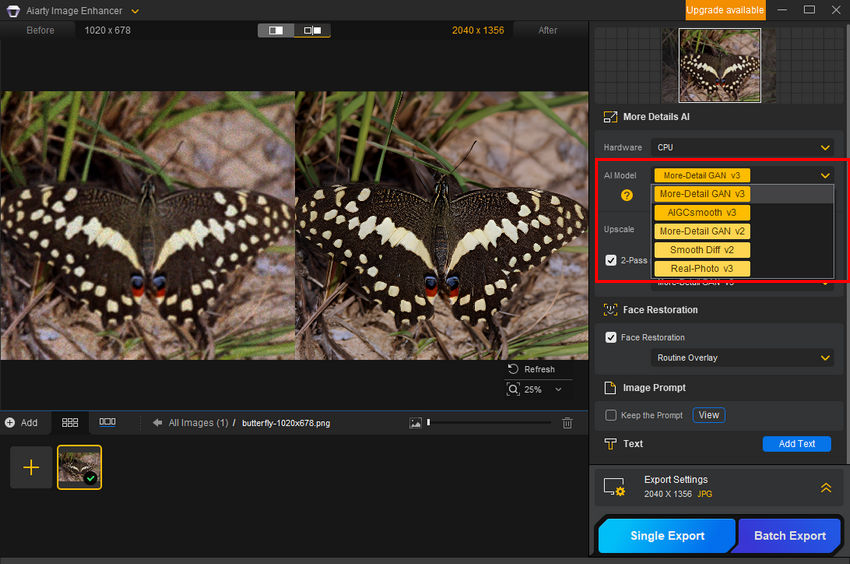
How to Upscale an Image with Aiarty Image Enhancer
Compared with manual resizing in Photoshop, the workflow is also considerably simpler.
- Download and install Aiarty Image Enhancer on your computer.
- Import your image into Aiarty Image Enhancer.
- Choose an AI model based on your image type.
- Select an upscaling factor such as 2×, 4×, or 8×.
- Preview the result and export the enhanced image.
 Frequently Asked Questions
Turn Resample on when you need to change the image's pixel dimensions. Photoshop will add or remove pixels to match the new size.
Turn Resample off when you're only adjusting resolution (PPI) for printing and want to keep the original pixel count unchanged.
For enlarging photos, Preserve Details 2.0 usually delivers the best results and offers a Reduce Noise control to help manage enlargement artifacts.
For reducing image size, Bicubic Sharper is often the preferred choice because it helps maintain edge sharpness and detail.
Minor enlargements often look perfectly acceptable, especially when starting with a high-resolution image.
As the scaling factor increases, softness, loss of fine detail, and interpolation artifacts become more noticeable. The larger the enlargement, the harder it is to maintain the appearance of the original image.
For substantial enlargements, AI upscaling typically produces more detailed results than traditional resampling.
Photoshop creates new pixels through interpolation, while AI models analyze image content and attempt to reconstruct textures and details during the enlargement process.
Resampling changes the number of pixels in an image, which can affect its dimensions and resolution. However, increasing the resolution value alone does not add new detail to a photo.
Additional image information is only created when Photoshop resamples the image.
You May Also Like
This post was written by Brenda Peng who is a seasoned editor at Digiarty Software who loves turning ordinary photos into extraordinary works of art. With AI assistance for brainstorming and drafting, the post is reviewed for accuracy by our expert Abby Poole for her expertise in this field.