Digitizing old printed photos is a meaningful way to preserve memories, but scanning them without glare, blur, or quality loss can be challenging. The Google PhotoScan app is a popular free solution that lets you scan old photos using your phone, automatically removing reflections and correcting edges.
However, many users soon realize that scanning is only the first step. If you want clear results for printing, sharing, or long-term archiving, improving resolution and clarity after scanning is often necessary.
In this guide, you’ll learn how to use the Google PhotoScan app step by step, common issues to watch out for, and a recommended workflow to achieve truly high-quality results.
Google PhotoScan is great for digitizing printed photos, but scans may still look soft or low-resolution, especially when enlarged. For best results, many users follow a simple two-step workflow:
1. Scan Printed Photos with Google PhotoScan. This helps you removes glare from glossy photos, auto-detects edges, corrects perspective, and saves scans directly to Google Photos.
2. Enhance Resolution & Clarity with Aiarty Image Enhancer. Scanning alone doesn’t increase resolution or restore detail; for sharper, textured, print-ready images, AI enhancement is the next step.
With Aiarty Image Enhancer, you can:
- Upscale scanned photos for 300DPI high-quality printing (2× or 4×, 4K/8K, up to 32K).
- Reduce blur and noise commonly introduced during scanning.
- Restore fine details in aged, faded, or damaged photos.
- Enhance entire photo albums efficiently with batch processing.
Rather than replacing PhotoScan, AI enhancement complements it by improving what scanning cannot fix.

Start scanning your old photos and enhance them for sharing, printing and archiving today!
What Is Google PhotoScan App?
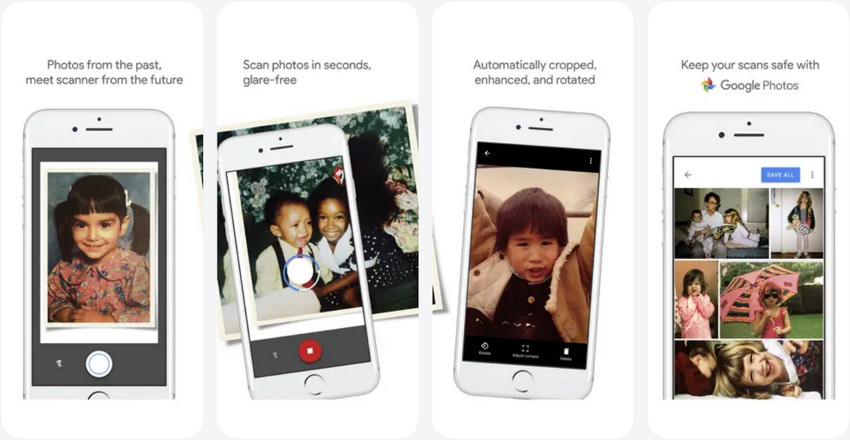
Google PhotoScan is a free mobile app developed by Google that allows users to easily digitize printed photos using their smartphone camera. It automatically removes glare, detects edges, and corrects perspective, making it simple to preserve old photos in a digital format for sharing, printing, or long-term storage.
Key Features of Google PhotoScan:
- Glare removal using multiple captures for clearer scans.
- Automatic cropping and alignment to frame photos perfectly.
- Perspective correction to straighten angled or tilted images.
- Seamless integration with Google Photos for easy storage and access.

What Google PhotoScan Is Best Used For:
- Digitizing old printed photos
- Scanning photo albums or framed pictures
- Quick mobile scanning without a flatbed scanner
This Google's scanner app focuses on accurately digitizing printed photos, ensuring glare-free, well-aligned scans, but does not perform image restoration, detail enhancement, or quality improvement.
How to Use Google PhotoScan App (Step-by-Step Guide)
If you’re new to PhotoScan, don’t worry. Following these steps will help you capture the clearest, most accurate scans of your printed photos, minimizing glare, distortion, and other common issues for the best digital results.
Step 1. Download and Install PhotoScan App
Download Google PhotoScan from the App Store or Google Play and install it on your phone.
Step 2. Prepare Your Photos Before Scanning
Before scanning, place your photos on a flat surface, use soft and even lighting, and avoid strong shadows or direct glare. Proper preparation ensures that scans are clearer, more accurate, and free from distortions, significantly improving overall scan quality.
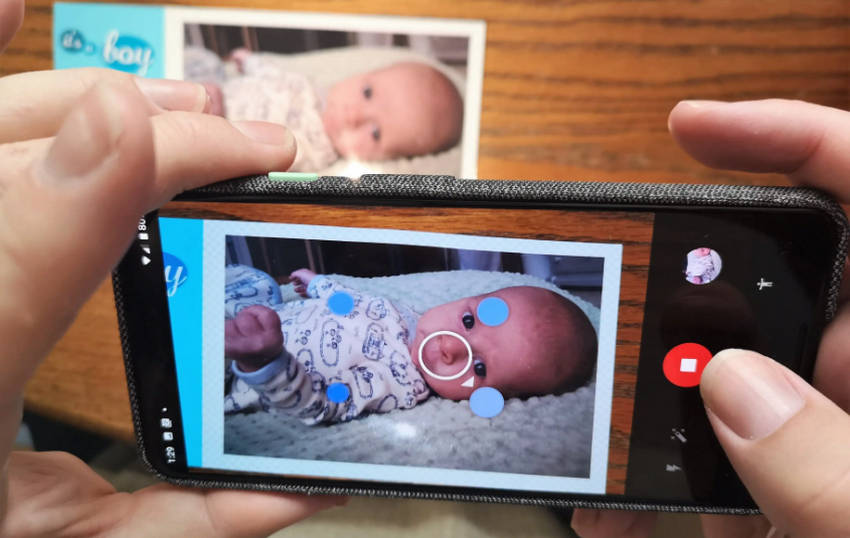
Step 3. Scan Photos Using PhotoScan
Hold your phone above the photo and follow the on-screen instructions to align the four dots, keeping your phone steady throughout the process. PhotoScan then combines multiple captures to minimize glare and distortion, producing a clearer and more accurate digital version of your photo.
Step 4. Save and Export Scanned Photos
After scanning, photos are automatically saved to Google Photos, where you can easily organize, view, and export them for further editing, AI-based enhancement, or high-quality printing.
Common Google PhotoScan Problems (And Why They Happen)
Even when used correctly, scanned photos can sometimes fall short of expectations. Understanding these common issues can help you anticipate limitations and take steps to improve results.
1. Why Scanned Photos Still Look Blurry
- Limited resolution of phone cameras, which can’t capture all fine details
- Low-quality or damaged original photos, which scanning alone cannot fully restore
2. Noise, Grain, or Faded Colors After Scanning
- Aging and wear of printed photos that reduce clarity and color vibrancy >> How to remove grain from photos
- Compression during the scanning process, which can introduce noise or subtle artifacts
3. Low Resolution for Printing or Enlarging
While scanned photos often look fine on a screen, they may lose clarity and detail when printed or enlarged, highlighting the need for additional enhancement to achieve high-quality results.
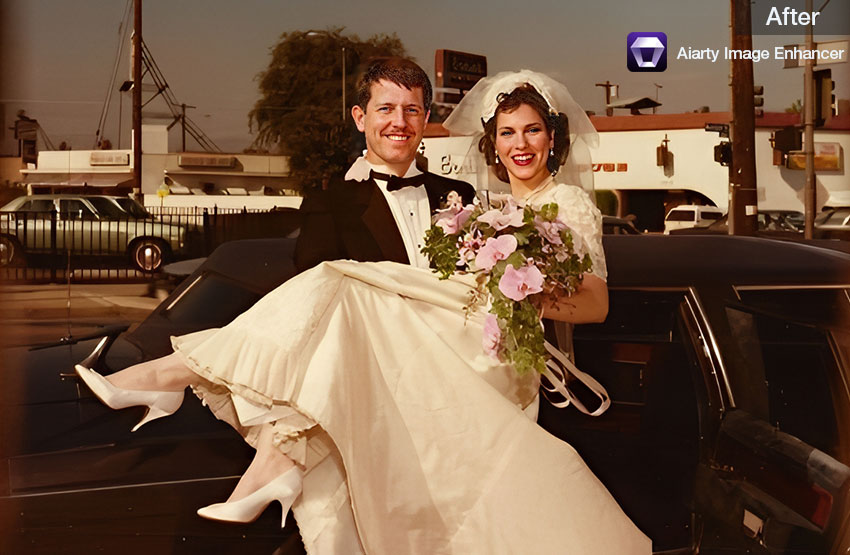
A Better Way to Enhance PhotoScan Results Automatically
While Google PhotoScan captures your photos accurately, it doesn’t improve their resolution or restore lost details. Google Photos offers basic edits, but for truly sharper, clearer, and print-ready images, using a dedicated AI enhancement tool like Aiarty Image Enhancer is the most effective next step.
Aiarty Image Enhancer uses advanced AI technology to improve scanned and old photos by intelligently analyzing textures, edges, and patterns. Its key features include:
- AI Upscaling Without Artifacts: Increase resolution for printing or enlarging while preserving natural details.
- Smart Denoise and Deblur: Reduce blur, noise, and imperfections introduced during scanning.
- Fine Detail and Texture Restoration: Recover subtle details in aged or faded photos for a more natural look.
- Enhanced Overall Clarity: Improve image sharpness and visual quality without over-sharpening.
- Batch Processing: Efficiently enhance multiple photos at once, ideal for large albums.
How Aiarty Image Enhancer Improves Scanned Photos (Step-by-Step Guide)
Step 1. Launch Aiarty Image Enhancer and import your scanned photo from Google PhotoScan by dragging and dropping it into the workspace.
Step 2. If available, set the hardware to GPU for faster processing. Choose the AI model that best fits your photo type: More-Detail GAN v3 for textures and intricate details, AIGCsmooth v3 for AI-generated or smoother content, and Real-Photo v3 for realistic photo restoration.
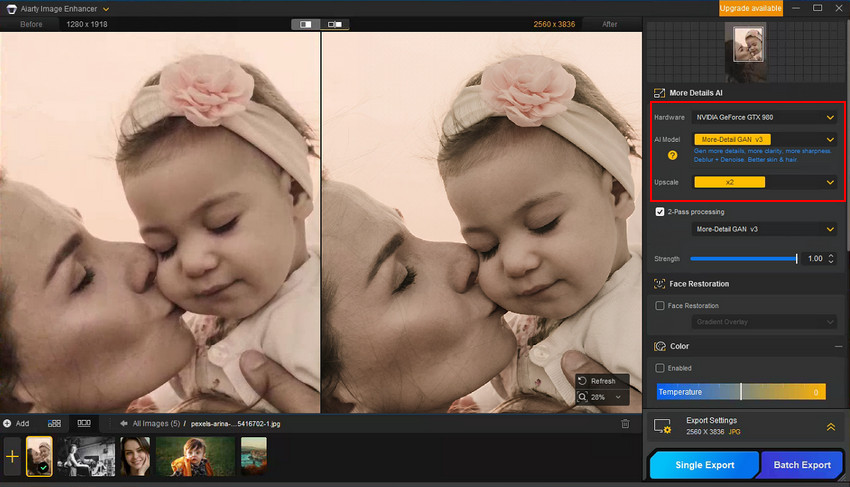
Step 3. Choose an upscaling factor based on your needs, such as 1×, 2×, 4×, 8×, 1080p, 2K, 4K, 8K, or even customize up to 32K, to increase resolution and clarity for printing or archiving.
Step 4. After the AI processing, you'll see before-after effect in the Preview window. If it doesn't match your expections, experiment with the following tips:
- Switch the AI model.
- Adjust the Strength value to balance the realism and clarity.
- Tick on Face restoration to refine facial details and automatically correct imperfections like blur or grain etc.
- Enable Color option to manually fix faded, washed out colors or remove color tint.
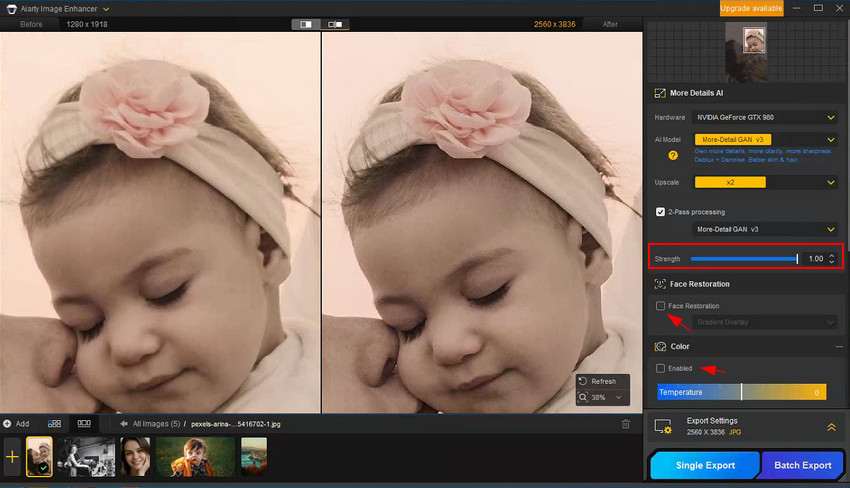
Step 5. When you're done, open the export settings to set the image DPI, format, quality, and select your output folder. Click Single Export and let the software automatically enhance your scanned image, removing blurriness, noise, and low-resolution artifacts for a polished final result.
Conclusion: Scan Smart, Enhance for Lasting Quality
Google PhotoScan is an excellent tool for quickly and accurately digitizing printed photos, but scanning alone isn’t enough if you need clear, high-resolution results for printing or long-term archiving. PhotoScan captures and digitizes the image, while Aiarty Image Enhancer focuses on improving resolution and clarity by restoring details that scanning cannot recover.
By combining PhotoScan for scanning with AI-based enhancement for quality improvement, you can preserve your old photos with the lasting clarity and visual quality they deserve.
 FAQs
FAQs
Yes. Google PhotoScan is completely free to download and use on both Android and iOS, with no subscription required.
PhotoScan improves how photos are captured by removing glare and correcting alignment, but it does not enhance resolution or restore missing details.
No. PhotoScan cannot fix blur caused by low resolution, camera movement, or photo aging. Additional image enhancement tools are needed.
For noticeable improvement, using an AI image enhancer is the most effective approach to sharpen details, reduce noise, and improve overall clarity.
Yes. AI-based image enhancers can upscale scanned photos to higher resolutions, making them suitable for large prints and photo books.
Google PhotoScan focuses on accurate, glare-free scanning, while PhotoMyne offers extra features like batch scanning and basic restoration, usually as part of a paid plan.
You May Also Like
This post was written by Brenda Peng who is a seasoned editor at Digiarty Software who loves turning ordinary photos into extraordinary works of art. With AI assistance for brainstorming and drafting, the post is reviewed for accuracy by our expert Abby Poole for her expertise in this field.