Have a shoebox full of old photographs gathering dust? Maybe they’re faded Polaroids from the ’80s, or fragile black-and-white prints passed down from your grandparents. Each image holds a piece of your family’s story—but every year, time steals a little more of their clarity.
Old printed photos are priceless treasures—family portraits, childhood snapshots, or vintage memories that you never want to lose. Unfortunately, physical photos are vulnerable to fading, tearing, and environmental damage over time. Learning how to digitize old photos not only preserves them forever but also makes them easy to share with loved ones, post online, or use in creative projects. In this guide, we’ll walk you through the best ways to digitize photos, from preparing your prints to saving and restoring old photos for the best possible quality.
Quick Answer: The best way to digitize old photos depends on your goal as following:
- Best quality: Flatbed scanner (600 DPI+)
- Fast & easy: Smartphone + scanning app
- Large batches: Professional service
Key Tips: Clean and organize photos before scanning for better results. Even high-quality scans may look faded—AI tools can restore color and details. Always follow the 3-2-1 backup rule to keep your digitized photos safe.
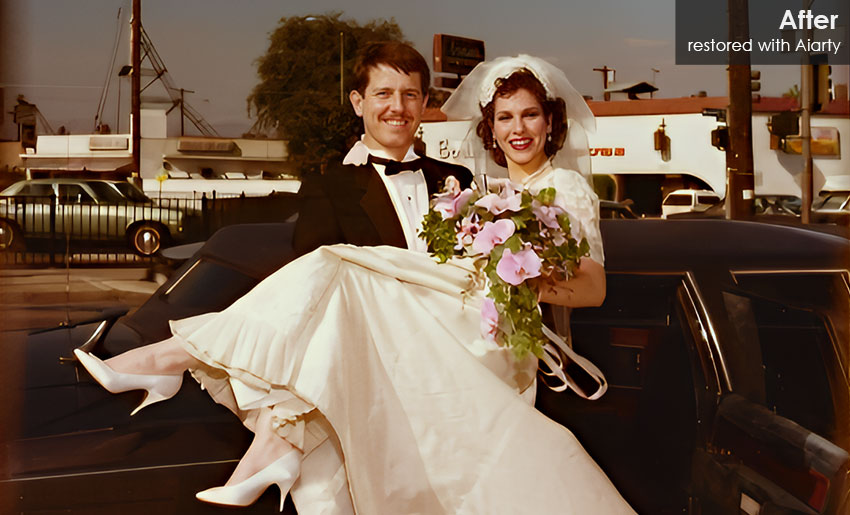
Example in Action: A faded 1980s wedding photo scanned at 300 DPI still showed yellowing and scratches. After enhancement, colors became vibrant, skin tones natural, and damage disappeared—ready for printing or sharing.

No matter which method you choose, digitized photos often need restoration. Tools like Aiarty Image Enhancer can instantly fix fading, remove scratches, and upscale resolution.
Now it’s your turn: Digitize one old photo and enhance it—you’ll see how much detail can be recovered in seconds.
Preparing Old Photos for Digitizing: Cleaning, Sorting, and Tools
Before you start scanning old photos, take a few moments to prepare your photos. This simple step is crucial for storing digital photos long term and will save you a lot of editing time later on.
Cleaning Techniques:
- Use a soft brush (like a camera lens brush) to gently remove dust.
- For fingerprints or smudges, wipe lightly with a lint-free microfiber cloth—never use tissue paper, as it can scratch the surface.
- Avoid using water or cleaning fluids unless the print is coated and you’re experienced in photo handling.
Organizing and Categorizing Your Photos:
- Sort by date, event, or theme (weddings, vacations, childhood).
- Use sticky notes or index cards to label batches for easy identification later.
- Create a scanning priority list—start with the most fragile or rare photos.
Tools You'll Need:
- Scanner or smartphone with a high-resolution camera.
- Computer or tablet for storing and editing.
- Storage devices like an external hard drive or USB stick.
- Photo sleeves or archival boxes for post-digitization preservation.
After scanning old photos, this pixel calculator helps determine whether the digital resolution is sufficient for high-quality printing.
Best Way to Digitize Old Photos: 5 Methods Compared
Digitizing photos can be done in multiple ways, each varying in cost, quality, speed, and the level of skill required. From quick DIY smartphone captures to high-resolution flatbed scanning and professional restoration services, every option comes with its own strengths and trade-offs. Here’s a closer look at the main options so you can choose the best way to digitize photos for your needs.
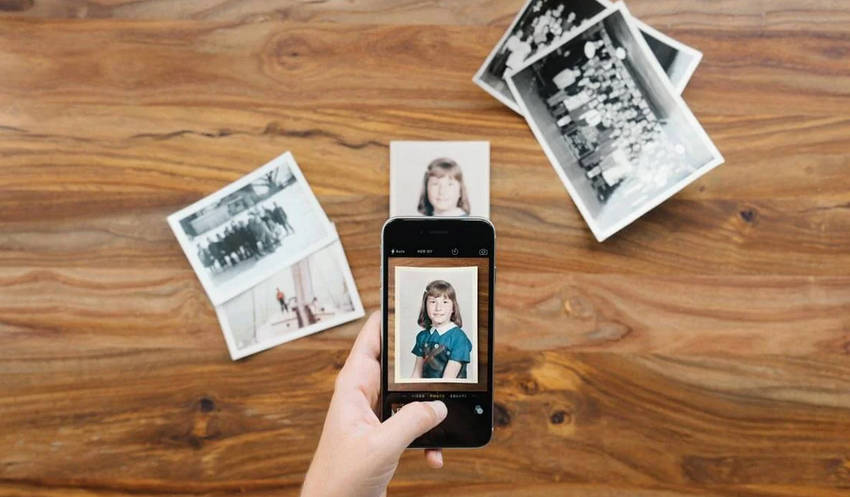
1. Photographing Old Photos (Fast but Lower Quality)
If you’re looking for a quick, budget-friendly way to convert photos to digital at home, photographing them with a smartphone or digital camera could be the easiest way. All you need is a well-lit space, a flat surface, and a steady hand—or better yet, a tripod—to keep the image sharp and aligned.
This method is ideal for anyone just starting to explore how to digitize photos without investing in extra equipment. However, while it’s fast and convenient, the results may not match the clarity and color accuracy of a dedicated scanner, especially for archival purposes.
- Extremely fast and portable.
- No extra equipment needed if you already own a phone or camera.
- Perfect for quick sharing on social media.
- Glare and shadows can appear, especially with glossy prints.
- Harder to get perfect alignment and focus.
- Lower resolution than professional scans.
2. Scanning Apps (Convenient but Limited Resolution)
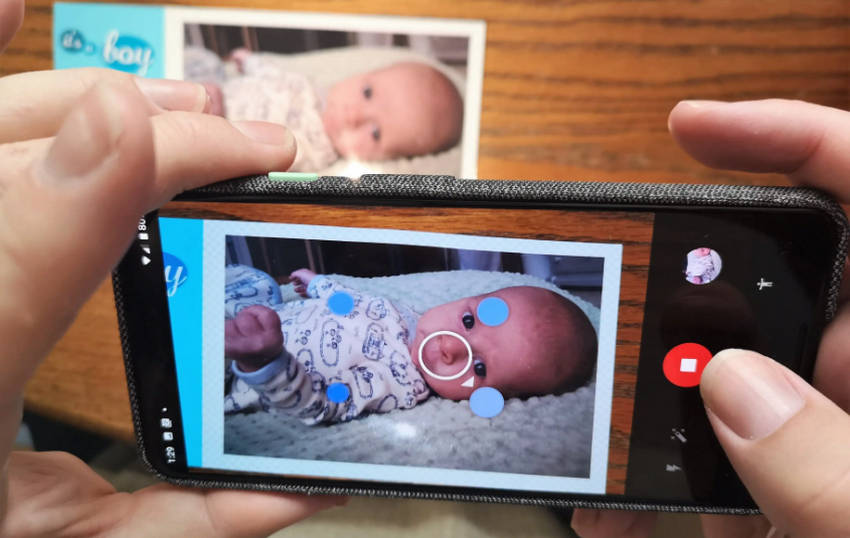
If you want a simple, portable solution for how to digitize photos without investing in a scanner, apps like Google PhotoScan are a great choice. Google Photoscan is an app for both Android and iOS that uses your phone's camera to digitize printed photos. It works by having you take multiple pictures of a single print, then uses smart technology to stitch them together, cropping and identifying the edges of the photo.
Imagine holding your phone above a cherished baby photo under a desk lamp, and the app automatically guides you to capture multiple shots from different angles. The app then stitches them together, removes glare, straightens edges, and enhances overall clarity, often producing results far better than a single phone photo and closer to the best way to scan old photos without owning a scanner.
- Removes glare automatically.
- Crops and corrects perspective without manual editing.
- Portable and easy to use anywhere.
- Resolution is still limited by your phone’s camera.
- Slower than simply taking one photo, since you need multiple shots per image.
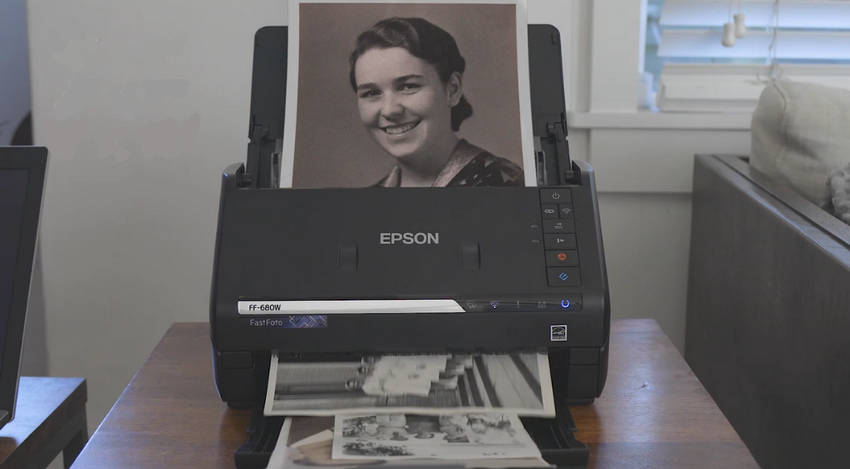
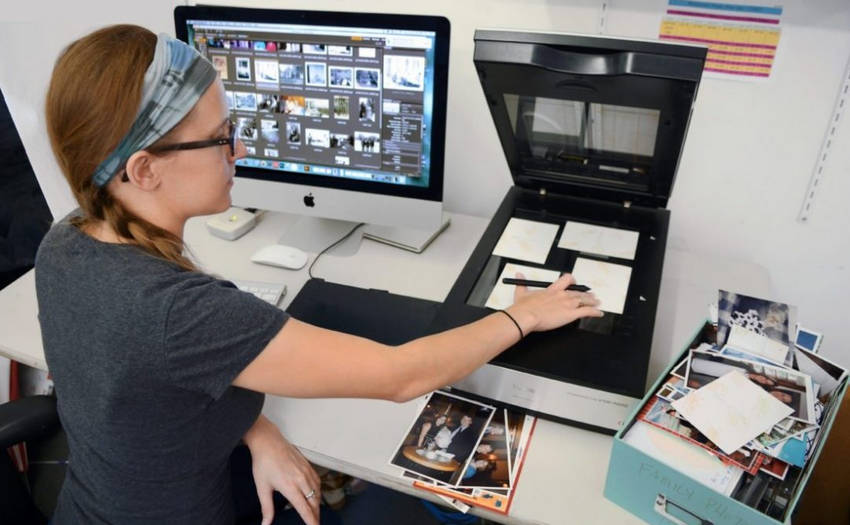
3. Flatbed Scanners (Best Quality Option)
When you want maximum detail and color accuracy, a flatbed scanner remains one of the best ways to scan old photos. Picture carefully placing a delicate 1960s portrait under the scanner lid, setting the resolution to 600 DPI, and watching the digital preview reveal every detail with perfect alignment.
Flatbed scanners are ideal for archival work or when you plan to print enlarged versions of your photos. While setup and scanning can be slower, the payoff is exceptional image quality without glare or distortion—making it the gold standard for preserving precious memories.But even high-resolution scans may still show fading or scratches, which often require post-processing or AI restoration.
- Crisp, high-resolution images ideal for reprinting.
- Consistent color accuracy and no glare.
- Can scan documents, slides, and negatives with the right attachment.
- Slower process, especially for large collections.
- Requires a computer and software setup.
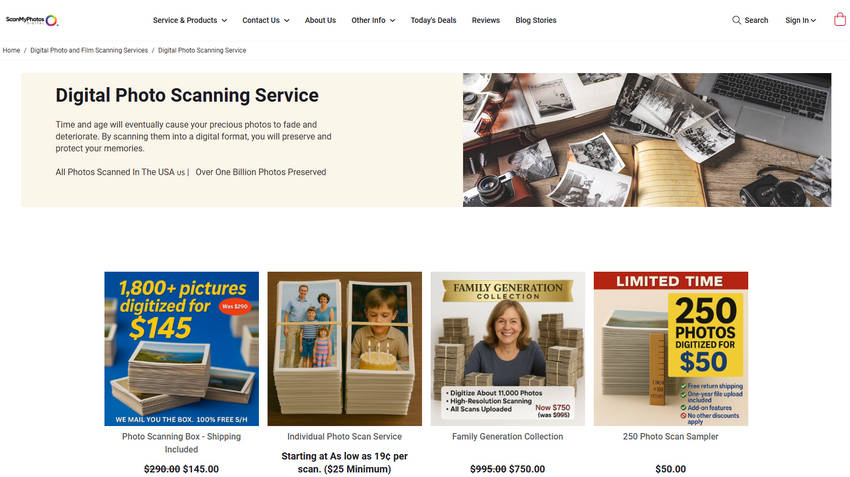
4. Professional Services (Best for Bulk)
For those with a huge collection or a desire for professional-grade results, outsourcing to a service like ScanMyPhotos or ScanCafe is an excellent solution. You can box up hundreds of your family albums and entrust them to a team of experts who will handle the cleaning, scanning, and even restoration.
This method is a great choice for anyone short on time or who wants the highest possible quality, and it's especially useful for delicate photos that require expert handling. Just be aware that this convenience comes with a higher price and the small risk of shipping your irreplaceable originals.
- Highest quality with professional-grade equipment.
- Optional restoration and color correction services.
- Time-saving for bulk digitization.
- Cost can add up quickly for large collections.
- Shipping carries some risk of loss or damage.
5. Local Photo Labs (Convenient but Limited Control)
For a quick and convenient option, you can bring your prints to local photo labs or retail stores like Walmart and Walgreens. Picture walking into your neighborhood store with a small envelope of prints, and picking up your digital copies later that day.
While this option allows to digitize old photos near me and avoids shipping risks, quality and customization options may vary depending on the store’s equipment. It’s best suited for small collections or when you need same-day digitization.
- Same-day service in many locations.
- No need to ship your valuable originals.
- Affordable per-photo rates.
- Limited customization compared to professional services.
- Quality may vary depending on store equipment and staff expertise.
Note: No matter which method you choose, digitized photos often appear faded, scratched, or low in detail. That’s why many people use AI tools like Aiarty Image Enhancer to restore and enhance their scanned photos.
Which Is the Best Way to Digitize Old Photos? (Full Comparison)
Still not sure which method to choose? This side-by-side comparison helps you quickly decide based on quality, speed, and cost.
| Method | Best For | Pros | Cons | Estimated Cost |
|---|---|---|---|---|
| Camera Photography | Quick sharing, casual use | Fast, portable, no extra gear | Glare, distortion, lower resolution | Free |
| PhotoScan App | Glare-free casual scans | Automatic glare removal, cropping | Limited resolution, slower process | Free–$5 |
| Flatbed Scanner | Archival, high-quality prints | Sharp, consistent, no glare | Slower, needs setup | $50–$300 |
| Professional Service | Large collections, top quality | Expert handling, optional restoration | Costly, shipping risk | $0.25–$1.00/photo |
| Local Photo Lab | Convenience, small collections | Same-day service, no shipping | Quality may vary, limited options | $0.25–$0.50/photo |
In short, the best way to digitize old photos depends on your priorities—choose a scanner for quality, an app for speed, or a service for convenience.
Next step: Once digitized, you can further improve your photos with AI enhancement tools like Aiarty Image Enhancer.
Enhance Image Quality Instantly After You Digitize Old Photos
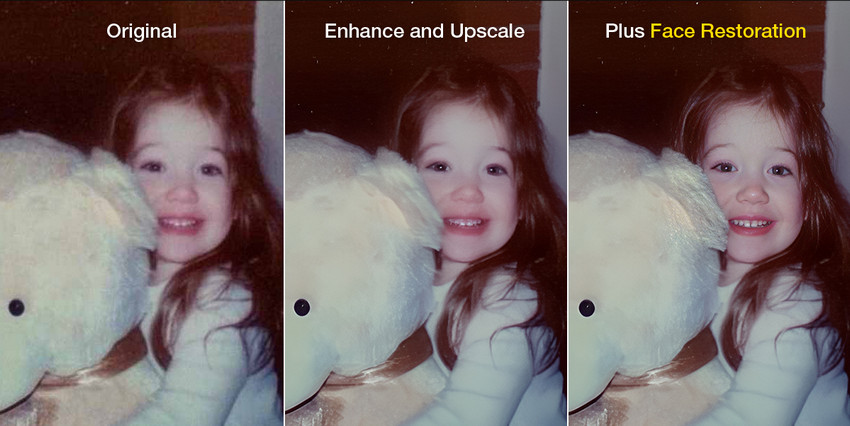
Even the best scans can look faded, scratched, or dull. With Aiarty Image Enhancer, you can automatically restore colors, remove blemishes, and improve clarity in seconds.
Instead of spending hours fixing photos manually, the AI detects damage and enhances your images with just a few clicks, making it ideal for restoring large photo collections quickly.
What Aiarty Image Enhancer Can Do for Your Digitized Photos:
- Remove Scratches, Stains, and Creases: AI reconstructs missing details and textures without blur or artifacts.
- Revive Faded Colors: Restores natural tones in skin, skies, and backgrounds, rescuing your dull/yellowed photos.
- Upscale Resolution Without Quality Loss: Perfect for printing, creating wall art, or showcasing on large displays.
- Batch Processing for Efficiency: Restore hundreds of scanned photos in a single batch, cutting project time dramatically.
See the magic for yourself! Download Aiarty Image Enhancer now and bring your old memories back to life.
How to Enhance Digitized Photos Quality Using Aiarty Image Enhancer?
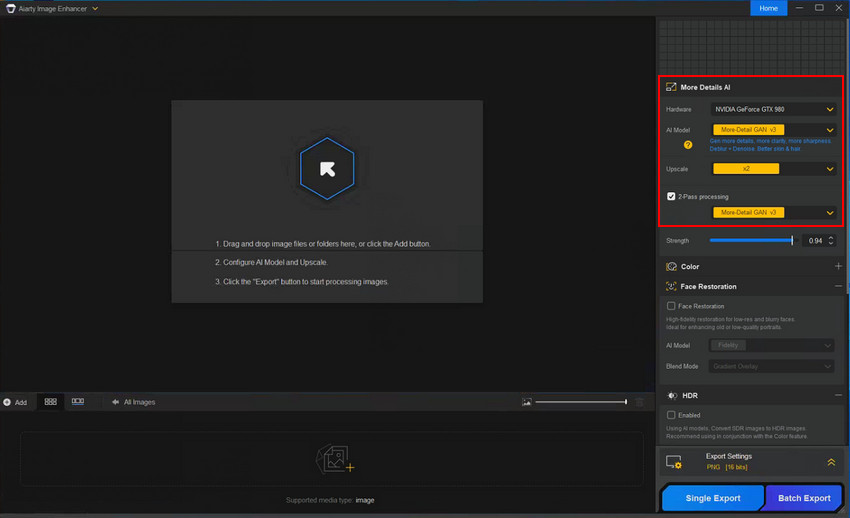
Step 1. Install Aiarty Image Enhancer.
Free download Aiarty Image Enhancer and launch it. Check the settings at the left panel.
- In Hardware, pick your GPU for faster processing; if none, the CPU works but slower.
- In AI Model, choose your mode—More-Detail GAN v3 is best for old photo restoration.
- In Upscale, set your target size (x2, x4, 4K, 8K, 32K etc.) or leave at x1 to keep original.
- Tick on 2-Pass processing if your image is in low-resolution or low-quality for an extra x1 enhancement pass (available for More-Detail GAN v3 and AIGCsmooth v3 only).
Step 2. Import your digitized old photos.
Either click the adding area or drag and drop to load your digitized photos to the AI image enhancer. The program will then automatically load the AI model, analyze your photos, and complete the restoration process.
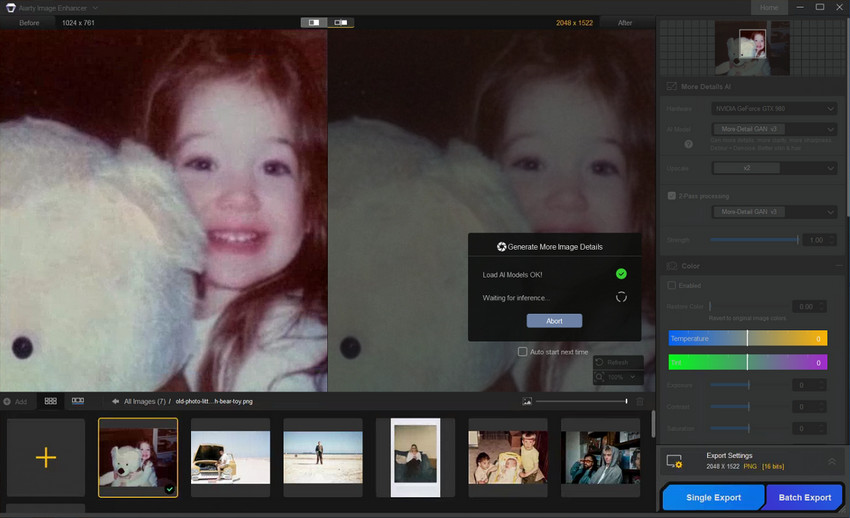
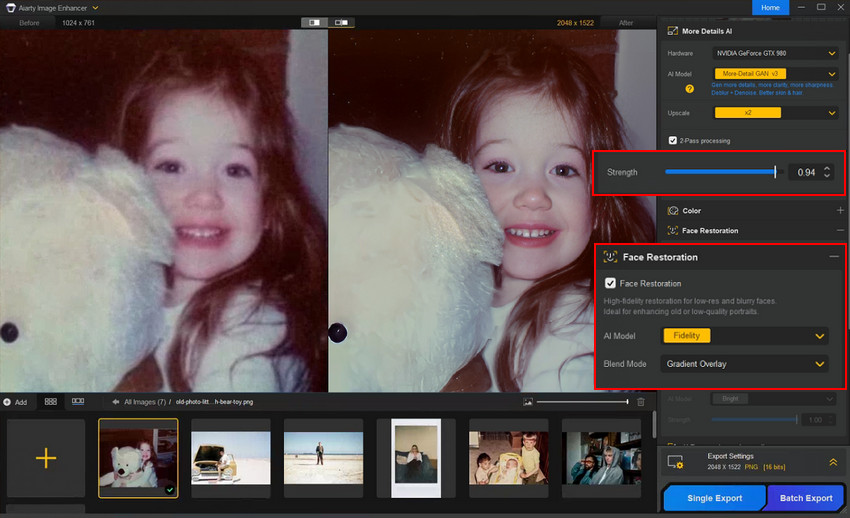
Step 3. Preview at 100% zoom and fine-tune for the best result.
Preview the restored photo at 100% zoom, then adjust the Strength slider for a more natural, high-fidelity result without the waxy AI look. If your image includes a face, toggle the Face Restoration option on or off to see which looks best.
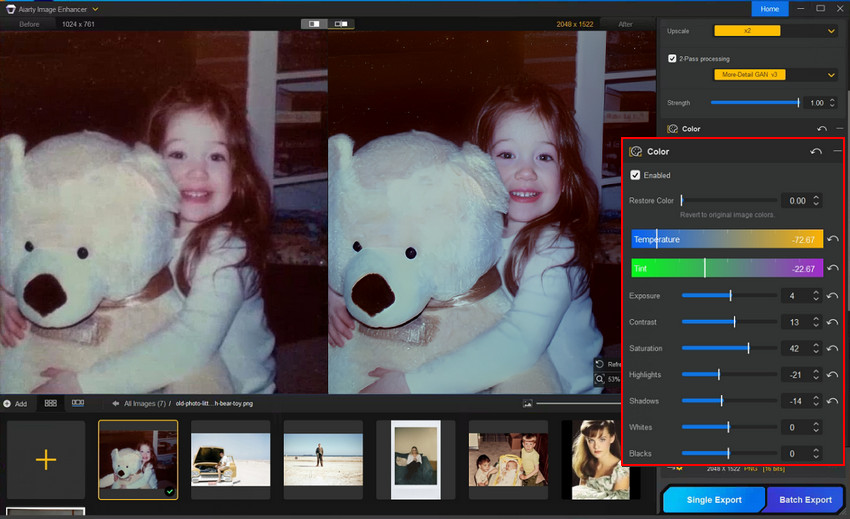
Step 4. Adjust color to fix faded or yellowed photos.
Use the Color controls to fine-tune temperature, tint, exposure, contrast, and saturation, correcting yellow casts and restoring faded tones for a more natural look.
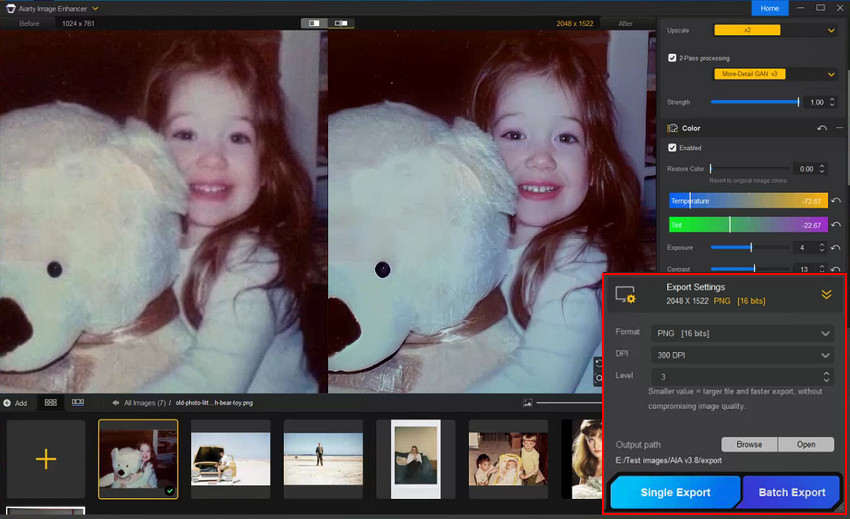
Step 5. Export your digitized photos with restoration.
After processing, choose the output format (PNG, JPEG, TIFF, DNG), DPI (300 DPI or higher are recommended), and more. Then click either the Single Export or Batch Export button to save your restored photos.
Instead of spending days manually touching up each image, you can digitize and restore your entire collection in a fraction of the time. For anyone serious about preserving their family history, combining the best way to digitize photos with AI-powered restoration is the most efficient path to ensuring your memories look as vivid as the day they were captured.
Store Your Digitized Photos Safely with Both Local and Cloud Backups
Once you’ve learned how to digitize old photos using your preferred method, the next step is ensuring they stay safe for years—or even generations—to come. Preservation doesn’t end with scanning; without proper storage, your efforts could be lost to hardware failure, accidental deletion, or even natural disasters. The best way to digitize photos for long-term security is to use a combination of local storage and cloud storage, following the proven 3-2-1 backup rule.
Cloud Storage Options:
- Google Photos: Free tier offers compressed storage, while paid plans preserve original quality.
- iCloud: Best for Apple users with seamless integration across devices, starting from 50GB plans.
- Dropbox: Great for cross-platform sharing and collaboration with family members.
Local Storage Recommendations:
- External Hard Drives: Affordable, portable, and perfect for quick offline backups.
- Network-Attached Storage (NAS): Excellent for long-term preservation and multi-user access within a household.
- Archival-Quality DVDs or Blu-ray Discs: Ideal for offline backups that can be stored in a safe place.
The 3-2-1 Backup Rule for Digitized Photos:
- 3 total copies of your photo collection.
- 2 copies stored locally on different devices.
- 1 copy stored off-site—either in the cloud or at a separate physical location.
Quick Backup Safety Checklist:
Before you call your digitization project complete, make sure you can tick off these boxes:
- ✅ I have three copies of each digitized photo.
- ✅ Two copies are stored locally but on different devices (e.g., external hard drive + NAS).
- ✅ One copy is stored off-site (cloud or physically separate location).
- ✅ My cloud storage account is active and regularly synced.
- ✅ I’ve tested restoring a file to confirm my backups work.
By combining local and cloud storage, you protect your digitized images from both everyday mishaps and major disasters. Whether your goal is to share them online or preserve them for future generations, this dual strategy ensures your memories remain safe, no matter what happens.
Final Thoughts
Digitizing old photos is more than a technical process—it’s an act of preserving your personal history. Whether you choose DIY scanning or professional services, the key is to prepare your prints, pick the right method, and protect the digital files for the future. For the finishing touch, tools like Aiarty Image Enhancer ensure your treasured memories don’t just survive—they shine.
Ready to bring your memories back to life? Try Aiarty Image Enhancer and see your old photos bloom again.
 FAQs
FAQs
For archival purposes, scan at 600 DPI or higher to ensure you can enlarge the image later without losing detail. But many scanners can’t reach such high resolution. Aiarty Image Enhancer can help you increase DPI of photos and upscale resolution up to 4K/8K/16K/32K.
For digitizing old photos, scanning is generally better than simply taking a picture of them. While photographing is convenient, scanning offers a higher-quality result, producing images with better sharpness and clarity that preserve more of the original photo's details.
The best way to digitize old photos depends on your needs—flatbed scanners for top quality, smartphone apps for convenience, and professional services for large collections or expert results.
Yes. You can use your smartphone or a photo-to-digital app like Google PhotoScan. These apps correct glare, straighten edges, and enhance clarity, making them a good alternative if you don’t own a scanner.
You can use AI-powered tools like Aiarty Image Enhancer to remove scratches, revive faded colors, and upscale resolution for printing or large displays—saving hours of manual editing.
You May Also Like
This post was written by Brenda Peng who is a seasoned editor at Digiarty Software who loves turning ordinary photos into extraordinary works of art. With AI assistance for brainstorming and drafting, the post is reviewed for accuracy by our expert Abby Poole for her expertise in this field.