How to Reduce Noise in After Effects in 7 Ways
Noise is one of the most common issues in video production, especially when working with low-light footage, high ISO shots, or heavily compressed clips. It can quickly reduce visual quality, making even well-shot content look unprofessional. Learning how to properly denoise in After Effects can significantly improve image clarity and help achieve a cleaner, more polished result.
This guide covers everything about After Effects denoise workflows, including native tools, third-party plugins, best practices, and advanced techniques for noise reduction After Effects used in real production environments.
Native Method: How to Denoise in After Effects
Adobe After Effects features two highly effective native tools capable of resolving noise without forcing you to buy external software.
1. Remove Noise with After Effect "Remove Grain"
Remove Grain is the primary built-in tool for noise reduction in After Effects. It analyzes image data across the frame and applies both spatial and temporal filtering to help reduce digital noise while preserving as much detail as possible.
It's best for removing moderate noise, reducing grain in low-light footage, and fixing grainy footage before color grading or visual effects work.
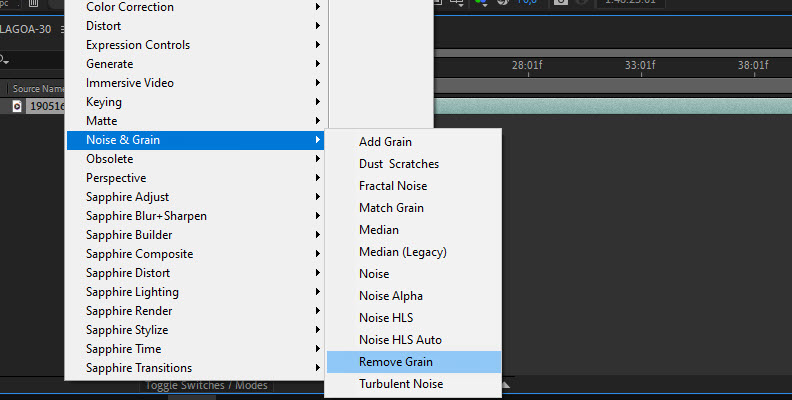
Step 1. Select your footage layer and go to Effect > Noise & Grain > Remove Grain in After Effects.
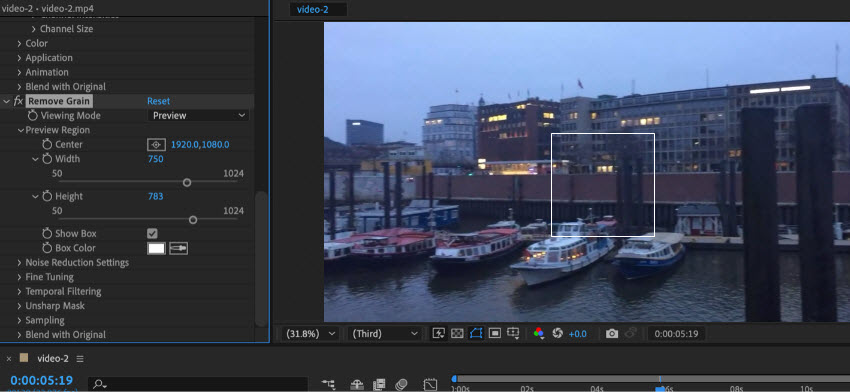
Step 2. A small grid square will appear. Drag this box over an area of your video that contains both high noise (shadows) and sharp, fine details so you can accurately gauge how the After Effects denoise processing alters your footage.
Step 3. In the Effect Controls panel, drop down the Sampling tab. Change the Sample Selection from Automatic to Manual.
Step 4. Switch your Viewing Mode at the very top of the effect panel to Noise Samples. You will see several small colored boxes scattered across your frame. Manually drag these boxes onto flat, featureless zones (such as a dark wall or an out-of-focus background) where only pure digital noise exists. This teaches the mathematical model exactly what artifacts to target, allowing you to denoise in After Effects with surgical accuracy.
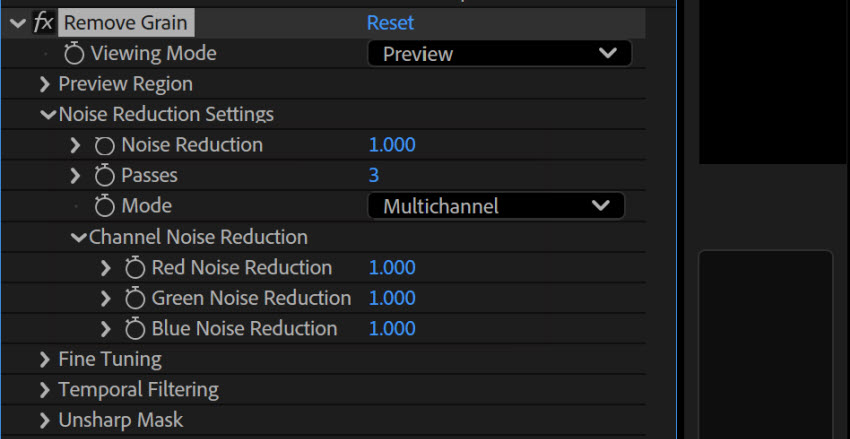
Step 5. Expand the Temporal Filtering section and check Enable. Digital noise randomly flickers from frame to frame. Temporal filtering analyzes adjacent frames to eliminate this jittery "flicker" without making the picture soft.
Best Setting: Set Passes to 2 or 3 for highly chaotic noise (note: higher passes increase render times).
Step 6. Switch to Final Output: Before caching previews or rendering, change the Viewing Mode back to Final Output.
Note: The native Remove Grain effect in After Effects is immensely CPU-heavy. To keep your timeline snappy, leave the Viewing Mode on Preview while you animate or composite, and toggle it to Final Output right before exporting your project.
2. Remove Noise with After Effect "VR De-Noise"
If you need a fast After Effects denoiser that won't paralyze your system during a preview, the built-in immersive video suite provides an excellent hardware-accelerated alternative. Although it was originally designed for 360° and VR footage, many editors use it on standard video projects because it is simple to apply and generally renders faster than Remove Grain in After Effects.
It's best for light noise reduction, quick edits, social media videos, and users looking for a fast After Effects denoiser with GPU acceleration.
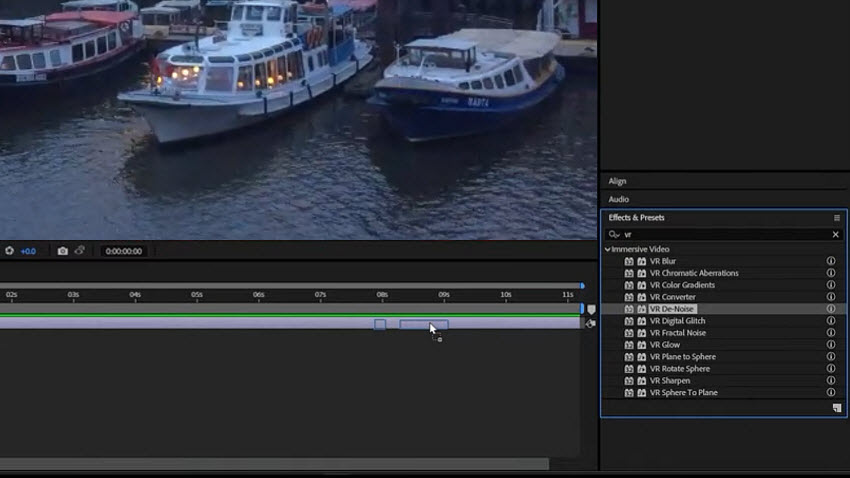
Step 1. Navigate to the top menu and select Effect > Immersive Video > VR De-Noise, or search for it directly inside the Effects & Presets panel. Drag and drop the effect onto your noisy video layer on the timeline.
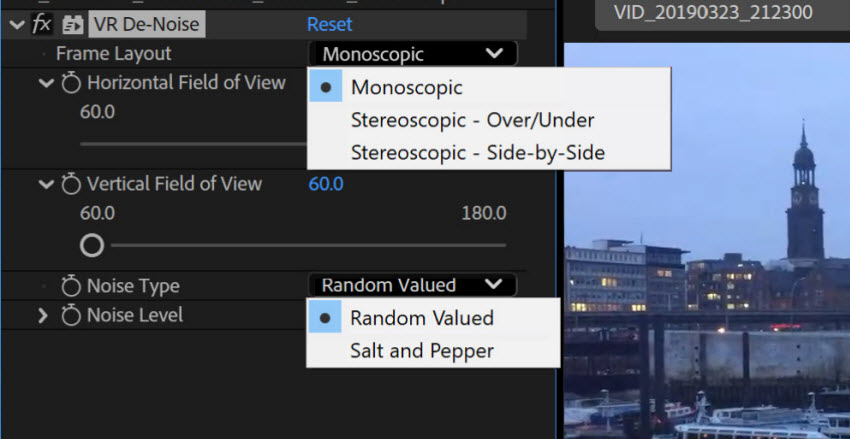
Step 2. In the Effect Controls panel, leave the Frame Layout set to Monoscopic and the Noise Type set to Random Valued (these are the correct default configurations for standard 2D video). Set the Noise Level slider down to 0 initially so you can see your original grain structure.
Step 3. Slowly scrub the Noise Level value upward (typically finding a sweet spot between 0.02 and 0.07). Stop adjusting the slider the exact moment the digital artifacts dissolve. Because this tool handles noise reduction After Effects calculations directly on your GPU, you will notice near real-time rendering and incredibly smooth playback compared to legacy CPU tools.
2. Denoise in After Effects using Third-Party Plugins
When managing feature films, commercial color grades, or low-light shots with severe sensor noise, native noise reduction tools in After Effects can sometimes fall short. Integrating an advanced After Effects denoiser plugin offers superior preservation of edge detail.
Popular denoisers for After Effects include:
- Neat Video
- Magic Bullet tools (Red Giant Denoiser)
- Topaz Video
- Boris FX Continuum
Each of these specialized third-party tools approaches noise reduction After Effects workflows differently—ranging from advanced manual sensor profiling to automated GPU frameworks and deep-learning artificial intelligence. Depending on your project's deadline, your budget, and the complexity of your footage, choosing the right external workflow will allow you to flawlessly reduce noise After Effects projects present without degrading your final image clarity.
1. Denoise in After Effects with Neat Video
Neat Video is widely considered the most useful denoiser in After Effects. Rather than applying a blanket blur that destroys image clarity, it reads your footage metadata to build a highly accurate mathematical profile of your camera sensor's unique noise characteristics at specific ISO levels and exposure balances.
Step-by-Step Guide: How to Use Neat Video in After Effects
Step 1. Select your noisy footage layer and go to Effect > Neat Video > Reduce Noise. Ensure it sits at the absolute top of your Effect Controls panel so you execute your noise reduction After Effects workflow before color grading or sharpening.
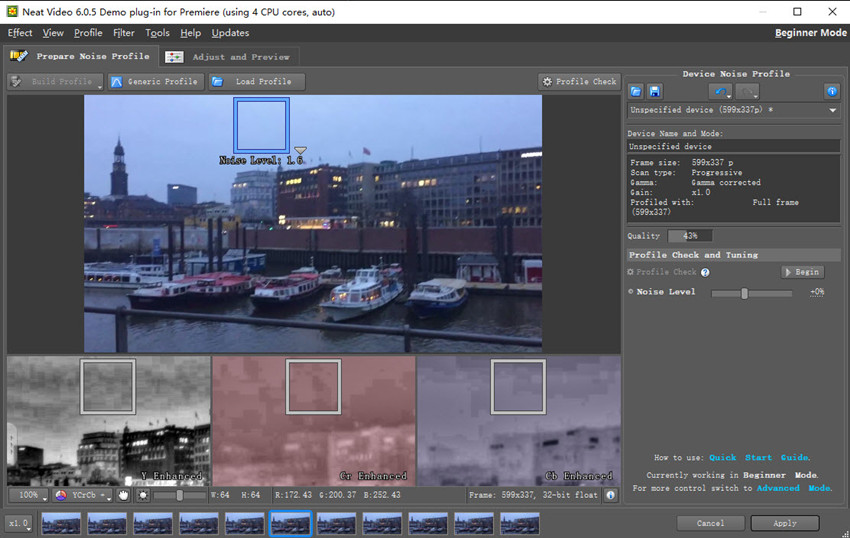
Step 2. Click the Prepare button in the Effect Controls panel. This will temporarily pause your After Effects composition and launch Neat Video’s custom external setup window.
Step 3. Find a flat, featureless area in your frame that contains zero physical detail but heavy noise (like a blank wall or an out-of-focus shadow). Click Auto Profile. The plugin will analyze the exact pixel grain signature across your Red, Green, and Blue channels.
Step 4. Switch over to the Noise Filter Settings tab. To eliminate random digital flicker and reduce noise After Effects jitter seamlessly across time, navigate to the Temporal Filter section and set the Radius to 2 or 3 frames. This ensures a stable image over your playback timeline while keeping fine textures completely crisp.
Step 5. Toggle the preview window to verify that textures like skin or hair are preserved, then click Apply in the bottom right corner to return to your main timeline.
2. Maxon Magic Bullet Denoiser (Formerly Red Giant Denoiser)
Historically known as Red Giant Denoiser, this plugin is now fully integrated into Maxon's Magic Bullet tools suite. Unlike Neat Video's manual profiling approach, Magic Bullet Denoiser leverages smart optical flow technology and automatic estimation algorithms.
It runs entirely on the GPU, allowing you to denoise in After Effects with near real-time playback. It requires almost zero setup so you simply drop it on the clip, and it instantly rewrites the pixel noise.
It can occasionally over-smooth complex motion or fine patterns compared to a manually tuned sensor profile.
3. Topaz Video AI
Topaz Video AI operates outside the traditional after effects denoise spatial math. Instead of blending pixels within a timeline layer, it uses deep learning models trained on millions of frames to literally reconstruct missing data.
It is unmatched for salvaging severely degraded or highly compressed footage. It goes far beyond classic remove grain After Effects techniques by intelligent upscaling and regenerating lost textures (like clothing threads or distant facial features).
It does not run natively as an inline After Effects effect. Editors must round-trip their clips by exporting them to the standalone Topaz application, rendering out a clean intermediate plate, and bringing it back into After Effects for final compositing.
4. Boris FX Continuum
For users who need a comprehensive post-production suite rather than just a simple utility, Boris FX Continuum provides an extensive toolkit. Its flagship BCC+ Noise Reduction filter is tightly integrated into the After Effects architecture, making it a staple in professional broadcast and commercial production houses where multiple cleanup tools are needed within a single pipeline.
Beyond basic noise reduction for After Effects, the editors can use Continuum to handle flicker removal, digital lens restoration, and advanced beauty skin smoothing simultaneously. It features complete native integration, deep GPU acceleration support, and requires no external software round-tripping.
Because Continuum loads a massive library of effects, it can be incredibly resource-intensive. The interface also presents a steep learning curve that may feel overwhelming for beginners who just want a straightforward After Effects denoise fix.
AI-Powered Alternative: Denoise Footage Before Importing into After Effects
While native tools and plugins can effectively handle many After Effects denoise tasks, some editors prefer to clean footage before importing it into their projects. This approach is particularly useful for low-light videos, high-ISO footage, smartphone recordings, and clips affected by heavy compression artifacts.
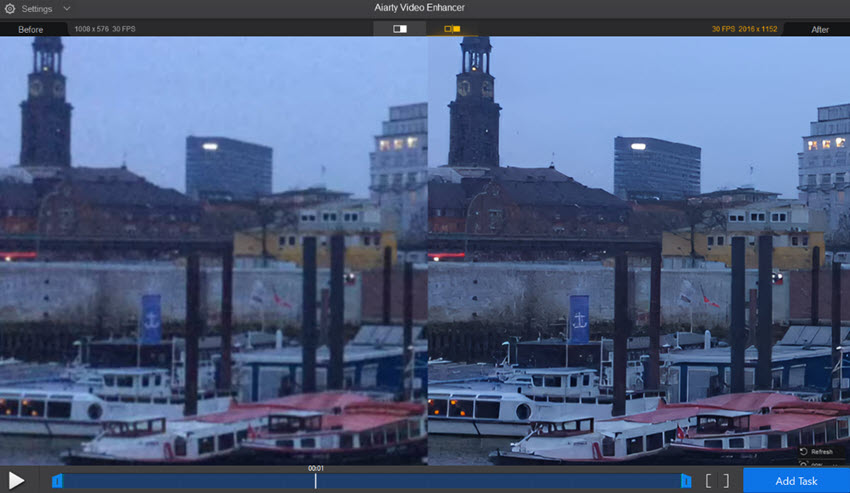
Aiarty Video Enhancer uses AI models to reduce noise, recover details, and improve overall video quality before editing begins. Unlike traditional noise reduction After Effects, Aiarty utilizes cutting-edge deep learning to erase grain as well as reconstruct lost organic details. It's particularly useful if you need:
- Faster noise reduction before After Effects editing
- Minimal manual adjustments compared to profile-based denoising tools
- Recover details while cleaning grain and compression artifacts
- Combine denoising and upscaling in a single workflow
- Avoid the performance impact of multiple noise-reduction effects
By removing noise before footage enters After Effects, editors can reduce the need for multiple denoise effects inside After Effects while preserving more detail for downstream post-production work.
Conclusion: Which Denoising Approach Should You Choose?
Selecting the right workflow to denoise After Effects projects ultimately comes down to balancing your deadline, budget, and the severity of the noise in your footage. No single tool fits every production environment, but you can easily categorize your choice into three clear pathways:
- Choose Native Tools (Remove Grain / VR De-Noise) if you are working on a budget, dealing with mild to moderate noise, and want to keep your project entirely self-contained without buying external software. Just remember to manage your preview cache to prevent system slowdowns.
- Choose Premium Third-Party Plugins (Neat Video / Magic Bullet / Continuum) if you are working on mid-to-high-end visual effects, commercial color grades, or tight broadcast deadlines where you need precision inline filtering directly inside your timeline layers.
- Choose AI Pre-Processing (Aiarty Video Enhancer) if you are dealing with extreme low-light artifacts, heavy camera compression, or smartphone/drone footage that requires true detail reconstruction rather than simple pixel blurring. Processing your plates through Aiarty before importing them into your composition ensures a lag-free, high-performance timeline.
By matching the specific needs of your footage to the strengths of these noise reduction After Effects workflows, you can completely salvage degraded clips, maintain crisp edge structures, and ensure your final exports deliver a flawless, cinema-grade presentation.
 FAQs
FAQs
Yes. Adobe After Effects includes built-in noise reduction tools that can help remove grain and digital noise from footage. The most commonly used native option is Remove Grain, which can be found under Effect > Noise & Grain > Remove Grain. For faster performance, some editors also use VR De-Noise, a GPU-accelerated effect originally designed for 360° video but often applied to standard footage as well.
While these native tools are suitable for basic to moderate noise reduction, professional editors often rely on third-party plugins such as Neat Video, Magic Bullet Denoiser, or Boris FX Continuum for greater control and improved detail preservation.
To fix grainy video in After Effects, start by applying a noise reduction effect to your footage.
- Select the video layer in your timeline.
- Go to Effect > Noise & Grain > Remove Grain.
- Adjust the noise reduction settings and preview the results at 100% zoom.
- Enable Temporal Filtering if your footage contains flickering noise between frames.
- Fine-tune the effect until the grain is reduced without making the image look overly soft.
For heavily noisy footage, especially videos shot in low light or at high ISO settings, dedicated denoising plugins or AI-powered tools may produce better results than native effects. The goal is to reduce visible noise while preserving important details such as skin texture, hair, and fine patterns.
The best method depends on your footage. For light noise, native tools like Remove Grain or VR De-Noise can be sufficient. For professional results, most editors prefer third-party plugins such as Neat Video, which provides more precise noise profiling and better detail preservation.
This is one of the most common complaints on Adobe forums and Reddit. It usually happens when:
- Noise reduction strength is set too high
- Temporal filtering is over-applied
- Fine textures are mistaken for noise
To avoid this, reduce the intensity gradually and always preview at 100% scale.
You May Also Like
This post was written by Brenda Peng who is a seasoned editor at Digiarty Software who loves turning ordinary photos into extraordinary works of art. With AI assistance for brainstorming and drafting, the post is reviewed for accuracy by our expert Abby Poole for her expertise in this field.