Should I Restore Image Quality Before Upscaling or After
When fixing low-quality images, such as those with high-ISO noise, color speckles, and compression artifacts, should we upscale first and then fix the flaws, or enhance image quality first and then upscale to higher resolutions?
In general cases, it is recommended to restore photo quality before upscaling. In theory, it involves separate steps:
- Choose x1 to keep the original resolution and restore the photo for better clarity.
- Export the image, re-import it, and then choose the desired resolution such as x2, x4, etc.
Depending on the design mechanism of an image enhancer tool, you can either complete the above process manually or have it handled automatically by the tool with specific settings.
To illustrate, let's put these benchmark images to the test using image enhancer software.
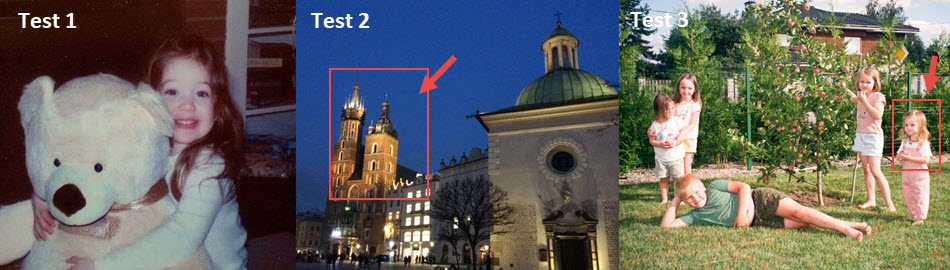
Test 1. Restore old portrait photos
Source image: 1024x706, target resolution: x2 (2048x1522).
Aim: restore compression artifacts and fix the blurry face.
AI Tool: Aiarty Image Enhancer developed by Digiarty.
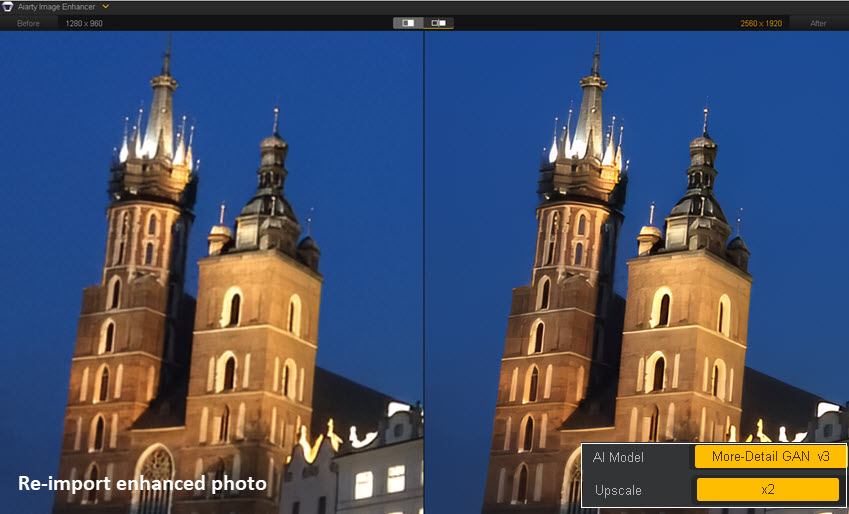
To enhance your workflow, Aiarty Image Enhancer introduces a 2-pass processing option to accomplish quality restoration and upscaling in one-go. It means you don't necessarily need to go through the separate workflows demonstrated in fig1 and fig2 below. Still, we present the comparisons for your reference.
Fig1. Choose a model to restore photo quality and set Scale x1 to keep the original resolution.
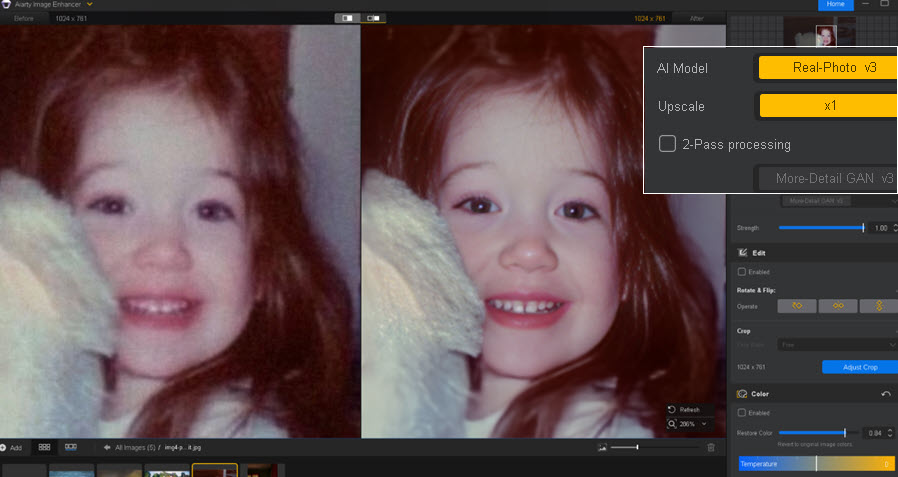
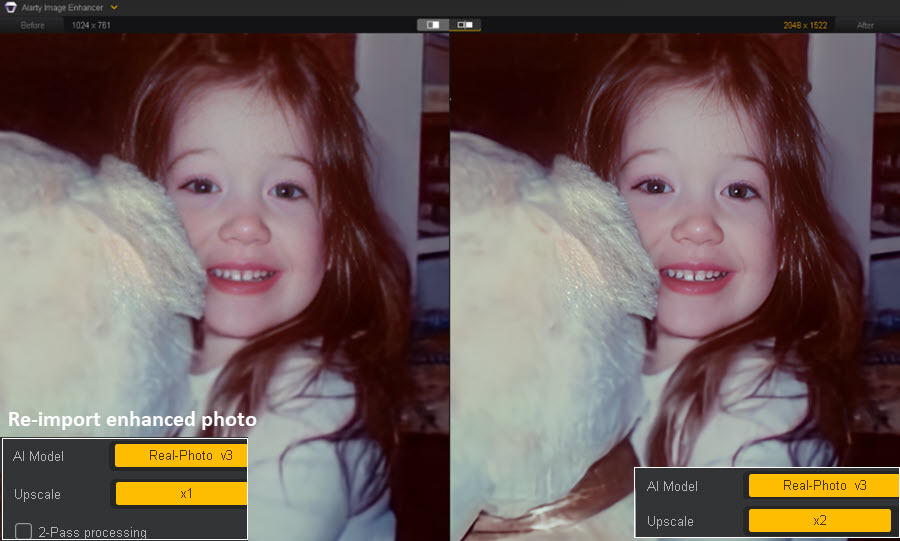
Fig2. Re-import the enhanced photo, then select x2 for resolution upscaling.
Instead of going through separate steps, you can enable 2-Pass Processing while choosing a model to restore old photos, and then select the scaling factor such as x2 as the final target output. Here's how to achieve that in Aiarty Image Enhancer.
Fig 3. Use 2-Pass Processing to restore photo quality while upscaling to x2 or higher resolutions.
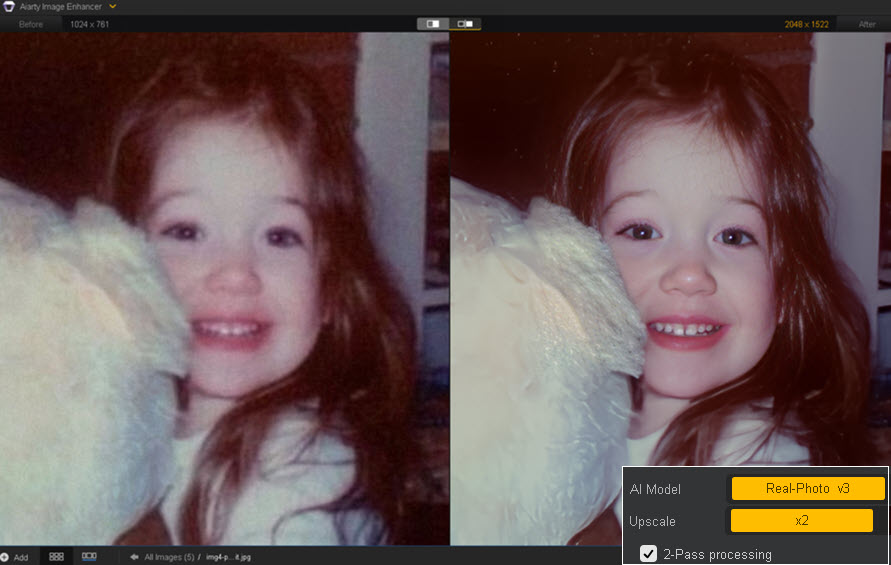
As shown in Fig. 3 above, the left image is the original low-quality file, while the right image is the enhanced result: restored quality and then upscaled in a single workflow.
In most cases, it covers the two separate workflows shown in Fig. 1 and Fig. 2 while delivering the same level of enhanced image quality.
For content creators and designers dealing with large batches of images, this ensures better efficiency while keeping outputs clear, natural, and free from newly introduced artifacts.
Ready to try it yourself? Download Aiarty Image Enhancer and start enhancing your photos, or get more test images here.
Test 2. Reduce noise in low-light photos
The source photo was taken on my old iPhone 6 in 2015, featuring an old castle during our visit to the salt mine near Kraków. It is riddled with digital noise, especially in the night sky, and the castle lacks clarity when zoomed in.
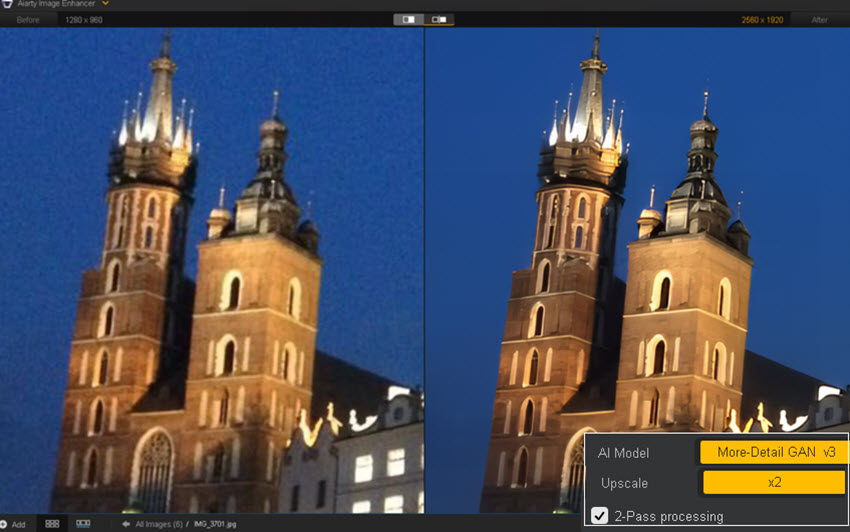
Testing Aiarty: More-Detail GAN v3 model, upscale x2, enable 2-Pass processing.
I applied the above parameters in Aiarty Image Enhancer, and the right panel shows the preview of the enhanced photo. Its AI model detects quality issues and reduces image noise. The blue sky appears cleaner, while the architectural textures are better restored.
- Source image: 1280x960
- x2 Upscale: 2560x1920
As explained previously, the 2-Pass Processing performs an additional x1 enhancement alongside the upscaling settings above.
If you still prefer a separate restoration workflow followed by upscaling, here's the test:
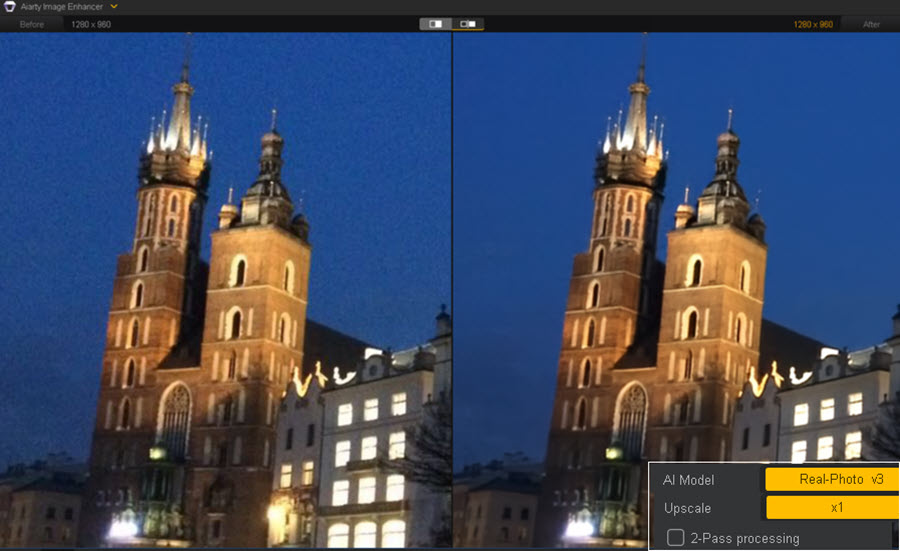
First pass:
Import the low-quality source photo, choose a model (such as Real-Photo or More-Detail), and set the scale to x1 to keep the original resolution.
Export the photo and then re-import it into the image enhancer.
Second pass:
Choose a model again and set the target resolution, such as x2, x4, or higher for upscaling.
Tips: If you want to further increase the photo resolution without losing details, you can experiment with applying x2 upscaling twice. In many cases, repeating another x2 workflow preserves clarity and fine details better than directly jumping to x4 upscaling.
Click the buttons below to download Aiarty Image Enhancer, and explore best practices and tips to get the most out of this photo enhancer software.
Test 3. Restore multiple faces in group photos
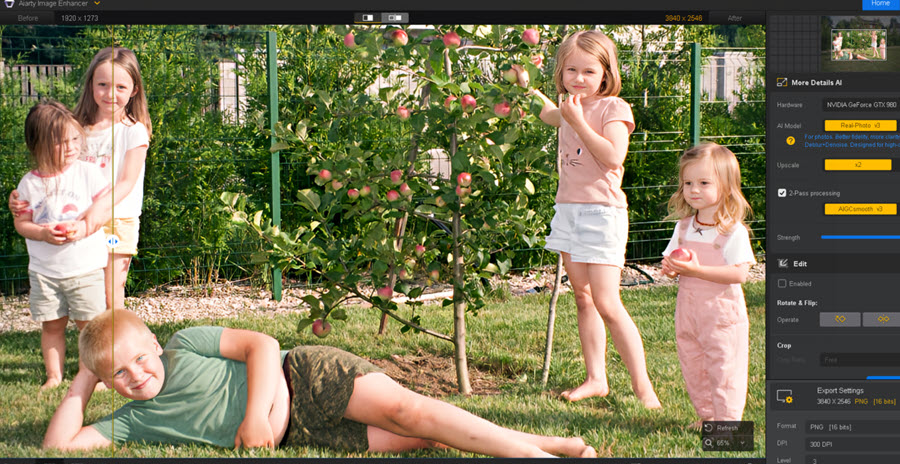
The source image above was downloaded from a family album, with degraded quality caused by platform compression. When zooming in, you can notice mosquito noise and jagged lines around edges, while the faces lack detail and clarity.
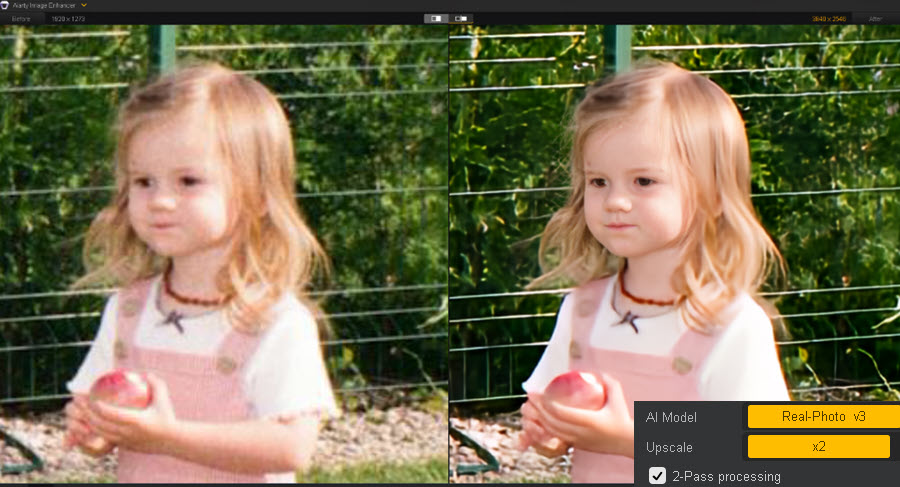
Testing Aiarty: Real-Photo v3 model, upscale x2, 2-Pass processing toggled on, along with the Face Restoration feature.
As shown in the before-and-after comparison above, even at a 400% close-up of the girl holding an apple, the enhanced result reveals noticeably better clarity, with natural details restored in the skin, hair, and background plants.
In case you're curious about the results using separate workflows, here is my test:
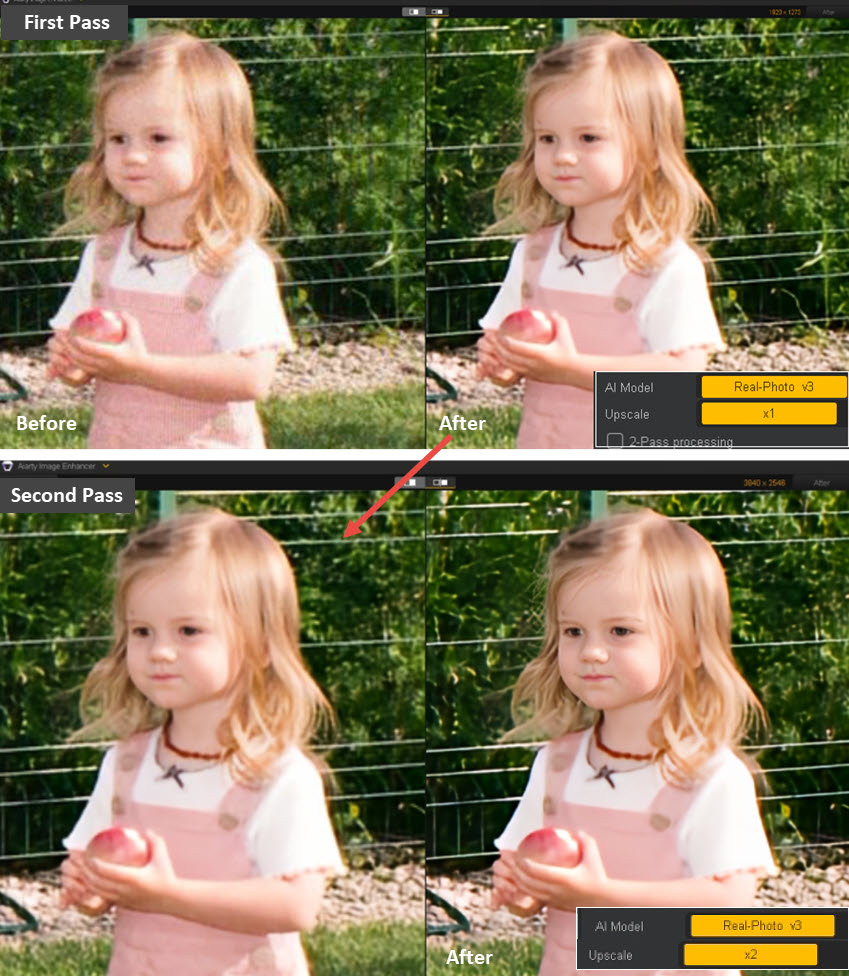
First Pass:
Import the source photo, choose the Real-Photo v3 model, set x1 to keep the original resolution, and toggle off 2-Pass processing.
Save the enhanced image and reload it into Aiarty Image Enhancer.
Second Pass:
Select x2 to upscale the photo from 1920x1273 to 3840x2546.
What AI models shall I choose to restore photo quality?
Depending on your budget, skill level, and enhancement needs, here are free open-source models, online enhancers, and dedicated desktop apps.
1. Open-source AI models with a GUI
For open-source image enhancers and upscalers, you will need a GUI (graphical user interface) to install and run custom models for different purposes.
Some models are designed for general enhancement, while others focus on anti-aliasing, noise reduction, detail-preserving upscaling, compression artifact removal, or are specifically trained for anime or realistic photos.
OpenModelDB hosts many AI models, with filters for input type, enhancement purpose, and AI model architecture.
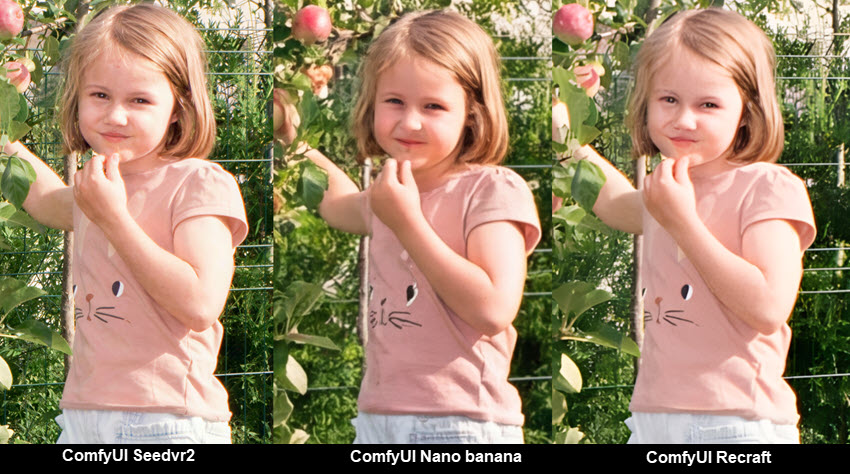
In case you are interested, I also tested these open source models using local image enhancer tools. Models such as SeedVR2, Nano Banana, Recraft, RealESRGAN, and 4xNomo8kSC are included, along with image comparisons.
2. Dedicated AI models built into image enhancer software
For the benchmark images in Tests 1–3, we used Aiarty Image Enhancer for photo restoration and upscaling, tweaking settings and switching AI models based on specific photo issues.
Here's a quick summary:
All AI models in Aiarty automatically analyze photo issues and apply enhancements accordingly. They help reduce image noise, fix blur, improve clarity, and restore details in skin, hair, plants, and architectural textures. Though each model has a slightly different priority.
- More-Detail Model: Prioritizes detail and texture restoration, while fixing grainy and blurriness.
- AIGCsmooth Model: Prioritizes smoothness for AI art, anime, and digital designs, with improved clarity.
- Real-Photo Model: Prioritizes faithful enhancement for photorealistic details, and also works with high-resolution photos.
- Face Restoration Model (optional): If the three standard models already enhance portraits sufficiently, you can leave this option off. For low-quality portraits or blurry, downscaled faces, you can enable this option.
With the real-time preview, you can quickly switch between AI models to compare enhancement results and choose the one that delivers the best quality with a natural look.
Aiarty also supports adjusting enhancement strength, helping balance the results and avoid over-sharpening. For a smoother workflow, you can optionally use its color tools, quick editing features, AI eraser, face enhancer, and more.
You May Also Like
This post was written by Brenda Peng who is a seasoned editor at Digiarty Software who loves turning ordinary photos into extraordinary works of art. With AI assistance for brainstorming and drafting, the post is reviewed for accuracy by our expert Abby Poole for her expertise in this field.