Testing Local Image Enhancers (with Real Examples)
Previously before deep-learning empowering image upscaling, noise reduction and detail restoration, we largely rely on photo editors, such as upscaling in Gimp, reducing image noise with Lightroom, or editing in Photoshop.
While these image editors are involving and incorporating AI technology, some users still need dedicated local image enhancer and upscaler tools, for following scenarios and beyond:
- Batch upscale hundreds of images to save time
- Restore image details and avoid artifacts
- Use AI models for quality enhancement and upscaling
- Enhance old photos, portrait, private or client images, AI art, and designs
I tested both standalone software and models working with a GUI, turning off network connection to ensure each of then working safely offline, and list out below options for you, with comparison images showing the output quality.
If you are skeptical about certain tools, you can turn off WIFI connection and unplug ethernet wire to see if all the processing, image enhancement and upscaling tasks still work.
Aiarty Image Enhancer - Offline AI Tool
Aiarty Image Enhancer is a powerful offline image enhancer and upscaler, running locally on Windows and Mac. It won't send any image to online servers as it doesn't have any uploading capability by design. You can rest assured to process any image safely in efficient offline workflows.
This offline image enhancer helps you to remove image noise, fix blurry, pixelated photos, upscale to 4K, 8K, and custom higher resolutions, fix blemishes and dust, edit colors, and restore natural details for skins, wildlife feathers, outdoor plants and surface textures.
Upscale Images with Aiarty Image Enhancer
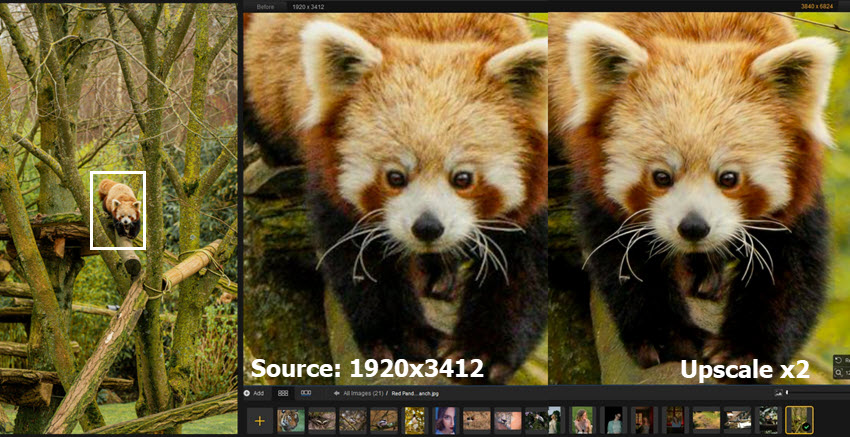
For this wildlife photo (image on left above), even shot with telephoto lens, the red panda is still far away and less impactful. When cropping or zooming in, it looks blocky and grainy, with some chroma noise and color speckles.
Using local image upscaler such as Aiarty Image Enhancer, you can put the subject in spotlight, upscale images by x2, x4, or output 4K, 8K or higher resolutions, and make it clearer.
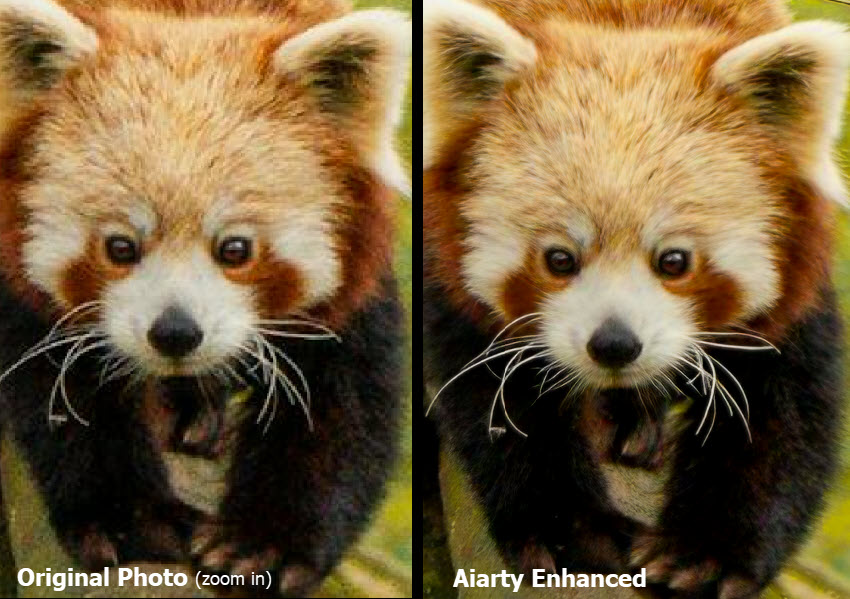
Restore Natural Details
Aiarty doesn't simply stretch the pixels, instead, the built-in AI models will infer and restore details in fur and branch texture, upscale the image while clean up artifacts, without over-processing.
You can follow these steps to achieve a natural look, with strength control.
Step 1. Import images and select an AI model.
You don't need any editing knowledge, simply switch among AI models, preview results in real time, and stay with whichever working for a specific image.
For blurry and low-light grainy images, the AI models will auto fix quality problems
Step 2. Choose a target resolution to upscale.
You can also toggle on 2-pass processing (check corresponding tests on more photos), which helps you to restore image clarity and fix quality issues before upscaling.
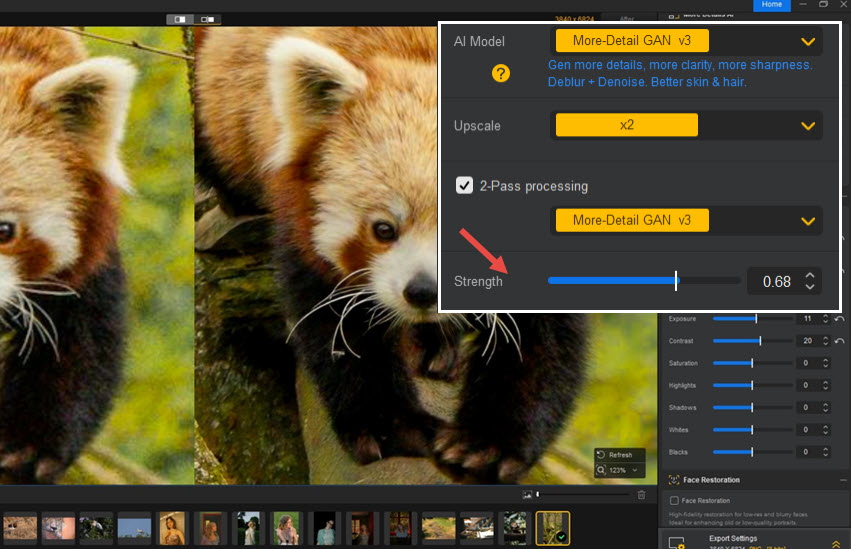
Now fine-tune the strength slider to control enhancement intensity. For this red panda photo, I nudged the slider around 0.65-0.85, and stay with 0.68 as it strikes a balance to restore natural details, without being too aggressive to look artificial and plastic-y.
Step 3. Apply optional editing or export directly.
You can adjust colors, crop or flip images, or fix blemishes with the AI eraser.
Besides working as a dedicated offline image upscaler, Aiarty also helps remove image noise, cleaning up night scenery photos, low-light indoor images, and cropped bird photos.
Testing Aiarty Image Enhancer for Noise Reduction
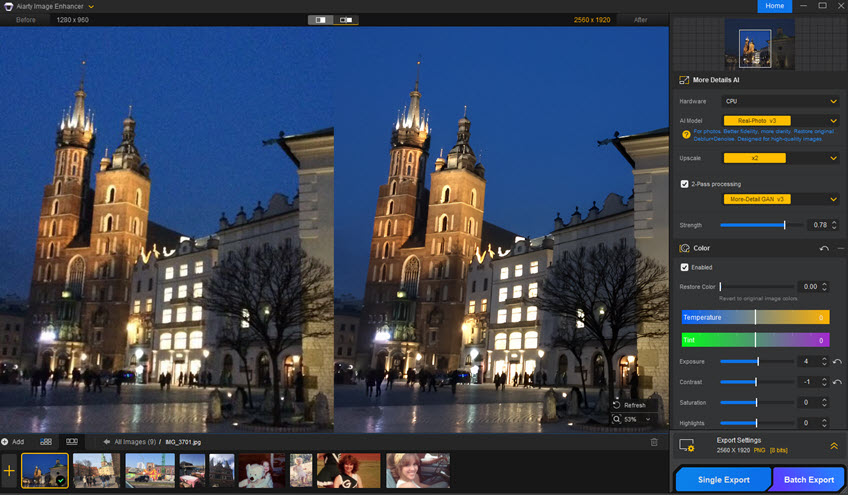
For this night photo taken with my old iPhone 6 with high ISO noise, I start with Aiarty's Real-Photo model, strength 1.0, upscale x2. Since I also prefer to restore image quality and add x1 enhancement, I toggled on/off 2-pass processing to compare the effects, and decided to stay with 2-pass on, strength at 0.78.
As you can see from the screenshot above, the grainy, noisy area are cleaned up, while the architectural details, textures of wall surfaces, and sharp lines are enhanced with Aiarty.
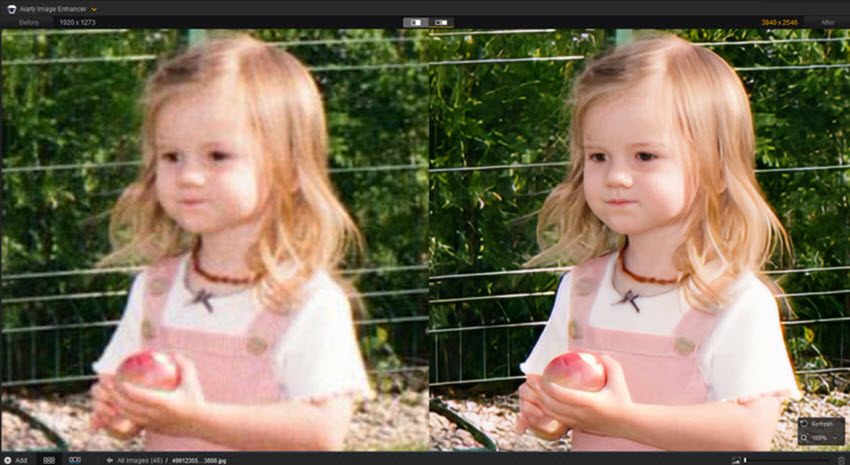
Testing Aiarty Image Enhancer for Face Restoration
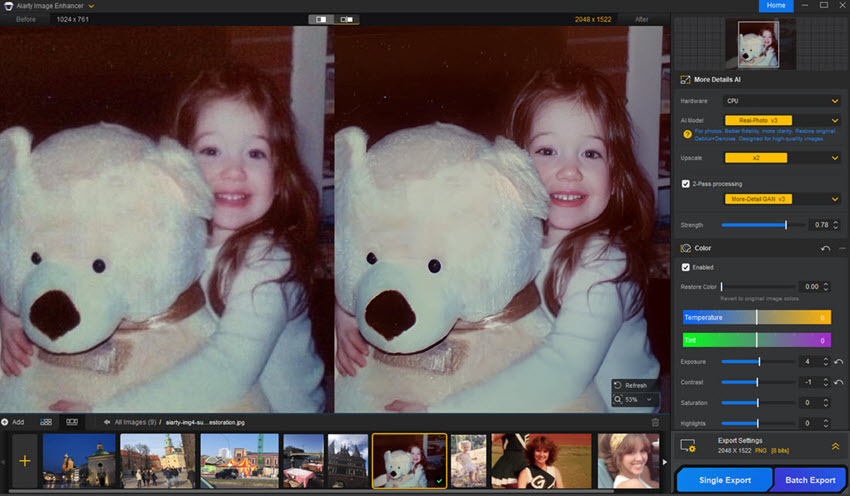
For this old portrait photos featuring a girl and toy bear, it looks soft and blurry when zooming in. I experimented with More-Detail Model and Real-Photo model, x2 upscaling, and both work to bring back overall clarity.
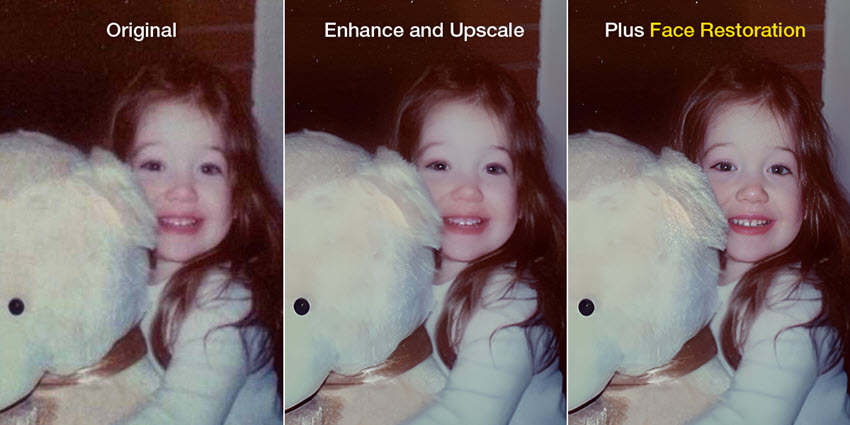
We can stay with these settings, or enable Face Restoration option in Aiarty, which is designed to fix blurry, compressed, and low-resolution faces in photos. You can quickly compare different settings below, and the most suitable parameters really come down to personal preferences.
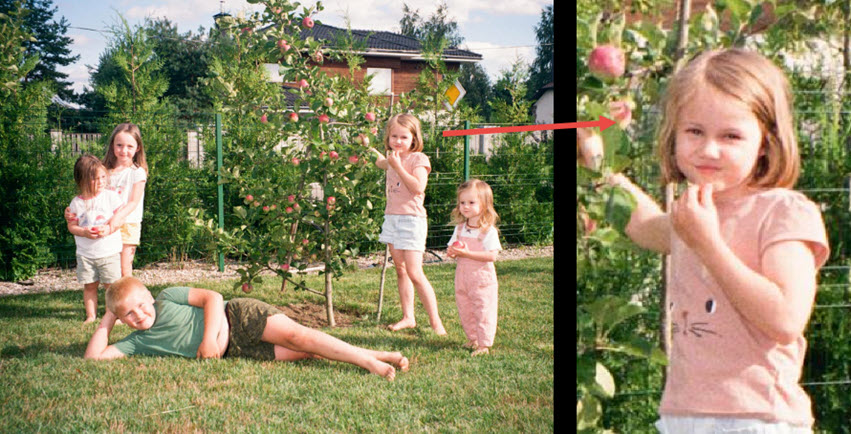
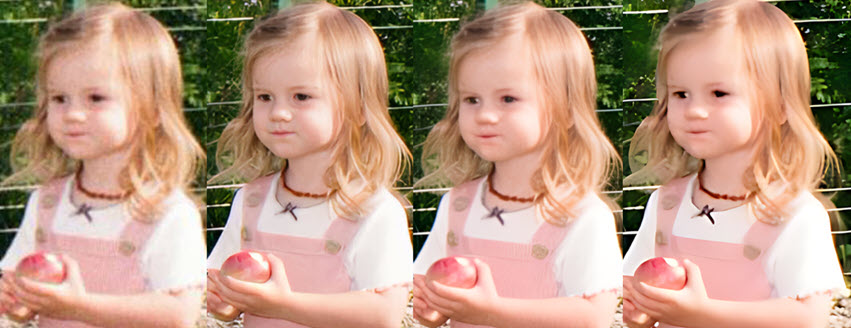
Source Image: 1920x1273, featuring five kids in a garden. When zooming in or viewing on a large screen, their faces look blurry and the surrounding plants lack detail.
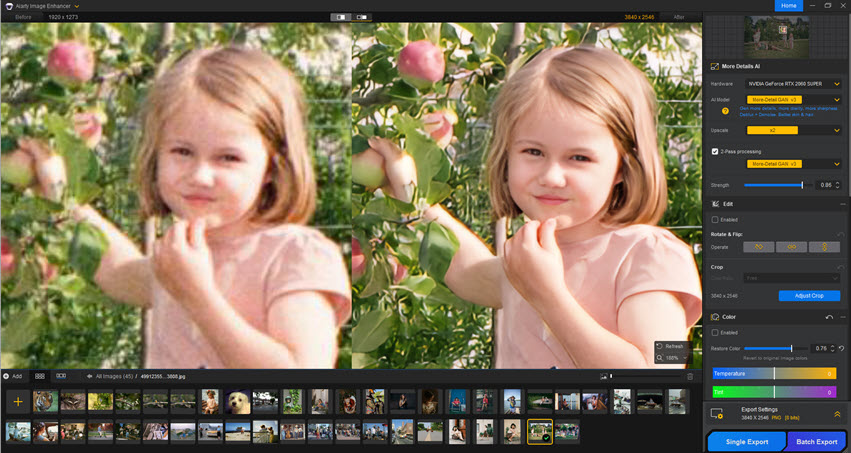
Settings in Aiarty Image Enhancer: More Detail model, 2x upscale, 2-pass (used to reduce compression artifacts and blurriness with an additional enhancement pass). You can toggle Face Restoration on or off and choose the look you prefer.
This is the same photo of the kids in the garden. Using the real-time preview in Aiarty Image Enhancer, we zoom in to inspect another girl holding an apple. The face restoration feature works across all faces in a group photo, not just a single portrait.
Tips: Download All Models to Enhance Images Locally
After installing Aiarty Image Enhancer on your computer, you can import images to start quality enhancement and upscaling. When running it for the first time, it will require network connection to save models locally, after that, all tasks are performed locally.
You can either:
- Go to Menu to download all models locally in 1-click.
- Or start specific tasks, and it will initial model downloading for that task for the first time.
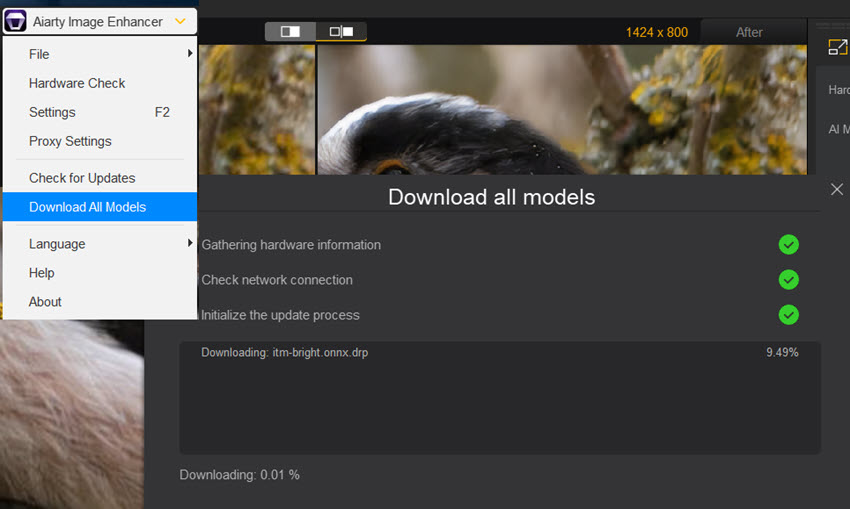
When dealing with same tasks afterward, such as face restoration, you don't need network connections as the models are already saved on your local device.
To enjoy the latest technology in AI-driven enhancement, you may need to update the software and download the latest AI models. In other times, image processing works safely offline.
Upscaly - GUI with Local AI Models
Upscaly is another frequently mentioned AI image enhancer, working locally with built-in AI models and downloadable custom models. I mostly used it for resolution upscaling to meet a required dimension. When it comes to quality restoration, it's a case-by-case result that varies, depending on your hardware and supported architecture, model selection, and the image problem itself.
- No quality difference after image processing in Upscayl?
Make sure your hardware supports Vulkan acceleration, and choose a dedicated AI model that addresses your specific image quality issue. For instance, some standard models are designed more for resolution upscaling, not specifically for fixing blurry or heavily compressed images.
- Which model shall I use in Upscaly?
This is a very broad question to answer without knowing your specific image quality problems. Still, I compared both its built-in models and some custom models with a benchmark image below.
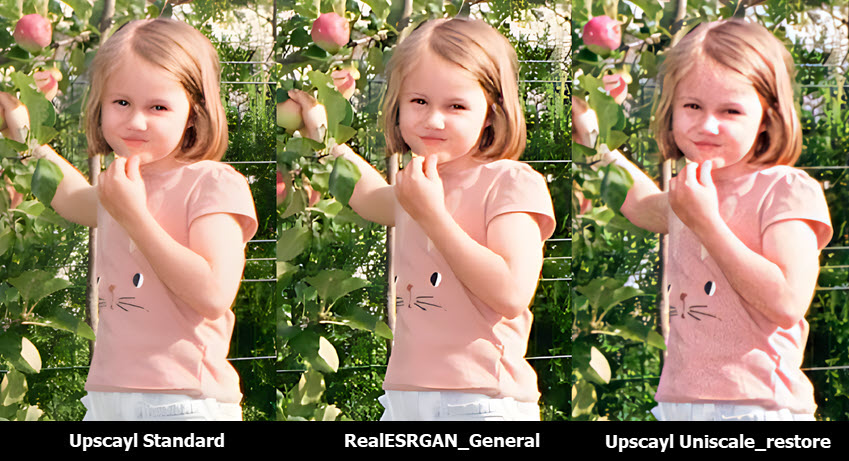
Left: Upscayl Standard, Middle: Upscayl RealESRGAN_General, Right: Upscayl Uniscale_restore.
As you can see, sometimes it's not about the local image enhancer being less effective, but rather choosing the wrong model for the specific flaws in a photo.
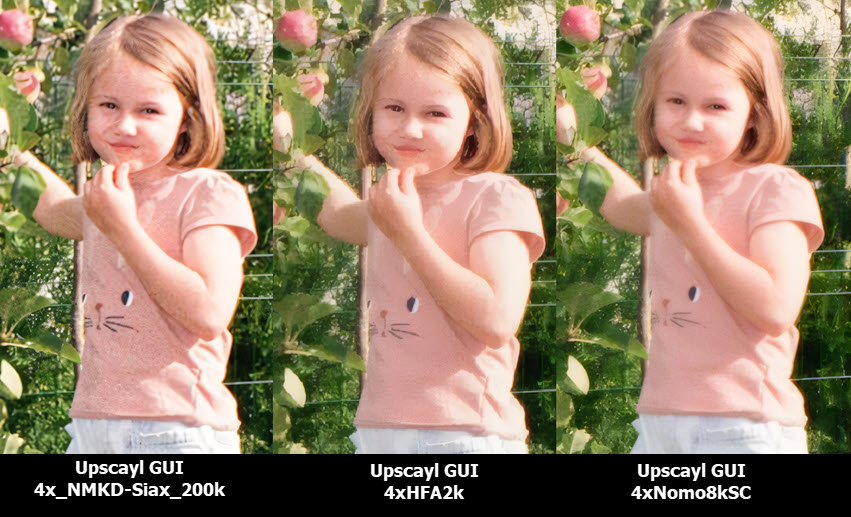
Comparing custom models, Upscayl as GUI. Left: 4x_NMKD-Siax_200k, Middle: 4xHFA2k, Right: 4xNomo8kSC.
ComfyUI - Local Image Enhancer with Node Workflow
If you are familiar with Stable Diffusion workflows, not only for image generation but also for quality restoration and upscaling, you will surely like the idea of using local image enhancer models in ComfyUI.
Strictly speaking, ComfyUI itself is only a GUI (graphical user interface). By integrating with different AI models and arranging them in a proper sequence through a node-based workflow, you can handle photo enhancement, upscaling, restoration, and comparison.
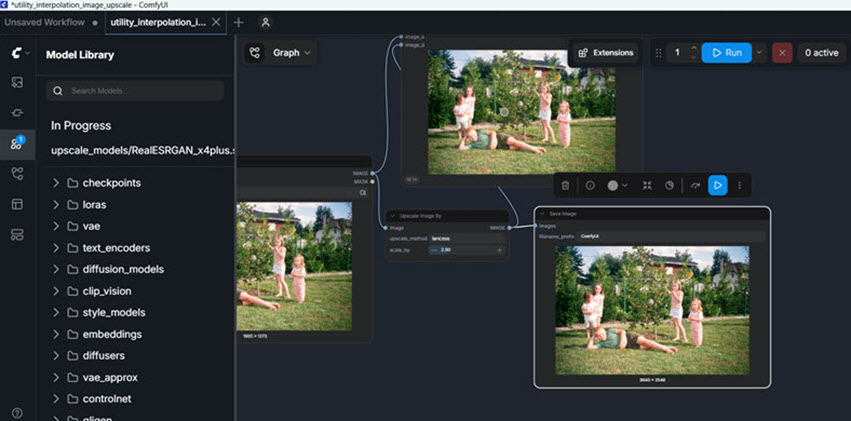
Assuming you have followed our detailed guide to set up ComfyUI for image upscaling, below are my hands-on tests of several popular models.
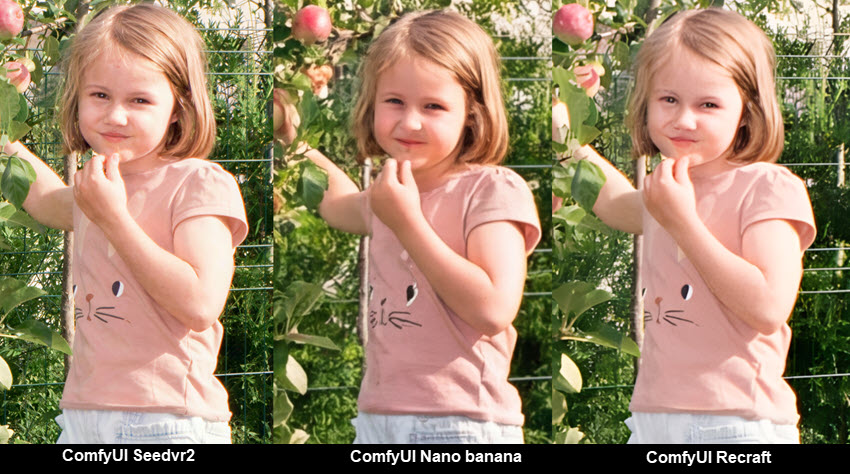
Left: Seedvr2 workflow in ComfyUI, Middle: Nanobanana workflow, Right: Recraft workflow
For the Seedvr2 workflow, I chose 4x upscale with a fixed seed. It appears to restore more texture and detail in the background plants than the other two workflows with Recraft and Nano banana.
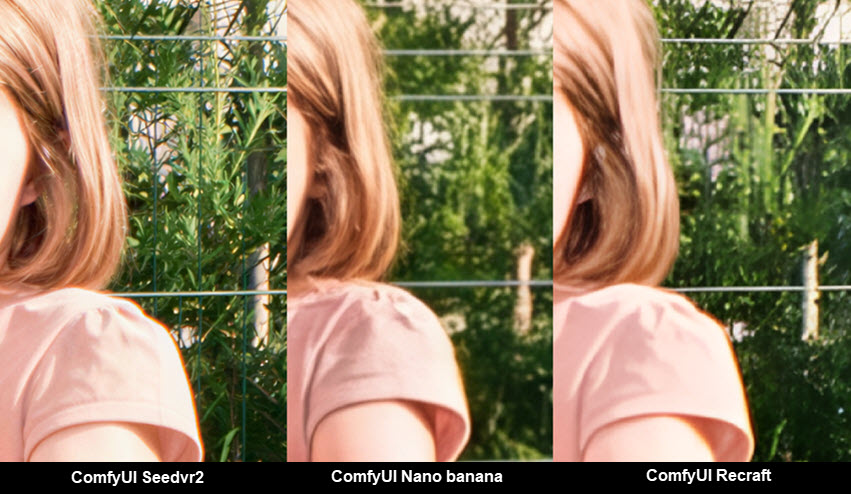
Though, for some photographers, the natural blur from shallow depth of field looks more cinematic, where the background remains softly blurred, while the subject stays sharp and in focus.
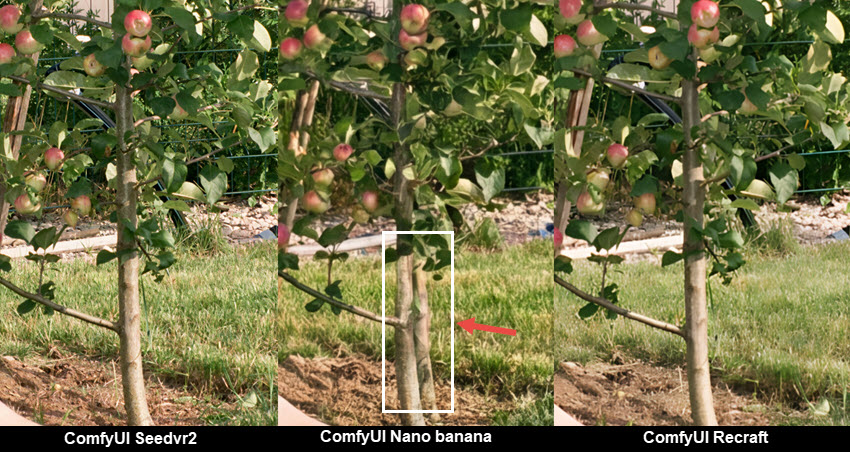
For the Nano banana workflow, I chose a 4K output and used the prompt "upscale this image, refine details, preserve text, retain composition, refine textures, skin, and materials". Compared to the other two models, we notice the tree trunk is redrawn and appears structurally altered, looking different from the source image.
If you have API keys from licensed Topaz apps, you can also use Topaz with ComfyUI.
Wrap Up
Local AI image enhancers have come a long way from traditional photo editing workflows. From my tests, there is no single best tool or model. Each has its own strengths depending on your workflow and image type:
- Aiarty Image Enhancer: best for natural detail restoration, quality upscaling, noise reduction and batch tasks, support commercial projects.
- Upscaly: best for resolution upscaling, with results depending on choosing the right model, some models are non-commercial only.
- ComfyUI: best for advanced users familiar with node-based workflows, or prefer style transfer which may alter the source images.
Instead of manually adjusting noise, sharpness, and resolution, you can now rely on dedicated models to handle restoration and upscaling more efficiently, and safely in offline environments.
You May Also Like
This post was written by Brenda Peng who is a seasoned editor at Digiarty Software who loves turning ordinary photos into extraordinary works of art. With AI assistance for brainstorming and drafting, the post is reviewed for accuracy by our expert Abby Poole for her expertise in this field.