How to Upscale Images in ComfyUI: Workflow, Models, and Nodes
ComfyUI is known as a playground for power users of Stable Diffusion—it lets you build custom workflows from scratch. But beyond AI art, you can also use it to do something very practical: upscale images. If you’ve got a photo that looks too small, ComfyUI can enlarge it with dedicated upscaler models such as ESRGAN or SwinIR.
The catch is that it’s more complex than a typical image upscaler. You’ll need to install the software, download models separately, and set up a workflow. In this guide, we’ll walk you through the process step by step.
What is ComfyUI
ComfyUI is an open-source interface for Stable Diffusion that works through a node system. Instead of a fixed set of buttons, you connect nodes on a canvas to decide exactly how the image is processed. Each node represents a step—loading a model, adding a prompt, running a sampler, or saving the output.
The project is actively maintained and available for free on GitHub. It runs on Windows, macOS, and Linux, and supports both NVIDIA and AMD GPUs. Installation is straightforward: download the latest release, unpack it, and run the script for your system.
While ComfyUI is often used to generate AI art from text prompts, it can also handle existing photos. With the right nodes, you can upscale an image, apply denoising, or restore detail in areas that look blurred. Upscaling in particular is one of the most practical features, since it works with common models like ESRGAN or SwinIR.
This mix of flexibility and customization is why ComfyUI has become popular among advanced users. It’s not the easiest interface to learn, but once you understand the workflow, you can apply it to a wide range of image editing tasks, including improving your own photos.
How to Upscale Images in ComfyUI
To get started, you’ll need both the software and an upscaler model. Here’s a detailed guide for non-technical users.
Step 1. Download and Choose the Right ComfyUI Package
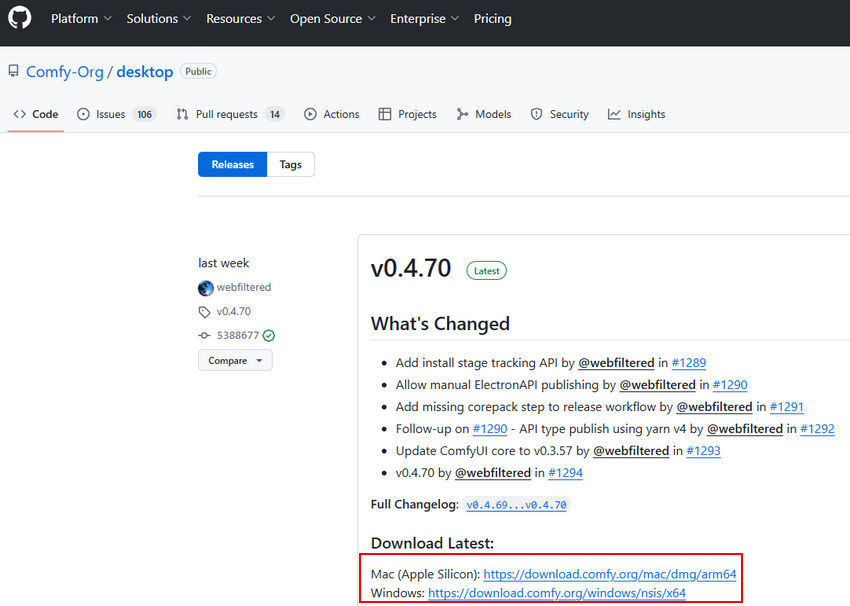
For most users, the easiest option is the desktop package, which comes with an installer or one-click launch scripts. This package bundles the necessary environment, so you don’t have to worry about setting up Python or dependencies manually.
You can find it on the ComfyUI GitHub Desktop Releases page. Look for Windows installers (NSIS/EXE) or macOS DMG files.
If you prefer to always use the latest code or don’t have installation permissions, you can choose the Portable (ZIP) version or the manual install (source code + Python environment). The official ComfyUI documentation explains the pros and cons of each method.
Step 2. Install ComfyUI on Computer
After downloading the installer, just double-click the .exe file and follow the prompts. Once installed, there will be a shortcut to launch ComfyUI.
If you downloaded the portable ZIP version, extract it to any folder you like—for example, D:\ComfyUI_windows_portable. Inside the folder, you’ll find scripts like run_nvidia_gpu.bat (for NVIDIA GPU) and run_cpu.bat (for CPU-only systems).

Double-click the appropriate script to start ComfyUI. A command window will open, and the interface will be available in your browser, usually at http://127.0.0.1:8188.

Mac and Linux users can follow the desktop or manual install instructions provided in the official documentation, including special guidance for Apple Silicon (M1/M2).
Step 3. Prepare Comfyui Image Upscaler Models
ComfyUI doesn’t include image upscaler models by default. You need to download them separately. Popular options include:
- ESRGAN – general photo upscaling, maintains natural detail.
- Real-ESRGAN – optimized for real-world photos, reduces artifacts.
- SwinIR – great for illustrations, anime, and sharper edges.
- 4x-UltraSharp – works well for digital art and images with defined lines.
Model files usually come as .pth or .safetensors. If the download is a ZIP archive, extract the .pth or .safetensors file first.
Where to place the models:
On Windows, copy the model into:
D:\<your ComfyUI folder>\ComfyUI\models\upscale_models\
On macOS or Linux, use:
~/ComfyUI/models/upscale_models/
Make sure the files are directly inside the folder and not nested in additional subfolders—ComfyUI won’t detect them otherwise.
If you prefer, community tools like ComfyUI Manager can download and manage models automatically, placing them in the correct folder. This is helpful for non-technical users.
Step 4. Set Up a Basic Image Upscale Workflow in ComfyUI
After launching ComfyUI in your browser, you’ll see an empty canvas. Here’s how to set up a workflow to upscale a photo:
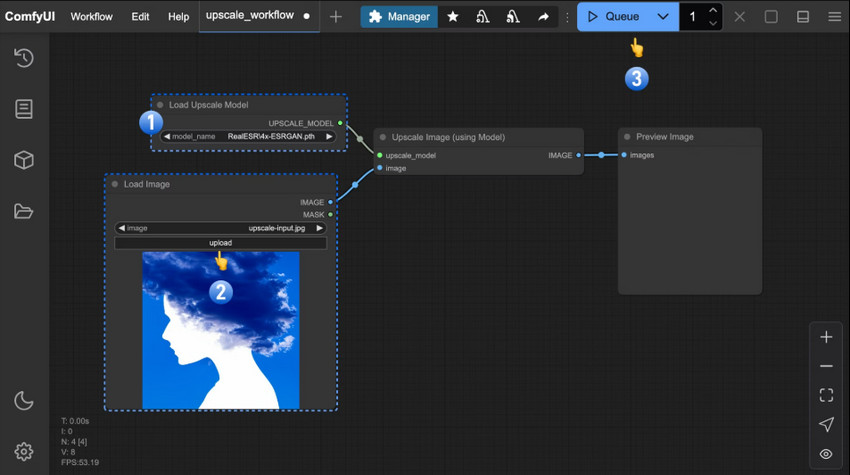
1. Add Nodes
- Right-click anywhere on the canvas and choose Add Node. You’ll see a menu of available nodes.
- Select Load Image to import the photo you want to upscale. Click the node, then choose your image from your computer.
- Add Load Upscale Model (sometimes called UpscaleModelLoader)from the node menu. This node doesn’t process the image itself—it provides the model weights to the Upscale node. Select your downloaded model (e.g., 4x-ESRGAN.pth).
- Add Upscale Image (Using Model) from the node menu. This is the node that actually enlarges the image.
- Add a Preview Image node and connect it to the output of the Upscale Image node. This way, the upscaled result will appear inside ComfyUI after you run the workflow.
2. Connect Nodes
Hover over the small circle (port) on the right side of the Load Image node, click, and drag to the input port on Upscale Image (Using Model). This is what “connect the output” means—the output of one node flows into the input of the next.
Similarly, connect the output of Load Upscale Model to the model input port on the Upscale Image node.
3. Set the Upscale Factor
Click on the Upscale Image (Using Model) node. On the properties panel (usually on the right), look for Scale or Upscale Factor. Choose 2x, 4x, or the value that matches your model.
Note: Some models have fixed upscale factors (for example, 4x-ESRGAN is fixed at 4x).
4. Run the Comfyui Upscale Image Workflow
Click the Queue button in the top-right corner, or press Ctrl (Cmd) + Enter to run the workflow. ComfyUI will process the image and show the result in the preview node. Once the preview is generated, you can right-click the preview window to save the image manually.
If you prefer automated export, add a Save Image node instead. This will save the processed file directly into your ComfyUI/output/ folder every time you run the workflow.
Hardware Recommendations and Common Issues
ComfyUI can run on a wide range of systems, but GPU acceleration is strongly recommended for upscaling. Different models and image sizes require varying amounts of GPU memory. If you encounter "out of memory" errors, try reducing the input size or choosing a lighter model.
If a model doesn’t appear in the node list, check that it’s in the correct upscale_models folder and has the proper file extension (.pth or .safetensors). Refreshing the page or restarting ComfyUI usually resolves detection issues.
This guide gives you everything you need to install ComfyUI, set up an upscaler model, and start enlarging your photos. From here, you can experiment with different models to see which works best for your images—SwinIR for illustrations, Real-ESRGAN for photos, or 4x-UltraSharp for digital art.
How to Upscale Images to 4K in ComfyUI
In ComfyUI, the most effective way to upscale an image to 4K is to generate or prepare the image at a moderate resolution first, then use an AI upscaling workflow to enlarge it. This approach requires less VRAM and typically produces better results than attempting to create a 4K image directly.
Method 1. Upscale to 4K with ESRGAN or Real-ESRGAN
Neural upscaling models are the fastest and easiest option for increasing image resolution while preserving the original composition.
Popular models include:
- Real-ESRGAN 4x Plus
- ESRGAN 4x
- 4x-UltraSharp
- SwinIR 4x
Place the downloaded model file in: ComfyUI/models/upscale_models
Then build a simple workflow: Load Image > Load Upscale Model > Upscale Image (Using Model) > Preview Image
A 4× model can enlarge a 1024 × 1024 image to approximately 4096 × 4096 in a single pass, making it a quick way to create 4K-sized outputs.
Method 2. Use Diffusion Upscaling for Maximum Detail
For higher-quality results, many ComfyUI users prefer diffusion-based upscaling workflows. Instead of simply enlarging pixels, these workflows reconstruct textures and fine details during the upscaling process.
Popular options include:
- PiD (Pixel Diffusion)
- Tiled Diffusion workflows / Ultimate SD Upscale
These methods generally produce sharper and more realistic results than traditional ESRGAN upscalers, especially for portraits, AI-generated artwork, and heavily compressed images.
Recommended Models for 4K Upscaling
Tips for Better 4K Results
- Use a high-quality source image whenever possible.
- For very small images, upscale gradually (for example, 2× → 4×) instead of jumping directly to 4K.
- In diffusion workflows, keep the denoise strength relatively low (around 0.3–0.5) to preserve the original image structure.
- If VRAM usage becomes a problem, use tiled upscaling workflows such as Ultimate SD Upscale or Tiled Diffusion.
- Compare multiple models, as the best choice often depends on the image type.
Which Method Is Better?
For speed and simplicity, Real-ESRGAN and other ESRGAN-based models are usually the best choice. For maximum detail and image quality, diffusion upscaling workflows such as PiD or SUPIR generally deliver better 4K results, although they require more processing time and GPU resources.
How to Batch Upscale Images in ComfyUI
Need to upscale dozens or hundreds of images at once? ComfyUI supports batch processing through directory-based image loader nodes, allowing you to automatically upscale every image in a folder without manually loading files one by one.
Step 1. Install a Batch Image Loader
ComfyUI does not include a folder-based image loader by default. A common solution is to install ComfyUI-Inspire-Pack, which provides the Load Image Batch From Dir node.
After installation, restart ComfyUI and place all images you want to upscale into a single folder.
Step 2. Build the Batch Upscaling Workflow
Create the following workflow: Load Image Batch From Dir > Load Upscale Model > Upscale Image (Using Model) > Save Image
This workflow loads each image from the folder, applies the selected upscaling model, and saves the enhanced result automatically.
Step 3. Configure the Nodes
Load Image Batch From Dir
- Set directory_path to your image folder.
- Set image_count to 0 to process all images.
Load Upscale Model
Choose an upscaling model such as:
- Real-ESRGAN 4x Plus
- 4x-UltraSharp
- SwinIR 4x
- ESRGAN 4x
Save Image
- Specify a unique filename_prefix (such as batch-upscale) to prevent output files from overwriting one another.
Step 4. Run the Batch Process
Open the ComfyUI side panel and enable Extra Options.
Then:
- Change Batch Count from 1 to the total number of images in your folder.
- Click Queue Prompt (or press Ctrl + Enter).
ComfyUI will automatically process the images one by one until all files have been upscaled.
Tips for Large Batch Jobs
- Keep the workflow batch size at 1 to avoid excessive VRAM usage.
- Use Batch Count for sequential processing rather than increasing node-level batch sizes.
- If you encounter out-of-memory errors, reduce image resolution or switch to tiled workflows.
- Model-based upscaling preserves the original aspect ratio and works well with mixed image dimensions.
- For large photo collections, Real-ESRGAN typically offers the best balance between image quality and processing speed.
Skip the ComfyUI Workflow: Upscale Images in a Faster, Simpler Way
ComfyUI is free, flexible, and packed with model options, but it can feel overwhelming if you’re not familiar with node-based workflows. If you’d rather skip the steep learning curve, Aiarty Image Enhancer is a much simpler alternative.
With Aiarty Image Enhancer, you don’t need to worry about nodes or model management. Everything is built-in, with a clean interface designed for speed. The app handles everything with AI-powered automation, while still giving you control over details like upscale factor and output resolution (up to a stunning 32K). Every upscale automatically reduces noise, fixes blur, restores details, smooths pixelation, and even improves faces. It also supports batch processing, saving you significant time.
How to Upscale an Image in Aiarty Image Enhancer
Step 1. Download and install Aiarty Image Enhancer.
Click the download button below to get the setup file. The installation is quick and straightforward, and you'll be ready to go in minutes.
Step 2. Open Aiarty Image Enhancer and add your image.
Drag and drop your photo into the tool. It supports JPG, PNG, and other formats. You can also load multiple images at once for batch processing.
Step 3. Pick the right AI model.
On the right panel, select from models trained for different image types.
Step 4. Choose your output size.
Use the Upscale dropdown to pick a preset like 1K, 2K, 4K, or 8K, or enter a custom resolution. You can also scale by factor (2x, 4x, 8x).
Step 5. Run AI reference and preview.
After you've finished adjusting your settings, a small window will pop up saying "AI reference is required". You just need to click the Start button to begin the AI reference.
The enhanced image will appear in the preview window, allowing you to quickly check the quality. If you're not satisfied, you can easily switch to a different AI model or adjust your settings and try again.
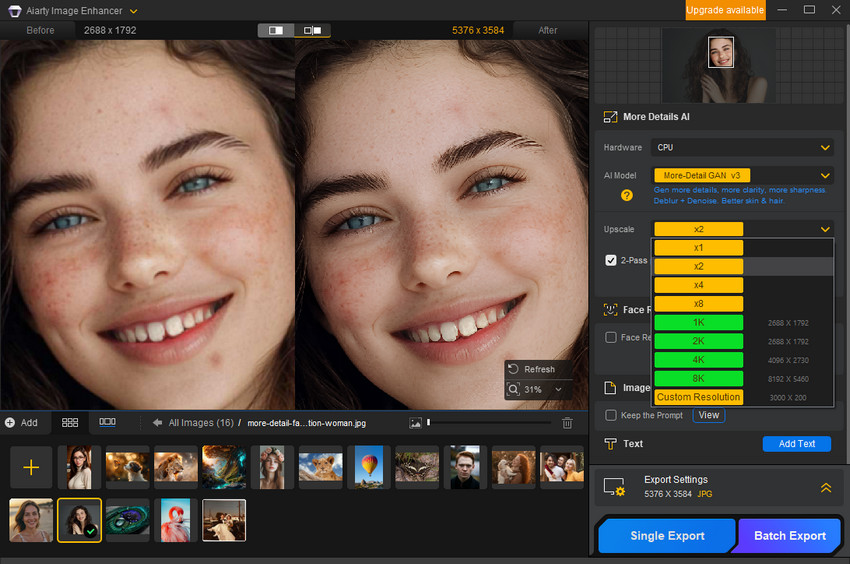
Step 6. Export your enhanced image.
If the preview looks good, go to Export Settings, set the file format and save location, then click Single Export or Batch Export button at the bottom right corner to process and export upscaled version.
Instead of juggling nodes and settings like in ComfyUI, Aiarty Image Enhancer keeps the whole process straightforward. You just drop in your images, pick a model, set the size, and let it handle the rest. That makes it a solid choice if you want high-quality results without the technical setup.
ComfyUI still has the edge if you need total control and customization. But for most people who just want crisp, clear images quickly, Aiarty Image Enhancer is the easier path.
You May Also Like
This post was written by Brenda Peng who is a seasoned editor at Digiarty Software who loves turning ordinary photos into extraordinary works of art. With AI assistance for brainstorming and drafting, the post is reviewed for accuracy by our expert Abby Poole for her expertise in this field.