How to Remove JPEG Artifacts (AI, Photoshop & Online Methods)
Updated on
Quick Answer: The best way to remove JPEG artifacts is to use AI-powered tools that can automatically reconstruct lost details and reduce compression noise. Traditional methods like Photoshop can help, but AI tools like Aiarty Image Enhancer deliver sharper, more natural results with minimal effort.
JPEG artifacts are a common side effect of image compression, often showing up as blocky pixels, blurry edges, or unnatural color shifts that make photos look low-quality. And because compression is everywhere, from Instagram and Facebook to Pinterest and stock photo sites, many images we download or share are already over-compressed. So how do you fix overly compressed photos?
If you’ve ever tried to preserve important memories or create clean visuals for a blog, only to find them damaged by JPEG artifacts, you’re not alone. The good news is that removing these artifacts doesn’t have to be complicated. Read on to learn how you can restore image clarity quickly and effectively.
What Are JPEG Artifacts & Why They Happen
JPEG artifacts are one of the most common image artifacts. They are visual distortions caused by JPEG compression, which reduces file size by selectively discarding image data that is less noticeable to the human eye. As a result, fine details and subtle color transitions may be lost, leading to visible quality issues.
Common Types of JPEG Artifacts
- Blocky pixels (Blocking): Square-shaped patches that appear in areas of solid color or low detail.
- Blurry or jagged edges: Loss of sharpness along object boundaries, especially in high-contrast areas.
- Color shifts: Subtle or noticeable changes in color gradients and tones.
- Ringing / Haloing: Bright or dark outlines around edges, creating an unnatural glow.
Why Do JPEG Artifacts Appear?
JPEG artifacts appear due to lossy compression, which removes image data to reduce file size. They become more noticeable with low-quality settings, repeated editing and saving, or when images contain fine details and smooth gradients.
Best Ways to Remove JPEG Compression Artifacts
When it comes to removing JPEG artifacts, there are two main approaches: traditional methods such as those available in Photoshop, and newer AI-powered JPEG artifact removal tools. Below, we’ll explore three effective ways to fix JPEG artifacts and restore clarity and detail to your images.
Method 1. Remove JPEG Artifacts Instantly with Aiarty Image Enhancer
Traditional tools remove artifacts by blurring them, while AI removes artifacts by rebuilding lost details. AI tools like Aiarty Image Enhancer can automatically remove JPEG artifacts while preserving fine textures and details, making them the most effective solution for high-quality image restoration. Designed for smooth performance on most computers, it also supports batch processing, so you can remove JPEG artifacts from multiple photos in one go.
- Automatically removes JPEG artifacts like blockiness, ringing, and color banding while preserving natural details.
- AI-powered detail reconstruction restores textures and sharp edges instead of over-smoothing.
- Built-in denoise and deblur models with strength controls to clean compression noise and improve clarity.
- Upscales images up to 16K/32K without amplifying artifacts, maintaining fine textures.
- Batch processing support for efficiently fixing multiple images at once.
- Optimized for NVIDIA, AMD, and Intel GPUs for fast, stable performance.
Remove JPEG artifacts fast with AI—clean, sharp, natural results.
How to remove compression artifacts using Aiarty Image Enhancer
Step 1. Import Your Images
Download, install, and run Aiarty Image Enhancer. Drag the source image files for loading to the program.
Step 2. Choose an AI model
Navigate to the right section and select an AI model based on your source image. In my case, I chose More-Detail GAN v3, which works amazingly well with images that have intricate details. For a deeper comparison of the 5 AI models, you can refer to the official guide.
Step 3. Choose the Target Resolution
Pick your desired output resolution. For this example, I opted to keep it at the original resolution. If you want to upscale your image to higher resolutions like 4K, 8K, or 10K, select the specific resolution or the upscaling ratio you need.
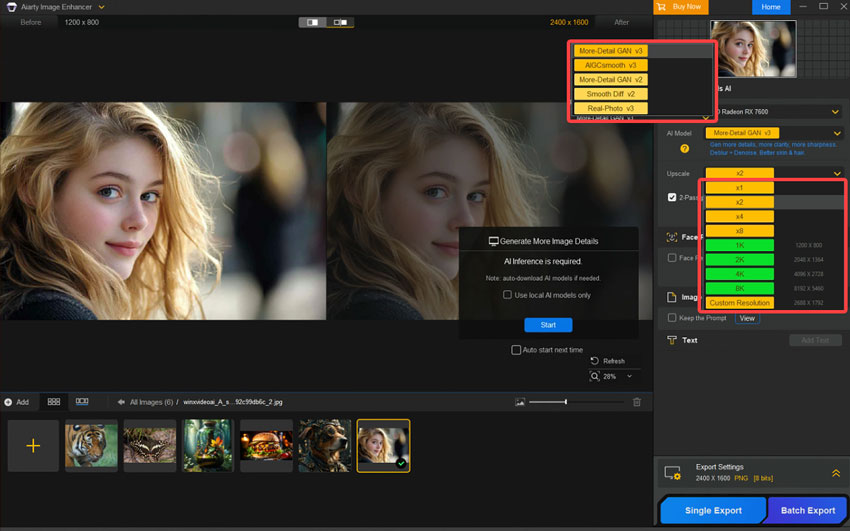
Step 4. Export the Images
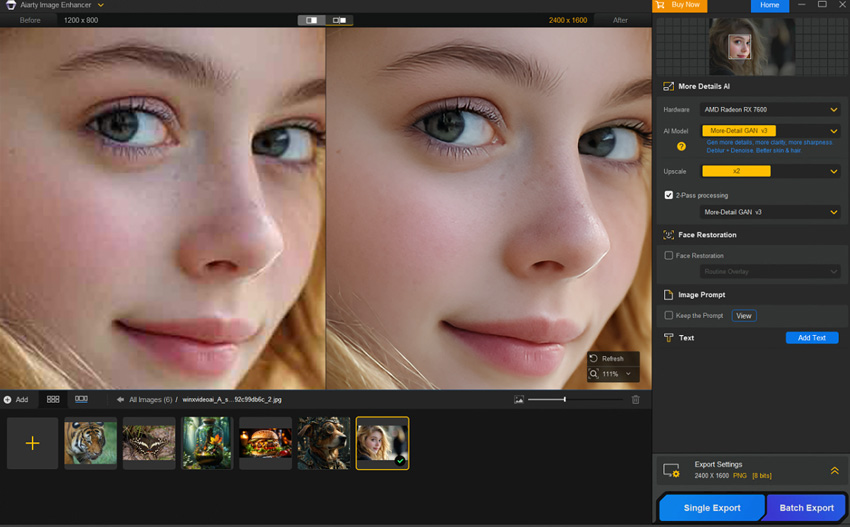
For even richer images, enable 2-Pass Processing and choose More-Detail GAN v3 or AIGCsmooth v3 for an extra round of AI-enhanced image processing. When you're ready, click Single Export to export the image with JPEG compression artifacts removed. If you're processing multiple images at once, click Batch Export to export them all simultaneously.
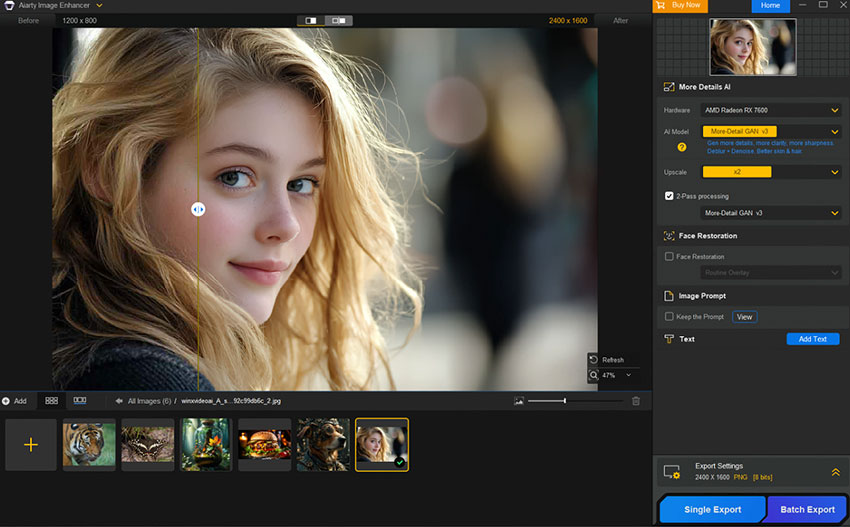
My Thoughts After Trying This Method
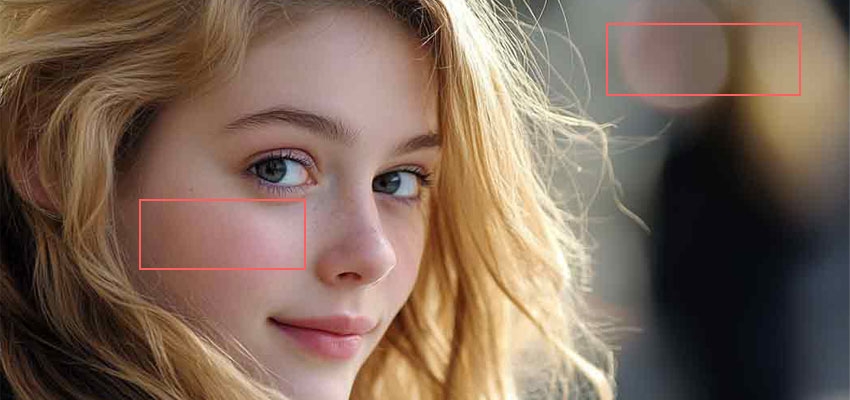
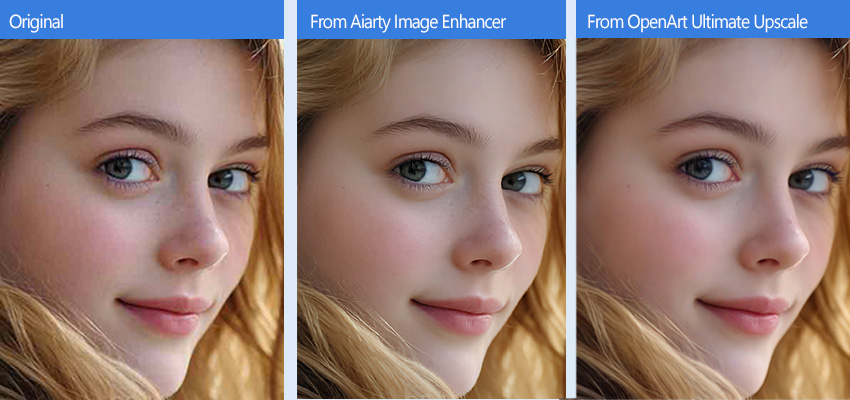
The processing speed is incredible fast – it removes JPEG compression artifacts from 100 images in just minutes on my AMD Radeon RX7600 computer. The outcome looks clear without distracting noise or JPEG artifacts. The spots on the cheeks, the lines on the lips, the shadows next to the hair, and even the details in the eyeballs are all perfectly preserved and restored. This makes Aiarty Image Enhancer a reliable and efficient solution for removing JPEG artifacts while maintaining realistic detail.
Method 2. Remove JPEG Artifacts with Photoshop
While there are faster and simpler methods out there, Photoshop is still one of the most powerful tools for removing JPEG artifacts. The downside is that it offers a lot of control, which can make the process more complicated and time-consuming. Plus, Photoshop can be quite resource-hungry, so if your system isn't up to the task, you might experience performance issues like 100% CPU usage or even freezing. And let's not forget the price—USD 22.99 a month can be a tough pill to swallow for some.
Step 1. Visit the Adobe Creative Cloud website and go to the Photoshop subscription page. Choose a plan that fits your needs. Create a new account or sign in to an existing one, then enter your payment details to complete the purchase.
Step 2. After purchasing, download Photoshop to your computer. Double-click the downloaded file to launch the installer and follow the on-screen instructions to complete the installation process.
Step 3. Press Ctrl + F on your keyboard to open the Discover panel. Under the Quick Actions section, find the JPEG Artifacts Removal filter. Click the Download button to add it to your workspace.
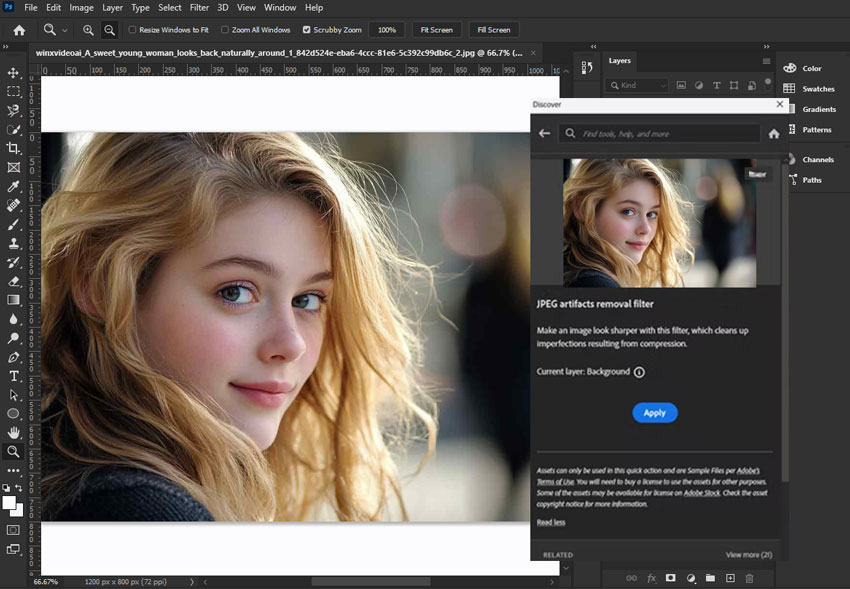
Step 4. Once downloaded, click the Apply button to start removing the JPEG compression artifacts from your image.
Step 5. After the task is complete, go to File > Export and select Export As. Here, you can choose the desired output format (JPG, PNG, etc.), set the quality level (higher quality results in better images, though larger file sizes), and adjust other parameters. It's best to choose a higher-quality setting to avoid introducing new JPEG compression artifacts.
My Thoughts After Trying to Reduce JPEG Compression Artifacts
The processing speed is pretty slow – it took me over 20 minutes to remove JPEG artifacts from just one image. I'm not sure where the problem lies, but I found some Reddit users mentioning that it might be due to the cloud-based nature of the process. Another annoying issue is that it adds some noise to the output, which can be a bit frustrating.
Method 3. Remove JPEG Artifacts Online with OpenArt Ultimate Upscale
If you're looking for a fast and convenient way to remove JPEG artifacts without needing to download any software, OpenArt's Ultimate Upscale offers an excellent online solution. It's designed not only to upscale images but also to fix common issues like compression artifacts, blurriness, and other imperfections. However, while it's labeled as free, there's a catch: it limits you to using trial credits for premium features over a 7-day period. After that, the premium plan costs between USD 14 to USD 56 per month, which can feel a bit on the pricier side.
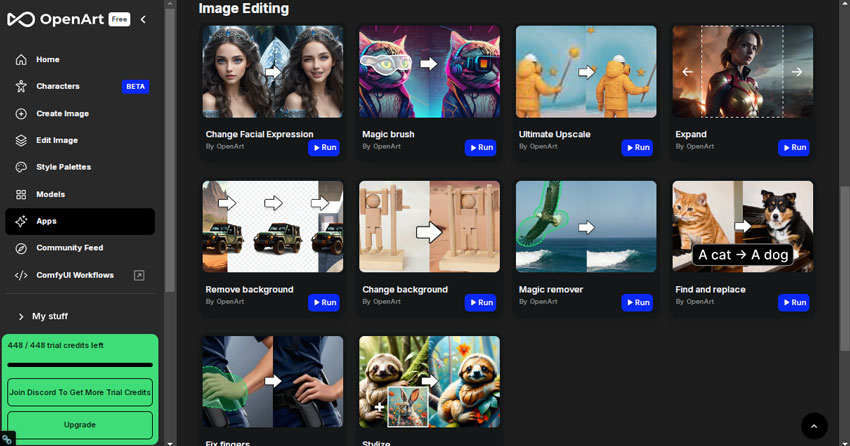
Step 1. Go to the official site of OpenArt. Sign up using your Gmail or phone number, and log in to your account.
Step 2. Once logged in, go to the Apps section and find the Ultimate Upscale. Click the Run button to launch this online JPEG artifacts remover.
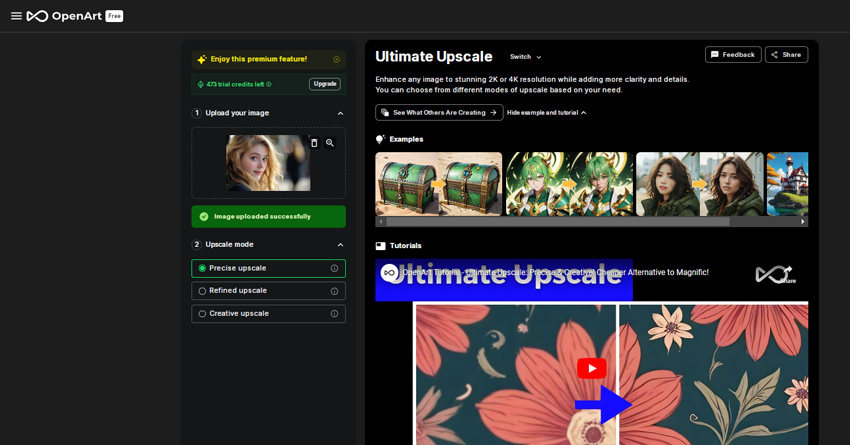
Step 3. Drag and drop your image into the upload section. You'll be presented with three upscale model options: Precise Upscale, Refined Upscale, and Creative Upscale. For the best results, it's recommended to choose Precise Upscale, unless you want the AI to alter more of the image's details.
Step 4. The upscaling process may take a few minutes. Once it's finished, you can click on the thumbnail to preview the result. Use the slider to compare the before and after effects.
Step 5. Explore the toolkit at the top to add some fun effects. For instance, you can modify specific parts of the image, transform it into animation-style art, and experiment with other creative options.
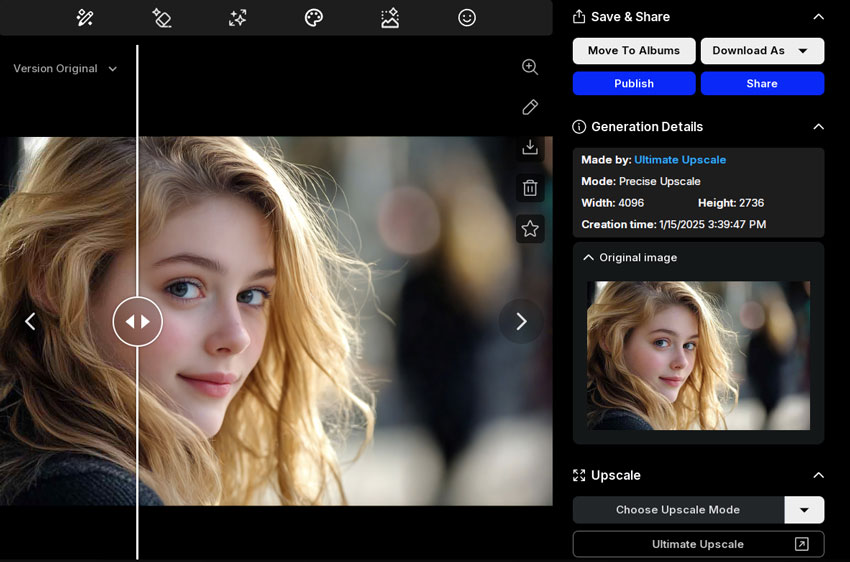
Step 6. When you're happy with the result, click Download As and select your desired image format, such as JPG or PNG, to start downloading your enhanced image.
My Thoughts After Trying to Remove Artifacts Online
The JPEG compression artifacts are effectively removed, and the overall image quality is noticeably improved. However, upon closer inspection, you may still notice some subtle changes in the details. For instance, the mole on her face becomes lighter and almost disappears.
Thus, if you appreciate the soft, almost imperceptible beauty effect that this JPEG artifacts remover adds, you might enjoy using it. However, if maintaining the original details is important to you, Aiarty Image Enhancer might be a better option for artifacts removal, as it does a more precise job of preserving natural features.
AI vs Photoshop: Which Is Better for Removing JPEG Artifacts?
There are two main approaches to removing JPEG artifacts: traditional manual editing using Photoshop and AI-powered enhancement. Each has its own strengths and limitations. Let's break it down to see the details:
Image Quality
- Traditional tools like Photoshop reduce JPEG artifacts mainly by smoothing or blurring compressed areas, which can lead to loss of fine details.
- AI-based tools like Aiarty Image Enhancer take a different approach by reconstructing lost textures and edges, resulting in clearer and more natural-looking images.
Ease of Use
- Photoshop requires manual adjustments and experience to avoid over-smoothing.
- AI tools automate the process, allowing users to remove JPEG artifacts in just a few clicks.
Speed & Efficiency
- Manual editing can be time-consuming, especially for multiple images.
- AI tools support faster processing and batch editing, making them more efficient for large workloads.
Quick comparison: AI tools reconstruct image details, while traditional tools mainly reduce artifacts by blurring them.
| Aspect | AI Tools (Aiarty Image Enhancer) | Photoshop (Traditional Method) |
|---|---|---|
| How it works | Reconstructs lost details using AI models | Reduces artifacts by smoothing or blurring |
| Image quality | Preserves textures and sharp edges | May cause detail loss or over-smoothing |
| Ease of use | Automatic, one-click processing | Manual adjustments required |
| Speed | Fast processing with batch support | Slower, especially for multiple images |
| Best for | Quick, high-quality artifact removal | Advanced users needing manual control |
Fix JPEG artifacts in seconds. Download Aiarty Image Enhancer and let AI restore sharp details and clarity—no manual editing required.
When Should You Remove JPEG Artifacts?
JPEG artifacts can affect image quality in many real-world scenarios, especially when clarity and detail matter. Here are the most common situations where artifact removal makes a noticeable difference.
1. Remove JPEG Artifacts for Printing: JPEG artifacts become more noticeable in large prints, often appearing as blocky areas or color banding. Removing them helps ensure cleaner, more professional print results.
2. Remove JPEG Artifacts for E-commerce Product Photos: Artifacts can reduce image clarity and make products look less appealing. Cleaning them up improves detail, which can help build trust and increase conversions.
3. Remove JPEG Artifacts for Social Media & Content Creation: Compressed images on social platforms can look blurry or noisy. Removing JPEG artifacts helps maintain sharp, high-quality visuals that stand out and engage viewers.
For quick and consistent results across these scenarios, AI tools like Aiarty Image Enhancer offer an efficient way to remove JPEG artifacts while preserving image quality.
Tips to Avoid JPEG Artifacts in the Future
JPEG artifacts are mainly caused by compression and repeated editing. Following these simple tips can help you maintain better image quality and reduce artifacts from the start.
Save Images in Higher Quality
- Use higher quality settings when exporting JPEGs to minimize compression artifacts.
- Avoid extremely low-quality settings that can cause blockiness and color distortion.
Avoid Repeated Compression
- Repeatedly editing and saving JPEG files can degrade quality over time.
- Keep a master file and limit how often you re-save compressed images.
Use PNG or RAW Formats
- Edit images in lossless formats like RAW, PNG, or TIFF to preserve full detail.
- Convert to JPEG only at the final step when needed.
Even with these precautions, artifacts can still appear—especially in heavily compressed images. In such cases, AI tools like Aiarty Image Enhancer can effectively remove JPEG artifacts and restore image quality.
 FAQs About Removing JPEG Artifacts
The best way to remove JPEG artifacts without losing quality is to use AI-powered tools that can reconstruct lost details instead of simply blurring the image.
AI tools like Aiarty Image Enhancer can automatically remove JPEG artifacts while preserving fine textures and sharp edges, delivering more natural results than traditional methods.
The most effective tools for removing JPEG artifacts are AI-based image enhancers.
AI tools like Aiarty Image Enhancer are the best choice because they can automatically detect compression artifacts and restore image details with minimal effort.
Yes, Photoshop can reduce JPEG artifacts using tools like Noise Reduction and blur filters.
However, these methods often soften the image and require manual adjustments. Compared to Photoshop, AI tools like Aiarty Image Enhancer provide faster and more natural results.
AI-generated images from tools like Midjourney or DALL·E can show JPEG artifacts due to several factors:
- Compression: Lossy JPEG compression is often applied to reduce file size, introducing blocky or blurry artifacts.
- Upscaling: Enlarging AI images can amplify compression artifacts or create new distortions.
- Export Quality: Low export settings or repeated saves can degrade image quality.
To fix these issues, AI enhancement tools like Aiarty Image Enhancer can intelligently reduce compression artifacts while restoring lost details.
Yes, AI can effectively remove JPEG compression artifacts by analyzing patterns and reconstructing missing details.
Tools like Aiarty Image Enhancer use advanced models to reduce noise, fix blockiness, and restore clarity automatically.
You can remove JPEG artifacts online using web-based image enhancers, which offer quick and simple processing without installation.
However, online tools may have limitations in quality and batch processing. For better results, AI software like Aiarty Image Enhancer is a more reliable option.
You May Also Like
Brenda Peng is a seasoned editor at Digiarty Software who loves turning ordinary photos into extraordinary works of art. With years of experience behind the lens and in front of the computer, Brenda shares her passion for photography, image enhancement, and editing through easy-to-follow tutorials.