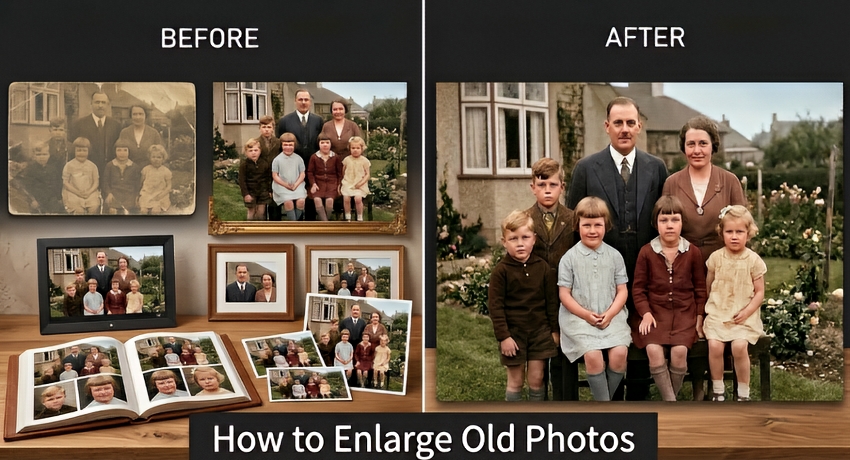
How to Enlarge Old Photos for Sharp, High-Quality Prints
Old photos hold precious memories, but many of them are small prints, faded, or low-resolution scans. When you try to enlarge them for printing, framing, or digital sharing, they often become blurry or pixelated.
The good news is that with the right preparation and tools, you can enlarge old photos while preserving as much detail as possible. This guide explains how to enlarge old photos, including scanning tips, understanding photo size vs resolution, and the best methods to enlarge both printed photos and digital scans.
Why Enlarging Old Photos Can Be Difficult
Many old photos were originally printed in small formats such as 3×5 or 4×6 inches. Because of their small size, the amount of image detail captured and stored in these prints is limited. When you try to enlarge these old photos, the following common issues often appear:
- Pixelation – Enlarging a low-resolution image spreads the original pixels over a larger area. As a result, individual square pixels become visible, making the image look blocky or jagged.
- Blurriness – Small details in the original photo may be lost or smoothed out during enlargement, causing the photo to appear soft or out of focus.
- Noise and Scratches – Old photographs often have film grain, dust, or scratches. Enlarging the image can make these imperfections more noticeable, which further reduces clarity.
- Color Fading and Contrast Loss – Over time, the colors in physical prints may fade, and contrast can decrease. Enlarging such photos without correction may exaggerate these issues.
To get the best old photo enlarge results, you need to start with the highest-quality digital version possible. The better the resolution and clarity of the original digital file, the more successful the enlargement process will be, and the more detail you can preserve in the final image.
How to Enlarge Old Photos without Losing Quality?
Enlarging old photographs successfully requires more than just stretching the image. To preserve sharpness, detail, and color, it’s important to follow a series of careful steps, from capturing or scanning the original photo, to using the right enlargement method, and finally saving it in an appropriate format. Below, we break down each step so you can enlarge your old photos without losing quality.
- ✅ Scan the original photo at high DPI (600–1200 DPI recommended) (Skip this step if you have the digital file).
- ✅ Choose a proper AI photo enlargement tool to upscale the old photos.
- ✅ Restore details by fixing blur, scratches, and faded colors.
- ✅ Export the image at the correct resolution for printing or sharing.
Step 1. Scan Old Photos at the Right DPI
Note:
- If you already have your photos in digital format (JPEG, PNG, TIFF, etc.), you can skip scanning and go directly to STEP 2.
- If you have negatives or slides, scanning them directly usually yields better detail, sharper contrast, and richer colors than scanning printed photos. Use a scanner with a film or transparency adapter for the best results.
- If you don’t have a scanner, you can use a high-quality camera or smartphone to photograph the photos. Make sure the photo is well-lit, flat, and fills the frame to capture as much detail as possible.
If your old photos only exist as physical prints, scanning them correctly is the first and most important step. A good scan captures as much detail from the original print as possible, providing a solid foundation for enlargement and digital editing later. In addition, scanning in higher DPI can capture more detail, which allows the old photos to be enlarged later without losing clarity.
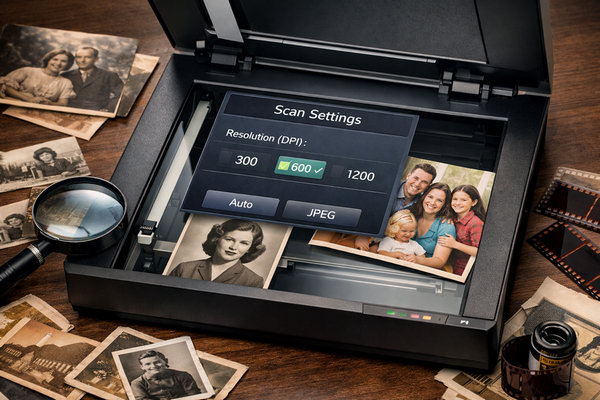
Recommended DPI for Scanning Old Photos:
To get the best results when digitizing old photos:
- Clean the scanner glass before scanning
- Scan in color mode, even for black-and-white photos
- Save files in PNG or TIFF instead of JPEG
- Avoid automatic sharpening during scanning
- Use 600 DPI or higher if you plan to enlarge significantly
These steps ensure your old photo enlargement process starts with the highest quality file possible.
Step 2. Choose a Proper Tool for Old Photo Enlargement
To get the best results, you need a tool that can enlarge old photographs without losing detail or introducing new imperfections. Simply stretching an image in a basic editor often leads to pixelation, blurriness, or exaggerated noise.
Modern AI-powered tools, like Aiarty Image Enhancer, are designed specifically to handle these challenges. Aiarty Image Enhancer will not only upscale and enlarge old photos to HD, 4K, and even higher resolutions, but also automatically manage common photo restoration tasks. It will:
- AI enlarge images up to 2×, 4×, and x8 while preserving edges and textures.
- Remove film grain or noise, fix blurriness, and reduce compression artifacts.
- Fix faded colors, adjusts brightness and contrast for a more natural look.
- Batch enlarge multiple photos efficiently and safely on your computer.
Step 3. Start to Enlarge Your Old Photo
Enlarging old photos doesn’t have to be complicated. With Aiarty Image Enhancer, you can upscale your images while also restoring lost details, fixing scratches, adjusting colors, and even restoring faces. Here’s how to do it step by step:
1. Download and Open Aiarty Image Enhancer
Start by downloading and launching this old photo enlargement software on your computer. The software supports a wide range of formats including JPG, PNG, TIFF, and more.
Tip: You can drag and drop multiple photos at once for batch processing, saving time if you have several old photos to restore and enlarge.
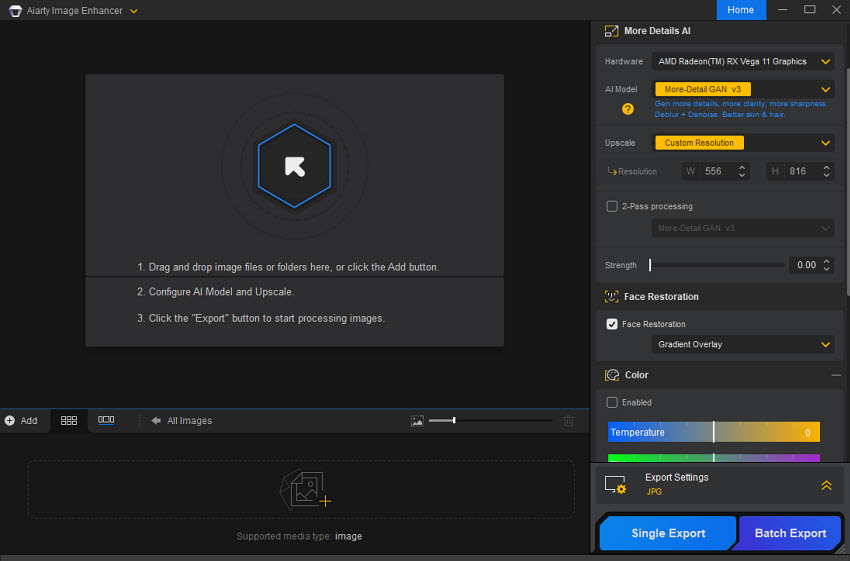
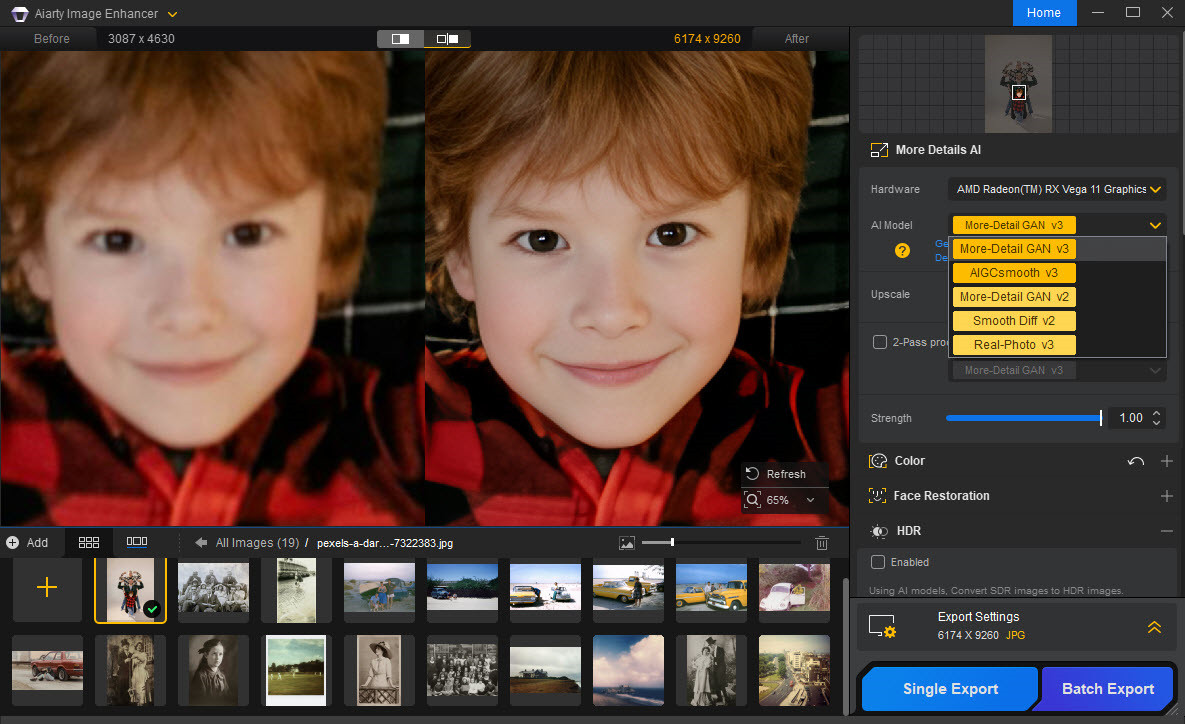
2. Choose the Right AI Model for Your Photo
Once your photos are loaded, check the right-hand panel for AI models optimized for different image types. For old photos, choose Real-Photo, or try the More-Detail model.
3. Set the Enlargement Size
Next, decide how much you want to enlarge your photo. Use the Upscale dropdown to select a preset like 1K, 2K, 4K, or 8K, or enter a custom resolution for precise sizing. You can also scale by factors such as 1×, 2×, 4×, or 8×
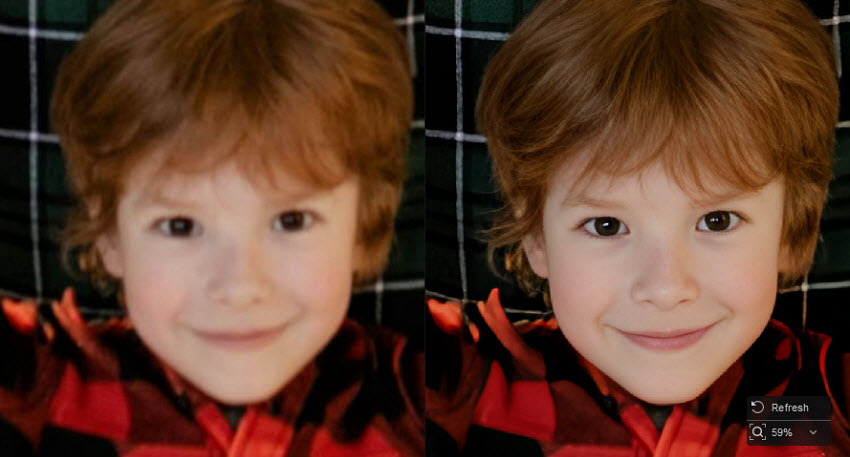
Aiarty’s AI will not only enlarge photos without quality loss, it will also intelligently enhance textures and edges, remove artifacts like noise, blur, and compression blocks during the old photo upscaling process.
You can preview the result to make sure the enlarged photo looks natural and sharp.

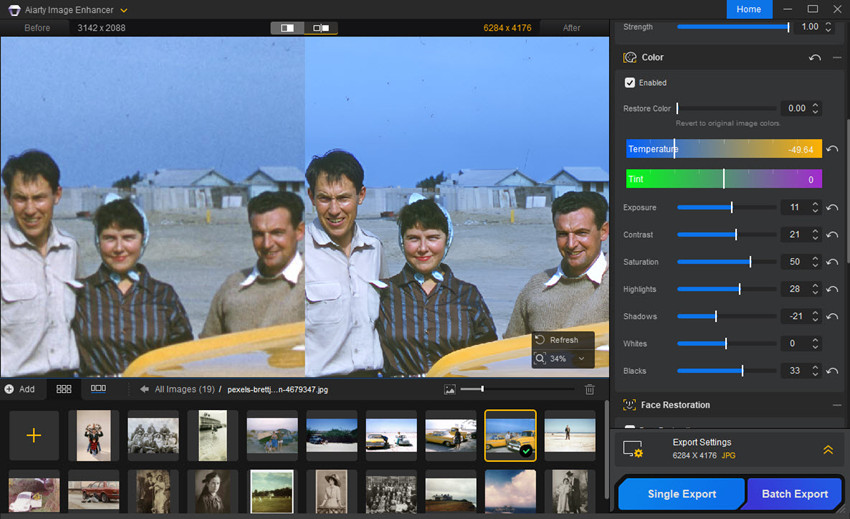
4. Adjust Color
Next, to restore old photos with faded colors or low contrast due to aging or scanning, use color correction to restore vibrant colors, enhance contrast, and adjust brightness for a more natural and lifelike look.
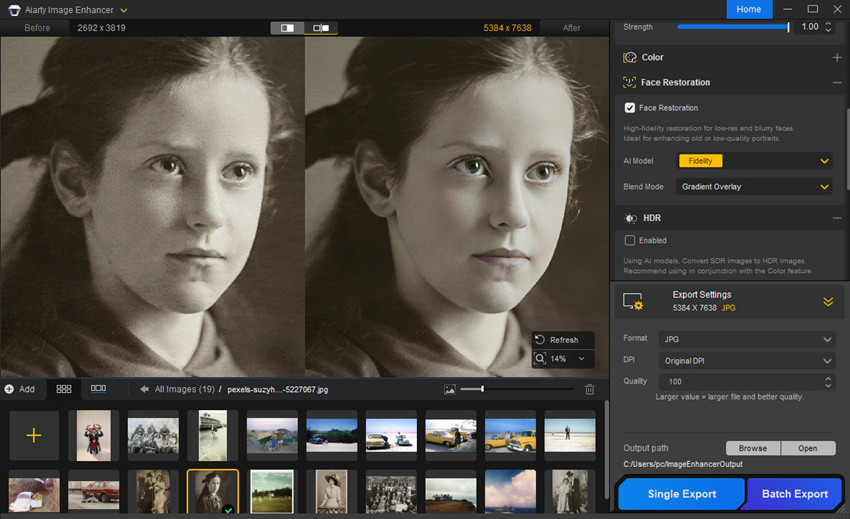
5. Restore Portrait Photos
Old or low-resolution portraits often have blurred facial features. Face restoration refines eyes, mouth, and skin details, bringing clarity and natural texture back to the subject's face.
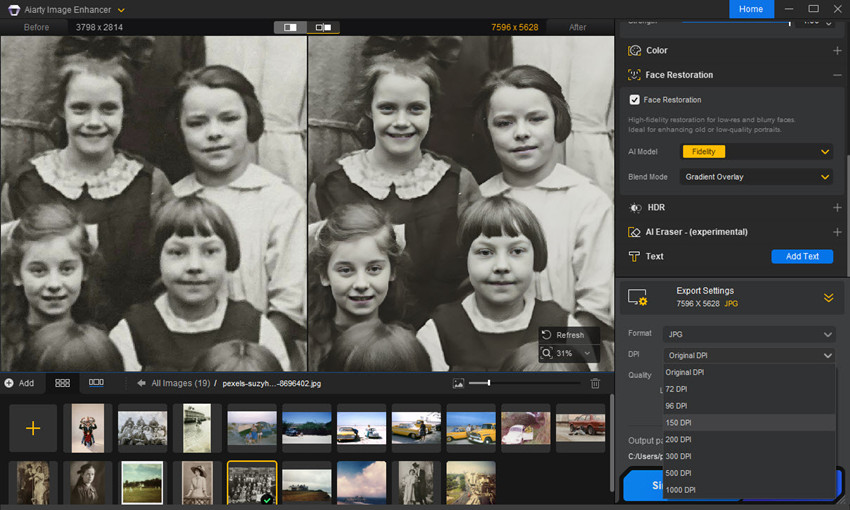
6. Export Your Enlarged Photo
Once satisfied, go to Export Settings, choose your preferred output format (JPG, PNG, TIFF, etc.) and output folder. For the best output quality, you’re suggested to save the enlarged old photos in PNG, TIFF, or JPEG (For large prints or restoration projects, TIFF or PNG is usually the best choice.)
Also, you can also change the DPI settings for the enlarged photos.
Then click Export Current or Batch Export to save the upscaled old photos on your computer.
Here Craig demonstrates a step-by-step test of Aiarty Image Enhancer, restoring and enlarging old family photos. The images are original prints, some over 70 years old, scanned via flatbed scanner—offering a real-world look at how AI handles faded, damaged, and low-resolution photographs.
How Much Can You Enlarge an Old Photo?
How much you can upscale an old photo depends mainly on three factors:
- The original image resolution
- The quality of the scan
- Whether you use AI photo enlargement tools
For most images, the safe photo enlargement from old photos range is usually 2× to 4× the original size without significant quality loss.
Traditional resizing methods simply stretch pixels, which quickly causes blur and pixelation when enlarging beyond 2×.
However, modern AI image upscaling tools can analyze textures, edges, and facial details to generate additional pixels. This allows many old photos to be enlarged 4× or even 8× larger than the original while maintaining good visual quality.
Scanning Quality Also Matters
If you are enlarging a printed old photo, the scanning resolution is just as important.
Scanning at:
- 300 DPI preserves the original print size
- 600 DPI allows about 2× enlargement
- 1200 DPI may allow 4× enlargement or more
Higher-quality scans capture more detail from the original print, which gives enlargement tools more information to work with.
How Large Can You Enlarge an Old Photo for Printing?
If you only want to enlarge old photos digitally for archive or sharing online, increasing the resolution can improve clarity for screens and online sharing. However, if you plan to enlarge the old photos for printing, the final print size depends on both image resolution and printing DPI. Higher resolution allows larger prints while maintaining sharp detail.
The table below shows recommended print sizes for common image resolutions.
Quality Guide
- Excellent – ideal for high-quality prints
- Very Good – sharp prints with minimal detail loss
- Good – acceptable for casual prints
- Not Recommended – image resolution too low for this print size
If your image resolution is lower than required, you may need to increase the pixel resolution before printing.
Final Words
Enlarging old photos successfully requires more than simply stretching the image. By understanding photo size vs resolution, scanning prints at high DPI, and preparing the image before resizing, you can dramatically improve the final result. Whether you're restoring family memories or creating large wall prints, following the proper old photo enlarge process ensures your vintage photos remain clear, detailed, and ready for display.
 FAQ
FAQ
Yes. Old photos can be enlarged without losing quality if you start with a high-resolution scan and use AI-powered upscaling tools. Modern AI image enhancers can reconstruct textures and edges, producing much sharper results than traditional resizing methods.
Yes. Photo enlargements can be created directly from the original printed photo. The best approach is to scan the print at a high resolution (600 DPI or higher) and then use photo editing or AI upscaling tools to enlarge the image while preserving details.
Many local photo labs, print shops, and pharmacies offer old photo enlargement services. Stores such as Walgreens, CVS, and Walmart Photo Centers often provide scanning and photo enlargement options. However, using AI photo enhancement software at home can sometimes produce better results and more control over image quality.
Yes. Walgreens offers photo enlargement services through its photo printing department. You can bring in a physical photo to be scanned or upload a digital image through their website or mobile app and order larger prints.
Yes. Even without the original film negatives, you can still enlarge old photos. The key is to create a high-quality digital version by scanning the print at a high DPI or photographing it carefully, and then using AI image enhancement tools to upscale the photo and restore details.
For most printed photos, 600 DPI is recommended if you plan to enlarge them later. Smaller photos may require 600–1200 DPI, while film negatives can benefit from 2400 DPI or higher to capture maximum detail.
Related article: What DPI to Use When Scanning Photos
You May Also Like
This post was written by Brenda Peng who is a seasoned editor at Digiarty Software who loves turning ordinary photos into extraordinary works of art. With AI assistance for brainstorming and drafting, the post is reviewed for accuracy by our expert Abby Poole for her expertise in this field.