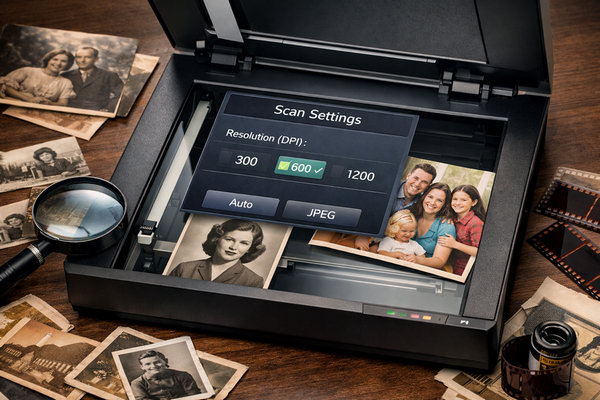
If you're about to digitize old family photos, you've probably run into the same question:
What is the best DPI for scanning photos?
Should you choose 300, 600, or even 1200 DPI?
It sounds technical, but the decision actually matters more than most people realize. Set the DPI too low, and your scanned photos may look soft or lack detail, especially if you ever want to print or enlarge the photos later. Set it too high, and you might end up with huge file sizes without gaining any real improvement in quality.
The confusion becomes even greater when scanning old photographs. Many vintage prints already have fading, grain, or minor blur. Simply increasing the DPI won’t magically restore lost detail. It only captures what’s physically there on the paper.
In this guide, we’ll break down:
- What DPI really means when scanning photos
- The best DPI settings for different scenarios
- Best scanner settings (beyond DPI)
- And how to get the clearest results from your scanned images
By the end, you’ll know exactly which resolution to choose and how to make sure your digitized photos look their best.
If you just want the short answer:
- 300 DPI – Good for standard photo archiving and basic sharing
- 600 DPI – Best overall choice for most old photos
- 1200 DPI – Useful for small prints you plan to enlarge
Here’s a clearer comparison:
So What Should You Actually Use?
For most people scanning standard 4×6 or 5×7 prints:
600 DPI is the safest and most recommended setting.
It gives you enough resolution to preserve fine details, allows moderate enlargements, and provides better long-term flexibility without creating unnecessarily massive files.
However, higher DPI does not automatically mean better clarity. It only captures the detail already present in the original photo. If the print is faded, slightly blurry, or grainy, scanning at 1200 DPI will simply make those imperfections more visible.
That’s why choosing the right DPI is important — but it’s only part of getting the best possible result.
What Does DPI Mean When Scanning Photos?
DPI stands for Dots Per Inch. In photo scanning, it refers to how many tiny dots of information the scanner captures per inch of the original photo.
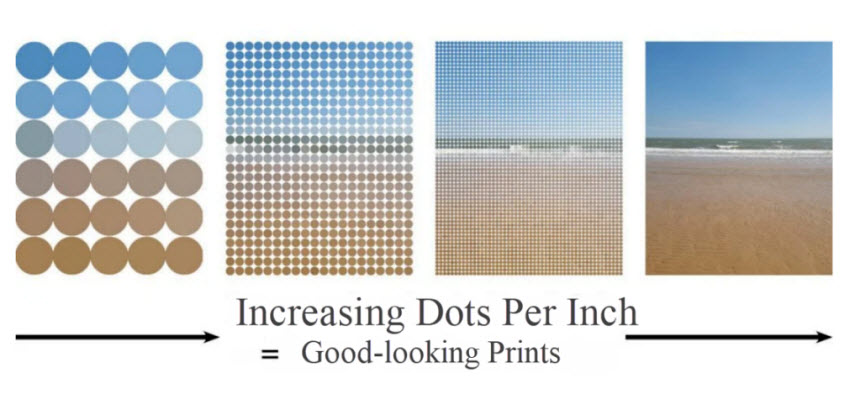
The higher the DPI:
- The more detail is captured
- The larger the digital image dimensions
- The bigger the file size
For example:
- A 4×6 photo scanned at 300 DPI produces an image roughly 1200 × 1800 pixels.
- The same photo scanned at 600 DPI becomes about 2400 × 3600 pixels.
That means 600 DPI doesn’t just “look better”. It actually doubles the pixel dimensions, giving you more flexibility for cropping, editing, or printing larger copies later.
DPI vs. Image Quality: What’s the Difference?
Here’s where many people get confused.
Higher DPI increases the amount of captured data, but it does not improve the original photo’s sharpness.
If your printed photo:
- Is slightly blurry
- Has faded colors
- Contains grain or noise
- Lacks fine detail
Scanning at a higher DPI will not magically restore missing information. It simply records those imperfections more accurately.
Think of DPI as a magnifying glass. It enlarges what’s already there. It doesn’t repair damage.
This is especially important when scanning old photographs. Many vintage prints have already lost detail over time due to aging, paper texture, or earlier low-quality printing processes.
Choosing the right DPI ensures you don’t lose additional detail during scanning — but improving the clarity itself may require additional enhancement steps after digitizing.
Best DPI for Different Scenarios
The “best” DPI really depends on what you plan to do with your scanned photos. Here’s how to choose the right setting based on your goal.
1. For Simple Digital Archiving
Recommended: 300 DPI
If you just want to:
- Back up family photos
- Store them digitally
- Share them on social media
300 DPI is usually sufficient.
It keeps file sizes manageable while preserving decent detail for screens and small reprints. For casual archiving, anything higher may not provide noticeable benefits.
2. For Long-Term Preservation (Most People)
Recommended: 600 DPI
If you’re scanning:
- Old family photographs
- Prints you may want to reprint in the future
- Images you might crop or slightly enlarge
600 DPI is the safest and most flexible option.
It captures significantly more detail than 300 DPI and allows moderate enlargements without visible quality loss. For most 4×6 or 5×7 prints, this is the ideal balance between quality and file size.
3. For Small Photos You Want to Enlarge
Recommended: 1200 DPI
If you have:
- Wallet-sized photos
- Very small vintage prints
- Images you plan to enlarge significantly
Scanning at 1200 DPI can help preserve as much fine detail as possible.
However, keep in mind that extremely high DPI settings produce very large files — and if the original print lacks detail, the visual improvement may be minimal.
4. For Very Old or Slightly Blurry Photos
Recommended: 600 DPI (with enhancement afterward)
For aging prints that already show:
- Fading
- Grain
- Soft focus
- Minor blur
600 DPI is typically enough to capture all available detail.
Going higher won’t restore lost clarity — it only enlarges the existing imperfections. The key here is to capture clean, high-resolution data during scanning and improve the clarity afterward through digital enhancement.
Best Scanner Settings (Beyond DPI)
While DPI is the most discussed setting, it’s not the only factor that affects scan quality. If you want the best possible results, you should pay attention to these additional scanner settings.
1. Choose the Right File Format
Recommended: TIFF (for preservation) or High-Quality JPG (for convenience)
TIFF preserves maximum image data and avoids compression artifacts. It’s ideal for long-term archiving or future editing.
JPG creates smaller files but uses compression, which can reduce image quality slightly.
If you’re scanning old or valuable photos, it’s best to save a master copy in TIFF format and create JPG copies for sharing.
2. Disable Automatic Enhancements
Many scanners enable features like auto sharpening, auto color correction, dust removal, and contrast boosting.
While these sound helpful, they often apply aggressive processing that over-sharpens details, increases noise, and alters original colors.
For best results, scan the photo as clean and neutral as possible. You can always make adjustments later with proper editing tools.
3. Use 24-bit Color for Color Photos
For standard color photos, choose 24-bit color mode.
For black-and-white photos, use grayscale mode instead of black-and-white (1-bit), which preserves more tonal detail.
This ensures smoother gradients and better editing flexibility later.
4. Clean the Scanner Glass
It may sound obvious, but dust and fingerprints on the scanner glass can reduce clarity, introduce visible spots, and create unnecessary retouching work.
Wipe the glass gently before each scanning session to avoid quality loss.
5. Scan Once, Scan Properly
Repeated scanning can introduce slight alignment differences and increase handling wear on fragile prints. It’s better to scan once at the correct DPI and with the right settings than to rescan multiple times later.
Important Reminder
Even with perfect scanner settings, the final image quality is still limited by:
- The condition of the original print
- The paper texture
- The original camera or printing process
- The optical limits of your scanner
Scanner settings help preserve detail but they don’t restore lost clarity.
How to Improve Scanned Photo Quality
Even with the right DPI and proper scanner settings, many scanned photos still don’t look as good as expected.
You might notice:
- Slight blur or soft focus
- Faded colors
- Visible grain or noise
- Lack of fine detail
- Scratches or minor imperfections
That’s because scanning only captures what already exists on the printed photo. It doesn’t rebuild missing detail or repair age-related damage.
If you want your digitized photos to look sharper and clearer, you’ll need to enhance them after scanning.
You can use traditional photo editing tools like Photoshop, or opt for a simpler, AI-powered solution such as Aiarty Image Enhancer.
Aiarty Image Enhancer can make scanned photos look crisp, vibrant, and true to life without complicated editing. Its key capabilities include:
- Sharpen edges without harsh artifacts
- Reduce noise while preserving exture
- Enhance facial details
- Upscale resolution without heavy pixilation
- Adjust color — restore faded tones and improve vibrancy
- AI Eraser — remove unwanted objects or blemishes automatically
How to Use Aiarty to Enhance Scanned Photos
1. Download and Install
Get Aiarty Image Enhancer for your computer and complete the installation.
2. Open the Software and Import Photos
You can import a single photo or multiple photos at once for batch processing.
3. Choose AI Model and Settings
- To enlarge photos, click Upscale and select the desired magnification or resolution.
- To adjust colors, go to Color and enable the adjustment option.
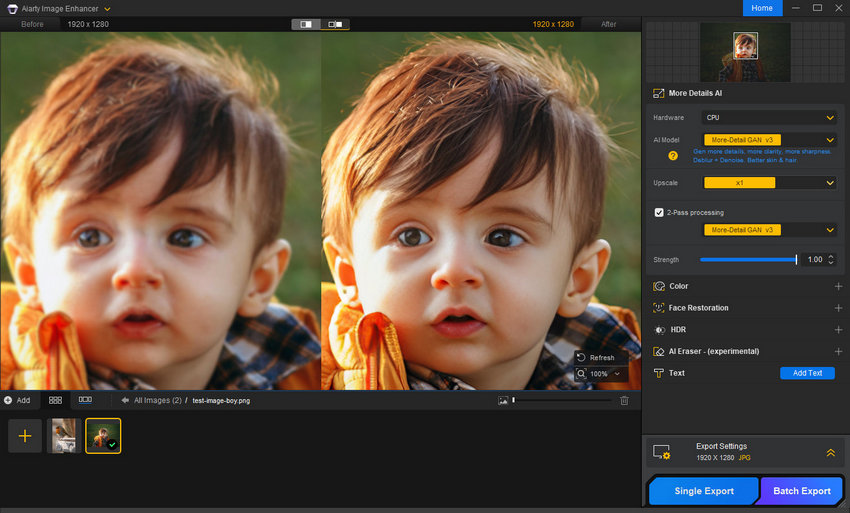
4. Preview the Results
Check the enhanced image in the preview panel to ensure it meets your expectations.
5. Export the Enhanced Photos
Click the Export button in the lower-right corner to save your high-quality images.
 FAQs About Scanning Photos DPI
For most standard prints (4×6, 5×7), 600 DPI is sufficient. Scanning at 1200 DPI may only be necessary for very small photos you plan to enlarge, or for capturing the finest details in archival-quality scans.
Higher DPI also increases file size significantly and may not visibly improve clarity if the original photo is already soft or aged.
Not necessarily. Higher DPI captures more detail if the original photo contains it. If the print is faded, blurry, or grainy, scanning at a higher DPI will also capture those imperfections.
For most standard prints, 600 DPI strikes the best balance between detail and file size. It captures enough information for editing, printing, or digital sharing.
Scanning at 1200 DPI is only recommended for:
• Very small photos you want to enlarge significantly
• Archival purposes where every tiny detail matters
Even at 1200 DPI, the quality of old or soft-focus prints won’t improve without post-scan enhancement. Tools like Aiarty Image Enhancer can further sharpen and restore detail, making 600 DPI scans look closer to high-end enlargements.
For vintage or aging photos, 600 DPI is generally ideal.
• It captures all available detail without creating excessively large files
• Preserves flexibility for cropping, printing, or digital editing
• 200 DPI: Only suitable for casual sharing on screens; prints may appear soft
• 300 DPI: Minimum recommended for standard prints and digital storage
• For most purposes, 300 DPI or higher is safer, especially if you plan to print or enhance the photos digitally
You May Also Like
This post was written by Brenda Peng who is a seasoned editor at Digiarty Software who loves turning ordinary photos into extraordinary works of art. With AI assistance for brainstorming and drafting, the post is reviewed for accuracy by our expert Abby Poole for her expertise in this field.