9 Best Photo Noise Reduction Software in 2026: I Tested Them All
Image noise is a common issue in digital photography, especially when shooting in low light, night, or at high ISO settings. It often appears as grain, color speckles, or loss of detail, making images look rough and less professional.
To improve image quality, photographers often rely on noise reduction software to remove unwanted grain from photos.
So, what is the best photo denoise software today?
The answer depends on your needs. Some tools are designed for RAW image processing and professional photography workflows, while others focus on one-click AI enhancement, JPEG cleanup, or combined features such as denoising and upscaling.
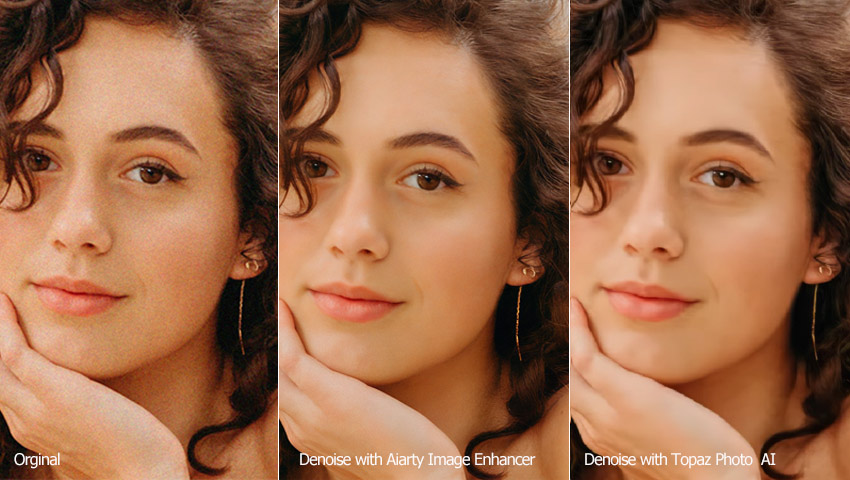
For this guide, we tested and compared 9 of the best image noise reduction software options using a low-light portrait and a high-ISO bird photo. These test images were selected because they contain challenging details such as skin texture, fine feathers, and visible color noise, making them useful for evaluating real-world denoising performance.
This comparison does not follow a strict ranking. Instead, each software is discussed based on its strengths, weaknesses, and ideal use cases.
Quick Verdict
- Aiarty Image Enhancer (Best for Quick AI Denoise without Losing Details): Supports RAW and other image formats, effectively removing luminance and color noise while preserving fine details. It combines denoising, sharpening, and upscaling in a single workflow for fast, batch-friendly processing.
- Adobe Lightroom Classic (Best for Workflow Integration): Ideal for photographers in the Adobe ecosystem, offering effective AI noise reduction, manual control, and professional color management within an integrated workflow.
- Topaz Photo AI (Best for AI Detail Recovery): Provides an Autopilot mode for intelligent automatic adjustments, while allowing manual control over denoising strength, minor deblurring, and selective denoise.
- DxO PhotoLab (Best for RAW Quality): Known for its DeepPRIME denoising, delivering industry-leading results in detail preservation, color accuracy, and high-ISO performance, making it the top choice for RAW photography.
- Neat Image (Best for Custom Control): Highly customizable, allowing precise noise profiling and manual adjustments for users who need granular control over denoising parameters.
- Fotor (Best Online Option): A lightweight, web-based tool for quick AI denoising, suitable for casual users and basic photo edits without software installation.
- Nero AI Image Denoiser (Best for Free Online Denoise): A browser‑based AI tool that quickly removes noise and grain from photos. It offers 10 free trial credits for new users.
- AVCLabs Photo Enhancer AI (Best for Simple AI Upscaling + Denoise): Easy-to-use AI enhancement features for basic denoising and resolution improvement, suitable for users who prefer minimal adjustments.
- HitPaw Photo Enhancer (Best for Beginners): A beginner-friendly tool providing straightforward AI-based noise reduction and image enhancement for quick improvements with minimal learning curve.
My Experience with 9 Photo Noise Reduction Software
Aiarty Image Enhancer
Best for: Users who need AI denoising alone or combined with upscaling in a single workflow, with support for batch processing and fully local, offline processing. Aiarty Image Enhancer excels at removing grain without losing detail, making it perfect for low-light shots, night sky photography, and fixing compressed JPEGs.
- Rating: 4.3/5 by G2
- Supported input formats: JPG, PNG, RAW, DNG, CR3, CR2, CRW, RW, ARQ, WebP, TIFF…
- Supported export settings: format (JPG, PNG), DPI settings, and quality value
- Platforms: Windows 10(x64) 1809 or later, Apple Silicon Mac running macOS Big Sur 11 or later, Intel Mac running macOS High Sierra 10.13.6 or later
- Pricing: Free trial available to evaluate the results; Flexible 1-year or lifetime options (Lifetime is a one-time $99 purchase for up to 3 devices).
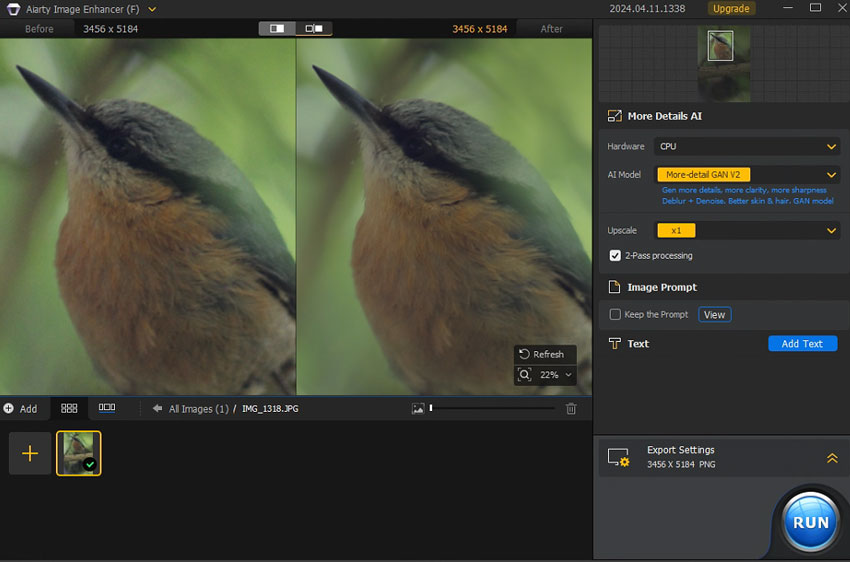
Aiarty Image Enhancer combines noise reduction, deblurring, and image upscaling in a single workflow. For this comparison, I primarily tested the software using the More-detail GAN model, which is designed to reduce noise while retaining fine textures.
What stood out during testing was the amount of control available to the user. The software includes multiple AI models and an adjustable Strength slider, making it possible to fine-tune the balance between noise reduction and detail retention rather than relying on a single automatic setting.
Another useful option is the ability to process images at ×1 resolution. This allows the software to be used purely as a denoising tool when upscaling is not needed, while users can still combine denoising and upscaling in a single step for lower-resolution images.
Testing with Aiarty Image Enhancer
To evaluate Aiarty's real-world denoising performance, I tested the software using two images that represent common photography challenges.
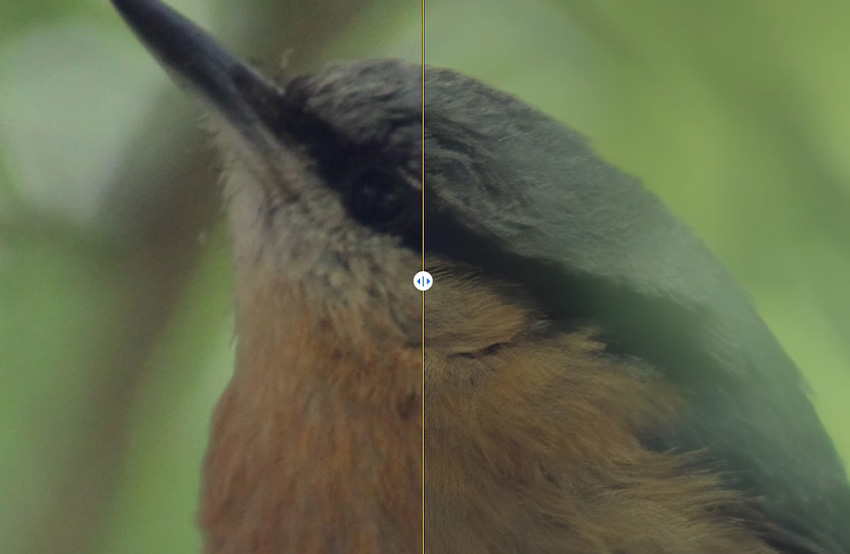
Test Image 1: A high-ISO bird photograph containing visible luminance noise and fine feather details. This image was selected to evaluate how effectively the software removes noise while preserving delicate textures.
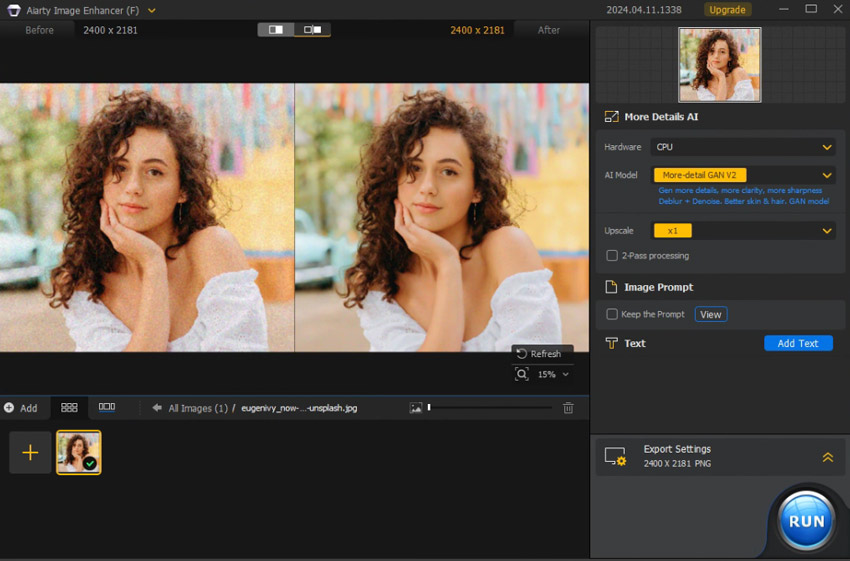
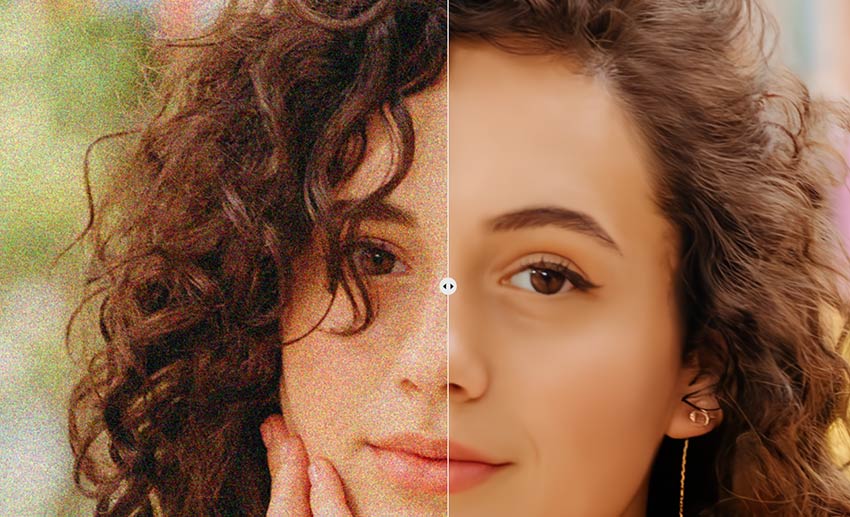
Test Image 2: A low-light portrait containing both color noise and luminance noise. This image was used to assess facial detail preservation, skin texture handling, and overall image quality after enhancement.
For both tests, I primarily used the More-detail GAN model because it is designed to reduce noise while retaining fine details and natural textures.
Test Result – Image 1 (Denoise Only)
For the bird image, I selected an upscale factor of ×1 so the test focused exclusively on denoising without changing the original image resolution.
The software successfully reduced visible noise throughout the image while maintaining most of the feather texture. At 100% zoom, small details remained clearly visible, and I did not observe obvious artifacts, halos, or excessive smoothing in the processed result.
The overall appearance remained natural, with a noticeable reduction in grain while preserving the structure and texture of the bird's feathers.
Test Result – Image 2 (Denoise + Upscale)
For the portrait image, I enabled both denoising and ×2 upscaling to evaluate Aiarty's combined enhancement workflow.
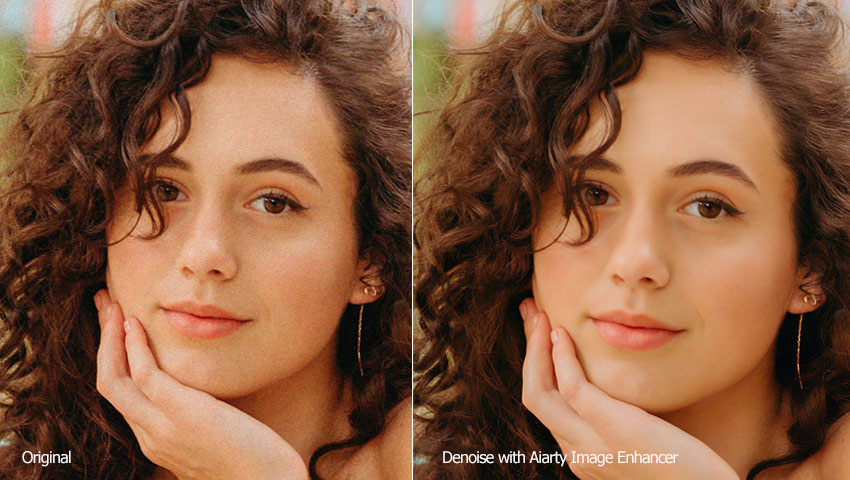
The software effectively reduced both color and luminance noise while generating a cleaner and more detailed output.
At close inspection, facial features such as eyelashes, eyebrows, eye reflections, hair strands, lip texture, and finger details remained visible after processing. The enhanced version appeared noticeably clearer than the original image while maintaining a natural look.
In this test, the software handled denoising and upscaling simultaneously without introducing obvious visual artifacts, making it a practical option for improving noisy portraits and low-light images.
- Easy to use and beginner-friendly.
- Supports RAW and other popular image formats.
- Reduces image noise while preserving fine details.
- Allows adjustable denoising strength without over-smoothing.
- Includes sharpening and upscaling to enhance clarity.
- Offers multiple AI models for different scenarios.
- Supports batch processing for multiple images at once.
- Processes images entirely locally and offline, ensuring privacy.
- In a few challenging images, noise may be reduced more strongly in some areas than others, depending on the photo’s lighting and quality.
- Face Restoration works well overall, but in very low-resolution or heavily damaged portraits, the results may not always look better than the original. It’s recommended to compare the results with the feature enabled and disabled to choose the most natural-looking outcome.
Best Practices to Get the Most Out of Aiarty Image Enhancer
Aiarty provides several AI models and customization options, each optimized for different image types. Here are some tips to help you achieve the best balance between clarity, detail, and naturalness:
- Test different AI models: Each model excels in different scenarios. If one model doesn’t produce a satisfying result, try another to see which best fits your image.
- Avoid jumping directly to the largest upscale: For certain images, scaling step-by-step (e.g., ×2 and then ×2 again) can produce cleaner textures than jumping straight to ×4/×8 or 4K/8K upscaling.
- Try upscaling by ×1: When your photo is already high-resolution, using ×1 allows you to enhance clarity, fix noise, and restore details without increasing the output size.
- Experiment with settings such as 2-pass processing: 2-pass often generates richer, more refined details, but for some images the result may look slightly too sharp or heavy. Compare both modes to find the most natural version.
- Use the Strength slider wisely: This slider controls how strongly the AI enhances and sharpens your image. The default value is 1. If the enhancement looks too intense or unnatural, adjust the slider downward to achieve a more balanced result.
- For printing: Adjust the DPI, output format, and quality settings to ensure the enhanced images retain maximum sharpness and detail in print.
- Optimize hardware for large tasks: Aiarty runs well on most systems, but upgrading your GPU can significantly speed up heavy projects or big batch jobs. Make sure your device meets the minimum system requirements for optimal performance.
Adobe Lightroom Classic
Best for: Photographers and creators seeking a complete professional ecosystem that combines cutting-edge AI denoising for RAW files with precise manual controls for standard JPEGs and archival photos.
- Rating: 4.6/5 by G2
- Supported image formats: DNG, AVIF, HEIF/HEIC, TIFF, JPEG, PNG...
- Platforms: Windows 10 (version 22H2) or Windows 11 (version 21H2 or later), macOS Monterey 12 or later, and mobile
- Pricing: $11.99/month (includes Lightroom for mobile, desktop, and web, plus Lightroom Classic and 1TB of cloud storage.)
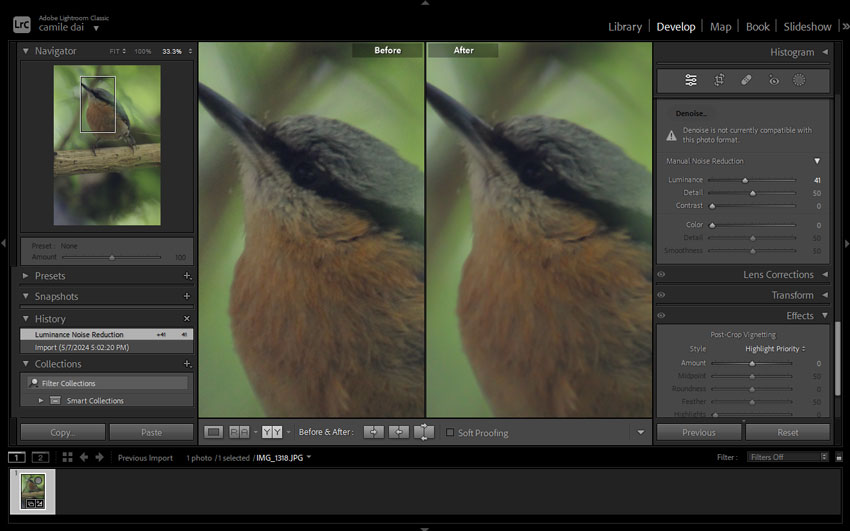
Adobe Lightroom Classic remains the industry standard for professional photographers, offering a comprehensive workflow for organizing and editing. When it comes to noise reduction, Lightroom now provides two powerful approaches tailored to different needs: AI Denoise and Manual Noise Reduction.
AI Denoise (For RAW): Ideally suited for photographers, this feature uses a deep neural network on the raw sensor data before demosaicing. It outputs a new DNG file with noise cleaned up while preserving exceptional detail.
Manual Noise Reduction (For JPG/PNG): For general formats like AIGC images, web downloads, or scanned archival photos, the classic "Detail" panel allows for precise pixel-level adjustments. Users can fine-tune sliders for Luminance, Detail, Contrast, and Smoothness to dial in the exact look they prefer.
Testing with Adobe Lightroom Classic
Note: The AI denoise feature has garnered positive feedback from photographers. However, it is limited to working only on high-quality, high-bit-depth image formats such as Bayer, X-Trans, and other linearized raw formats (like Linear DNGs). It is currently unable to remove noise from compressed formats like JPEG, PNG, and TIFFs that lack the necessary raw data.
Since both of my test images are JPG files, Lightroom automatically falls back to Manual Noise Reduction, not the AI Denoise feature. The following results therefore reflect the performance of Lightroom’s Manual Noise Reduction.
Test Result – Image 1
Using the manual sliders, Lightroom effectively reduced the luminance noise in the background. The strength of this approach lies in its control—unlike "black box" AI tools, I could manually balance the "Luminance" and "Detail" sliders to smooth out the grain while maintaining a natural look for the bird's feathers. It offers a classic, photographic finish that many professionals prefer for its predictability.
Test Result - Image 2
For the portrait, the manual adjustments created a visually pleasing, smooth surface. The color noise was handled exceptionally well. While JPEG compression inherently limits how much detail can be recovered compared to RAW, Lightroom managed to produce a clean, usable image that is ideal for web sharing or small prints.

- Industry-leading AI Denoise for RAW files that preserves incredible detail.
- Offers precise manual control for fine-tuning images.
- Professional-grade color grading and photo management ecosystem.
- Supports third-party plugins and extensions.
- Features auto masking for precise local adjustments.
- AI Denoise is powerful but restricted to RAW files (does not work on JPEGs).
- AI Denoise processing can be slow on older or less powerful GPUs.
- Cannot batch-process AI Denoise; images must be handled one at a time.
- May create unnatural swirls and squiggles in starry backgrounds.
Topaz Photo AI
Best for: Advanced users who want high-quality sharpening and noise reduction on powerful PCs, and who don’t mind spending time downloading and testing multiple AI models to get the best results.
- Rating: 4.0/5 by G2
- Supported image formats: JPEG, BMP, PNG, GIF, TIFF...
- Platforms: Windows 10/11, macOS Big Sur 11 and higher
- Pricing: $21/mo for Personal ($252/yr, no refund, no cancel)
Topaz Photo AI combines AI-powered noise reduction, sharpening, and image upscaling in a single application. During testing, I found its denoise module offers a good balance between automation and manual control, making it suitable for users who want more flexibility than one-click enhancement tools.
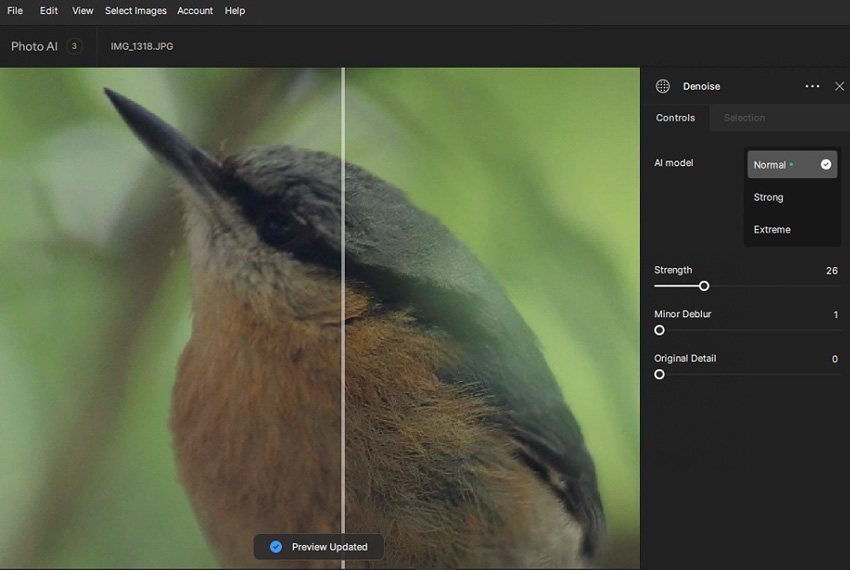
The software provides multiple denoise modes, including Normal, Strong, and Extreme. Depending on the amount of noise present in the image, switching between these modes can produce noticeably different results. In heavily noisy photos, the Strong or Extreme settings may recover a cleaner image, although the most aggressive settings can sometimes reduce fine textures.
Topaz also includes several adjustment controls, such as Strength, Minor Deblur, and Original Detail. These settings allow users to fine-tune the balance between noise reduction, sharpness, and texture preservation rather than relying entirely on automatic processing.
Testing with Topaz Photo AI
Test Result – Image 1
The details in both the background and the main subject have been well-preserved.
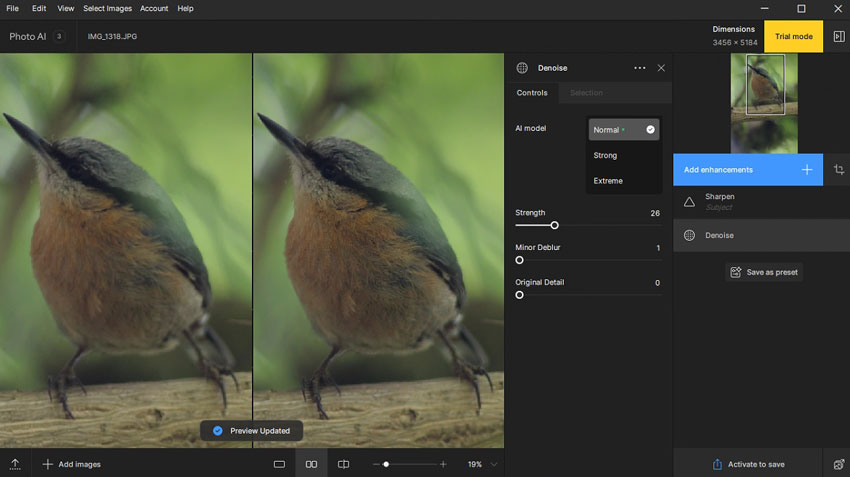
Upon closer examination, I found that the feature appears to be overly sharpened. The feather in the original image has a soft and delicate appearance, whereas, in the denoised image, it appears rigid and rough.
Test Result - Image 2
It effectively removes almost all perceivable noise while maintaining only a slight, subtle smudging effect.
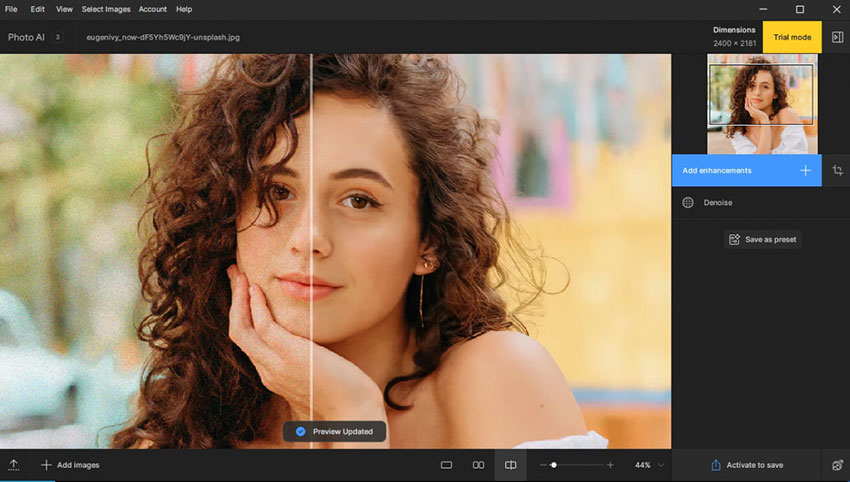
Let's zoom in. We can find the details in the eyes, individual strands of hair, facial shadows, and skin creases are remarkably retained. However, in comparison to Aiarty Image Enhancer, Topaz Photo AI loses some detail in the fingers and knuckles. Overall image clarity is slightly inferior to Aiarty Image Enhancer as well.
- Noise reduction level for handling images with different levels of noise.
- Recover details option to bring back details.
- Uses a massive amount of app memory.
- Downloading the recently released models takes a lot of time.
- Resource-intensive, can't run smoothly on less-equipped computers.
- Inconsistent results across the image, with some parts noticeably sharper than others.
DxO PhotoLab
Best for: Advanced users to reduce noise from RAW images on top-tier PCs.
- Rating: 4.0/5 by PCMag
- Supported image formats: RAW, native DNG from supported cameras, Linear DNG from supported cameras, Linear DNG from DxO PhotoLab, JPEG, PNG...
- Platforms: Windows 10/11 (version 20H2, 64-bit) or later, macOS 12.6.8 (Monterey) or later
- Pricing: $229 (one-time purchase)
DxO PhotoLab is one of the strongest options for photographers who primarily work with RAW files. In addition to photo editing and lens corrections, the software is particularly well known for its AI-powered noise reduction technology.
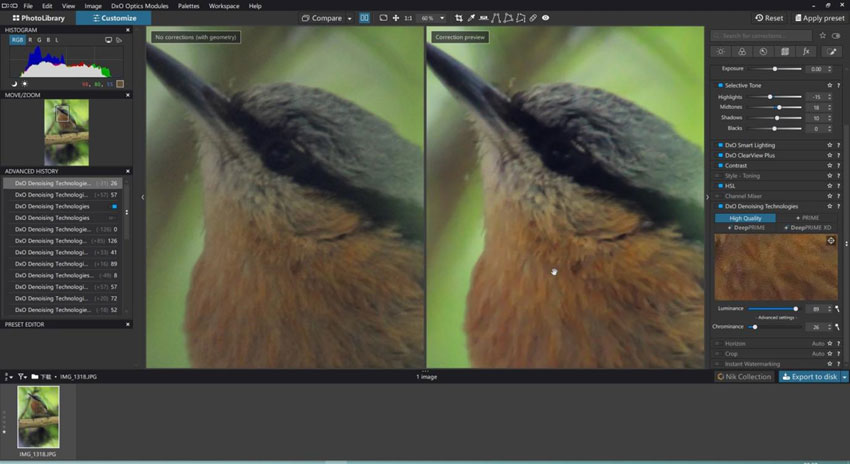
DxO offers several denoising methods, including HQ, PRIME, and DeepPRIME. While HQ is suitable for basic noise reduction and provides faster previews, PRIME and DeepPRIME are designed specifically for RAW image processing and can deliver significantly cleaner results in high-ISO photos.
During testing, DeepPRIME produced excellent noise reduction while preserving fine details and color accuracy. It was especially effective on images with heavy luminance noise, making DxO PhotoLab a popular choice among wildlife, sports, and low-light photographers who regularly shoot at higher ISO settings.
Testing with DxO PhotoLab
Test Result – Image 1
The result was an improvement over Lightroom, but it was challenging to reduce noise without making the image too soft. Additionally, a strange green edge was visible on the right side of the bird, and the bird's color appeared different from the original.
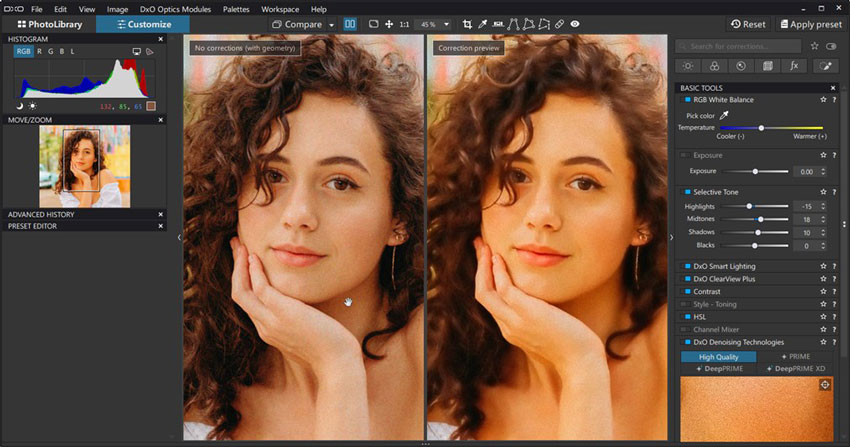
Test Result - Image 2
The image still appears noisy and low in quality, with faces and clothing looking overly soft and smudged. Additionally, the color of the denoised image appears warmer and brighter compared to the original.
- Excellent AI-powered noise removal capabilities with DeepPrime XD.
- Comprehensive image management and editing features.
- Supports raw files from hundreds of different camera models.
- Can be used as a plugin for Lightroom.
- The steep learning curve for green hands.
- Advanced AI denoising (DeepPRIME) is unavailable for JPEGs, limiting its effectiveness on existing photo collections.
- Slow performance, even on a robust, well-built PC.
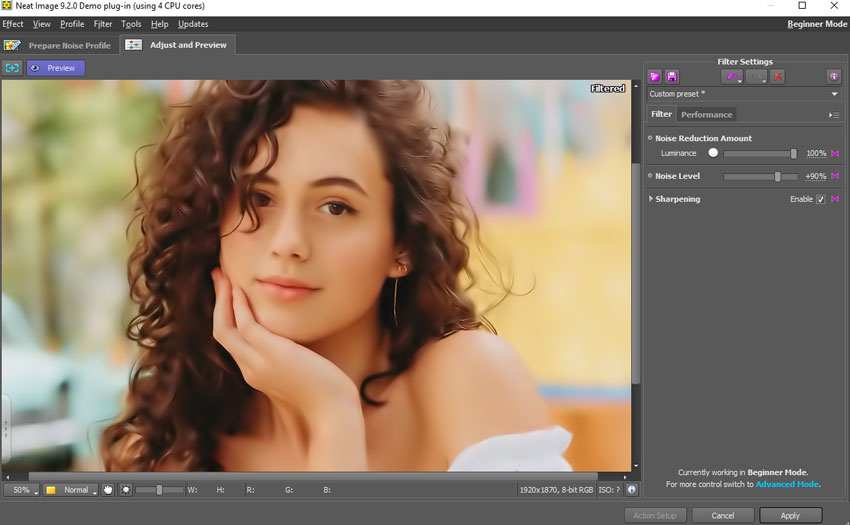
Neat Image
Best for: Users who need highly customizable noise-reduction controls inside Lightroom / Photoshop or prefer fine-tuning every parameter manually.
- Rating: 4.3/5 by CNET
- Supported image formats: JPG, TIF, PNG, and BMP
- Platforms: Windows 11 / 10 / 8 / 7 (64-bit), Apple Silicon Mac running macOS Big Sur 11 or later, Intel Mac running macOS High Sierra 10.13.6 or later
- Pricing: $39.9 with limited features; $79.9 with unlimited features
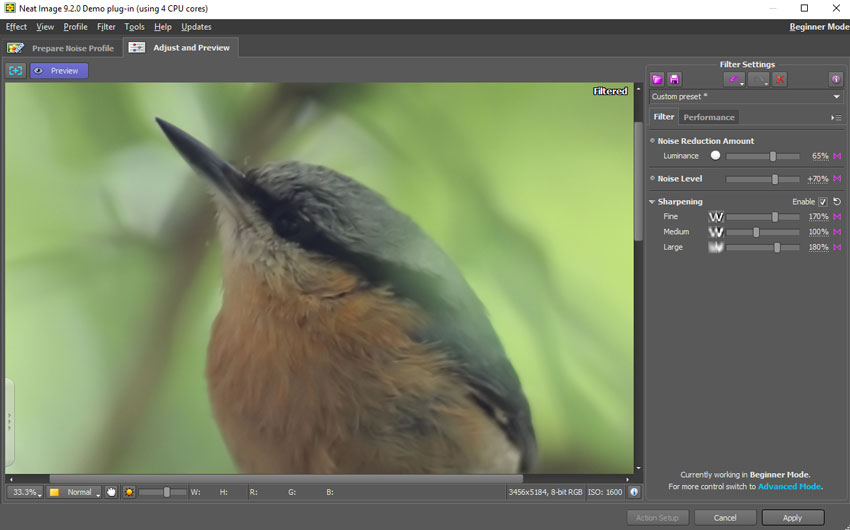
Neat Image is a dedicated noise reduction tool that has been widely used by photographers for many years. Unlike many newer AI-based solutions, it focuses on analyzing image noise and building a noise profile to remove grain while preserving important details.
The software can reduce luminance noise, color noise, film grain, JPEG compression artifacts, and other common image imperfections. It is available both as a standalone application and as a plugin for popular photo editing software, making it easy to integrate into existing workflows.
One advantage of Neat Image is the level of control it provides. Users can manually adjust noise reduction settings and fine-tune the balance between noise removal and detail preservation, which may appeal to photographers who prefer more control over the editing process.
Testing with Neat Image
Test Result – Image 1
While Neat Image does a good job of cleaning up the noise and graininess in the background pixels, it seems to have over-smoothed the details of the bird in the foreground. Rather than capturing the intricate textures and individual feathers, the bird now has a painted, almost illustrative appearance, lacking the natural, lifelike quality of the original.
Test Result - Image 2
The denoised image appears over-processed, resembling digital art. The hair appears excessively blurred. Facial features seem painted on, lacking the texture of real skin. The earrings look like odd, solid-colored lines. The patterns on the clothes are nearly erased, appearing as a jumble of white pixels stacked together.
- Plenty of customizable options for refining output.
- Full control over the sample area, noise level, NR parameters, etc.
- Low-quality output for images at high ISO.
- Quite tough to strike a balance between noise removal and sharpening.
- A little bit difficult for beginners to master.
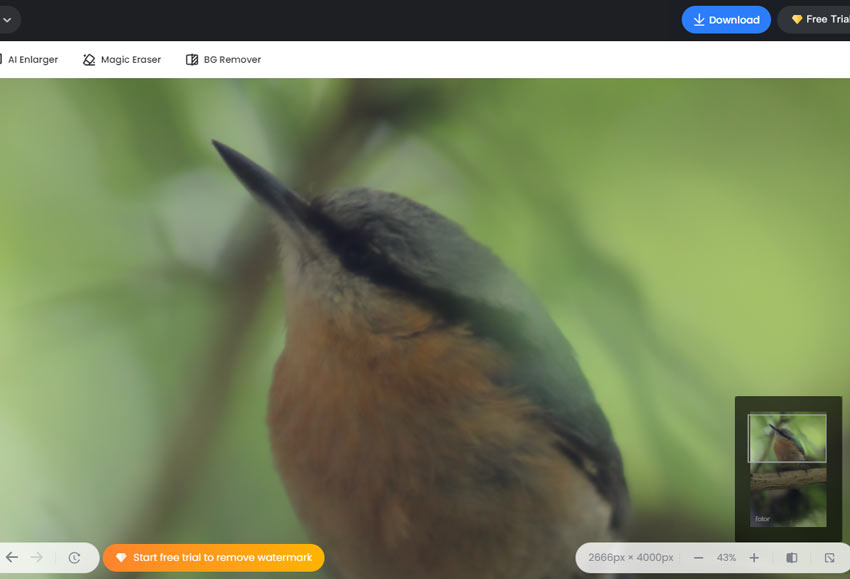
Fotor
Best for: Beginners to sharpen and reduce image noises directly on the browser.
- Rating: 4.2/5 by G2
- Supported image formats: PNG, JPG, and SVG
- Platforms: Windows, Mac, Android, iPhone, etc
- Pricing: $8.99/month for Fotor Pro; $19.99/month for Fotor Pro+
Fotor is a convenient browser-based photo editor that offers a wide array of editing tools such as cropping, resizing, flipping, shaping, adding borders, and a range of AI-driven features for creating AI images like AI face and avatar generators, as well as enhancing image quality with denoise and resolution enlargement tools. The denoise function in Fotor is user-friendly, with two sliders, one for adjusting luminance noise and the other for color noise.
Testing with Fotor
Test Result – Image 1
Increasing the denoise level results in a smeared appearance and loss of important details, while decreasing it can leave unwanted noise in the image. Below is the best result I can get with Fotor. However, the overall appearance is excessively softened and lacks sharpness.
Test Result - Image 2
The image still looks noisy and low quality even though I pull the slider of luminance and color noise slider to the maximum.

- An extensive set of photo editing tools, including AI-driven utilities.
- Browser-based, making it accessible across devices.
- Simple, intuitive interface with sliders for basic adjustments.
- Batch processing capabilities for efficiency.
- Struggle to find the right balance between noise removal and detail preservation.
- Noticeable noise even at maximum denoise settings.
- Limited control and customization options compared to professional photo editors.
- Lack of advanced noise reduction algorithms found in dedicated tools.
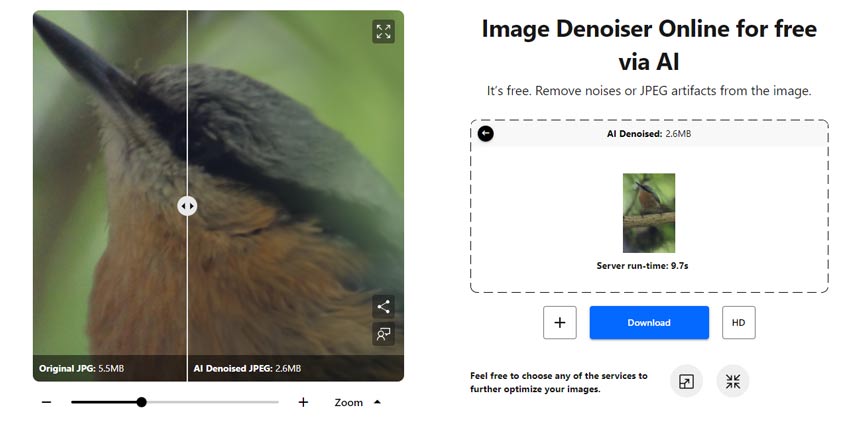
Nero AI Image Denoiser
Best for: Beginners to denoise slightly noisy images that come in small sizes.
- Rating: 4.4/5 by G2
- Supported image formats: PNG, JPG, and SVG
- Platforms: Windows, Mac, Android, iPhone, etc
- Pricing: Starts at $9.95/month with 100 monthly credits (one image processing costs 1 to 10 credits based on the model used)
Nero AI presents a suite of AI-powered tools accessible directly through our browser, featuring capabilities like photo restoration, colorization, and avatar generation. Among its offerings is the AI Image Denoiser, designed to enhance noisy images with ease by just uploading the original image. Notably, the denoising process is fully automated, making it user-friendly for beginners. However, the lack of customization options means that if the resulting image is unsatisfactory, there are no avenues available to refine it.
Testing with Nero AI Image Denoiser
Test Result – Image 1
The background now appears sharp and clear. However, the bird's feather has turned into a blurry mass resembling felt, lacking the expected texture and detail.
Test Result - Image 2
When viewed at a smaller scale, the effect seems quite good - the noise has been completely removed, and the person's skin still retains a reasonable amount of detail.
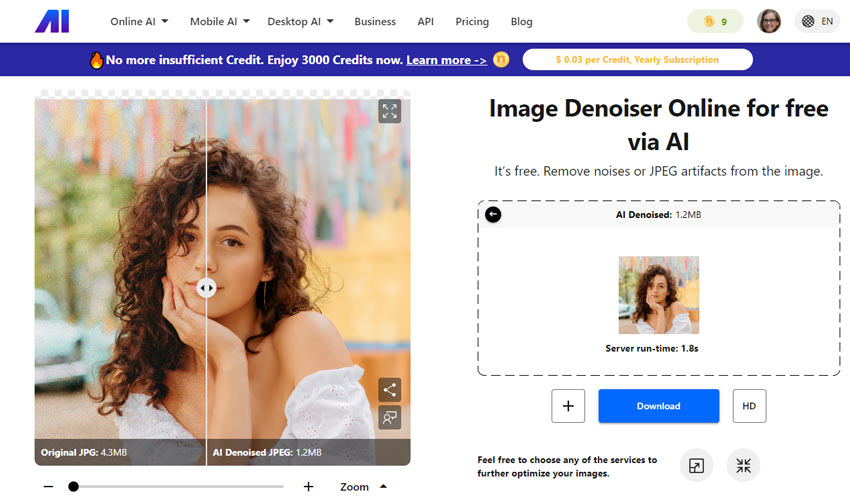
However, when zooming in to 50% or more, the skin appears waxy and has lost much of the natural texture and fine details that would be expected.
- A few AI models trained for different demands.
- 5 credits per day for free use (no watermark added).
- Often cause a horrible loss of picture details.
- Can only work with JPG, PNG, and SVG files.
- No option for customizing the denoise or sharpness level.
AVCLabs Photo Enhancer AI
Best for: Users who want to enhance the quality of a single noisy or low-resolution photo with minimal effort.
- Rating: 3.5/5 by G2
- Supported image formats: JPG, PNG, BMP, JFIF, and WebP
- Platforms: Windows 11, 10(64bit); macOS 10.15 and above
- Pricing: Limited free trial; a one-month plan for $19.95; a one-year of use for $79.95; a lifetime license for $159.90
AVCLabs Photo AI combines several AI-powered enhancement tools in a single application, including image upscaling, noise reduction, color correction, and more. Rather than focusing solely on denoising, it is designed as a general-purpose photo enhancement tool that can improve image quality through multiple AI-assisted adjustments.
During testing, I found the workflow relatively straightforward. Users can choose from features such as AI Upscaler, AI Denoiser, and AI Color Calibration depending on the type of enhancement needed. This makes the software approachable for beginners who prefer quick results without spending much time adjusting settings.
Compared with some dedicated noise reduction tools, however, AVCLabs provides fewer manual controls. The software does not offer separate denoising models, strength adjustments, or detail preservation sliders. Most of the processing is handled automatically, while users can mainly adjust parameters such as image size, brightness, contrast, and saturation.
Because of this simplified approach, AVCLabs may appeal to users looking for an easy all-in-one enhancement solution, while photographers who want precise control over noise reduction and texture preservation may prefer software with more advanced adjustment options.
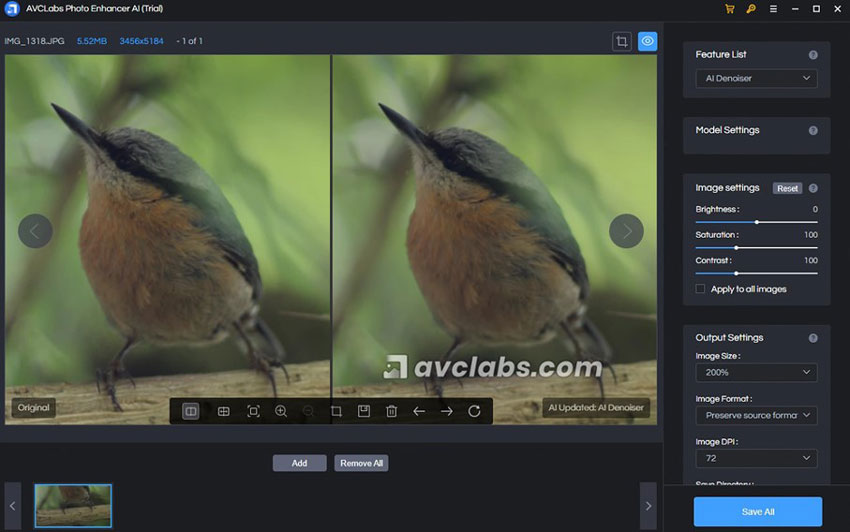
Testing with AVCLabs Photo Enhancer AI
Test Result – Image 1
It seems AVCLabs Photo AI did fix the image noise. Sadly, the loss of detail in the feather and the texture of the tree trunk is apparent even when viewing the denoised image at a smaller size, not just in the larger original version.
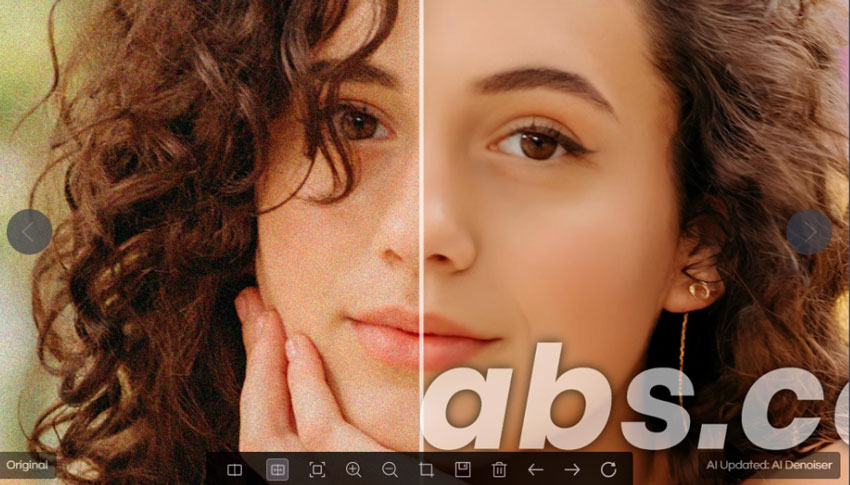
Test Result - Image 2
At first glance, the denoised image appears satisfactory, with most of the intricate hair details preserved.
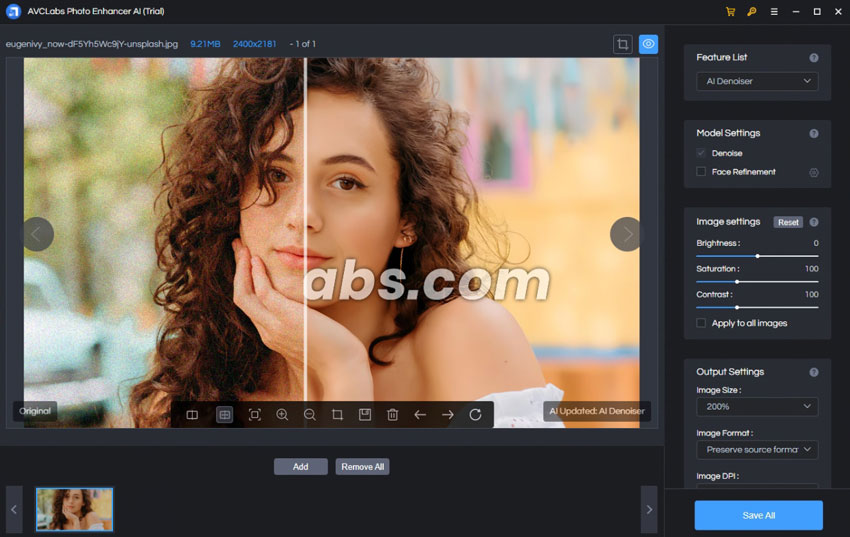
However, upon closer magnification, a faint smearing or artificial smoothing becomes perceptible, especially when examining the details of the lips, eyes, and brows.
- User-friendly interface with customizable workflow options.
- Abundance of features such as face enhancement and DPI adjustment.
- Supports batch processing for efficiency.
- Prominent trial version watermark.
- Image denoising results may not meet expectations.
- Require users to download additional AI models and runtime components before use.
- Limited ability to apply individual settings to multiple images during bulk processing.
HitPaw Photo Enhancer
Best for: Beginners or casual users who want to reduce noise and enhance facial details in photos.
- Rating: 4.5/5 by G2
- Supported image formats: JPG, JPEG, PNG, and WebP
- Platforms: Windows and Mac
- Pricing: Free trial with watermark and limited features. Paid plans include $9.99 for one week, $29.99 for one month, and $179.99 for one year
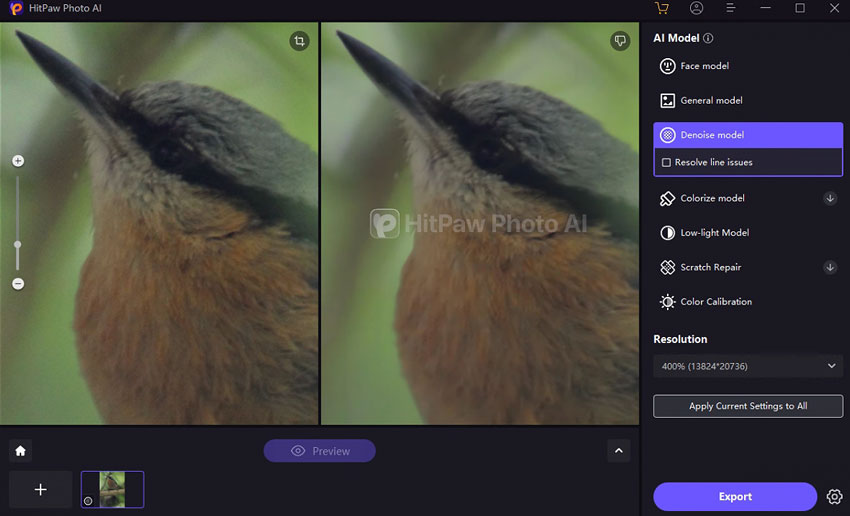
The HitPaw Photo Enhancer is another decent piece of image enhancer that uses artificial intelligence to make our images look better. Its General Denoise model can help reduce unnecessary noise and sharpen details in our photos automatically. Plus, this noise reduction software has a Face Model, with which we can restore blurry faces. Anime lovers will appreciate the Animation Model - this boosts resolution to enhance our viewing experience. And if we have black and white videos, the Colorize Model will add vibrant colors to them, making them look more real.
Testing with HitPaw Photo Enhancer
Test Result – Image 1
The denoised image looks very similar to, or even worse than, what I got from the denoise feature of AVCLabs Photo AI. While there's no noticeable noise remaining, the fine details of the feathers have been over-smoothed, leaving them looking smudged and unclear.
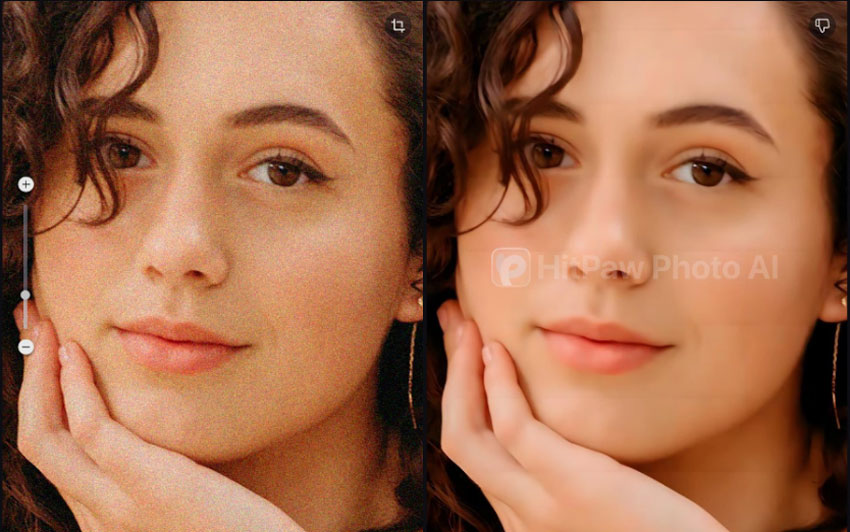
Test Result - Image 2
The effect is somewhat average, better than Neat Image and Fotor but not as good as Topaz and Aiarty Image Enhancer.

It was somewhat disappointing in terms of preserving fine details. On a close look, we can find the facial features have become blurry and almost plastic-looking.
- Intuitive interface that makes it easy for beginners to start with.
- Multiple AI tools for colorizing, low light fixing, and more.
- Slow denoising speed results in longer processing times.
- Excessive noise reduction may cause images to appear waxy and blurry.
- Lack of options to adjust noise reduction levels or sharpness.
- Limited file format support (only JPG, PNG, WebP; no Raw support).
- Manual preview is required for processing each image, without an auto-preview feature.
Comparison: What Is the Best Noise Reduction Software
After testing several popular noise reduction tools on different types of images, it’s clear that there is no single best tool for everyone. Each software has its strengths depending on your needs. For example, Aiarty Image Enhancer is highly versatile for batch processing and preserving fine details, while other tools may be better suited for single-image edits, RAW workflows, or highly customizable noise control.
| Noise reduction software | Noise reduction | Detail retention | Pricing | Quick navigation |
|---|---|---|---|---|
| Aiarty Image Enhancer | Excellent | Excellent | Free Trial; 1-year or Lifetime ($99 for 3 devices) | |
| Adobe Lightroom Classic | Traditional: Good when sliders are balanced; AI Denoise (RAW only): Generally effective | Traditional: Detail loss possible at high ISO; AI Denoise: Usually well-preserved, minor smoothing possible | $11.99/month (Includes Lightroom, Classic & 1TB Storage) | |
| Topaz Photo AI | Excellent | Excellent | $21/mo for Personal ($252/yr, no refund, no cancel) | |
| DxO PhotoLab | Average | Over-softens image | $229 lifetime | |
| Neat Image | Excellent | Noticable detail loss | Start from $39.9 lifetime | |
| Fotor | Fair | Over-softens image | Start from $8.99/month | |
| Nero AI Image Denoiser | Good | Visible detail loss | Start from $9.95 per month | |
| AVCLabs Photo Enhancer AI | Good | Some detail loss | Start from $19.95/month | |
| HitPaw Photo Enhancer | Good | Artificial-looking | Start from $9.9/week |
How I Tested These Noise Reduction Software
To ensure this comparison is as fair and repeatable as possible, each noise reduction tool was tested using the same hardware and identical image files. My goal was to evaluate how these tools perform in a typical workflow where users need to salvage existing compressed images.
1. Test Materials
I utilized two specific JPG images for all tests to maintain consistency:
- Image 1 – It was shot with a Canon EOS 600D camera, using an ISO setting of 3200. The image appears very noisy throughout, including the background, the bird's feathers, and the trees and leaves.
- Image 2 – It's a portrait captured from the web. This image exhibits significant color noise, which is quite distracting and noticeable. The challenge for the noise reduction software is to correct the color noise without losing important details in the image.
2. Optimization Strategy
Since the software list includes both professional editors and one-click AI tools, I adapted the testing method to the nature of each software:
- For Manual Tools: I manually adjusted the noise reduction and sharpening sliders to find the "sweet spot"—removing the majority of grain without creating a plastic look or destroying fine textures.
- For Automated AI Tools: I utilized their automatic processing or default recommended models. If a tool offered no manual sliders, I evaluated the direct output provided by the software.
- For Hybrid Tools: I selected the AI model best suited for the specific image type (e.g., "More-detail GAN" or "Denoise") and made minor adjustments to strength settings if the default was too aggressive.
3. A Note on File Formats
It is important to note that some professional tools (specifically Adobe Lightroom Classic and DxO PhotoLab) reserve their most advanced AI denoising features exclusively for RAW files. Because this test focuses on JPEG image recovery, these specific tools were evaluated on their standard noise reduction capabilities available for compressed formats. This provides a realistic look at how they perform if you are not shooting in RAW.
 FAQs
FAQs
The top AI denoise tools include Aiarty Image Enhancer, Topaz Photo AI, DxO PhotoLab, and Adobe Lightroom Classic. Each excels in different scenarios: Aiarty for easy and quick AI denoising, Topaz for automated detail recovery, DxO for RAW image quality, and Lightroom for integrated Adobe workflows.
Start by applying AI noise reduction to RAW or high-resolution files to remove grain without losing details. Next, use upscaling or sharpening tools if higher resolution is needed. Batch processing can save time, and testing different AI models or strength settings ensures the best balance of clarity and texture.
Beginner-friendly options include Aiarty Image Enhancer, Fotor, HitPaw Photo Enhancer, AVCLabs Photo Enhancer AI, and Nero AI Denoiser. These tools offer one-click AI denoising, require minimal settings, and provide quick results.
AI denoisers use machine learning models trained on millions of images to distinguish noise from real details, preserving textures while avoiding over-smoothing. Traditional denoisers rely on filters that often blur details and can create unnatural-looking results.
Yes. Modern AI tools can remove luminance and color noise, restore fine textures, and enhance image clarity, especially in high-ISO, low-light, or compressed images. Some tools also combine denoising with upscaling to improve overall resolution.
Noise is caused by electronic interference in the camera sensor, high ISO, long exposures, or compression artifacts. Using AI denoise software, shooting at lower ISO when possible, and applying proper post-processing can significantly reduce noise while maintaining image quality.
Use AI models that separate noise from important textures, adjust denoising strength carefully, and avoid over-smoothing. Tools like Aiarty, Topaz, or DxO allow precise control to remove noise while preserving sharpness and fine details.
For fast online edits, Fotor and Nero AI Denoiser are recommended. They provide easy-to-use interfaces and basic AI denoise functions suitable for JPG and PNG images without installing software.
Shoot in RAW format if possible, reduce ISO where feasible, and apply AI noise reduction during post-processing. Tools like Aiarty, DxO, or Topaz Photo AI can recover details that might be lost in shadows or high-ISO conditions.
Yes, there are several free options available depending on your needs and skill level:
- Open-Source Software: Programs like darktable and RawTherapee are completely free and offer powerful, traditional noise reduction. However, they rely on manual slider adjustments and have a steep learning curve.
- Free Online AI Tools: Web-based editors like Fotor or Nero AI Denoiser offer basic free versions. They are easy to use but often come with limitations, such as lower export resolutions, daily limits, or watermarks.
You May Also Like
This post was written by Brenda Peng who is a seasoned editor at Digiarty Software who loves turning ordinary photos into extraordinary works of art. With AI assistance for brainstorming and drafting, the post is reviewed for accuracy by our expert Abby Poole for her expertise in this field.